
MusicMaster Blog
Replace Songs Better Publicado por Webmaster en agosto 22nd, 2016
By Jesus Rodriguez
In MusicMaster 6.0 we have many new features that have been introduced. One of my favorites has to be the Rule Filters within the Song Replacement Tool.
When you are in the Schedule Editor I am sure you may have had to replace a song or two within your log by clicking on F9 or double clicking on your song, fill an unscheduled position or add a song. I bet there have been many times when you have to decide to override a rule and replace the position with a song that breaks a rule because it was only off by a little bit from the rules parameters.
What if I told you now you can make your rules a little more flexible for that one position on the fly? Just think of the possibilities! We all want that perfect log and set our rules up to do that for us. Occasionally a rule is more difficult to accomplish as our library changes. Adding or removing songs changes the number of songs with specific sound codes, tempo codes, or anything you might be testing. Instead of you taking a shot in the dark of what song you think will be the best one for that position when you override the broken rule you can have this great new tool find it for you.
When you get to the song replacement window you will see a new tool called Rule Filters. The Rule Filters tab will only appear when you are filtering your songs using the flags for Hide Unbreakable Failures or the Show Only Perfect Songs. Once you click on this amazing new tool you will see a window come up called Replacement Song Rule Filters.
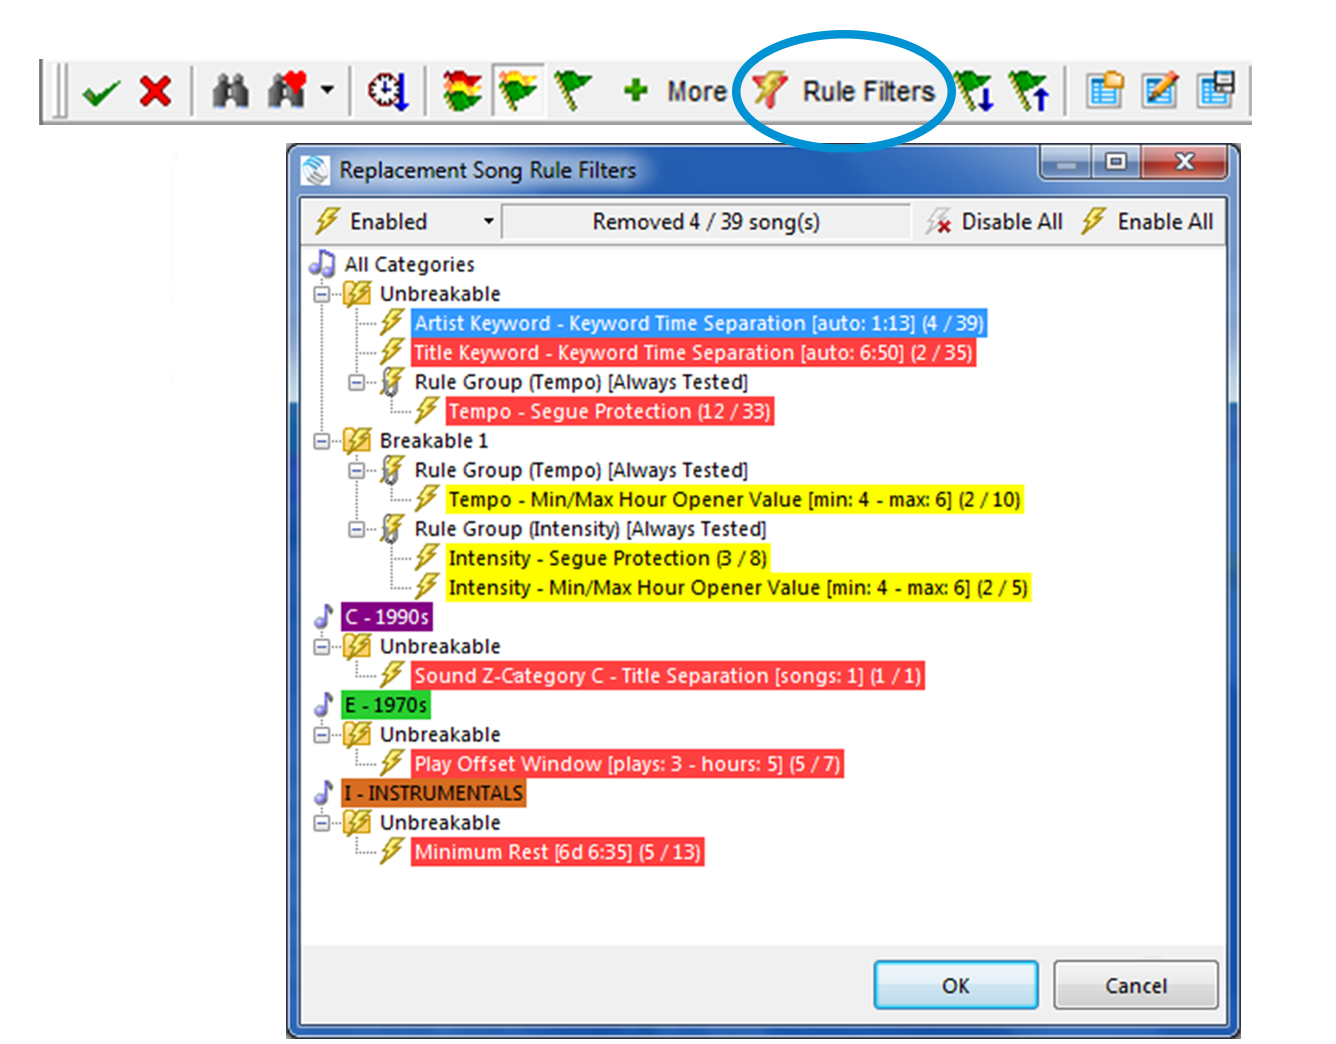
At a glance this looks very similar to your Test Results and for the most part it accomplishes a similar scenario for you at a glance with some additional advantages.
Right away I am sure things look pretty familiar and easy to understand but as a quick reminder let’s dive into the obvious. The red background is showing us the Unbreakable Rules failures and the yellow the Breakable rule failures.
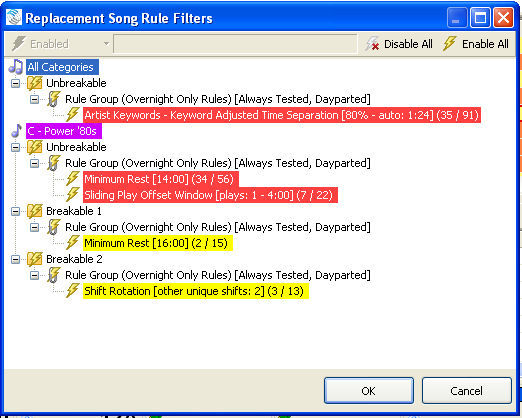
When you first open this tool you will see that the first tab Enabled is not activated, the center box is empty, and you only have two options to either Disable All or Enable All the rules that are giving you problems in finding the perfect song. You can think of the Disable and Enable All tabs as an on and off switch for your rules. This may seem like a quick fix to find a song within your Song Replacement Window but shouldn’t we try to find the best song?
Lets learn how we can find the best song while simply relaxing the rules a little. Lets look at each one of the items in the Replacement Song Rule Filters Menu Bar from left to right for you to reference as we go along.
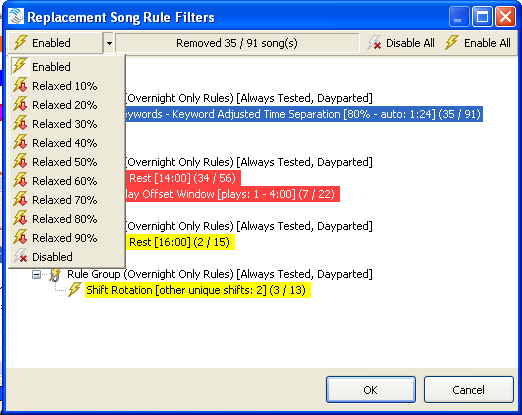
First click on the rule you wish to relax. You will see that once you’ve selected a rule your Enabled Tab, the first one on the Menu Bar, becomes active and the second bar now has some information on it. The information you see is the same note that is detailed to the right of the broken rules letting you know the number of songs that have been removed from the total amount of available songs due to this rule being broken. You now have the ability to relax the rule for this position using the first button by clicking on the Enabled button. You will get a dropdown of options to relax the rule by a percentage of your choice and even go as far as disabling it for this position in the log. You can repeat these steps for all or as many rules as you wish to relax for this position. As you do this you will see your test results change in the amount of songs you now have available after relaxing the rule or rules. If you were done here you could click OK and see the additional songs you just made available by relaxing your rules.
The third and fourth tabs Disable All and Enable All as mentioned earlier are simply an on off switch for your broken rules. You can also turn any rule on or off by double clicking on it to specifically Disable or Enable it.
After you’ve picked a replacement song, the next position you look at will have all the rules in full effect again. You can now follow the same steps on the new position to see what changes you can make to see more replacement songs.
I hope that this new tool helps you find the perfect song for any position in your log. It is great for when you find yourself having to make a replacement by simply relaxing your rules just a little bit for that one position.
If you have any questions or would like any personal training on this new feature, please contact your MusicMaster Scheduling Consultant.
Filling Unscheduled Positions via Saved Queries Publicado por Webmaster en agosto 8th, 2016
By Paul Ziino
We’re going to go through two processes here. The first step is creating a Saved Query in MusicMaster. To do so, click on Dataset/Library/Query the Library/New Query. This opens the Library Query box.

Here you can create queries for all sorts of things in your library. For example: query for songs with high test scores, songs with low burn scores, songs within a certain genre or gender, specific categories, the sky is the limit! Once you’ve built the query click the “Save As” icon then name the query. Now that you’ve saved this query it will be available to you in Library Maintenance and in the Schedule Editor.
In the databases I schedule, I keep a pretty tight rotation. So much so that sometimes I get unscheduled positions and there is just nothing available in that category that passes the rules. So I’ve built a saved query that looks through all the songs in my five non-power categories. I’ve labeled this saved query as “Replacement Search.” Now when I’m editing a log, I keep the Info Bar open on the screen and switch it to the Queries display. From here I am able to drag a saved query into a position in the Schedule Editor, and the replacement window automatically populates with all the songs from that saved query that can work in the desired position. It saves me a bunch of steps as opposed to creating the query each time I wish to fill the unscheduled position.
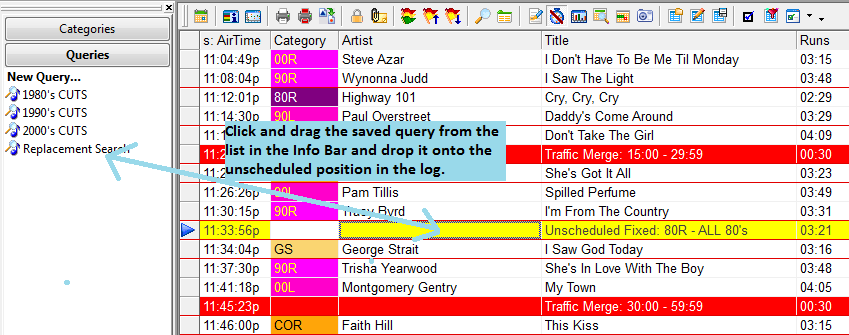
You can also right-click the unscheduled position and select “Schedule Song/Search using a saved query,” then select the desired query. Both methods will give you the same result, but I find the drag and drop method much quicker.

For tips like this and lots more, make sure to check out the Blog Archive or contact your MusicMaster Scheduling Consultant!
Siete Signos De Una Base de Datos Disfuncional Publicado por Jesus Rodriguez en julio 25th, 2016
Por Drew Bennett
It’s a challenge to keep a radio station’s database in the best shape it should be. Day in and day out, you’re making changes, moving songs around, adjusting rules all to keep the station sounding the best it can. Maintaining a database can be a real challenge and perhaps it’s time to ask for more money. Your job is super important! When you open a database to take a look around, you’ll know with some certainty whether the database is being properly maintained or not. Today, you can compare your data to the seven signs of a dysfunctional database.
- Incomplete Song Cards
This is one of the earliest signs that something is wrong in the data. You can also bet that there’s something wrong on the air, too. If your data is incomplete, it’s impossible for your rule tree to maximize your library and generate a good log. If Artist Keywords are missing from songs or if song cards contain incomplete attribute fields, the database is in trouble. Rules aren’t able to test and pass or fail all songs. The spirit and the sound of the station can’t be achieved without complete data so look here first when grading the dysfunction of your database.
- Fuzzy Rules
A Rule Tree can be an antique store or it can be a tech store. Antique stores tend to be full of old junk. Some of it works and some of it doesn’t but it’s all old. A tech store is clean, up to date and with the latest and greatest to offer. How long has it been since you’ve checked out your Rule Tree? What do you sell over there, grandfather clocks or Apple watches? If you’ve scheduled the station with a rule tree that has been tinkered with and touched by former programmers who don’t work there anymore, you’re running an antique shop and it’s time to close down and re-open a Sharper Image. When it comes to Rules, it’s important to know exactly what you sell, what rules you have in place and how they work. Your rules help you create the sound of the station and the mix of music in the log. Knowing exactly how they work and exactly what you have in there is quite possibly the biggest point to take away from this list of seven signs.
- Neglected Turnover
It’s a FACT: There’s not a rule in the world that will save you from terrible turnovers. If your Power Gold category plays every 12 hours and you’re frustrated that your Shift Rotation rule keeps failing, don’t blame the rule. Blame the turnover. Perfect logs start with perfect turnovers. If you add songs to a category or take a category away from a clock, you’re changing the turnover and it’s one of the most important things to consider when you schedule music. If turnover is bad, the whole database is bad.
- Hidden Settings
Remember when we talked about former programmers in your Rule Tree? The same goes for hidden settings in the software. “I had no idea I was Gold Recycling the Recurrents!” “You mean to tell me I’ve been Auto Platooning 50% of my Gold category every Sunday?” Take a look around the software and make sure the right lights have been turned on and the right lights have been turned off. You never know when an AutoMove is causing your unforeseen heartache. Tools, Options, Additional Properties is another good place to look. Hidden settings that other users have placed on the data can cause you to pull your hair out if you have no idea they’re being used. Speak to a Music Scheduling Consultant who can take you on a tour of the software to make sure it’s nice and tidy.
- Multiple Copies of the Data
It’s great to keep copies of the data so you can test out new scheduling methods or check out a new feature. It can get dangerous when you become confused as to which database is the official data. Delete old data you don’t use and make it a policy never to have more than one other copy of the data that is being actively edited. This will save you from updating the wrong data or worse, deleting the wrong database.
- No Reconciliation
Reconciliation is important when scheduling music for two main reasons: you must report to certain agencies and governing bodies with a list of what you played on the air and songs that did not play must get placed back in the stack so they can be played and exposed to your audience. If you don’t reconcile by hand or by automation, it will cause your reports to become inaccurate and songs won’t rotate as they should.
- Dirty Clocks
Another big sign that you’ve got dysfunctional data are the clocks you have listed in format maintenance and how they look inside. Do you have two hundred clocks listed but you only ever use six? Do you have relic lognotes inside your clocks that reference automation systems you don’t even use anymore? Use the Select functionality in Clocks to select clocks you don’t use anymore and remove them. Hunt out old lognotes and references to old automation systems by using the Lognote, Purge feature. This will only remove those lognotes that are not in any clocks or logs. It will keep your data cleaned up and ready for another change down the line!
Can you think of other signs that indicate a database needs some work? Pass it on to us! Do you need to speak to someone who can help you clean up your data and get it back in shape? Call your assigned Music Scheduling Consultant for more and happy scheduling!
Teclas Personalizadas Publicado por Jesus Rodriguez en julio 11th, 2016
Por Dave Tyler
Una de las razones MusicMaster ha convertido en el software de programación de música de elección se debe a su capacidad de personalizar lo que ve y cómo se utiliza MusicMaster. ¡Los usuarios de MusicMaster de todo el mundo están excitados sobre muchos nuevos rasgos e instrumentos dentro de MusicMaster Pro 6.0 y uno de aquellos es Teclas directas de Encargo o Correlación Clave! Asignación de clave le permite crear teclas de acceso rápido que quieren y necesitan en el mantenimiento de la biblioteca así como el Editor de programación.
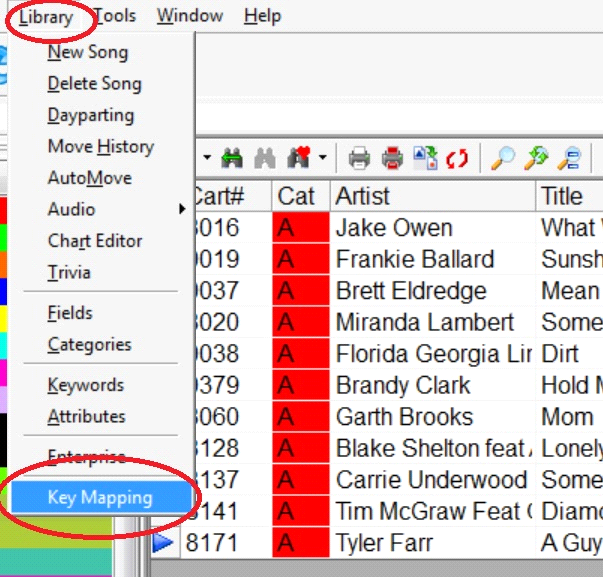
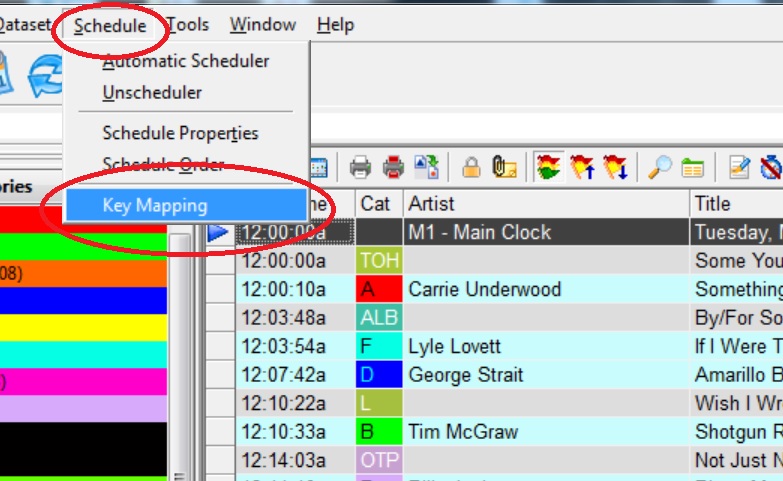
Para empezar abra una categoría y luego vaya a los mapas de la biblioteca y la clave.
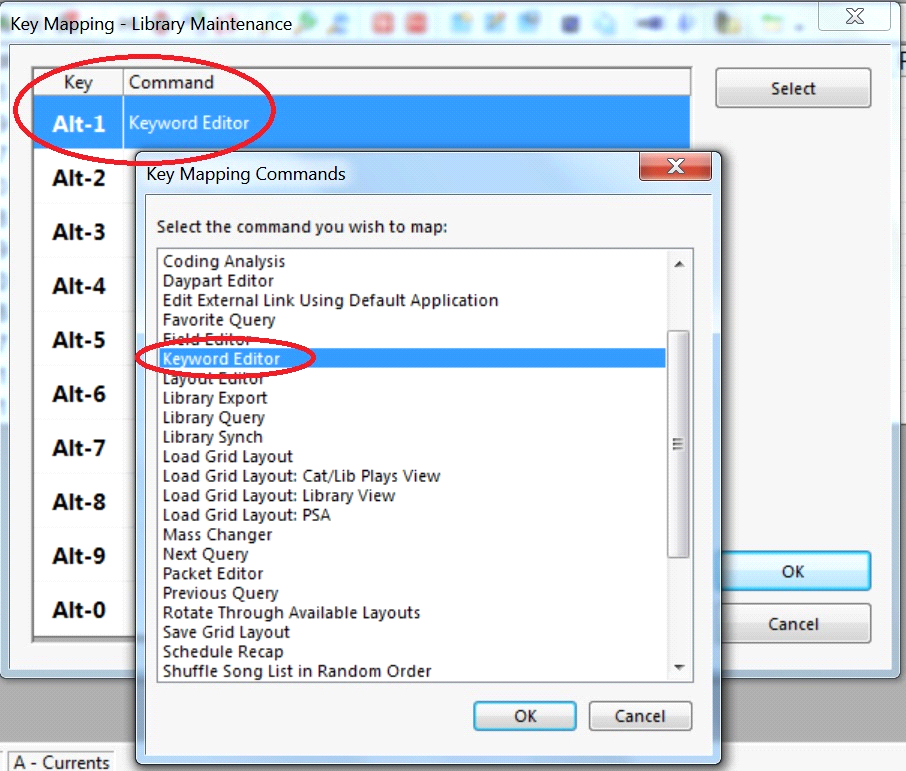
La siguiente pantalla le dará 10 accesos directos en blanco (Hot-Keys). Haciendo doble clic en el cuadro vacío se puede elegir las cosas que son importantes para usted mientras que en Mantenimiento Biblioteca. En mi ejemplo, yo quiero agregar un acceso directo para el Editor de palabras clave por lo que si veo a cuestiones de palabras clave que puedo solucionar sobre la marcha. Sólo tiene que seleccionar clic ‘palabra clave Editor’ OK y se le asigna automáticamente a la tecla de acceso rápido ‘Alt-1’.
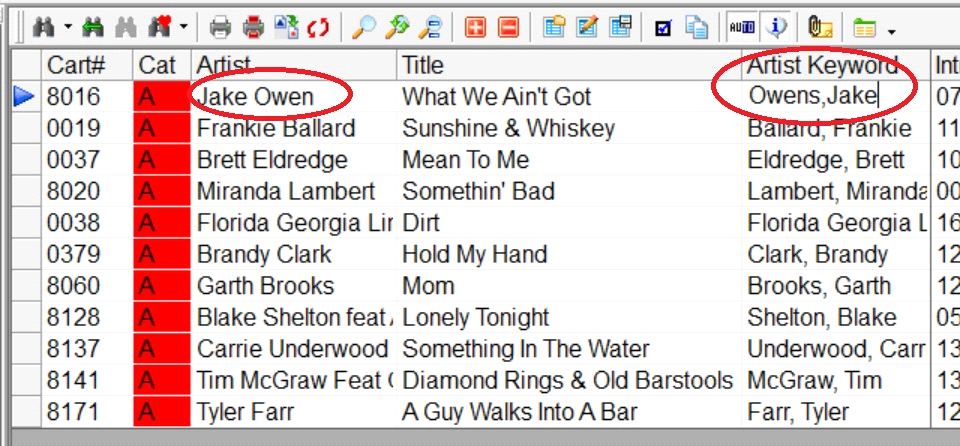
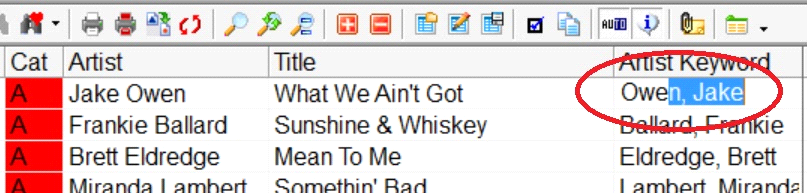
Mientras yo trabajaba en el Mantenimiento de Biblioteca noté que yo tenía una cuestión de Palabra clave con la palabra clave de Jake Owen entrada incorrectamente como Owens, Jake. Guardando este ‘s’ se arruinara mi separación del artista y podría causar Jake reproducir potencialmente con una de sus canciones.
Puedo usar mi nueva tecla de acceso directo pulsando Alt-1 y MusicMaster 6.0, abrirá la ventana de palabras clave de mantenimiento en el que puedo ver que tengo dos palabras clave para Jake Owen. Simplemente puedo cambiar el nombre de la incorrecta para que coincida con la correcta. MusicMaster combinará las palabras clave. Como puedo añadir más canciones por Owen a mi base de datos de Autocompletar sólo me mostrará una entrada de Jake.
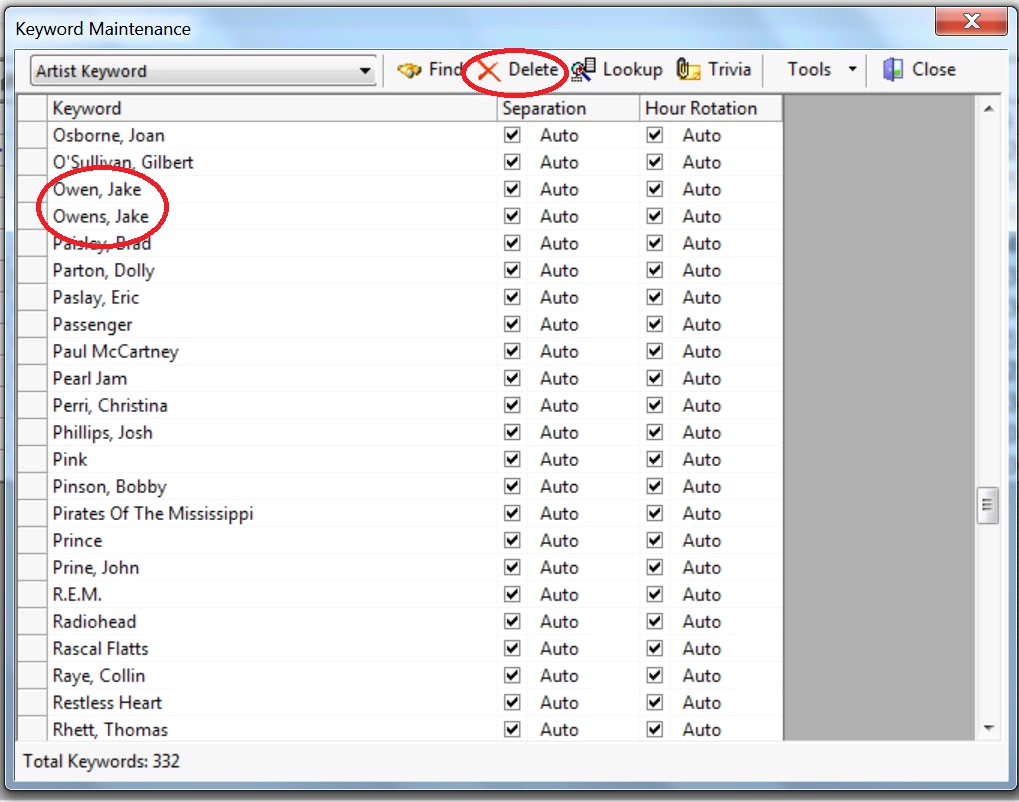
Ahora puedo añadir la Palabra clave correcta y mi regla de Separación de Artista trabajará correctamente.
Este es sólo uno de 35 funciones que podría utilizar en mis teclas de acceso rápido en el mantenimiento de la biblioteca! Si te gusta lo que ves en el mantenimiento de la biblioteca entonces prepárate porque en su Editor de programación hay 42 funciones disponibles para usted. Vamos a explorar un par de las acciones que harán a editar los registros de una brisa así! La puesta en marcha es casi idéntica para el Editor de programación. Simplemente abra un día y horario seguido por asignación de clave, haga clic en comenzar a personalizar las llaves de éxito personal.
Ahora vamos a ver las muchas funciones útiles que puede mapa para hacer su vida más fácil. Un ejemplo sería la capacidad de tener un acceso directo a la exportación a la automatización.

Pero no acaba allí… Recuerde que usted puede crear hasta 10 de estas teclas personalizadas. Puede acceder a algunos de las otras características sorprendentes disponibles en 6.0 como instantáneas de la historia o la posibilidad de cargar un diseño de cuadrícula. MusicMaster Pro 6.0 ofrece una variedad de tiempo y haga clic en opciones de ahorro para que puede navegar su carga de trabajo rápidamente y puede entonces centrarse en las cosas que importan como conseguir el sonido que está escuchando en su cabeza en el aire! Teclas personalizadas es una característica más de ahorro de tiempo en MusicMaster 6.0 Pro que le permite hacer su estación mejor… más rápido!
La Limpieza de sus Palabras Clave Publicado por Jesus Rodriguez en junio 27th, 2016
Por Jerry Butler
Consigo llamadas a partir del tiempo a tiempo de programadores que dicen que su artista, título o separación de compositor no trabajan correctamente. Las signaturas aumentan en esta cuestión en las semanas conduciendo hasta la Navidad con la separación de título. Tenga presente la mirada de reglas de separación a sus palabras clave de artista, palabra clave de título y palabras clave de compositor. Después de analizar los datos, a menudo encontramos que algunas entradas son deletreadas sólo un poco diferentes. En orden para que la separación de la palabra clave funcione correctamente, los deletreos en la palabra clave específica tienen que ser exactamente el mismo. ¿Cómo puede usted comprobarlo rápidamente? Muchos programadores como yo iría a través de la biblioteca, ordenar y comparar los artistas o títulos de cada tarjeta de la canción.
Aquí es una manera más rápida, más fácil, más a fondo para corregir sus palabras clave hacen esos cambios en su ventana de mantenimiento de palabras clave.
Haga clic en Conjunto de datos, Biblioteca y palabras clave. Utilice el menú desplegable para seleccionar la palabra clave que es necesario comprobar. A efectos de demostración, vamos a comprobar la palabra clave del título.
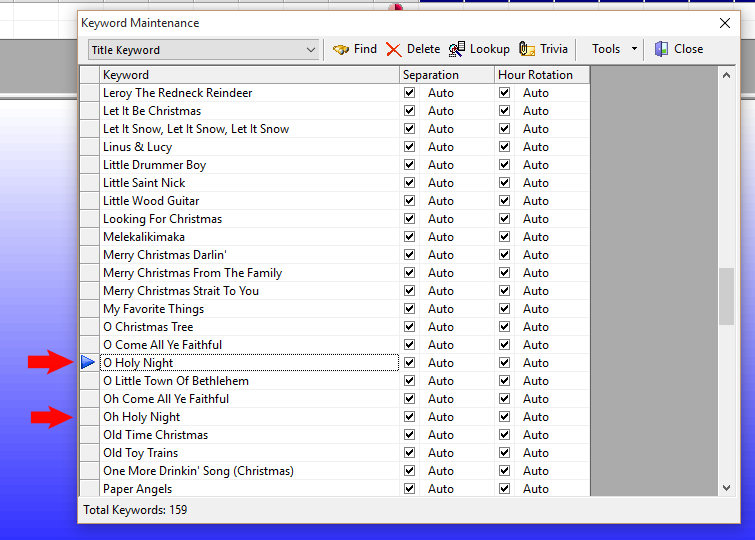
He destacado entradas de \”O Holy Night\” y \”Oh Holy Night\”. Las reglas de separación de título funcione correctamente, estos necesitan ser exactamente lo mismo. En lugar de cambiar la tarjeta de cada canción, puedes hacer el cambio para todas las canciones aquí. Voy a cambiar “Oh Holy Night” a “O Holy Night”. Para hacer esto, simplemente haga clic en la línea y el cambio de tipo. Cuando presione [enter], Recibo una solicitud que me deja saber la palabra clave ya existe y me pregunta que si me gustaría combinar los dos. Haga clic en Sí y cualquier canción con ‘Oh Holy Night’ se actualizarán para ‘O Holy Night’ y la regla separará los títulos correctamente.

Compruebe sus palabras clave hoy y asegúrese que el artista de su estación, el título y el compositor o cualquier otra separación de palabra clave dirigen el modo al que usted lo quiere.
Conoce Al Sr. Bandera Adicional En El Panel De Resultados En 6.0 Publicado por Jesus Rodriguez en junio 13th, 2016
By Jesus Rodriguez
Por Jesus Rodriguez
En este blog vamos a responder el misterio detrás de la bandera adicional en su Panel de Consulta de Resultados en MusicMaster 6.0! Supongo que sólo sería apropiado para mí presentar a los dos. El Sr. Bandera diga hola al usuario mejor de MusicMaster. Increíble usuario salude al Sr. Bandera Extra!
Así que ahora que nos conocemos todos déjenme decirles un poco acerca de mi amigo, el señor de la bandera adicional. Lo único es que solo le gusta salir a jugar cuando haya seleccionado el icono de triple indicador en el panel de resultados de la prueba. Él no es demasiado aficionado a la fiesta solo porque sólo tiene dos trajes de una bandera amarilla y una bandera roja. A menos que se seleccionan a sus amigos triples bandera que acaba permanecerá en la clandestinidad. Cuando salen a jugar puede asomar el Sr. Bandera Adicional y ver cuál es la violación que representa su equipo de bandera roja o amarilla. También puede hacer clic en Sr. Bandera Adicional y le llevará directamente a la regla que tiene la violación como un VIP.
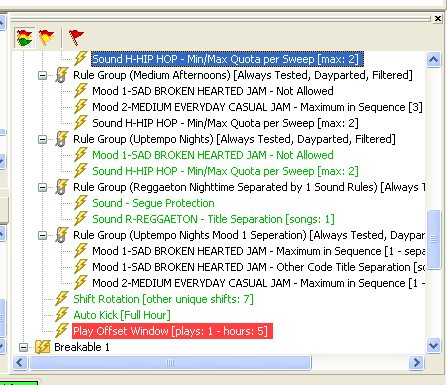
A algunas personas les gusta tener todavía la lista entera de reglas en su pantalla de panel de resultados de prueba pero la desventaja a esto es que si usted tiene muchas reglas usted no puede ver lo que el fracaso es de un vistazo. Con la opción de bandera suplementaria usted puede ver fácilmente ahora y señalar lo que fallado. Este es grande si su árbol de regla es realmente extenso entonces usted puede ver rápidamente lo que la cuestión era con su árbol de regla.
Si usted fuera un usuario que sólo tiene que saber lo que los fracasos de regla son entonces el doble rasgo de bandera que hemos tenido durante años sería posiblemente lo mejor para usted. Sin embargo, si usted quiere saber donde el fracaso de regla ocurre dentro de la lista completa de sus reglas entonces la bandera triple que se pone con la opción para usar a Sr. Bandera Adicional sería la mejor solución para usted así usted ya no tiene que enrollar de arriba abajo la busca de la regla que estuvo rota.
Dynamic Flow and the Art of Music Scheduling Publicado por Webmaster en junio 6th, 2016
By Marianne Burkett
I just experienced the pleasure of helping a client go through a process of format concept to completion. The new format sounds terrific and better than he expected. Good sounding radio doesn’t just happen. All the great music in the world played back to back won’t keep your audience locked in if it’s not scheduled correctly.
While discussing the importance of what I term as “Dynamic Flow”, I painted this picture for my client: ”You know how awesome and comfortable it is to sit at the seashore and listen to the ocean waves.” When you sit on the beach, the ebb and flow of the tide make it appealing to be still for long periods of time. You don’t really think about the sound, but you know you can sit there for a long time without being bored or stressed.
I want dynamic texture everywhere in my daily music logs. This is where the rubber meets the road for increasing TSL/Time Spent Listening. For instance, when a song writer composes a hit song, song dynamics is critical to that song’s success or failure. It’s a very rare instance that you’ll hear a song doesn’t have some kind of dynamics change somewhere in the middle of the track, at the bridge. If all songs were sonically the same tempo, energy and texture at the beginning, middle and the end, they’d be downright boring. It’s no different when you think in terms of a full quarter hour of time with what songs are playing on your station! Are they different texturally, in tempo and in style? If you’re listening to your station and it wears you out… you might have a dynamics issue. If you’re listening and you get bored, you might have a dynamics issue. When you mix it up, it becomes interesting to listen to. The station sounds focused and unique and your listeners stick around for longer periods of time.
So what can you do to ensure you’re not “fatiguing” the listener? Other than spending hours meticulously hand scheduling your music, you can accurately code your music for tempo, energy, mood, sound and gender. You can review your library analysis on each code to determine how many or how few your active music library contains and apply rules to “scatter” the codes through the quarter hour, half hour or full hour.
Put together strategically, your station has its own unique fingerprint of sound. Even if you are playing the same exact titles as your competition, your coding is subjective based on what YOU think it is, therefore your station can sound different and BETTER than the competition, depending on how you schedule the music.
If you’d like to know more about making your station stand out from the crowd, feel free to contact me directly or contact any of the Music Scheduling Consultants here at MusicMaster.
The History Graph and Editing a Log Publicado por Webmaster en mayo 23rd, 2016
By Dave Tyler
We all work hard at getting our music to sound just right. You created your categories, plotted them in your grid and assigned the Rules to govern them. Although most of the time things are running great we all get unscheduled positions in our clocks. With the release of MusicMaster there is now a new feature you might just love to give you a better visual of what is happening at that position and in that hour.
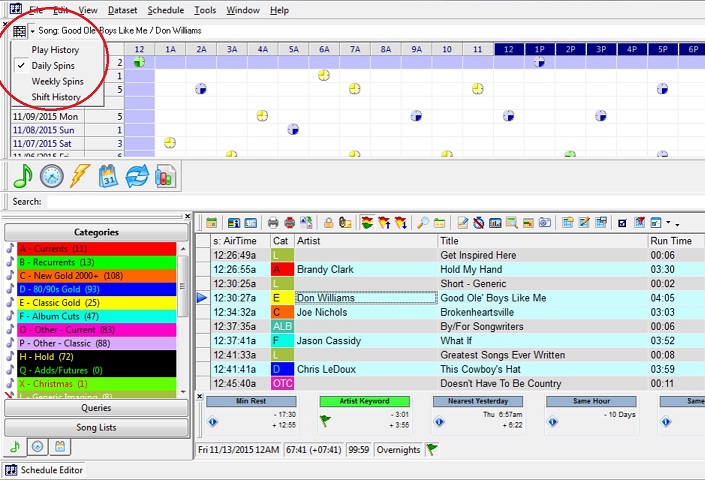
This new tool works when you are in your Schedule Editor AND have the History Graph in your view and set to either “Daily” or “Weekly Spins”. See the example below for selecting the History Graph so you can see it.

In my example below you can see that I am editing the position where Don Williams is playing and everything is fine with that selection.
Now when I attempt to look in another category for a replacement song by using Direct Entry (also a new feature in 6.0) I choose my A category and the Brandy Clark song. This is obviously a poor choice being that the same song is scheduled just before this position; however look at all of the information available to you on this choice.
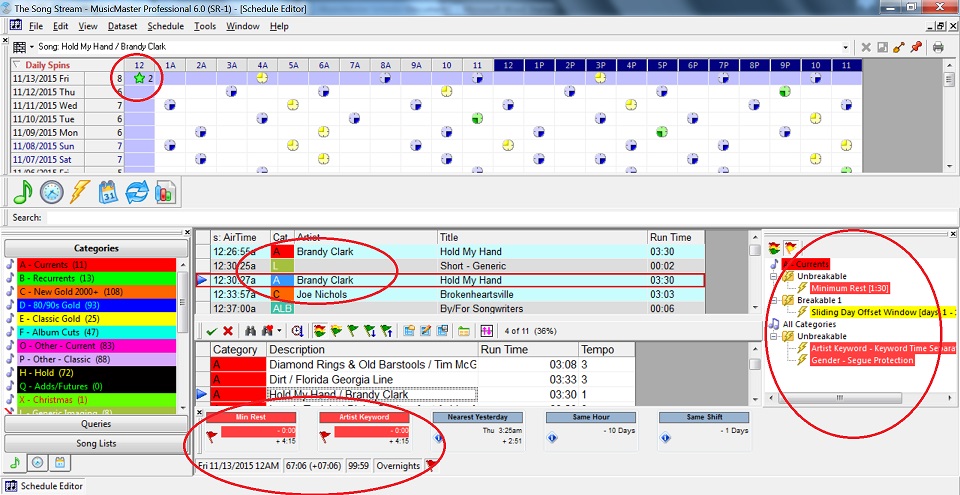
The Schedule Editor provides the red flags for Minimum Rest and Artist Keyword in my Results Bar on the bottom as well as my Test Results Toolbar on the right that displays a Gender issue as well. Look at the top in the History Graph. Now you can see that “Star” icon, which is the location of the proposed play plus there is a number (“2”) to show how many times this song is scheduled in this hour. Depending on your screen display, you now have several places where MusicMaster will alert you to the problem.
This is another way that MusicMaster gives you all of the tools you need to program and nurture the sound of your radio station(s)! As always if you ever have a question, do not hesitate to ask one of your Music Scheduling Consultants.
The Keyword Separation Wizard Publicado por Webmaster en mayo 9th, 2016
By Paul Ziino
Recently I wrote an article on how to set unique values for specific keywords. But did you know that MusicMaster can make those adjustments for you?
Go to Dataset/Library/Keywords. Then use the dropdown to select the desired keyword field. Within Keyword Maintenance click Tools and Separation Wizard.
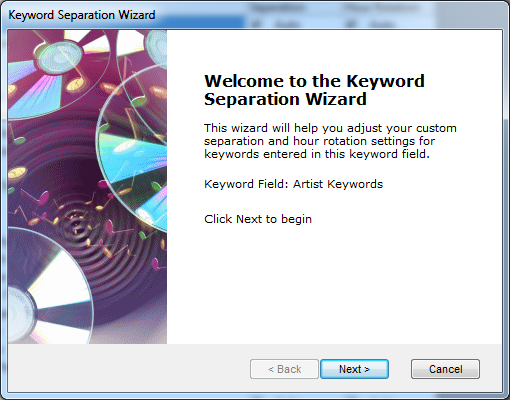
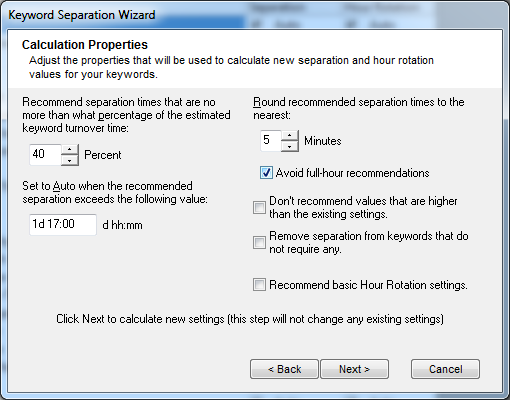
Click Next and you’ll enter the Calculation Properties screen where you can adjust the properties used to calculate new separation and hour rotation values for your keywords.
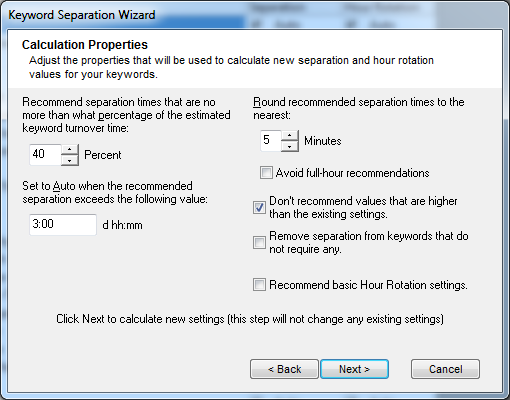
When you run the separation wizard, MusicMaster goes through your active library and based on clock calls and the makeup of your library, determines the optimum turnover speed for each of your keywords. The first setting on the Calculation Properties screen asks what percent of that optimum number you want to use as your unique separation value for your keywords. Forty Percent is the default, and it’s a perfectly fine starting point. If MusicMaster determines 10 hours is the optimum, it will recommend a separation value of four hours.
The next setting is where you determine the threshold for just leaving the Auto setting from the Rule Tree. By default, that is 3:00, but you can set this to any number you want. Set it to 13:00, or 1d 17:00, or 18d 5:00, it’s your choice. The larger you set this, the more likely that each keyword will get a specific separation time.
Up next is how you want the separation times rounded. Default here is 5 minutes, but you can go to 10 or 1 or whatever you choose—most will leave this at 5. You can also check the box to “Avoid full-hour recommendations,” that way you don’t get artist separation values of 60 minutes or 120 minutes, etc.
“Don’t recommend values that are higher than the existing settings” basically says if we have a unique value in there and the wizard thinks it could be higher, ignore it. I generally leave this unchecked.
“Remove separation from keywords that do not require any” basically says if the artist is played so rarely or never that it requires no value to set it to 0:00. I leave this unchecked just in case I put that artist back in rotation that way it has some value assigned.
“Recommend basic Hour Rotation settings” asks MusicMaster to set Keyword Hour Rotations. If you’re not using that rule in the Rule Tree for this field, you can leave it unchecked.
So here’s how I have mine set up.
When you click “Next”, MusicMaster starts calculating and tells us how many keywords need adjustment.
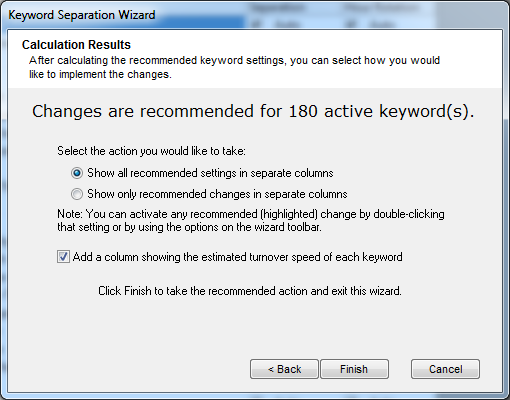
There are a couple options here. I like to see all the recommended settings in separate columns, not just the recommended changes, so I select that first option. I also like to see what the Separation Wizard determined was the estimated or optimum turnover speed, so I leave that checked. Click Finish.

This is the list of all the keywords in the database. Those in blue show the recommended wizard settings. We can display only those with recommended adjustments by clicking the Filter icon. We can also sort this list by any column by clicking on the column header. I like to sort on the Recommend column.
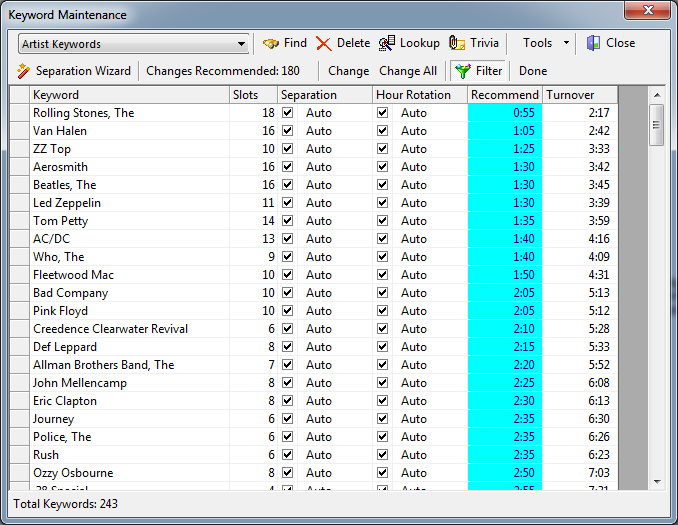
So now at the top of the list we have the artist with the lowest recommended value and the bottom of the list shows the artist with the highest recommended value. If I want, I can accept all these recommendations and update the Separation value for all by clicking Change All. Or I can double-click any of those recommended values to change just that one artist.
Remember, these values only work if there’s an active Keyword Time Separation rule for this field in place in the Rule Tree that applies to the categories in question. That rule sets the Auto value. As I scroll through the list of recommended changes, it looks like I could use 5:20 as my Auto value and the majority of my artists would have no problem achieving that. Those with a recommended value less than 5:20 I can accept their unique recommendations.
A lot of programmers start with a low artist separation rule of maybe 1:10. With this exercise we can clearly see that only two artists in this data have a recommended value lower than that. But we can get so much more as a result of the Separation Wizard. So I say we go for it!
If you have questions about using the Keyword Separation Wizard or any other MusicMaster feature, make sure to reach out to your MusicMaster Scheduling Consultant for help.
Prompted Queries Publicado por Webmaster en abril 25th, 2016
By Drew Bennett
As a programmer, you may take a look at MusicMaster every day, all day. At some point, you get into a groove of scheduling logs, editing hours of music and exporting to the automation system. Our blog series is designed with our users in mind because one of the great things about them is that we introduce you to cool tips you can use in your arsenal of MusicMaster tricks. It’s fun to learn new tips and today, we’re going to cover a search tip in 5.0 and 6.0 that will turn your queries into super-charged search machines!
First, let’s look at a feature in MusicMaster that’s been around for quite some time: The Prompted Query. A Prompted Query is a search that you create and it lets you define your search value later, when you run the prompted query, instead of when you set up the query itself. It might look like this when you run a prompted query:
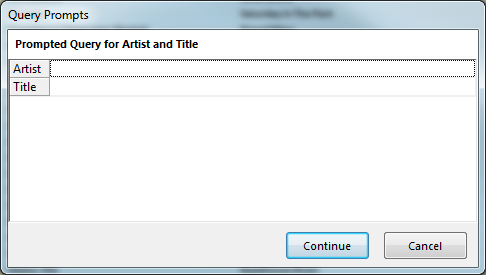
This search allows me to tell MusicMaster that when I run this search, I’ll look for something in the Artist and/or Title field but I won’t define those values until I run the query at a later time. That’s a great way to search the database but how do you set it up?
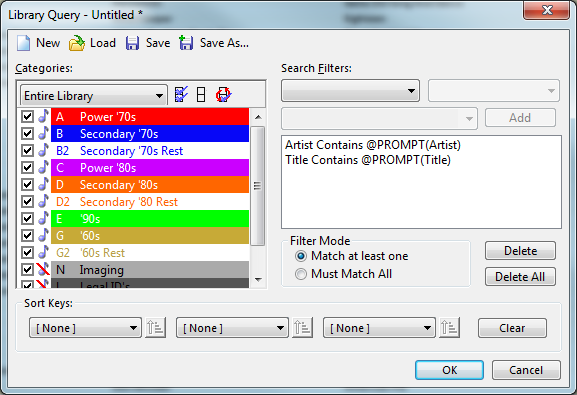
Open the query box by choose the black binocular icon in Library Maintenance or anywhere you see ![]() in the software. When you choose a field to search through, you’re typing something special in the query setup screen to create a Prompted Query. In the third dropdown menu on the right side of the query , type @PROMPT(Name of Field) where “Name of Field” is the field name or label you want to give to that searched field in the query. Save that query when you are done and now you can access it through your favorite query icon or by loading it in a query box.
in the software. When you choose a field to search through, you’re typing something special in the query setup screen to create a Prompted Query. In the third dropdown menu on the right side of the query , type @PROMPT(Name of Field) where “Name of Field” is the field name or label you want to give to that searched field in the query. Save that query when you are done and now you can access it through your favorite query icon or by loading it in a query box.
In MusicMaster PRO v5.0 and below, a prompted query creates a separate search box for each field you define in the query like this:
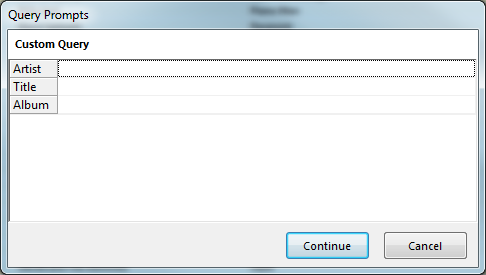
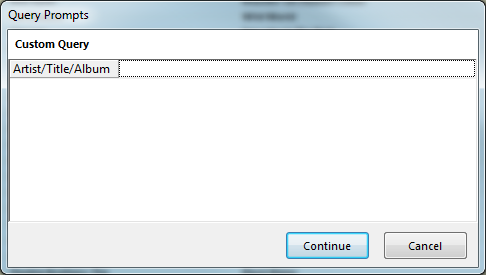
Notice that Artist, Title and Album have their own search boxes to use. In MusicMaster PRO v6.0 and above, it’s possible to consolidate these fields to one search field. The way to do that is to give each @PROMPT the same label regardless of what field is searched through.

Now when this query is saved and launched, there is only one field to search through.
You can build upon this prompted query method by adding more fields that share the same label and search through even more fields in a prompted query. The Library Query functionality is very powerful in MusicMaster. Prompted Queries make it even easier to find what you need, when you need it.
It’s great to learn new tips and tricks in MusicMaster and when you use the software as much as you do, time saving tips can be real life savers! If you have any questions about this or any MusicMaster blog entry or how-to, reach out to your assigned Music Scheduling Consultant and happy scheduling!