
MusicMaster Blog
Setting your Pass Order, Search Depths and Combining the Pass Publicado por Webmaster en enero 16th, 2017
By Marianne Burkett
Since coming on board with MusicMaster in 2005 after years of being in radio as a programmer in various places, I thought I knew a lot about scheduling music.
In the past, I’d always set my pass order from Currents first to my larger gold categories last and set the search depth to 30% or so. Now, I’ve changed my tune. I still schedule my currents first by the session. A’s schedule, than B’s, C’s etc. Then I combine the pass order for my larger categories, plus I now use 100% search depth in my larger categories.
How do you combine categories into the same pass? Go to Dataset/Schedule/Scheduling Properties, put your cursor on the category you want to combine, hold down the shift key, and drag your category up or down the list using the blue arrow. When you let go, you’ll see the pass order combine.
It will look like this:
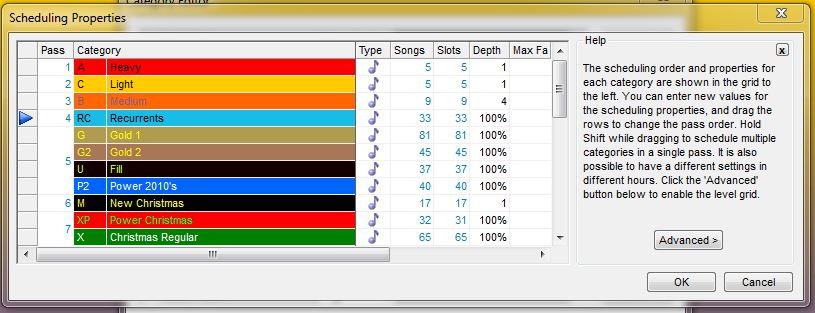
Heavy, Light and Medium all schedule one pass at a time. Notice Pass four contains Recurrents, Gold1 while Pass five contains Gold2, Fill and Power 2010s. Depending on your clocks, these categories build your hour in the order they are listed in each clock and move from the top of the hour to the end, then moving to the next hour.
Why is this a good thing? If you have a core artist in your currents or recurrents, the likelihood of that core artist scheduling from a category at the end of the pass order is pretty bleak. When you combine the pass order, MusicMaster schedules hour to hour with those combined categories and the core artists in your Gold categories have a far better chance of scheduling.
I also changed my search depth to 100% in the gold categories in the databases I work with. Initially, this also made me nervous, but my minimum rest settings in the unbreakable folder never fail, so there is really nothing to be nervous about.
When I tried these methods on a few formats I work in, not only did I get far fewer unscheduled positions, I got a better log and needed to make fewer edits.
It takes less time to do the logs when you allow MusicMaster to do the heavy lifting for you.
If you have any questions, contact your Music Scheduling Consultant.
Happy Scheduling!
Airplay Affidavits – Show Your Value with the Help of MusicMaster Publicado por Webmaster en enero 2nd, 2017
By Jerry Butler
Most stations believe they have to run their promos, PSAs or underwriting through traffic to show value to the sponsors or charity. MusicMaster gives you the ability to run an airplay affidavit and show the value of your airtime.
Adding Category Info to the InfoBar Publicado por Webmaster en diciembre 19th, 2016
By Dave Tyler
I will be the first to admit that I am a bit of an “Info-Geek”! I like having the tools I need and the information I need at my fingertips when I need it. MusicMaster has a couple displays that I now take for granted but when I run across a database that is not using them it drives me crazy! Over in your Info Bar where your categories live there is a big blank area…dead space that could, in my Info-Geek mind be filled with something useful to me.
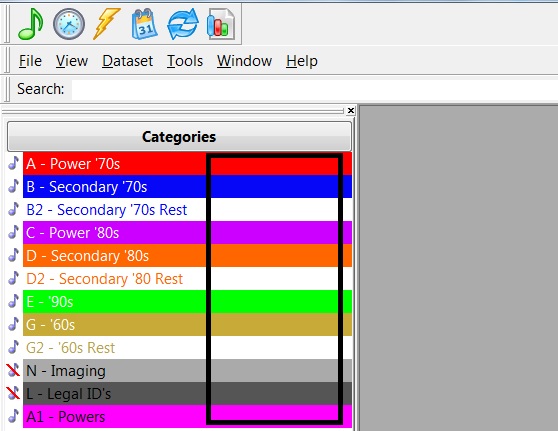
Well if you are using MusicMaster 5.0 or later then you already can fill that space and you have 3 options to choose from Song Count, Average Run Time & Slot Count.
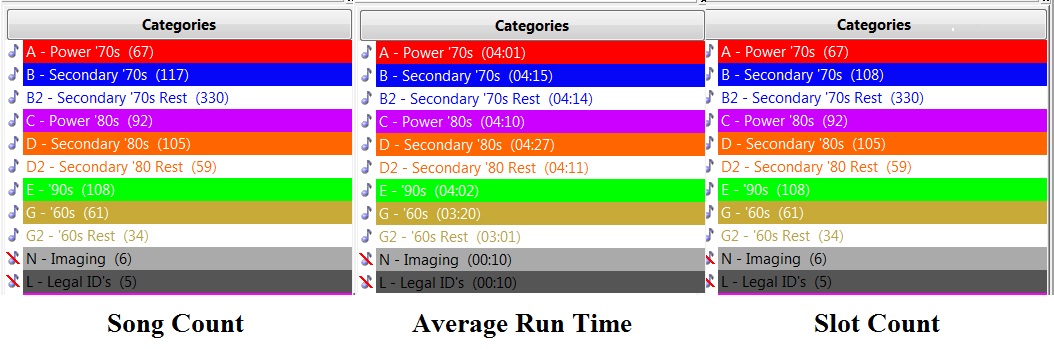
These options are pretty straight forward. Song Count is literally how many songs are in that category. Average Run Time is just that, the average length of the songs within that particular category. Finally Slot Count denotes how many “Slots” are in that particular category. Slot Count can be important to you if you use a lot of packets. You will note in the above example in Category B there are 117 songs in the category (Song Count) but only 108 Slots (Slot Count) because 9 of those songs are packeted in some form or another. These option give you a quick reference to information that may be specifically important to you.
Ok so now I’ve shown something cool now let me show you how to make the magic happen in your Info Bar. Start by going to Tools/Options.
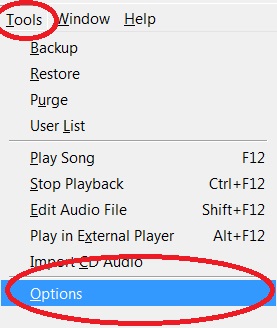
Then go to Library Editor Options and you will see the drop down box with your available options below the heading of “Show Extra Category Information”.
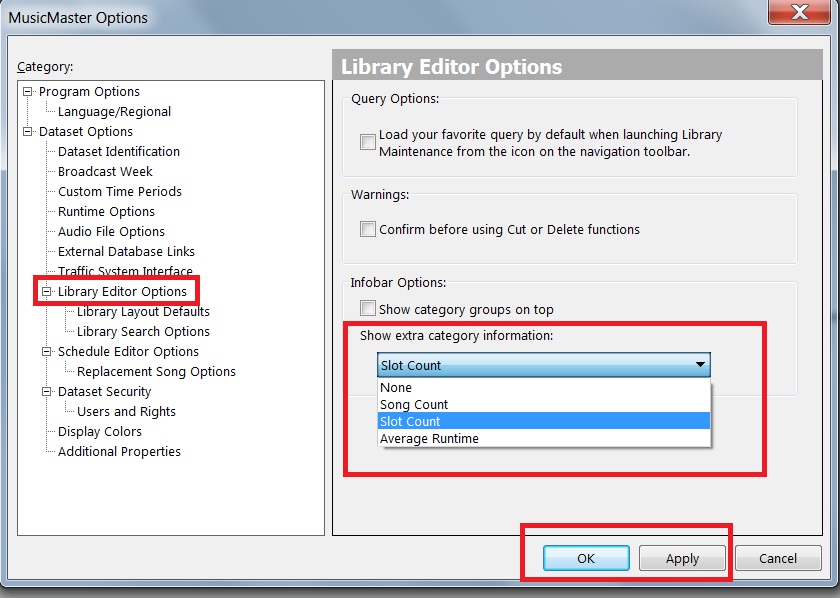
Choose which one of these will be of the most value to you, click Apply then OK and it is done! This additional information is just another great function of MusicMaster that puts the important information you need at your fingertips.
To find out about other time saving functions, if you have any questions or are on an earlier version and want to upgrade your version of MusicMaster to have access to these wonderful features contact your MusicMaster Music Scheduling Consultant.
Analizar la Programación Publicado por Jesus Rodriguez en diciembre 5th, 2016
Por Paul Ziino
Hay mucho que puedes hacer con el análisis instantáneo. Aquí hay algunas ideas.
¿Curioso cuánta música lenta estás programando? ¿O cuántas melodías de rock? Puede ver todo esto dividido por hora, día o período de tiempo personalizado. He aquí cómo configurarlo.
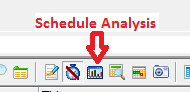
En el Editor de programación, haga clic en el icono de análisis, entonces la ficha de análisis instantáneos.
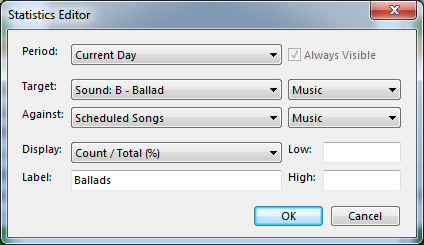
Haga clic en el botón Agregar. En la pantalla del Editor de estadísticas indica el período de tiempo (hora, día, o cualquier período de tiempo personalizado disponible).
El objetivo es lo que usted desea analizar. Para este ejemplo, estamos viendo baladas y estamos probando sólo música.
Contra es lo que estás comparando. ¿Quieres saber el total en comparación con el total de elementos en el registro, sólo elementos de la canción, o sólo los elementos de la canción programada? Escogeremos canciones programadas, y solo queremos contar las canciones de música. Me gusta ver la Cuenta / Total que nos dice cuántas baladas y qué porcentaje del registro que es igual. Podemos etiquetar esto y establecer umbrales bajos y altos como se desee.
Haga clic en aceptar y cierre la ventana de análisis de programación. Ahora haga clic en el icono cambiar las barras de herramientas, seleccione la ficha barras de herramientas y compruebe el análisis instantáneo.
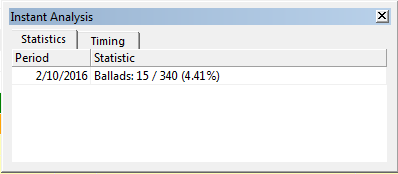
Esto nos dice que 15 de los 340 elementos de música programados en el tronco hacia el 10 de febrero son cifrados como Baladas, que iguala el 4.41 % de la música.
Puede utilizar el mismo proceso para comprobar el tempo, el género, el contenido canadiense o cualquier otro atributo.
Estoy interesado en ver lo que la media es por hora. I ir al botón de análisis de programa, la ficha de análisis inmediato y haga clic en Agregar. Esta vez puse mi objetivo como valor del estado de ánimo, prueba sólo contra la música, y deseo mostrar el valor promedio. Elijo hacer esto para la hora actual, la pantalla actualizará como desplazo el cursor desde una hora a la siguiente.
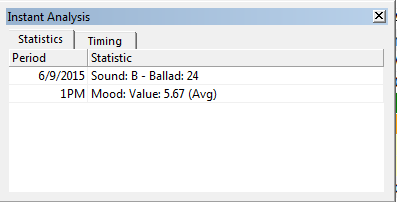
Tan hacia el 6/9/2015 tengo 24 baladas a lo largo del día, y el 1pm la hora tiene un humor medio de 5.67 (por una escala de nueve puntos).
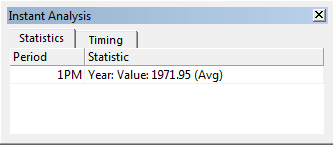
En la misma línea que el estado de ánimo medio, también puedo mostrar el año promedio asumiendo año se establece en la base de datos en un campo numérico.
¿Necesita ayuda para configurar su análisis instantáneo? ¡Póngase en contacto con su Consultor de Programación de MusicMaster hoy mismo!
CRTC Reports and How to Run Them Publicado por Webmaster en noviembre 28th, 2016
By Drew Bennett

O Canada! Where pines and maples grow; Great Prairies spread and lordly rivers flow…and where 35%** of a broadcast hour’s musical content must be Canadian! Today, we’re going to look at CRTC (Self-Assessment) reports and how to get accurate information from MusicMaster when you need to keep track of CANCON.
Promo de Música Promo En Demanda Publicado por Jesus Rodriguez en noviembre 14th, 2016
Por Jesus Rodriguez
Este año ha sido muy divertido de alojamiento de tantos días del genio. He sido impactados por la gran respuesta que he recibido sobre una parte de la Genius día que yo anfitrión. Es una parte de la sesión en la que comentamos algunas cosas realmente interesantes que puede hacer con conjuntos de última hora en los relojes con el fin de crear en la demanda promociones que se pueden utilizar para su música. Esto toma su promoción de la música a otro nivel!
¿Alguna vez has estado en una situación en la que usted está haciendo cambios musicales y sus promos ahora es viejo? ¿Qué pasa cuando usted envíe un correo electrónico a la producción para crear nuevas promociones y nunca lograr que se haga lo suficientemente rápido? ¿Y cuando has oído su promo y por el segundo día que ya suena a rancio debido a que se ha exagerado
Vea este video corto para ver lo que podría estar haciendo. Apuesto a que va a perder la cabeza!
Si te gustó lo que viste vamos a empezar en el uso de esta característica. A continuación se muestra un enlace a un tutorial paso a paso de cómo configurar su propio promo musical a la carta.
https://youtu.be/7VBvEusmVVg
Hay muchas otras cosas que puede hacer con sistemas especiales. Contamos con una serie de blogs de los cuatro artículos que detallan más de las características que usted puede crear.
Espero que usted puede utilizar esta forma de crear promocionales en demanda! Si usted necesita ayuda, póngase en contacto con su asesor de programación del MusicMaster.
Curado El Informe Feo Publicado por Jesus Rodriguez en octubre 31st, 2016
Por Dave Tyler
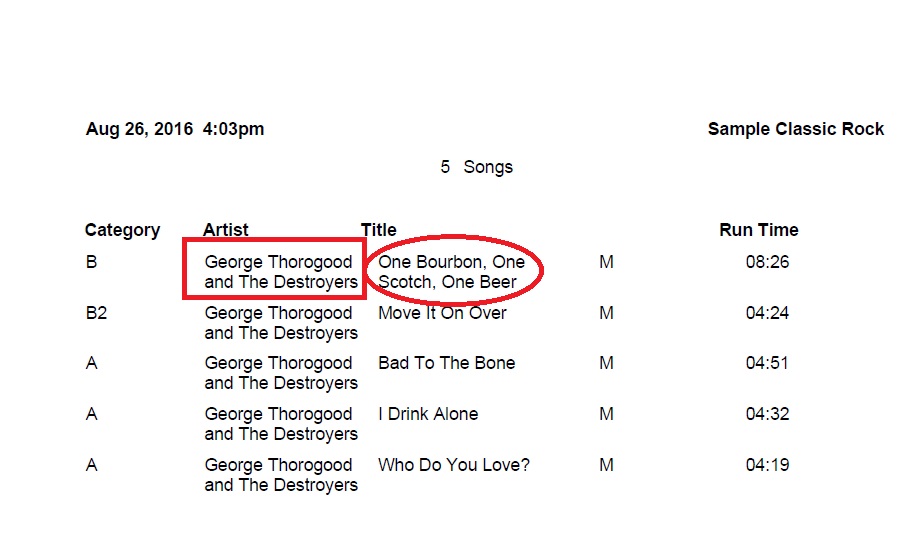
Si usted es uno de esos programadores que le gusta una copia tangible, duro de su registro en sus manos o tal vez necesitan imprimir a cabo todas las canciones de una categoría para la investigación o un próximo especial, MusicMaster tiene las herramientas para hacer que se vea exactamente cómo quiere que se vea. Vamos a tomar esta lista impresa de canciones de George Thorogood, por ejemplo.
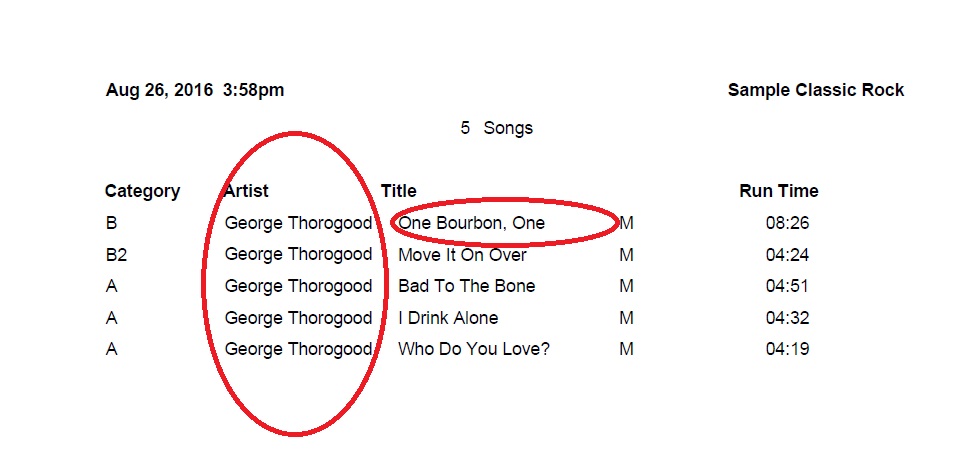
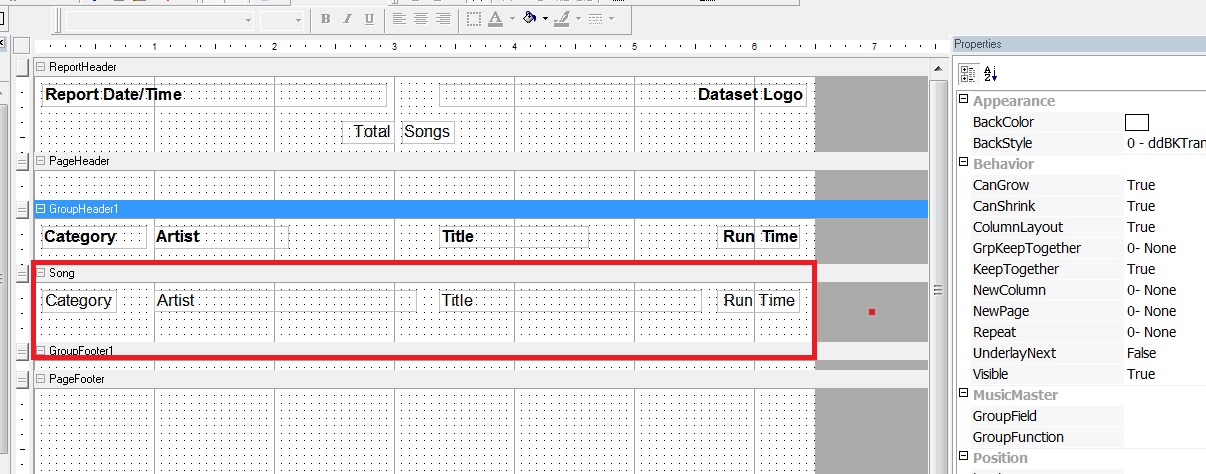
Seguro esto pone las canciones en una lista, pero hay un par de ausencia de cosas. ¿Primero de dónde están los Destroyers, la cinta de reserva de George? ¿Y quién quiere sólo un Bourbon? ¡Quiero Scotch y Beer también! El problema es mi tronco es demasiado atestado para poner toda adentro esta información. Entonces primero haciendo clic a nuestro icono de impresora entonces el botón corregir cuando la caja de Informes de Biblioteca de Encargo se abre.

Aquí hay dos cosas que puede hacer para limpiar las cosas. Una opción es la activación de la función ‘Puede crecer’ colocando ‘True’ en el cuadro de opciones al seleccionar el artista a continuación, los campos de título.
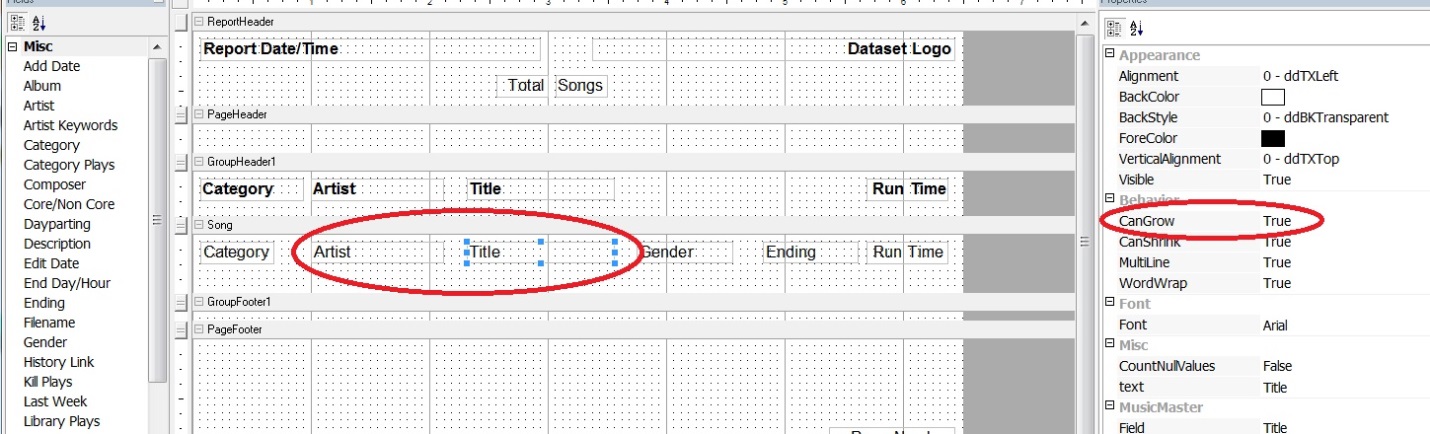
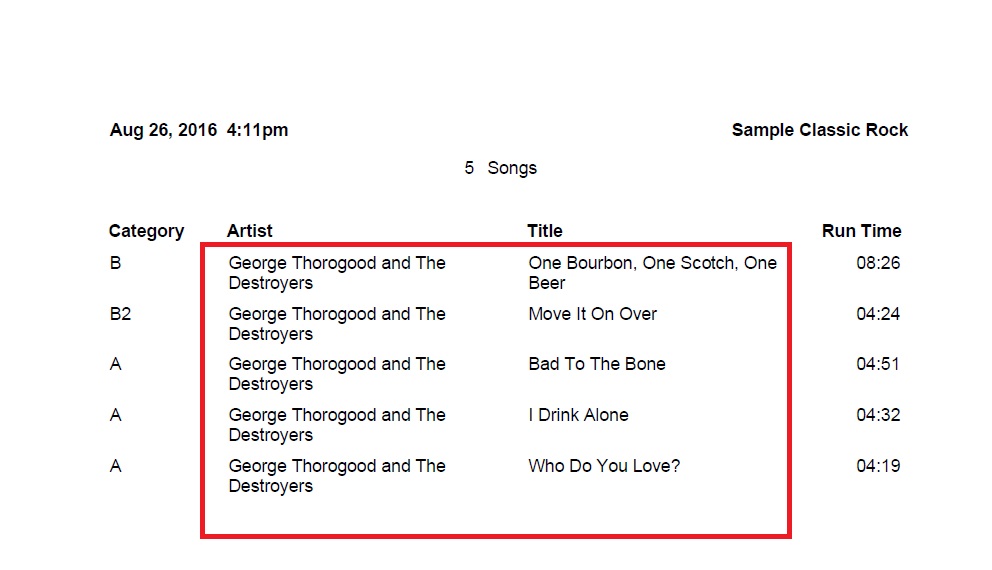
Ahora, cuando imprimimos la lista se mostrará el nombre completo de la banda y el título completo de la canción. La función puede crecer permite a estos campos a rellenar en una fila de abajo.
Tal vez usted está pensando que esto también es un poco demasiado amontonada, entonces la otra opción es limpiar hasta qué los campos están en su punto de vista. El campo es el género realmente necesario para este informe? A continuación, volver al editor de informes de la biblioteca personalizada y quitar todos los campos deseados y estirar los campos de título y artista.
Esto en combinación con la función “Puede Crecer” limpia su punto de vista y le permite ver toda la información en un formato que es mucho más agradable.
Por supuesto estamos hablando de MusicMaster aquí así que hay un montón de otras maneras para personalizar sus informes incluyendo su logotipo y mucho más. Así ¿“A Quién Ama Usted?” .. .Si! MusicMaster! Si usted tiene alguna pregunta sobre cómo hacer que los registros y reportes lucen mejor hable con su representante de MusicMaster.