
MusicMaster Blog
Preparación Para Casos De Emergencia Publicado por Jesus Rodriguez en agosto 1st, 2011
Por Marianne Burkett
Teniendo en cuenta el clima inusualmente severo que hemos vivido este verano, parecía un buen momento para hablar de estar preparados para “cortar y correr” con su base de datos de las estaciones, la mochila y una copia de la aplicación de software MusicMaster con seguridad escondida.
Esto no es sólo acerca de las inundaciones, las emergencias de nieve, huracanes, tornados, incendios y terremotos. También puede abarcar algo tan simple como un balanceo de voltaje, apagones repentinos, colapso de disco duro, enfermedad o peor!
Una historia corta, sobre todo verdadera:
La lluvia fue implacable y los ríos se extendiera sus bancos. Casas fueron siendo engullidos en agua a lo largo de la ciudad. La estación de radio, aparentemente insensible a otras situaciones de mal tiempo en el pasado, fue encerrada durante el fin de semana. La página de inicio de personal dirigido a salvar sus propiedades y ayudar a los problemas. Entonces, ocurrió lo impensable. El río cresta el domingo y completamente había inundado la emisora de radio. Cada escritorio, todos los equipos, cada ordenador portátil, los estudios – todo destruido en un abrir y cerrar de ojos.
El lunes recibí una llamada de la Directora del programa. Explicó que lo que había sucedido. Hice la pregunta simple: ¿tienes una copia de seguridad con usted? No tenía una copia de seguridad, fue en la estación. Sin embargo tenía un viejo portátil en su casa, con una vieja copia de seguridad almacenada. Era una copia de seguridad muy viejo… cinco años! Explicó qué tipo de cosas tendrían que hacerse en MusicMaster, incluyendo sincronización de biblioteca y reconstrucción de categorías, relojes y codificación y… He trabajado con él en el proyecto. El Director del programa también había re-nombrado viejos archivos de exportación en fechas recientes, por lo que algo estaba en el aire hasta que su obra fue terminada en la base de datos. La estación fue reconstruida y vida ha vuelto a la normalidad en la ciudad de río.
Seguramente no pienso alarmarle, pero yo sugeriría hacer un backup “Estándar” en su disco duro o servidor diariamente, además de realizar una copia de seguridad de pendrive “Personalizado” sobre una base diaria. Junto con la copia de seguridad de la base de datos – guardar una copia de la aplicación de software de MusicMaster en una unidad flash. Así, en caso de emergencia, puede ejecutar el software y restaurar la copia de seguridad en su equipo doméstico o portátil y todavía generar registros.
Realizar copias de seguridad:
Herramientas/Reserva/Realizar una Reserva Estándar. El fichero de reserva se creará y se almacenará a cualquier posición a la cual su icono de MusicMaster se señala. Para encontrar que, haga clic con el botón derecho del ratón en su icono de MusicMaster, vaya a Propiedades y mire el camino. En el ejemplo abajo verá que mi icono se señala a N:\MMdata:
 Realizar una copia de seguridad personalizada:
Es tan simple como realizar una copia de seguridad estándar! Usted necesitará crear el perfil de copia de seguridad antes de poder realizar la copia de seguridad personalizada. En primer lugar, usted necesitará saber qué letra es tu pendrive. Conecte su pendrive, vaya a “Mi PC” o “Equipo” y echar un vistazo a qué Letra de unidad se asigna a la unidad flash. En el ejemplo siguiente, mi carta de pendrive pasa a ser “E”. Luego, vaya a Herramientas/Reserva “Crear.”

En otros archivos, considere la posibilidad de añadir en cualquiera de los archivos que necesita para la reconciliación o proceso de circulación (los archivos .DEF). A continuación, estos productos se incluyen en la copia de seguridad para su custodia.
Haga clic en ACEPTAR y estarás listo para realizar una copia de seguridad personalizada cada día.
Se puede crear varios perfiles de copia así.

Otra red de seguridad es a usted mismo por correo electrónico una copia de seguridad sobre una base diaria. Ciberespacio es una cosa maravillosa.
También he descubierto los placeres del uso de un nuevo servicio gratuito llamado Dropbox, para almacenar mi copia de seguridad en “la nube” (más información en este post).
Usted puede pensar que soy un poco paranoico en hacer estas copias de seguridad cada día que trabajo en MusicMaster. ¿Y qué? Prefiero ser un poco paranoico y cuidado, que perder ni un día de trabajo a algún tipo de desastre natural o artificial.
Otra cosa de no es la que puede acceder a todas las versiones de la aplicación de software MusicMaster desde nuestro centro de soporte.
Por supuesto, si usted tiene alguna pregunta en absoluto – no dude en contactar con su asesor de programación de música. Siempre estamos aquí para ayudar.
MusicMaster for Windows 4.0 SR-23 is now available Publicado por Scott Wirt en julio 25th, 2011
The latest service for MusicMaster 4.0 is now available. This update features a long list of corrections, useability improvements and minor enhancements. We recommend that all clients keep their software up-to-date, and apply this latest service release as soon as possible. To do so, simply click the Check for Updates link on the MusicMaster Help menu. If you have any questions about the new update, please contact your Music Scheduling Consultant.
Categorías Alternativos Publicado por Jesus Rodriguez en julio 1st, 2011
Por Paul Ziino
Una vez configurado, categorías alternas dentro MusicMaster puede ofrecer un montón de opciones para los programadores de música. El concepto básico es que en algunos horarios quiere una canción para girar en una categoría, pero en otros horarios debe girar en una categoría diferente. Sin embargo, desea MusicMaster contar juegos en ambas categorías para la historia del juego de la canción.
Primer Paso: Clonación Canciones
Para copiar una canción de la A y agregarlo a la B, encontrar la canción en la categoría A, haga clic derecho sobre él, luego seleccione copia/seleccione canción luego seleccione la categoría copiarlo a (B).
 Segundo Paso: Compartir LaHistoria
Usted necesitará un campo clave para colocar un identificador único para la canción — típicamente su número de automatización. Si sus datos carecen de un campo clave único sin usar, póngase en contacto con su asesor de programación MusicMaster y pídeles que agreguen uno para usted. Puede etiquetar este campo como “Enlace de la historia”. Asegúrese de que tenga en cuenta el ID del campo asignado al campo de enlace de la historia en conjunto de datos/biblioteca/campos.

Ahora vaya a herramientas/opciones/propiedades adicionales. Bajo el encabezado de la historia, indicar el ID del campo de enlace de historia en el campo principal del resto y establecer normas primarias del resto a 1. Esto dice MM para utilizar el campo de enlace de la historia al determinar el resto de la canción. Haga clic en aplicar y aceptar.
 Tercer paso: Añadir el Link de la historia y Dayparting las canciones
Ahora que has copiado la canción en su categoría alterna y configure el campo primario del resto y reglas, usted necesitará añadir el Link de la historia de las dos copias de la canción. Esto debe ser el mismo en todas las copias que desea compartir una historia. Como se indicó anteriormente, esto es comúnmente el ID de automatización para esa canción.
Una vez que el enlace está en su lugar, en todas las copias, ya es hora de poner las Dayparting restricciones sobre ellos. En este ejemplo, queremos que la copia de un juego a partir de las 6am-18:59 y la B copia para jugar de 7pm-5:59, siete días a la semana. Haga doble clic en el campo Dayparting en la primera canción y crear la restricción. A continuación, repita el proceso para cada canción.
Una vez que el enlace está en su lugar, en todas las copias, ya es hora de poner las Dayparting restricciones sobre ellos. En este ejemplo, queremos que la copia de un juego a partir de las 6am-18:59 y la B copia para jugar de 7pm-5:59, siete días a la semana. Haga doble clic en el campo Dayparting en la primera canción y crear la restricción. A continuación, repita el proceso para cada canción.
Restricción para canción en A

Restricción para canción en B

Ahora estás listo para programar sus registros.
Paso cuatro: ver historias combinadas
Después de que usted tiene programada la música, abrir el gráfico historia F6 para uno de sus temas vinculados. De forma predeterminada MusicMaster muestra todas las vueltas programadas de esa canción dentro de la historia activa. Pero puedes utilizar la lista desplegable a la derecha de la línea de la canción para cambiar de la vista de la canción a cualquier palabra clave historia, paquetes y ni siquiera mover la historia. Y puesto que el enlace de la historia es un campo clave, puedes ver una historia combinada de todas las canciones compartir ese enlace historia! Además, puede hacer clic el icono para “Resaltar juega por la canción activa” para añadir widgets a la pantalla para giros de esta copia a diferencia de otras copias de la canción.
Gráfico de la historia de canción en A
 ¿Cuánto tiempo debería mantener la copia?
Realmente depende de tu situación. Recuerde, si elimina una canción de MusicMaster, su historia va a desaparecer. Así que sugerimos si ya no desea reproducir la copia que se quite el código de automatización y luego poner la canción en una categoría de resto no programadas, dejando el enlace de la historia en su lugar.
Why Use Alternate Categories or History Links?
Hay un par de razones que puede utilizar categorías alternas o enlazar la historia en MusicMaster. Una de las razones — programar una canción en pesados durante el día, pero por la noche lo quieres programar en luz. Una segunda razón — tiene un programa especial que utiliza sus propias categorías de música, y quiere aparecer en rotación regular y rotación de la exposición especial así como esta canción. Una tercera razón — tiene dos o más versiones de la misma canción, y quieres MusicMaster a tratarlos igual, debe agregar el mismo enlace de historia cada versión. Y pueda surgir con más razones, también.
Issue #68 Publicado por Webmaster en julio 1st, 2011
Welcome to MusicMaster
KCSN-FM Northbridge; Pro Plus TV Sloveia; WAMO-FM Pittsburgh; RTL Letztebourg Luxembourg; KJUG-FM, KCRZ Visalia; KENZ-FM Salt Lake City; Radio Shoppers Chula Vista; WGPR-HD 3 Detroit; D&C Active Regina
New Website Coming Soon
The new MusicMaster website is just about ready to go online. It’s all new and completely updated with many new features to keep you informed. We’ve also begun using our new domain name, so you can link to the MusicMaster website at http://www.MusicMaster.com. Check out the new look and let us know what you think!
MusicMaster Genius Workshops – World Tour 2011
 These training workshops are an opportunity to really refine your MusicMaster skills, and take advantage of many hidden treasures you may not have discovered yet in the software. The curriculum is beneficial to the beginner as well as an experienced user.
Wednesday July 13th 1p-5pm Minneapolis, MN We are just two weeks away and looking forward to seeing you in the Twin Cities. This is a FREE workshop and will take place just prior to the start of The 36th Conclave Learning Conference at the same hotel as the convention. There is still time to register, but we need to know you are coming. To reserve your space in the workshop contact Mark Bolke. You can register for The Conclave here. Group rates are available.
Thursday and Friday November 10-11 Potsdam, Germany Attendees for this workshop will have the opportunity to choose between one of three courses. There will be a beginners track for users relatively new to MusicMaster, a more advanced group for those users who want to take their skill set to a higher level, and and the third track will focus on special techniques for our television/video programmers. More information and registration information is available here. If you have additional questions contact Rainer Eichhorn.

Industry Event Calendar
![]() If you are planning to attend any of these upcoming events let us know. We would love the opportunity to say hello, share a cup of coffee, or help with any questions you may be having.
If you are planning to attend any of these upcoming events let us know. We would love the opportunity to say hello, share a cup of coffee, or help with any questions you may be having.
- The Conclave July 14-16, Minneapolis
- Monitor Latino Convention August 15-18, Guadalajara, Mexico
- IBC 2011 Amsterdam, September 8-13
- NAB Chicago, September 14-16
- Broadcast India, Mumbai, October 20-22
- CBI Fall Convention, Orlando, October 27-30
MusicMaster Pro-Team: Bob Hamilton
 Bob Hamilton is President of Hamilton Communications, specializing in Management, Programming, Music direction, talent improvement, promotion marketing, Sales/Programming development and station cash flow! Forty-five years of Programming/Managing stations. Previous station owner. National Music Director for RKO Radio Stations consulted, WNEW AM New York, KRLA LA, KTWV LA, KLAC LA, KABL SF, B-103 Long Island, KGW Portland, KJUL Las Vegas, KLUV Dallas, KEZW Denver, Route 81 Radio, First Broadcasting, Chancellor, AM’FM Stations. Clear Channel Radio. King Broadcasting.
Our purpose is to help you gain market position and win, resulting in cash flow success. We offer programming that works with sales and programming. We are not satisfied until you win! We work with all aspects of station operation from traffic to engineering to sales to management. We cover all the bases.
Personal successes include building K-EARTH 101 from ground one and making it the premier Oldies station in the nation; making WNAK AM/FM the premier Adult Standards station in the country; building Adult radio that works including success stories like KSFO/KYA San Francisco; turning Magic 61 into the standards station; taking KABL from nothing to 35-64 winner in San Francisco; and, winning two awards from the NAB.

The MusicMaster Pro-Team is comprised of experienced broadcast consultants and programmers who are available to assist MusicMaster clients with programming advice. Their services are available under this cost effective program with no long term commitment required, and can be added to your existing software support plan. Information on each MusicMaster Pro-Team member is available below. If you would like to retain the services of one of the MusicMaster Pro-Team members or have questions about the specifics of the program contact Mark Bolke Vice President/COO at (651) 405-9119 or mark@mmwin.com.
See the complete MusicMaster Pro-Team Roster.
 Quick Tip: Most-Rested Perfect Song
When you’re looking for a replacement song, you can find the most-rested perfect song very quickly in the Schedule Editor. The short-cut [Shift-F9] will automatically search for that song and actually insert it into your log. This shortcut bypasses the replacement window entirely to speed up your editing process.
Recent Feature Article from the MusicMaster Blog
Alternate Categories
By Paul Ziino
Once set up, Alternate Categories within MusicMaster can offer a lot of options to music programmers. The basic concept is that in some dayparts you want a song to rotate in one category, but in other dayparts it should rotate in a different category. However you want MusicMaster to count plays in both categories for that song’s play history… (Read more.)
Music Master of the Month

 John Bradley
Custom Channels
SBR Creative Media
Boulder, Colorado
“I started using MusicMaster in the 1980’s just a few years after Joe Knapp created it. MM always keeps innovating, evolving, and adapting to keep us up-to-date.
We use MusicMaster daily in our two companies. Custom Channels provides music and messaging for in-store and online radio. Clients include Whole Foods, Life is good, Floyd’s Barbershops and the Bonnaroo music festival. SBR Creative Media advises radio stations on programming.
“We currently run 60 databases from the MusicMaster Enterprise system along with advising radio stations that run their own MusicMaster, so we’ve seen many different ways MusicMaster is used. When we owned our own radio stations there was no hesitation about using MusicMaster.
“It’s difficult to rank the best features of MusicMaster because it really is the sum of the interconnected functions that make MusicMaster such a marvelous software program. We especially like that it’s so fun to use. The colors, the personalization, being able to listen to every song, and the depth of features make manipulating a music library really fun!
“Finally, we can’t say enough about the MusicMaster support staff. They always treat us well when answering our dumb questions or when giving us a creative solution when we want to do something out of the ordinary with MusicMaster.”
Utilizando Grupos De Reglas Que “Ignorar” Día De La Semana vs Fin De Semana Juega Publicado por Jesus Rodriguez en mayo 1st, 2011
Por Marianne Burkett
Esto es muy sencillo de configurar, así que si esto sigue paso a paso usted podrá hacerse en ningún momento!
Abra su árbol de regla y vaya a la carpeta primera en tipos de regla disponibles en el lado derecho del árbol de regla, llamado “Elementos del árbol de regla especial”. Dentro de esa carpeta verá grupos de reglas.
Primero meter carpeta frágil o irrompible de la primera categoría en que te gustaría trabajar dos grupos de reglas. Identificar un grupo de reglas como su grupo de reglas de lunes a viernes y el segundo como su grupo de reglas de fin de semana. Una vez que has creado una restricción horaria para cada grupo de reglas… Asegúrese de seleccionar desde el arrastre menú inmediatamente por debajo de su ventana de restricción horaria “Ignorar los juegos fuera de este periodo de tiempo”.
Vea las ilustraciones abajo:


Una vez que tenga estos dos primeros grupos de reglas configurado, no poblarlas todavía! Copie y pegue los grupos vacíos en las otras categorías que le gustaría “ignorar entre semana o fin de semana reglas de rotación” acatar. Una vez que has hecho pueblan sus grupos de reglas con las reglas de rotación que tengan sentido para cada categoría.En el cierre para arriba abajo verás un resto mínimo Imperio y exclusivo día Offset que están “fuera” del grupo de regla y a respetarse a 24/7. Dentro de los grupos de reglas usted verá algunos “dayparted” o “tiempo limitado” reglas de rotación.
También, en el ejemplo siguiente, las reglas de desplazamiento Offset día son diferentes ya que estamos tratando con una ventana más grande para el grupo de reglas de lunes a viernes y una pequeña ventana para el grupo de reglas de fin de semana.

Recuerde, cada categoría gira diferente, así que asegúrese de utilizar el poder del icono MusicMaster facturación de análisis, que en la ilustración anterior es el icono de flecha azul al lado del icono de calendario. El análisis del volumen de ventas le dará una buena idea de qué tipo de reglas que necesita, por ejemplo día compensaciones o jugar las compensaciones. Los desplazamientos del día prueba de día a día y se utilizan a menudo con pequeñas categorías donde jugaría una canción cada día o varias veces al día. En la ilustración siguiente verá el recurrente categoría jugará casi todos los días:

Reproducción Offset Windows se utilizan en las categorías que la vuelta a un ritmo mucho más lento, como el siguiente ejemplo:

Para obtener más información acerca de cómo configurar grupos de reglas y la corrección de las normas de la biblioteca, póngase en contacto con su consultor de música!
Utilizando MusicMaster Con Dropbox Publicado por Jesus Rodriguez en mayo 1st, 2011
Por Drew Bennett
Hoy, voy a compartir un secreto entre oficina. Voy a decirte cómo compartir archivos entre otros. Esta es información secreta superior para que no se lo digas todo el mundo. Esto podría regresar a la competencia y podrían volverse productivas de repente.
 Es cierto, que utilizamos Dropbox para compartir archivos, uno con el otro. De hecho, lo usé para entregar este artículo a la persona que se encarga de publicar los blogs que escribimos. Ahora, eso es super secreto y información que puedo apostar a que no sabías. Hoy voy a mostrar cómo utilizar Dropbox con MusicMaster en la estación para hacer tu vida más fácil (y tal vez de su asesor más fácil así.)
En primer lugar, voy a cubrir cómo configurar una cuenta de Dropbox y luego voy a discutir algunos consejos que pueden enviar su productividad a través del techo.
Ir a la Página Web de Dropbox en www.dropbox .com y descarga usando el enlace en la Página Web de Dropbox. Una vez que haya descargado el archivo ejecutable, ejecutarlo. Siga las instrucciones del asistente de instalación y bingo; Sólo has instalado Dropbox en tu máquina y estás listo para crear y compartir una carpeta.
Encontrarás tu carpeta de Dropbox nueva marca-practicamente en su escritorio. Haga doble clic en él y se abre para mostrar una carpeta vacía. Con el botón derecho, tal como lo harías si estás creando una carpeta en Windows y elija, “Nuevo” y luego, “Folder”. Nombre de la carpeta nueva y golpea ¡ OK. Ahora haga clic otra vez en la carpeta y elija, “Dropbox” y luego “compartir esta carpeta”.
Abrirá la ventana del navegador y llevarte al sitio web de Dropbox donde puede escribir en las direcciones de correo electrónico de las personas que te gustaría compartir esta carpeta con. Envíe sus invitaciones a la dirección de correo electrónico que has elegido. Esos usuarios deben instalar Dropbox así y aceptar su invitación a compartir la carpeta. Ahora, cada uno de ustedes puede simplemente arrastrar y soltar archivos desde tu ordenador en esta carpeta compartida. Archivos adjuntos de e-mailing no más, no más buscando los archivos descargados. Todo está ahí en tu carpeta de Dropbox compartida. Bueno, ¿no? Pensamos, también.
Entonces, ¿cómo puedes usar Dropbox con MusicMaster para ser más productivos? Bueno, ahora mismo, probablemente descubriste que pasar las bases de datos alrededor al Director del programa o Consultor va a ser bastante fácil. Sin embargo, hay algunas otras maneras de utilizar Dropbox y MusicMaster que puede ahorrar muchos dolores de cabeza algún día.
¿Qué pasa si usted y su asesor querían trabajar juntos sobre la base de datos pero hoy está en Pensacola y estás todavía en la estación? Almacenar los datos en tu carpeta de Dropbox compartida permite que usted y su asesor para trabajar en los mismos datos. Puede abrir MusicMaster, hacer un cambio, cierre MusicMaster y luego esperar a Dropbox sincronizar el archivo para que su asesor puede abrir y ver el cambio.
Puede también copia de seguridad de sus datos a su carpeta de Dropbox y descargarlo desde cualquier lugar o sólo archivo viejas copias de seguridad para su custodia. Para hacer esto, abra MusicMaster y cabeza a herramientas y luego hacer un Backup. Elija el “crear”, botón. MusicMaster te lleva a la pantalla de opciones de perfil de copia de seguridad personalizada. En el cuadro de descripción en la parte superior, llamar a esto “Dropbox Backup”. En la parte inferior de esta pantalla, busque el campo nombre de archivo de copia de seguridad y navegue a la carpeta de Dropbox. Haga clic en “Abrir” y establecerá la ruta a la carpeta de Dropbox dentro del campo de nombre de archivo de copia de seguridad. Ahora, haga clic en, “OK,”y va a terminar en la pantalla de copia de seguridad. Ahora, puede poner de relieve el perfil de copia de seguridad de Dropbox y elegir el, “realice una copia de seguridad personalizada,” botón. MusicMaster se copia de seguridad de la base de datos a su carpeta de Dropbox. ¿Ves? Ahora ha respaldado por los datos y nadie con que comparte la carpeta puede tomarlo y utilizarlo. También puede copia de seguridad de bases de datos y mantenerlos a salvo y en línea en el evento se pierde su computadora a un accidente.
Nota: Dropbox es un recurso en línea. Es siempre importante para mantener una copia de seguridad en su máquina. Dropbox es una gran herramienta para usar, pero lo pierdes tu conexión a internet, también pierdes Dropbox así que tenlo en cuenta.
Dropbox es una gran manera de pasar archivos a tus compañeros y colegas. Es una gran manera de compartir y colaborar en archivos y queremos usarlo con MusicMaster. Si crees que Dropbox podría ser útil, descargarlo y probarlo. Su asesor te lo agradecerán.
La Mirada “Bajo La Capucha” De MusicMaster Publicado por Jesus Rodriguez en abril 6th, 2011
Por Aaron Taylor
En este artículo, hemos pensado que sería muy útil para el funcionamiento a través de algunos “bajo el capó”, zonas de MusicMaster para Windows, que es posible que nunca haya tenido la oportunidad de ver antes, o tal vez había interesarme en estos rincones y siempre pensé, “hmm, me pregunto qué es lo que este hace y pensé que le solicite su MSC sobre estas zonas, o podría leer en esas áreas algún día. Algún día es hoy en día. Este artículo se entiende como una descripción general de estas áreas. Trataremos de escribir más sobre estas áreas en el futuro con mayor detalle. Mientras tanto, si tiene alguna pregunta acerca de estas áreas, sólo tiene que ponerse en contacto con nosotros, estaremos encantados de analizar las áreas en más detalle.
Información de Sistema
Puede acceder a la siguiente zona que acerca del sistema de ayuda, ayuda-acerca de MUSICMASTER-USER INFO, o mediante el directorio C:\MMWIN, busque mmsysinfo.exe (esto puede ser útil si por cualquier motivo no eres capaz de entrar en la aplicación en un momento determinado).Si alguno de estos faltan o están desactualizado, el archivo mmsysinfo.exe o archivo de información del sistema de ayuda a enumerarlas. Busque las columnas de caras sonrientes a la izquierda.
Si alguno de ellos son de color amarillo, típicamente ese componente en particular es obsoleto y debe ser actualizado tan pronto como sea posible. Si cualquiera de las caras sonrientes son de color rojo, esto generalmente significa que el componente del sistema está desaparecido y que tenga problemas con el programa funciona correctamente. Póngase en contacto con su asesor de programación de música inmediatamente si ves cualquier sonrientes “infeliz” y trabajarán con usted para corregir esto.
 Tenga en cuenta que esta ventana también puede decirle a usted (o a su representante técnico) ¿qué sistema operativo se está ejecutando y service pack, y si el horario de verano está activada en tu máquina y cuándo se producirá. Por último, hay una opción en la esquina izquierda para copiar en el Portapapeles, que le permite crear una lista más detallada de la información anterior en el Portapapeles en Windows, lo cual a su vez se puede pegar en un archivo que puede ser enviado a nosotros para la revisión adicional si es necesario.
Herramientas-Opciones
Esta zona de MusicMaster para Windows es amplia en el número de opciones que se pueden configurar desde aquí (otro artículo aparte se podría escribir a detalle todo lo que se puede “retorcer” de aquí!) principales áreas de interés aquí son normalmente: Opciones de conjuntos/Identificación de Dataset, en las que se puede ajustar el nombre que le ha dado un cambio en la base la apertura esquema de color o añadir un logotipo de la pantalla de inicio que si lo desea.

Esta zona de MusicMaster para Windows es amplia en el número de opciones que se pueden configurar desde aquí (otro artículo aparte se podría escribir a detalle todo lo que se puede “retorcer” de aquí!) principales áreas de interés aquí son normalmente: Opciones de conjuntos/Identificación de Dataset, en las que se puede ajustar el nombre que le ha dado un cambio en la base la apertura esquema de color o añadir un logotipo de la pantalla de inicio que si lo desea.
Archivo de Audio Opciones, que es donde se configura MusicMaster para reproducir audio de su automatización o una unidad interna.

Sistema de Tráfico Interfaz, donde MusicMaster está configurado para aceptar un tráfico entrante/spot registro para combinar en MusicMaster fines de distribución, o a una combinación música/tráfico exportación.
 Opciones del Editor de la Biblioteca y Editor de Programación contienen un montón de interesantes ajustes de configuración que se pueden realizar en las áreas de la aplicación.
 Seguridad de DataSet, que es donde usted querrá ir para configurar permisos de usuario distintos.

Finalmente, propiedades adicionales contiene una amplia variedad de ajustes de configuración para todo, desde audio a la tolerancia de sincronización. El archivo de ayuda en MusicMaster hace un buen trabajo de detalle cómo se configuran cada uno de ellos y lo que ellos controlan, pero no dude en acercarse a su representante de soporte si tiene alguna pregunta sobre qué se puede hacer en esta área de gran alcance del software.
 Notas Del Sistema
Cuando MusicMaster para Windows se actualiza a una nueva versión (consulte Comprobación de ayuda para la actualización o mmupdate.exe), se agrega en este archivo. Este es el lugar para visitar si te gustaría averiguar lo que ha sido añadido o actualizado a MusicMaster. Este archivo también le dirá los sistemas operativos de Microsoft que MusicMaster es soportado actualmente en, y es también una lista (en la parte superior del archivo) los principales componentes de Microsoft que debe incluir su máquina para ejecutar la aplicación correctamente. Compruebe-sistema de ayuda de información (como se describió anteriormente) para verificar que su máquina está al día con estos componentes.

Editor De Diseño De Exportación (MMExportDesignEditor.exe)
Este archivo se encuentra en la carpeta c:\mmwin y es la utilidad que utilizamos para hacer la exportación a la automatización y también las exportaciones de biblioteca (si está utilizado). Verá el resultado final en DATASET-calendario-exportación-exportación de automatización (típicamente). Más allá de dar las opciones para definir la exportación diseños por categoría, así como por los tipos de elementos en la base de datos, las opciones de configuración aquí son ilimitadas! También puede importar diseños en desde otras bases de datos si lo desea. Esto es extremadamente útil si va a agregar una nueva estación para el clúster y ya tiene otras bases de datos MusicMaster con diseño de exportación para su automatización existentes de trabajo. Casi todo lo que necesitas para salir “” en un archivo basado en texto de MusicMaster puede lograrse desde aquí. Si gustaría tener una visión general de esta área del software, o está tratando de emular a una especie de exportación de la información que usted no puede comprender, háganoslo saber y seguramente tendremos algunas ideas sobre cómo puede hacerse!

Comprobar Si Hay Actualizaciones (MMUpdate.exe)
Lo encontrará en el C: \MMWIN carpeta o si va a AYUDAR A COMPROBAR SI HAY ACTUALIZACIONES. Esto le permitirá MusicMaster para comprobar nuestros servidores para obtener la versión más reciente de MusicMaster su clave es con licencia para descargar. Usted necesita asegurarse de que la máquina cuenta con conectividad a internet en el momento en que usted haga clic en este para que funcione. También, usted tendrá que tener la certeza de que usted cierre MusicMaster completamente una vez que la descarga de la nueva versión es completa y comenzar el proceso de actualización. Se requiere derechos de administrador para realizar la instalación. Normalmente, la MusicMaster boletín que reciben cada mes le permitirá a usted saber si hay disponible una nueva actualización, pero también puede sentirse libre para comprobar esta utilidad o pedir su música Programación Consultor si está ejecutando la versión más reciente.

Herramientas-Lista De Usuarios
Vaya a Herramientas de LISTA DE USUARIOS, si es necesario para verificar que alguien en la red no es también la base de datos antes de realizar una copia de seguridad.
 Aquí hay otro consejo, si por cualquier razón usted tiene algún problema haciendo copias de seguridad (por ejemplo recibiendo un mensaje que indica los datos está en uso:
Control-Alt -Supr, se mostrará el Administrador de tareas de Windows, que es una forma rápida de saber si MusicMaster es simplemente abrir dos veces en su máquina. Si aparece dos veces en esta lista más adelante, esta es una buena indicación de que una instancia de la aplicación se ha detenido, y es posible que se deba “final encargado” consulte con su MSC si tiene alguna pregunta sobre este.

Ayuda-Registro De Usuario
Esto puede ser útil para averiguar si su clave es disponible para actualizar para permitir la descarga de una versión más reciente de MusicMaster, si tu MSC le pide que marque el número de serie de la llave (si se daña y puede ser un reemplazo en orden) o para simplemente Asegúrese de que su clave MusicMaster es capaz de conectarse vía internet a nuestros servidores de licencias. A menudo, verá un mensaje de “conexión” mientras se establece la comunicación y luego mostrará alguna información en las casillas como se muestra a continuación.
 Archivo De Pensamiento
Encontrará este archivo en el C: \mmwin directorio listado por letras de llamada si la opción está activada (en CONJUNTO-PROGRAMADOR PROGRAMADOR AUTOMÁTICO -OPCIONES), “guardar proceso de pensamiento en el disco”.
Esta puede ser una herramienta muy útil para ayudar a descifrar el proceso de toma de decisiones que MusicMaster usa cuando planifica cada categoría. Esto no sólo puede ver a través del directorio MMWIN en su equipo, pero también se puede acceder a él desde el Editor de programación o mantenimiento de la Biblioteca. Mantenimiento de la biblioteca de carga, la categoría y haga clic con el botón derecho en la canción que desea revisar. Desde ese menú contextual, seleccione Programación Recapitulación. A continuación, podrá elegir la canción actual, canción seleccionada(s), marca las canciones o Todos. MusicMaster, a continuación, cargar la información para su revisión. Si usted se encuentra en el Editor, haga clic con el botón derecho en la canción que desea revisar y seleccionar Programación Recapitulación.
 También puede revisar el archivo pensando mediante el informe Resumen (DATASET-calendario-Resumen Informe). Este informe le mostrará el proceso de decisión que Musicmaster atravesó en la última sesión de programación. Se le mostrará por qué canciones fracasó antes de finalmente elegir una canción o dejando la posición no programada. Esto puede ser muy útil para determinar por qué algunas canciones no están jugando.
Esto de ninguna manera pretende ser un Resumen de los “rincones y grietas” “todo incluido” de esta aplicación increíblemente poderosa, pero más e intermedio Introducción a algunas de las otras áreas del software que el usuario general puede no haber sido consciente de.
Como siempre, no duden de llegar a su maestría personal, o vía support@mmwin.com si usted tiene preguntas o inquietudes acerca de algo que está haciendo, que al estar haciendo, o algo así que están viendo en MusicMaster que usted tiene preguntas sobre.
Programación de Intros/Entradas Publicado por Jesus Rodriguez en marzo 25th, 2011
Por Paul Ziino
Muchos clientes MusicMaster utilizan las reglas de protección Segue para asegurarse de no continuar canciones lentas con canciones rápidas o prevenir a artistas femeninas de jugar consecutivamente. Pero, ¿has considerado usar protección Segue a coincidir con los tiempos de los charla a los intros canción apropiada? Esta es la pregunta que recibimos:
“Tengo una canción con una entrada de 12 segundos. Quiero asegurarme que la pieza de representación antes de que revise la rampa de la canción y cumplirá el puesto. ¿Es posible esto?”
La respuesta es Sí. Primero necesitarás un campo en tu base de datos que puede acomodar a la codificación necesaria para hacerlo. Trabajará un inusitado campo atributo-general, o un campo de atributo-Multiple puede funcionar tan bien.
Paso 1: crear los códigos adecuados. Para hacer esto, vaya a Dataset/biblioteca/atributos. Utilice el desplegable en la parte superior para seleccionar el campo atributo deseado. Asegúrese de entrar en el campo valor, así como la descripción, el número de segundos para que el campo de las clases en el orden correcto.
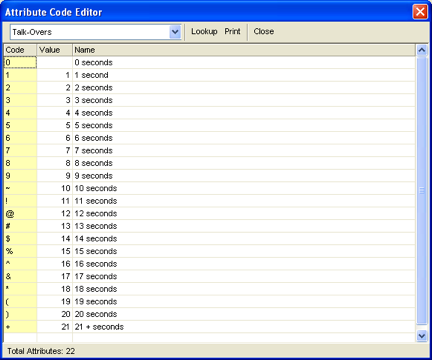 Usted puede elegir cualquier solos caracteres que deseas los códigos, no obstante recomendamos utilizar algo intuitivo. Por ejemplo, hemos utilizado los códigos 0-9 para los tiempos de introducción de cero a nueve segundos. Usamos mayúsculas-1 (!) para 11, Shift-2 (@) para 12 y así sucesivamente.
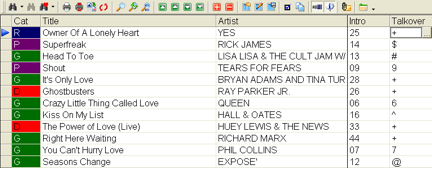
Paso 2: código de la biblioteca. Consulta de la biblioteca de canciones donde Intro equivale a X.

Luego, agregue el código X al campo Talk-Over. Luego hacer una nueva consulta por igual a Intro Y, luego agregar el código Y al campo Talk-Over y así sucesivamente. Cuando haya terminado, la biblioteca debe ser algo así…
Hacer lo mismo con las categorías de la proyección de imagen para que imágenes seco tiene el código apropiado hablar de atributo asignado. Imagen producida se debe asignar el código 0 segundos.
Paso 3: crear la regla. En el árbol de la regla, abre la categoría de imágenes (o categorías). Entonces bajo “Atributo campo reglas” encontrar el campo Talk-Over, entonces la regla de protección Segue. Arrastrar y soltar esa regla en la categoría correspondiente de la proyección de imagen. Se debe configurar para que un código puede continuar sólo en sí mismo, la regla sólo debe probar adelante y debe ignorar no musical.
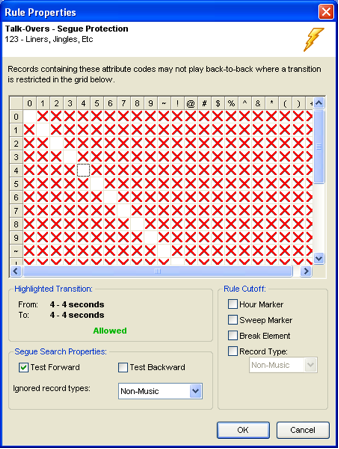 Nosotros hacemos la Prueba Adelante y no hace caso de la No música de modo que la representación sólo mire el siguiente artículo de la música previsto en el tronco y no mire nada programado antes de ello.
Paso cuatro: Establecer las propiedades de la programación. Ir a conjunto de datos/Programa/Propiedades de la programación. Asegúrese de que la imagen está programando categoría más adelante en el orden de las categorías musicales. Además, se le quiere dar la categoría a 100% de profundidad para que MusicMaster puede mirar todos los elementos de la categoría.
Consejo: Usted probablemente querrá múltiples piezas de imágenes para cada código de Talk-Over impedir que el exacto mismo artículo jugando cada vez que se requiere una altura sobre la rampa.
Otra variación de esta pregunta es…
“Quiero tener la proyección de imagen de horario MusicMaster que coincide con los ritmos de la música en cualquier lado”.
Puede utilizar los mismos pasos para igualar tempos de proyección de imagen de la canción que sigue. Y si usted está utilizando un campo atributo-Combo o atributo-In/Out para Tempo, puede en realidad probar hacia adelante y hacia atrás… que forma el primer código del campo es el principio y el último código del campo es el final. Por ejemplo…
Los códigos son S, M y F para lenta, media y rápida. En un campo de atributo-In/Out, tus canciones sería SS = lento In/Slow Out, SM = lento In/Medium Out, SF = lento In/Fast Out, MS = medio In/Slow hacia fuera y así sucesivamente. Luego se establecería su transición rejilla de protección así:

Tenga en cuenta que estamos probando hacia adelante y hacia atrás. Esto le dará el efecto deseado de barrido. Tiene dos canciones programadas con imágenes entre. La primera canción termina lento, la segunda canción comienza rápido. Cuando MusicMaster parcelas el pedazo de imagen en el medio, elegirá uno con un tempo de SF, así el imager empieza lento y termina rápido, barriendo perfectamente entre los dos elementos de la música!
Nota: Con un campo de atributo-Combo, sigue protección sólo mira el primer y último código. El código de medio se utilizaría en otras normas aplicables a ese campo.
Hay un montón de maneras que usted puede poner la regla de protección Segue a utilizar: Año Clave armónica intros, amenos, y mucho más. Si usted tiene preguntas, usted siempre puede conectar con su música Programación Consultor de respuestas.
Tres Lecciones Importantes Para Cuidar De Su Base MusicMaster Publicado por Jesus Rodriguez en febrero 18th, 2011
Por Marianne Burkett
Los clientes se ponen en contacto con conmigo para todo tipo de razones. Echemos un vistazo a los tres escenarios diferentes.
Scenario A:
El programa no responde normalmente a los comandos. Un paseo por el escritorio el lunes por la mañana y tratar de abrir la base de datos y recibir este mensaje:
 La primera cosa a hacer cuando vea este mensaje es para comprobar el Administrador de tareas de Windows. Si no está seguro acerca de cómo abrir el Administrador de tareas puede pulsar ” Control-Alt -Delete” simultáneamente y se. También puede hacer clic con el botón derecho en cualquier espacio de gris en tu barra de tareas y usted lo encontrará en el menú emergente. Una vez que haya abierto el Administrador de tareas, consulte la ficha Aplicaciones y ver los programas que se están ejecutando. Puede ver MusicMaster ejecutando dos veces.
 Simplemente cerrar ambas instancias utilizando el administrador de tareas. Si tu red tus datos, asegúrese de que nadie en la red es acceder a la base de datos. Si necesario, compruebe en el administrador de tareas de cada estación de trabajo capaz de abrir la base de datos. Después de que esté seguro de que nadie acceda a la base de datos, abrir MusicMaster y ejecutar herramientas y depuración. Si eso no sube claros errores, comuníquese con su asesor de programación de música.
Scenario B:
Cierre MusicMaster mal durante una sesión de programación. Si por alguna razón, usted se encuentra en el medio de una sesión de programación, que se ejecuta en el programador automático o editar los registros y experimenta una interrupción súbita de la alimentación o el equipo se bloquea y tiene que reiniciar. Esto puede causar errores en la base de datos. En la mayoría de estos casos, usted tendrá que llamar a su música Programación consultor de inmediato o restaurar la copia de seguridad más reciente. Esta es la razón por la que siempre hacen hincapié en la importancia de hacer copias de seguridad diarias de la base de datos. Con es -crear una copia de seguridad estándar. Sólo intenta realizar copias de la base de datos está siendo accedido por un usuario.
Scenario C:
La base de datos es hinchada e inactiva. No hay ninguna manera políticamente correcta de poner esto, pero si no Purga Automáticamente su historia del tronco, su base de datos crecerá como alguien en “Toda la Dieta de la Comida rápida. ” Más grande se pone, más despacio funciona. Compruebe sus configuraciones predeterminadas en la Historia Dataset-Schedule-Purge y asegúrese que se pone a “Automáticamente Purga. ” En ausencia, lo ponemos en 90 días y 8 historias de la canción.
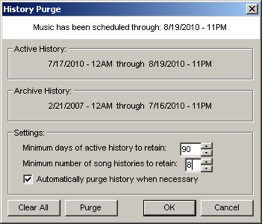 Depende de usted. Mientras aumenta el número de días (estos son los registros que se puede acceder mediante el Editor de programación), su base de datos será más grande. Purgar registro historias significa simplemente que se archivan sus historias de la canción. No pierdes tus historias!
No recomiendo tener menos que 20 días de los registros de activos. Cuando se ejecuta su purga de la historia, no interrumpa el software. Puede parecer que no está funcionando, pero sea paciente y permite la purga procesar. Una vez completada la purga la utilidad va a desaparecer. En ese momento, ejecutar herramientas de purga para conseguir la base de datos hasta su tamaño óptimo.
Comprender cómo cuidar a tus bases de datos, haciendo copias de seguridad diarias y tomando adecuadamente su sistema Windows producirá la salud en general sin problemas para la programación de música. Si usted tiene alguna pregunta o inquietud, no dude en contactar al equipo de soporte en MusicMaster.
Volúmenes De Ventas Ideales Publicado por Jesus Rodriguez en febrero 1st, 2011
Por Drew Bennett
Digamos que usted tiene la rara oportunidad para modernizar totalmente su base de datos. Has estado pensando en nuevos relojes y rotaciones y quieres empezar a traer mejores rotaciones a su estación.
Cuando se trata de programación musical, los relojes son ‘donde sucede la magia’. Si usted tiene grandes relojes que alientan una rotación natural de su categoría, sus reglas pueden ser allí como una red de seguridad y no como una solución. Su objetivo debe ser lograr la perfecta rotación en el plano del reloj. Muchas veces, relojes no están dando la rotación que necesita. Reglas que impiden ojo-llagas, como armónicos y apilado, están ahí solucionar un problema que necesita ser abordado en los relojes ellos mismos (y no necesariamente el árbol de la regla)
Al comenzar el proceso de construcción de relojes que logran estas rotaciones perfectas que buscas, MusicMaster tiene una herramienta simple pero muy eficaz para ayudarle a crear grandes relojes. Se llama la calculadora de facturación y usted lo encontrará en el análisis.
 Cuando llegues al análisis, mira el centro de la pantalla a la derecha y verá un grupo de iconos. La calculadora de volumen de ventas ha sido marcada en el ejemplo anterior.
Digamos que usted tiene una categoría de 27 canciones y quisiera que suba con relojes que alcanzan la rotación perfecta para la categoría. ¿Cuántas veces debe pedir la categoría en una hora? La calculadora de volumen de ventas le ayudará a averiguarlo.
 En el ejemplo anterior, entramos en el número 27, en el conteo de ranura del campo porque es el número de registros que tenemos en la categoría. Para encontrar información de facturación básica para esa categoría y para ver cómo nuestras canciones girará durante todo el día, vamos a entrar el número promedio de veces que tenemos la intención de llamar para la categoría en un reloj. En este caso, entramos a 2 en el campo promedio por hora. Ahora, podemos haga clic en el botón calcular a la derecha del volumen de negocios medio campo y descubrir cuál será el volumen de negocios promedio de la categoría. MusicMaster mostrará una representación gráfica de la rotación de la categoría en la parte inferior de la calculadora de facturación. En el ejemplo anterior, nuestros 27 canciones giran perfectamente mientras hacemos un llamamiento para la categoría dos veces por hora. Esos valores se pueden cambiar y ajustados hasta que se logren rotaciones perfectas.
Una vez que están armados con el número de canciones tiene una categoría de que la calculadora de facturación está ahí para que usted pueda determinar cuántas veces tienes que llamar para la categoría en un reloj y durante todo el día en la red de asignación.
Cuando tienes rotaciones perfectas para comenzar con, las reglas se convierten en una red de seguridad y que pueda centrarse en la creación de normas que la desarrollan el espíritu y el sonido de su estación de radio en lugar de aplicar reglas que fijan las rotaciones imperfectas en el nivel de reloj.
La calculadora de volumen de negocios es un simple pedazo de software pero demostrará ser inestimable en su búsqueda para rotar sus canciones la mejor manera posible.