MusicMaster Blog
Extra Category Information for Infobar Publicado por Webmaster en julio 31st, 2017
By Jerry Butler
MusicMaster offers so many tools to customize what you see in your database. From specific fields and colors to window layouts and more. Many programmers have the infobar showing in their view allowing you to easily see all categories and category groups.
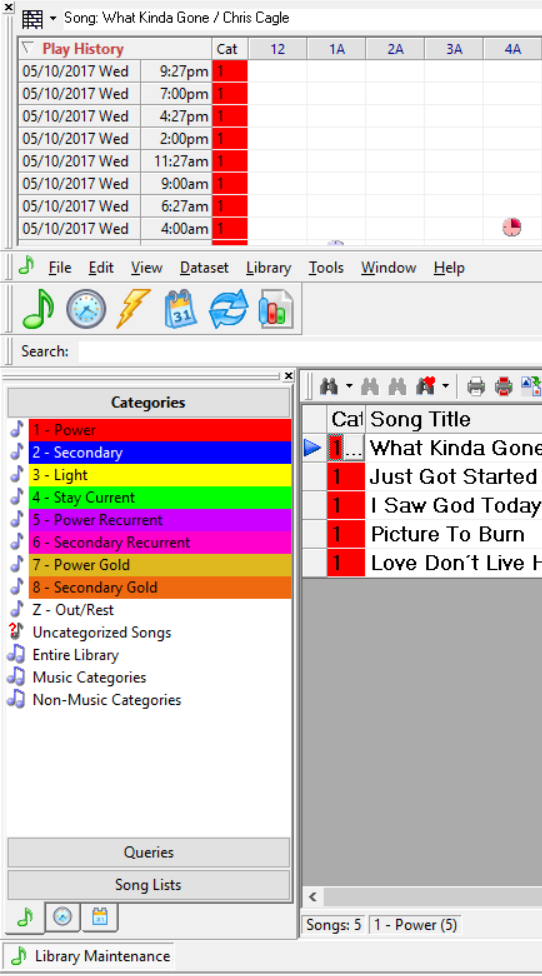
Did you know that you can also see specific information about each category? By clicking on Tools, Options and Library Editor Options, you can choose from three different options to show in your Infobar concerning your categories. You can show song count, slot count or average run time.
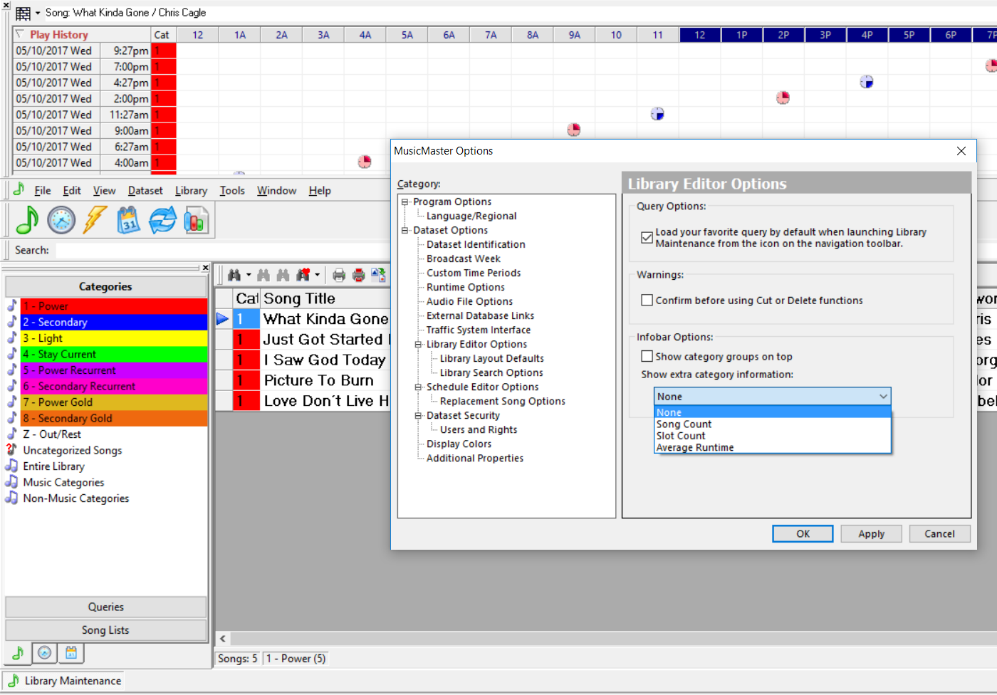
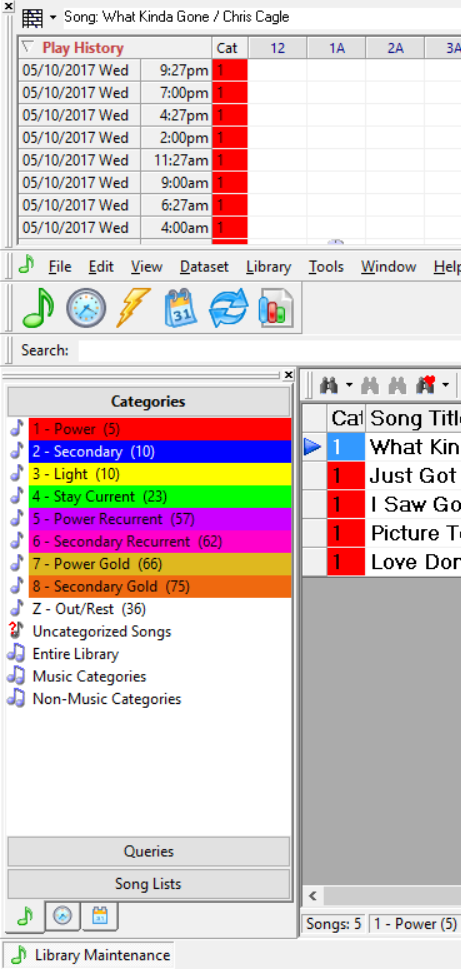
Select what you would like to show and click OK. I picked slots. You can see those numbers in parentheses after the category name.
Happy scheduling from MusicMaster!
Coding Music: Make It Your Own! Publicado por Webmaster en julio 17th, 2017
By Drew Bennett
When I was young and just learning to program a day’s music log, my main issue was not being aware of what I needed to know about the music I was scheduling. Sound codes, Mood, Tempo, Type and Texture were mostly foreign to me. I can sit here and remember working on the DOS-based version of MusicMaster at KNNC in Austin, TX and thinking back then, “I guess I’ll just schedule this music the way the other guy showed me and then fill in these unscheduled positions and…done.” I bought my first PC in 1997. I got serious with learning about computers and the software I used at work every day. A majority of my time was spent reading the MusicMaster-DOS manual and that began my journey toward a passion for the science and art of music scheduling. Sound codes, Mood, Tempo, Type and Texture became my main daily focus. As a result, I listened to music differently than ever before.
My point is that I began to pay attention. I developed a personal sense of music and what made songs slow or fast, pop or rock, etc. I have my own opinions about what constitutes a sad song or a happy one. You do too. That personal sense of attributes that apply to a song needs to be in your music library if you program a radio station. If you landed a new job as the PD or MD of a heritage station in your favorite city, what would you do with the music when you got there? It might also be a good idea to ask what the last guy did with the music when he got there, too. How many programmers have touched this database in the last few years? Who uses this database day-to-day? Does a consultant have access to it? Do they make changes? These are big questions you should ask when you walk into a new situation at a radio station. You’d be surprised to learn that these questions are rarely asked by programmers and many times, databases are filled with data that’s been inputted by the last four or five programmers that worked at the radio station.
When you are tasked with a new job of scheduling music at a radio station, your first line of business after filling out a direct deposit form is to get into the database and make it your own. Take the bold move of wiping out every attribute in each song card and start over. If “Faithfully,” from Journey is a slow song, you need to have been the one who decided that and coded the song. If you do not, you are relying on the opinions of others to program your radio station. It’s as if someone is living with you in your own house! Perhaps not, but it is bad data. It is not yours and it could affect your music logs in a negative way.
To remain consistent with your music, it is a good idea to keep a one-sheet about your database. In that document, list coding examples in song cards and helpful notes about clocks or other areas you might use like Gold Recycling.
Slow Tempo = “Vision of Love” – Mariah Carey.
Rock = “New Sensation” – INXS.
“We use Migrating Positions during the afternoon to keep variety in the quarter hour between our ’60s category and our ’90s category.”
“Category P uses Gold Recycle. We pick up at 9am for 8 hours and we drop off at Midnight for 5 hours.”
You will save time exploring the software if your notes are thorough and you will help programming assistants and/or consultants get around the data if they need to review your work.
Making the database your own by coding every record yourself and keeping notes about your database for quick reference is the best way to keep good data and a tight ship in the programming department. Here are some extra tips to consider as you get started:
Clone your existing database and make your changes there. That way, you can keep a music log going in the original data and you can trade the old data for the new data when you are done. The idea that you can make mistakes in copied data is also a plus. Once you are done re-coding the data, think about a review of your rules and how they may need to be changed to adapt to new coding.
Happy scheduling!
To Tag or Not To Tag? Publicado por Webmaster en julio 3rd, 2017
By Jesus Rodriguez
Recently I took a three hour road trip to a music festival and being the radio nerd that I am I took this opportunity to scan the dial and even some radio apps. I am around music 24/7 (at least it feels like it). I get away from it by listening to talk radio, specifically comedy channels. I love providing enjoyment to people in the next lane seeing me drive alone in my car looking like a crazy guy laughing about absolutely nothing in their eyes.
What I may say to some may seem like blasphemy and to others may make sense. If tagging music (have a recorded intro or backsell) is your thing then cool more power to you. It is super easy to do within MusicMaster. This blog is not about how to tag songs but if that is what you are looking for you may want to stop reading, click below, and enjoy yourself before I burst your bubble.
If you decided to keep reading and you are a fan of tagging music, you may want to take a seat first. Disclaimer, the station I am criticizing is that of a non-MusicMaster client.
Years ago before RSS Feed in cars, radio in car applications, and even before smart phones, I also was a tagger. I thought we were geniuses to be able to tell the listener quickly what was the song they just heard. It made perfect sense especially for new songs. Let’s be honest no one wants the on air personality opening the microphone to back or front sell every song. SO MUCH CLUTTER!
Well I found myself listening to this particular channel and they tagged every single bit. I get it. I may want to know who that was and maybe download the CD or TV special. However, unlike a music channel where songs can last a few minutes the bits ranged from about 60 seconds or less. That means there was a tag every 60 seconds or sooner. Now from a listener perspective what if your jock opened the mic every 60 seconds or less would you be ok with that? Ugh, NO!
How are your listeners going to know what new song or bit that was? Friends, look around you as I did on my drive. I thought to myself is all that clutter really necessary as I am staring at my cars panel which clearly tells me what song, artist, or in this case comedian that was just now? I bet your station has an app and I bet there is a most recently played tab. A P1 listener will find what they need but me the guy taking a drive enjoying your station punched out because of all the clutter. Instead of all those tags the station could have easily added up to five more bits in that hour. Maybe sticking to the less is more mentality would help them.
Have a different opinion? Comment and share your thoughts.
Artist Separation in MusicMaster Publicado por Webmaster en junio 19th, 2017
By Marianne Burkett
One of the most common support calls I’ll get with a new user is a sudden issue with Artist separation.
There is a difference between the Artist field and the Artist Keyword field in MusicMaster. The Artist field is used to describe the artist or artists that are on a song, all in one line. This field is not typically tested in the rules. As an example, I will use a group of established rock artists that gathered in the late 80s and recorded a few albums together: The Traveling Wilburys. Among the members of the band were Roy Orbison, George Harrison, Tom Petty and Bob Dylan. In the Artist field on a Traveling Wilburys song, you’d likely just put “Traveling Wilburys” or your paper log and on-screen display in automation would read like a novel. However, the Artist Keyword field would have multiple entries on different lines as shown in the illustration:
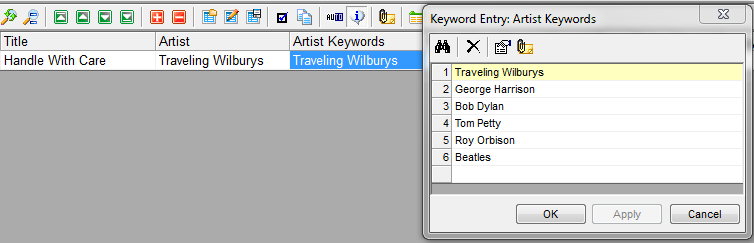
The on-screen display in your automation system would read “Traveling Wilburys”, but when you run the automatic scheduler to get your logs ready to air, you’ll have artist separation rules looking at the six separate keywords listed in your artist keyword field. Note, I added Beatles to the list because of George Harrison’s involvement in the song. (You probably wouldn’t want a Beatles song scheduling right next to a song featuring George Harrison. Of course, that is entirely up to you.)
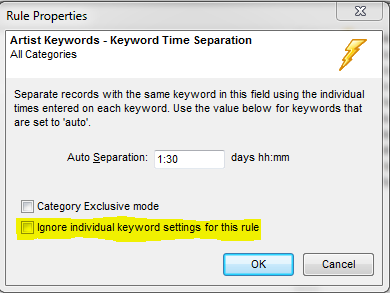
Artist Keywords are necessary in MusicMaster if you want artist protection. Great care should be taken with your keywords. A typo or differently spelled keyword will not protect your artist! You will also need to install Artist Keyword Time Separation rules in the Rule Tree to determine your “overall” or “auto” setting. As with life, not all things are created equal. If you have a 90 minute time Artist Keyword time separation rule installed in your Rule Tree, this will apply to ALL of the artist keywords you have, unless you’ve created some unique or individual time separations. There are a few different ways to do this:
- As you create the new keyword a “New Keyword” box will appear:
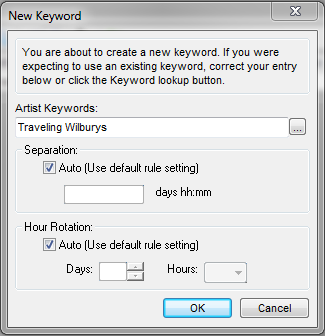
From here you can either leave the Auto setting alone or deselect the setting and physically type in the actual time you’d like to keep the keyword apart.
I’ve opted to put a 1 day 5 hour Artist Separation on The Traveling Wilburys because they only have one song in my library and I don’t want it to come up for consideration while Auto Scheduling as much as say, Tom Petty who is a core artist. Yes, Tom Petty is in the group the Traveling Wilburys, but his time separation can be different. Every keyword can have a unique time separation.

The second way you can setup unique Artist Separation times is to go to Dataset/Library/Keywords/Artist Keywords
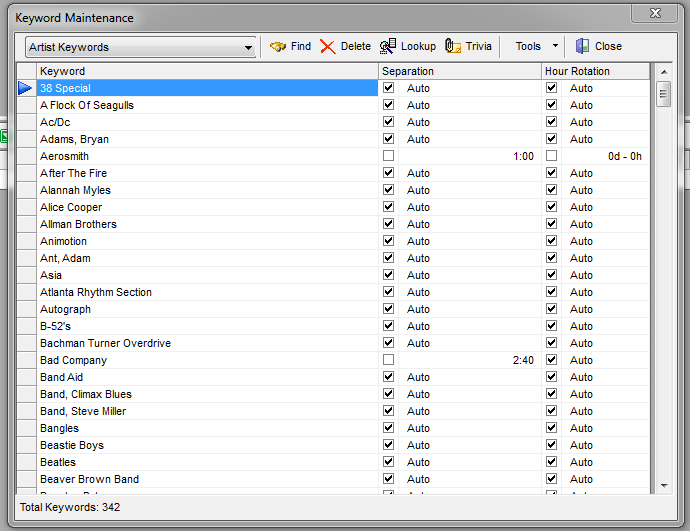
You see I have a list of the keywords in my library and most of them say “Auto”. That’s okay because the setting in the rule tree is the “Auto” setting at 90 minutes. You’ll see Aerosmith, a CORE artist has a 1 hour time separation because we play a lot of Aerosmith in several categories. I need that lower time so their songs have a chance to schedule. On the other hand, Bad Company has a 2 hour and 40 minute time separation because I just have a handful of their songs and I want to try and have them schedule further apart so they don’t all play in one part of the day. Make sense?
We do have a Keyword Separation Wizard in the Tools Section of Keyword maintenance and I encourage you to explore that. It will give you recommendations, but only you will have the final say on whether to accept those recommendations or not. Individual time settings override the setting in the rule tree unless you’ve opted to ignore individual keyword settings.
 If you have any questions or are unsure about Keywords and Keyword Rules – be sure to contact your Music Scheduling Consultant.
Time-Saving Music Log Reports Publicado por Webmaster en junio 5th, 2017
By Drew Bennett
Today, it’s tough to juggle everything you need to juggle at the station. Even the music department can be something you explore to find ways of saving time. One of those ways is to build reports and run them against a log you scheduled to make sure everything looks good before sending it on to automation. In today’s tip, I’m going to talk about the reports you should run before sending any music log to air.
Maria Miller joins ON AIR as Sales Assistant Publicado por Max Müller en mayo 30th, 2017

MusicMaster’s international distributor ON AIR welcomes a new team member! Maria Miller joins the global MusicMaster family as Sales Assistant based in Berlin, Germany.
Maria started her professional career with an apprenticeship as a Commercial Assistant in Business Administration. Before she joined ON AIR, she was engaged in customer service for numerous large companies. Maria is very passionate about communication with people, whether by telephone, email or personally.
Having grown up bilingual, she speaks Russian as perfect as German. Вот это да! Naturally, English also works fine. Maria’s big passion, besides languages, is music – a passion she was practically born with: her mother is a music teacher, her father plays viola in the Berlin Symphony Orchestra and Maria herself likes to play the piano whenever she gets a chance.
MusicMaster 6.0 SR-4 Available Publicado por Webmaster en mayo 23rd, 2017
The latest service release for MusicMaster 6.0 is now available. This new update contains the latest round of corrections and enhancements. Here are a few highlights: A new navigation update allows you to use CTRL-[ to move the cursor back to the previous cell in most grid-based screen. After you’ve done that, CTRL=] will return you to where you were. In the Schedule Editor, clicking on the upper-left corner cell will select all rows will be selected. Select multiple songs and use the context menu option in Library Maintenance to add them all to the Player Playlist. Nexus improvements include performance improvements to the getAttributes command as well as additional information being returned when using the getSchedule command with the mergeTraffic property. Various other updates and improvements are also included. Use Help, Check for Updates to upgrade to 6.0 SR-4 today. Contact your Music Scheduling Consultant if you need assistance installing this version or have any questions about the new update.