by Chris Hulsether
So, you’re ready to dive into user and role management in MusicMaster CS? Awesome! Whether you’re a radio programming pro or just got roped into „admin duty,“ this guide will help you breeze through setting up users and roles like a boss.
Let’s break it down step by step (no tech degree required!).
First Up: USERS
This is where you create and manage the people who will use MusicMaster CS. Think of it as building your team’s backstage pass. But hold up—you can’t assign permissions to users until you’ve created Roles first! So let’s talk about that…
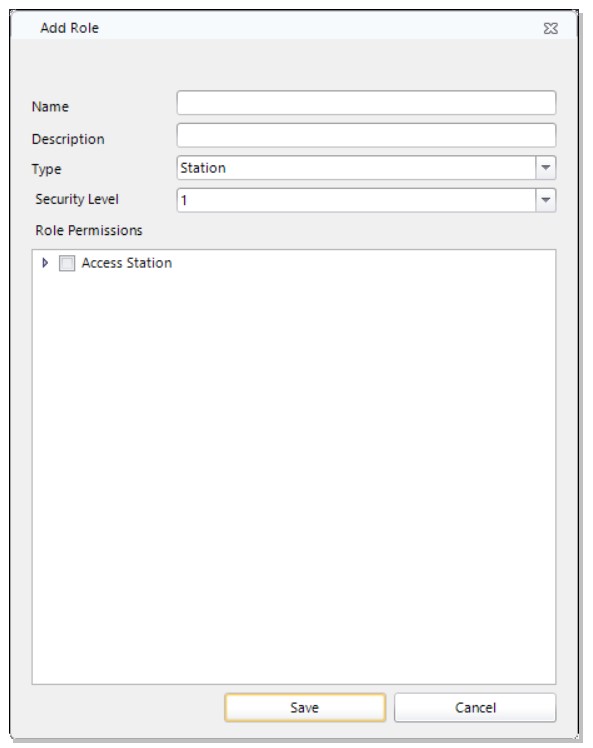
You will get an Add Role box where you will have a drop-down listing the available Roles. You can then determine which Stations the user will have access to. I will have more on how to create Roles in a moment!
What Are ROLES?
Roles are collections of permissions. You can think of them like job titles—“Program Director,” “Music Scheduler,” “Super Admin,” etc. Instead of assigning every little permission one by one to each user (ugh, tedious!), you bundle up what they can do into a role and assign it in one shot. Boom. Efficiency.
Oh—and here’s the cool part: Roles are cumulative. That means if you give a user more than one role, they get the combined permissions of all those roles. Double win!
I have more on Roles in a little bit, now back to adding a new user!
Adding a New User
When you open the user section, you’ll get a screen where you can fill in their basic info (name, email, username, password—you know the drill).

Once you click Add, you’ll be prompted to assign a role. You can pick the station(s) they should have access to, and the role(s) they’ll rock in those stations.

Bonus: You can assign multiple roles to one user! For example, Jeff might be the Programming guru at MMCS-FM and also the Music Director at MMCS-AM.
As you add roles, the Permissions panel will update to show everything the user can do across all their roles. It’s a live, running list of what kind of power they have.
Enterprise vs. Station Roles
There are two types of roles:
- Enterprise – system-wide access
- Station – station-specific access
Each permission shows up color-coded (green, yellow, red) so you know at a glance what they can and can’t do.
Role Options in MusicMaster CS: Who Does What?
So you’ve got users, and now it’s time to assign them some superpowers a.k.a. Roles. In MusicMaster CS, there are two types of roles: Enterprise (big picture stuff) and Station (focused, boots-on-the-ground tasks).
The cool part? Remember, Roles are cumulative—give a user multiple roles, and they get all the permissions combined. Like stacking power-ups.
Here’s a breakdown of what each role can do, divided into two neat lists for your scrolling pleasure:
Enterprise Rights
|
Category
|
Permissions Include
|
|
Enterprise
|
Add/Delete/Edit Automated Tasks, Create/Restore Backups, Edit Enterprise Config, View Logs, Subscribe to Notifications
|
|
Library
|
Add/Edit/Delete Songs (Music & Non-Music), Edit Categories, Queries, Keywords, Attributes, Export & Print Songs
|
|
Field Editor
|
Edit Display Name
|
|
Move Songs
|
Move songs across categories or between Music/Non-Music
|
|
Scheduler
|
Automatic Scheduler access
|
|
Stations
|
Add Stations
|
|
Users
|
Add/Edit/Delete Users and Roles, Import/Export User Lists, Set Passwords
|
Station Rights
|
Category
|
Permissions Include
|
|
Clocks
|
Add/Edit/Delete Clocks and Lognotes, Assign Clocks
|
|
Shows
|
Manage Shows
|
|
History
|
Purge or Archive History
|
|
Library
|
Add/Edit/Delete Songs (Music & Non-Music), Dayparts, Trivia, Category Level Assignments, Chart Editor
|
|
Field Editor
|
Edit Display Name
|
|
Move Songs
|
Move songs across categories or between Music/Non-Music
|
|
Print Songs
|
Yep, you can print ‘em too
|
|
Reports
|
Add/Edit/Delete/Run Reports, Configure Restricted Report Options
|
|
Rules
|
View/Edit Rule Trees
|
|
Scheduler
|
Auto Schedule Music & Non-Music, Export Logs, Shift Assignments, Clone/Delete/Insert Elements, Modify Traffic or Lognotes, Pre-Schedule Logs, Reconcile, Unlock, Replace Songs
|
|
Stations
|
Create/Restore Backups, Edit Station Config
|
|
Traffic
|
Edit Spots
|
📌 Pro Tip: If a user is assigned the Super Administrator role, it overrides all other roles—kind of like becoming the DJ Jedi Master.
Need help assigning the right roles?
Your Music Scheduling Consultant is always just a message away. Reach out if you need a hand getting things tuned just right!
Manage Like a Pro
From the Manage Users and Roles screen, you can edit, clone, or delete users and roles. Want to duplicate a user’s setup? Just right-click and clone. Easy setup = more time for coffee. 
Same goes for roles—clone one, tweak it slightly, and save under a new name. Super handy when you’ve got similar but not identical responsibilities to assign.
Active Directory? No Problem!
If your team uses Active Directory, you’ll also see an option for „External Account.“ You can link their AD profile with the MusicMaster CS account. Quick and painless.


Importing & Exporting Users
Want to add a bunch of users at once? Import a .CSV file with the correct columns and boom, they’re in. You can also export the list to use in another database.
Want to Spy—uh, Check Who’s Logged In?
You can even see which users are currently logged in, when their session started, and what station they’re working on. No judgment, just transparency.

Got Questions?
If you’re unsure about anything or want some help getting your roles set up just right, don’t hesitate to reach out to your Music Scheduling Consultant. They’re awesome and ready to help you fine-tune your setup like a hit playlist.
That’s it! You’re now fully equipped to master Users and Roles in MusicMaster CS. Go forth and assign!


