
MusicMaster Blog
Don’t Pull the Plug: Why “Resting” Your Songs is Better Than Deleting posted on March 31st, 2026
by Joe Knapp, Musicmaster Founder/President
In the fast-paced world of music programming, it’s tempting to treat your MusicMaster database like a cluttered closet. When a song burns out or a “Current” loses its luster, the gut instinct is often to hit the “Delete” key and scrub it from existence.
However, in the world of professional music scheduling, deletion is a permanent solution to a temporary problem. Before you purge that track, let’s look at why moving songs to an inactive “Rest” category is the superior move for your data integrity, your reporting, and your sanity.
1. History is Valuable
Every time a song spins, MusicMaster logs a piece of data. This airplay history is the foundation of your station’s “memory.” When you delete a song, you aren’t just removing the audio reference; you are ripping out every historical record associated with that song.
- Analysis Gaps: If you run a “History Browser” report to see what your station sounded like last summer, a deleted song will show up as a “Missing” or “Unknown” entry.
- Reporting Nightmares: When it comes time for SOCAN, BMI/ASCAP, or SoundExchange reporting, having a “Swiss cheese” history file makes it nearly impossible to provide accurate, defensible logs to regulatory agencies.
2. Guarding Against “The Great Return”
Music is cyclical. You may want to restore a song that you delete today somewhere down the road.
- If you delete it: You must re-enter all the metadata (Artist, Title, Year, Sound Codes, Energy Levels) and re-link the automation ID.
- If you “Rest” it: You simply drag it from your “Rest” category back into active rotation. All your previous coding and history remain intact.
3. Maintaining “Artist Separation” Integrity
MusicMaster uses historical data to calculate rules like Artist Separation. If you delete a song by Artist X and then add a different song by Artist X a week later, the system may not “remember” the last time that artist played. This can lead to clumping and poor rotation logic because the “chain of history” was broken by the deletion.
4. Avoiding Automation Desync
Your MusicMaster database lives in a delicate marriage with your automation.
- Deleting a song in MusicMaster while it still exists in your automation system can cause “reconciliation errors.”
- By moving the song to an inactive category in MusicMaster, you keep the IDs synced without scheduling the track on air.
Best Practice: The “Rest” Strategy
Instead of deleting, create a “Rest” category that is excluded from your clocks.
| Action | Deleting | Moving to “Rest” |
|---|---|---|
| Data Retention | All history is lost forever. | All history is preserved for reports. |
| Metadata | Must be re-entered if the song returns. | Stays saved and ready to use. |
| Reporting | Causes “Unknown” entries in logs. | Maintains clean, professional reports. |
| Workflow | Irreversible and high-risk. | Reversible in two seconds. |
Bottom Line
Your database is a living history of your station’s brand. Treat your songs like assets, even when they aren’t on the air. By using an inactive category, you keep your library clean without sacrificing the data that makes MusicMaster so powerful.
Next time you’re tempted to hit delete, let it rest instead.
Save Time with Category QuickMove posted on November 24th, 2025
by Vicky James
Back In the Day… I recall years ago being in a music meeting when the process of jotting down music changes, taking them back to my office, and manually making the changes in each category was still a thing. Nowadays, you can easily access categories and instantly make moves by dragging elements to the target category using Category QuickMove. You can also make changes to the song card data here as well! This feature is ideally used in smaller categories and allows up to 8 categories to be reorganized at a time.
QuickMove is available across all versions of MusicMaster: Pro, Client-Server, and the Web Client. We’ll demonstrate it using CS.
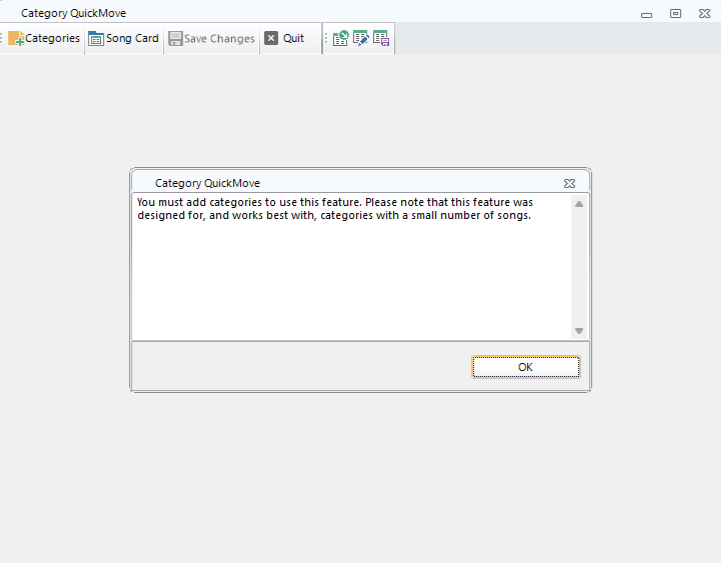
Click Dataset, Library, and Category QuickMove.
Note that the feature prompts a reminder that QuickMove works well with small categories.
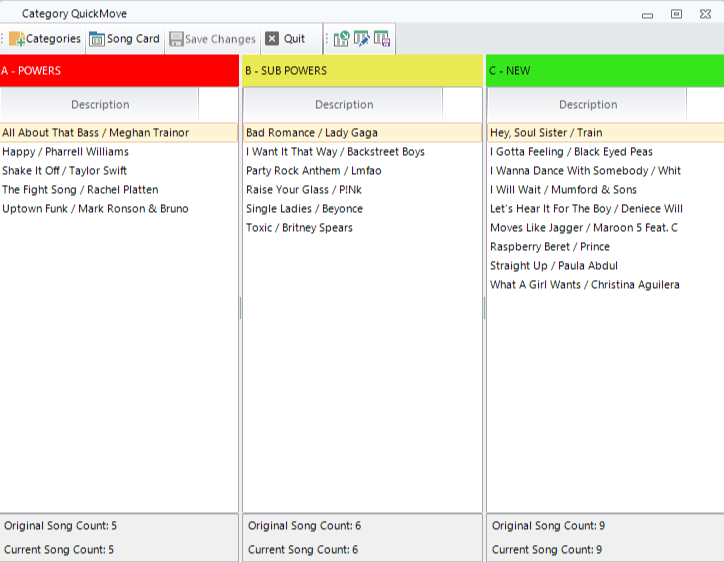
Choose the Categories that you would like to view in QuickMove. You must select at least 2 and up to 8 categories, if needed. It will populate with only the description of each element. First, we will create a layout.
Select Modify Layout and add the fields you would like to view in the panel seen above. I suggest, at a minimum, adding the Title, Artist, and IDs to the view.
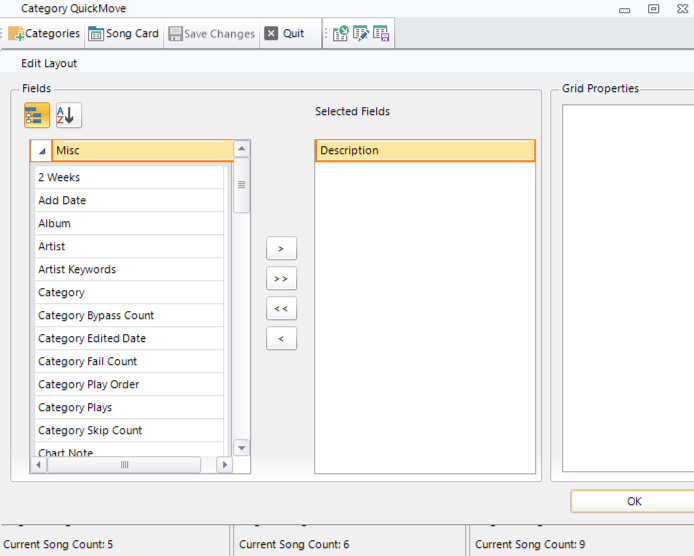
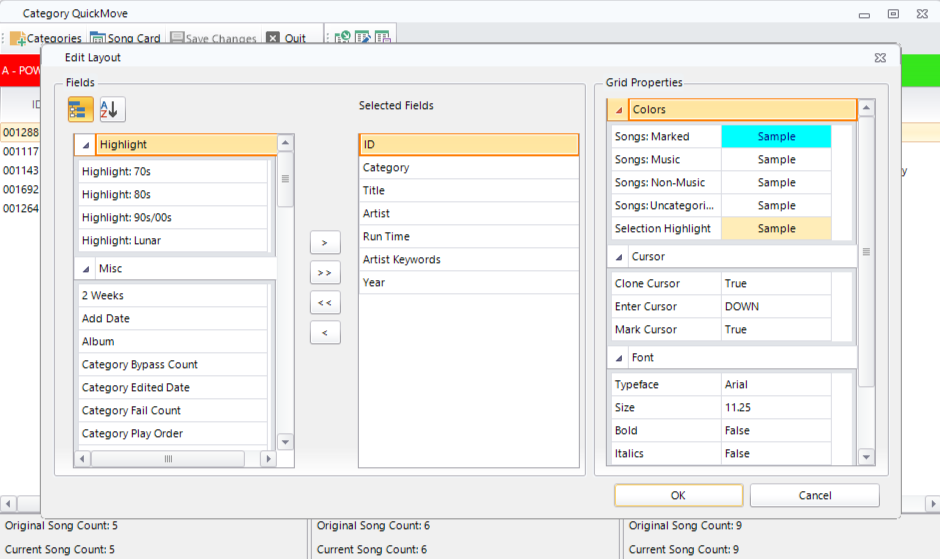
Once the layout is set, SAVE your layout.
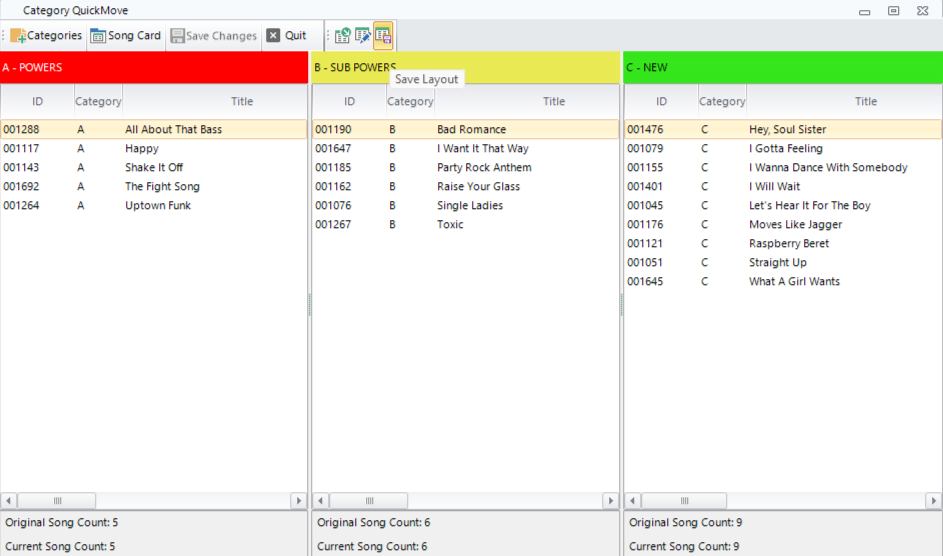
Now that the view is configured, you can quickly click and drag elements to the new category. Notice the Song Count at the very bottom of the window shows the previous category song count, along with how many songs have been added or subtracted. Since the number of songs in your category affects your rotation patterns, you may want to track these changes to keep the counts consistent.

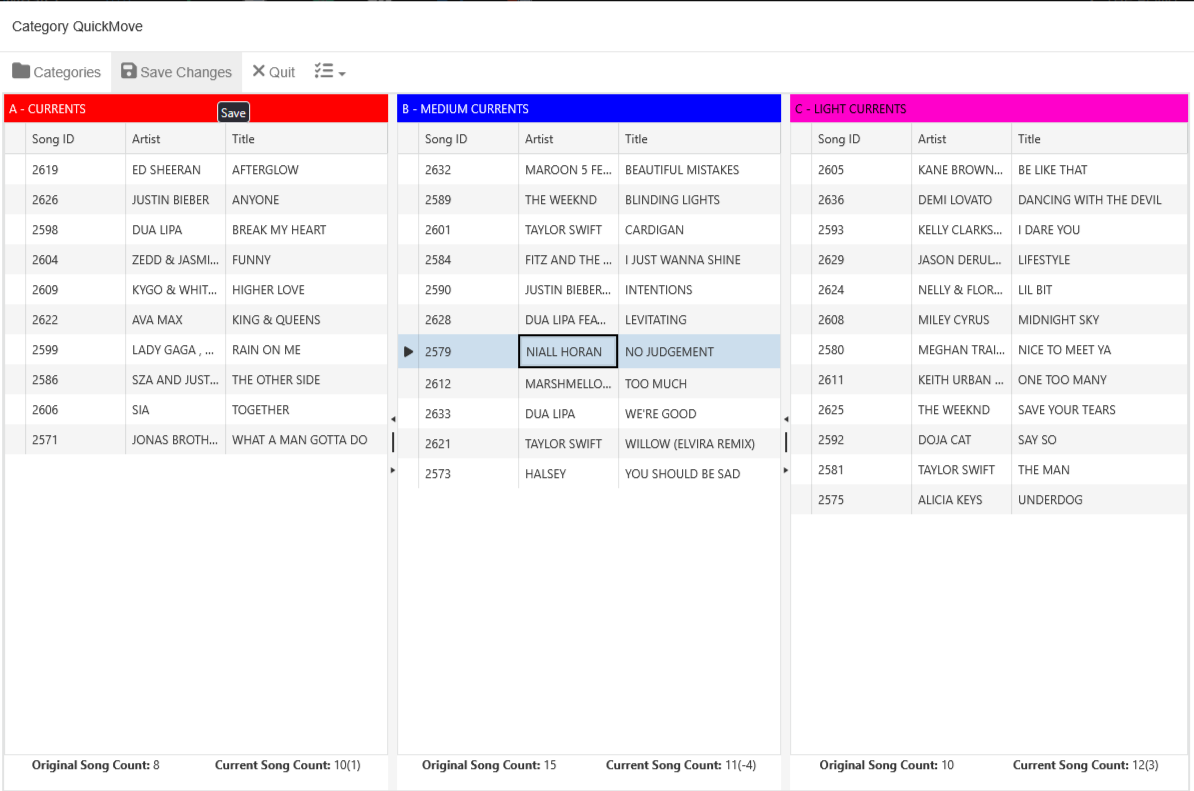
Category QuickMove is also available in the Web Client, complete with drag-and-drop capabilities!
AutoMove and AutoPlatoon in MusicMaster CS and Web Client posted on September 2nd, 2025
by Brian Wheeler
Not unlike a shopkeeper, programmers sometimes like to rotate inventory to keep things fresh. Some programmers will just move a few songs in manually, perhaps after getting research or after sensing a listening trend. But did you know there are a couple of handy tools to keep your product moving besides simply moving songs from one category to another? We’re going to discuss AutoMove and AutoPlatooning. While this feature is available in MusicMaster Pro, we’ll focus here on its use in MusicMaster CS and the CS Web Client.
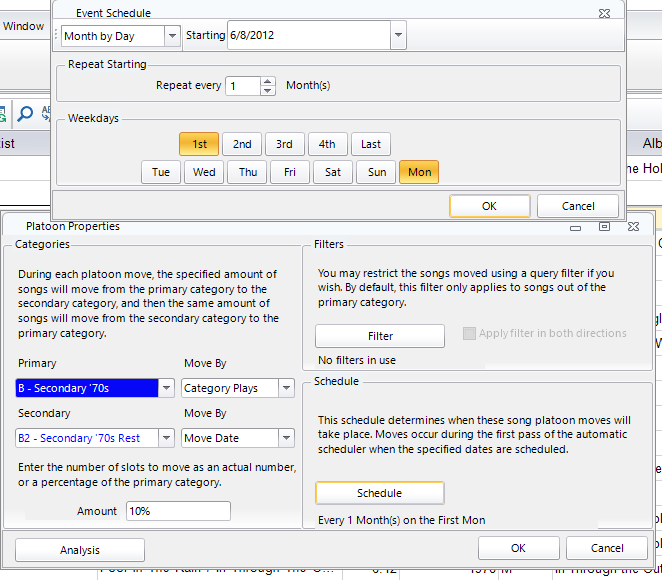
AutoMove is a tool that lets you schedule selected songs to move from one category to another after certain conditions are met. To access this feature, you simply open a category, then right click within the category. You’ll see the Move feature, which includes the ability to set up AutoMove. The premise here is that you’re able to tell MusicMaster where to move this song and when to move it. Do you want to move songs seasonally? Enter a date for the song(s) to be moved. Do you want to rest songs after they’ve played a certain number of times? Enter the number of plays that should occur before the move should happen. Here is a sample view of what you may see when setting up AutoMove in MusicMaster CS.
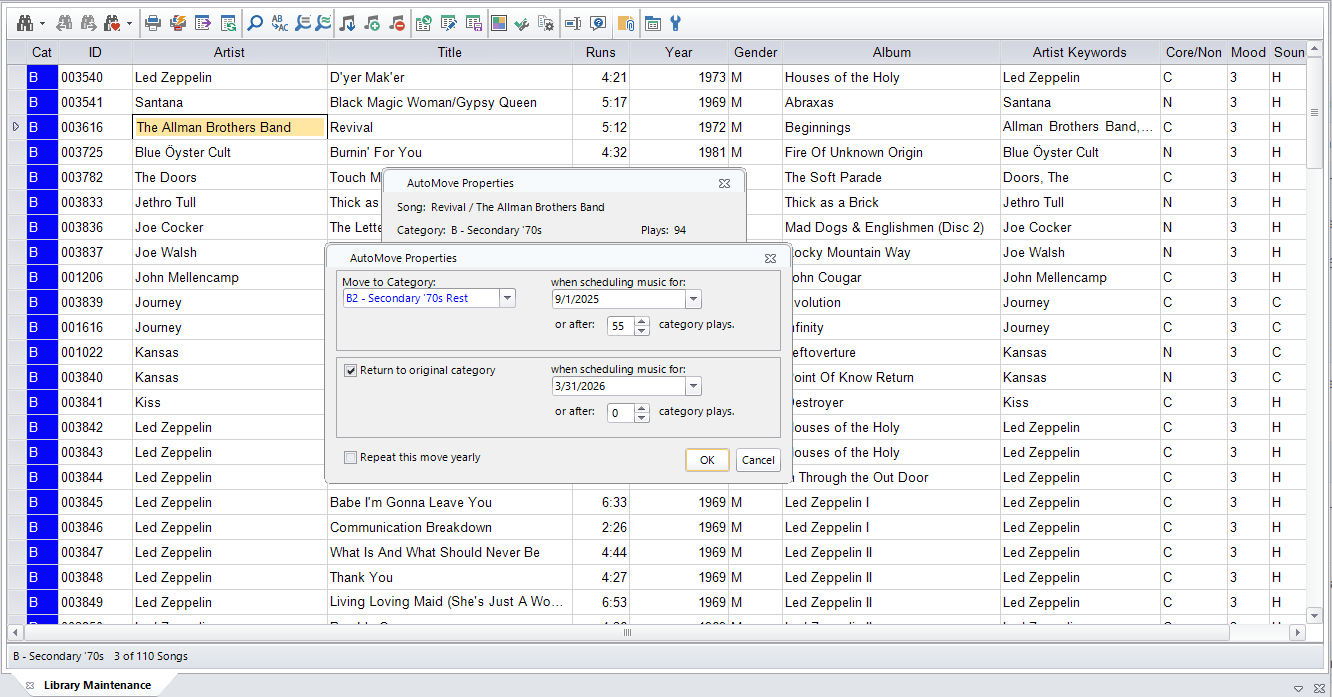
As you can see, I’m afforded the ability to AutoMove songs after x number of plays. I can also return songs to their original category by a pre-determined date. I can set up the Automove to execute these steps yearly as well.
How Automove appears in the Web Client: 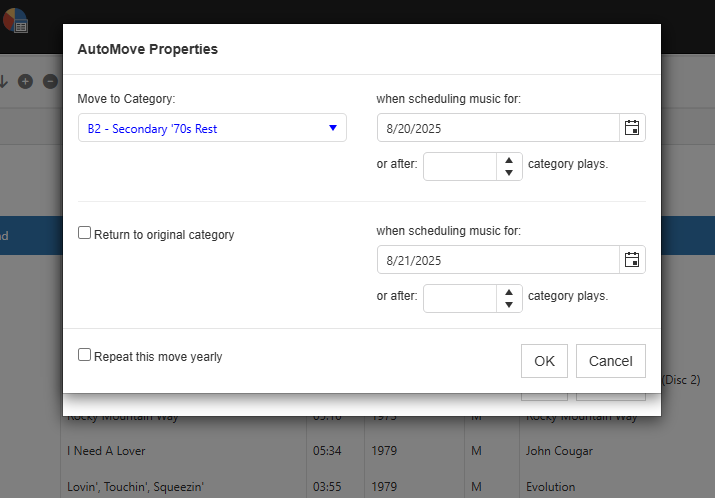
Auto Platoon has a similar capability but also enables you to set additional filters and gives you the ability to control when and how many songs get moved. In this case as seen in CS, I’ve elected to move 10% of the B category into a hold category the first Monday of each month. The songs that are chosen to move will be determined by category plays.
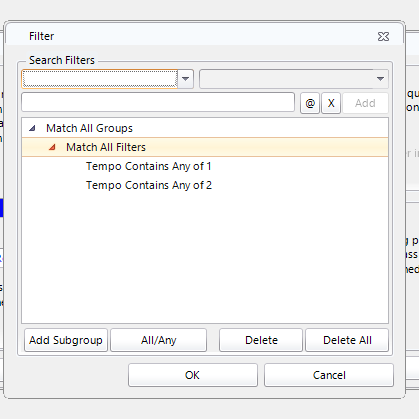
As a variation, I later chose to include a filter, only moving songs that had a tempo filter. That means that when my AutoPlatoon kicks in, the only songs that can be considered in the platoon must be slow songs (tempo 1 or 2) that occur in my active category. It’s not a commonly used filter, but it demonstrates the possibilities when thinking about how one may use the AutoPlatoon feature.
In this next photo we demonstrate another AutoPlatoon configuration seen in our Web Client. I’ve got the AutoPlatoon set to move 10 songs monthly on the first of the month. As you can see, 10 songs move into a hold category, and 10 songs will move from your hold category into the active category. This takes place when scheduling the date indicated on your AutoPlatoon settings. 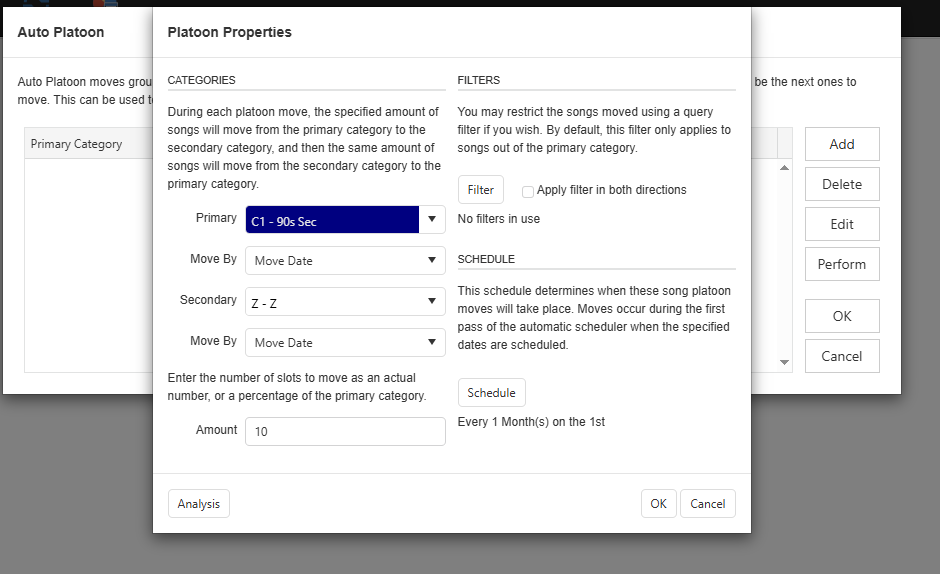
AutoMove and AutoPlatoon are two very useful tools to keep things fresh in your station. As always, if you have questions or would like to discuss these or any other features in MusicMaster, your MusicMaster Music Scheduling Consultants are only a call or an e-mail away. Reach out! Let’s talk.
Using MusicMaster to Conduct a Deeper Analysis based on Music Research Scores posted on May 29th, 2024
By Joe Knapp, President/Founder – MusicMaster
Bringing your research scores into MusicMaster lets you do a very detailed analysis that can uncover some interesting trends.

For example, I’ve found that the audience prefers songs that are not “begging” or “desperate” sounding. They prefer songs that have a “happy” or “charitable” mood. Unexpectedly, they also seem to prefer songs, at least in the oldies format, that have an “angry” tone.
Clicking on the header of each column instantly sorts the list by that field, allowing you to make comparisons and observations.

I’ve also discovered that the audience prefers medium or up-tempo songs over slow or down tempo songs. The gender of the singer doesn’t matter at all when it comes to audience favorability. There is a slight correlation between Era, however. The newer songs are preferred over the older songs, in this case being 1964-1973 versus 1955-1963.
These results, of course, will vary greatly from one format to another. But, if you’re doing music research, bringing those scores into MusicMaster is easy and quite valuable. You can learn things about your audience that you cannot see by looking at the same numbers in the research analysis software alone.
With your scores in MusicMaster, you can easily establish Rules and Optimum Goals to help the AI scheduling engine select the ideal song for each position in your log.
If you need help with this, we’re always here for you. Music scheduling is all we do, so we tend to do it very well!
(For Part 1 of Joe’s series on Music Research, view this article: https://musicmaster.com/newsletters/0224.php#coj)
“LET’S RIP IT!” Importing CD Audio & Data posted on May 29th, 2024
by Vicky James
I recently had a client who needed help with the major task of building a library, but he wanted to take it back to the sorta’ old school and use all CDs to complete the project. He was overwhelmed at the idea of how much time it could take. I asked if he wanted them ripped in no time… His answer, “YES, but how??!!!”
He had no idea that MusicMaster even had a feature to Import Audio with CD under the Tools tab. When I introduced him to the feature, he was thrilled!
I then wondered about those of you who may also have overlooked this feature as he did… Allow me to show you how!
Click the Tools. Import CD Audio. Allow the CD Audio Importer a few seconds to initialize and read your CD.

Once the Importer launches, this box should populate with data if the CD is readable. Next, select the songs you want to rip. Here in the example, all 12 songs are checked. If your CD’s metadata doesn’t automatically populate, click the Read Disk button on the lower left and nearly immediately, the metadata should appear.
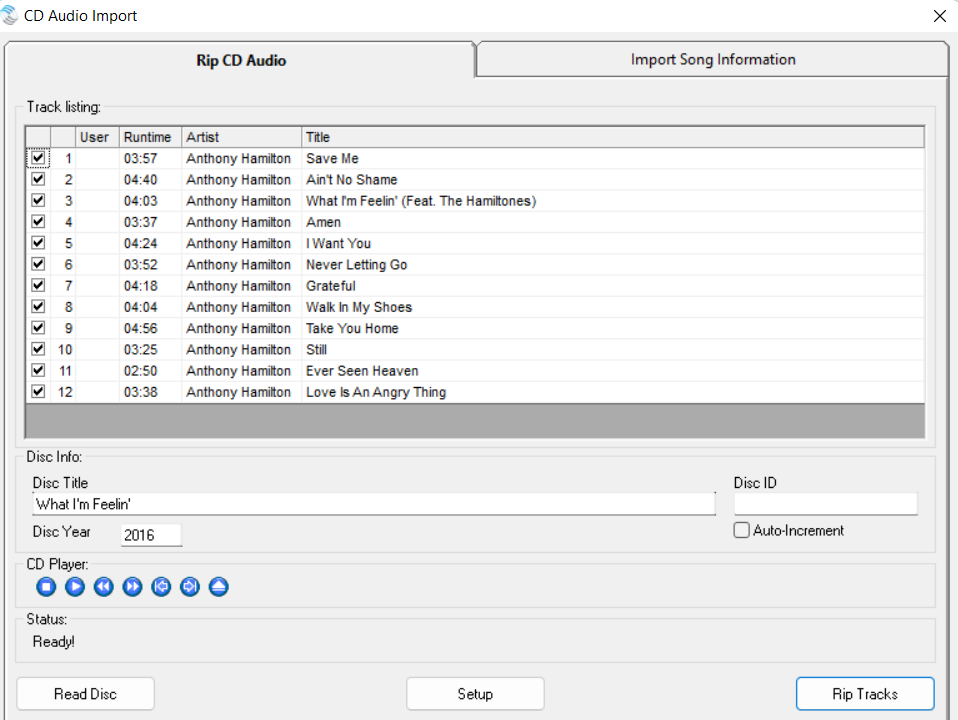
You’ll notice in the below image is the option to configure your setup, if necessary. This includes the CD drive where the disc is located. Audio Filename Format is where you specify the audio’s format as an MP3, WAV file, or if you simply want the Metadata Only. If you select the MP3 or WAV, you will be given the option to choose the channels and frequency, which is also set by default for you already. Audio Filename/ Location shows where the audio is stored and how the filename should be ingested into your filename field, if needed. In the example below, a track might be stored as Anthony Hamilton – Still.mp3. The Additional Options allows you to show the CD Player or Disc Info.

We’re getting closer to the fun part. Once you’ve adjusted your settings, selected the tracks, and reviewed the info, you’re ready to start rippin’! Click Rip Tracks and within moments, a box pops up indicating ripping is complete!

Once things are ripped, you can go to the right-hand tab to Import the Song Information directly to your database.
You will need to identify what metadata goes from the Target (the CD) to the Source (your MusicMaster database). Click the drop down option for each line needed under the Target, then next to it, drop down each line selecting the Source for the field in which you want to store that metadata in the database. Depending upon your format, you can set the target for artist to the source of your preference. For example, a Classical format may want the Target of Artist going to the Source as Composer. This is what makes this feature so resourceful for users who need to expand their library, catalog projects, or clean up songs with bad metadata.

After you’ve adjusted your settings and reviewed the sample, you can click Import and you’ll see this prompt to confirm the number of songs selected.

It’s All Done!


… and here are the imported songs in the MusicMaster database.
For more information about the CD Audio Importer, contact your Music Scheduling Consultant!
Streamlining Your Library Management with Library Sync: A Game-Changer for Ratings Success posted on May 15th, 2024
by Jerry Butler
Introduction:
In the world of radio programming, staying ahead of the curve is paramount. As program directors are now stretched thin managing multiple stations and formats, promotions, and corporate reports, time is a key element we are all short on. Programmers strive to maintain a fresh and appealing sound for their audience, but the process of managing a library can often be time-consuming and labor-intensive. However, with a properly formatted library sync, the task of refreshing your library just in time for ratings has been revolutionized. In this blog, we’ll explore how utilizing a library sync can streamline your workflow, saving time and effort while ensuring your programming is finely tuned for success.

Efficient Import of Research Numbers, Music, and Imaging:
One of the key features of library sync is its ability to import various elements seamlessly into your library. Whether it’s the latest research numbers, your competition’s spin count, new music releases, or updated imaging, a well-configured sync can ensure that your library is always up-to-date with the latest content. This means no more manual data entry, saving you valuable time and reducing the risk of errors.
Categorization Made Easy:

For program directors tasked with organizing their library for ratings, categorization is crucial. Traditionally, this process could be arduous, requiring hours of manual sorting to ensure each songs are placed in the correct categories. However, with a library sync in place, categorization becomes a breeze. By creating a sync definition file that specifies how songs should be categorized based on various criteria such as genre, tempo, or mood, you can automate this process. The result? A meticulously organized library in a fraction of the time it would take to do manually.
Case Study: Transforming Workflow Efficiency
I worked with a program director who programmed multiple stations and formats. Before implementing a library sync, he spent days preparing his libraries for ratings. Running through reports from his consultant, sorting through hundreds of songs, updating metadata, and categorizing each track was a daunting task that consumed valuable time and resources. However, with the introduction of a library sync solution, this process was streamlined. By creating a sync definition file tailored to his specific needs, the program director was able to automate the process. What once took days to complete could now be accomplished in a matter of minutes, freeing up time to focus on other aspects of programming and ensuring the library was finely tuned for ratings success. So why spend days manually managing your library when you can accomplish the same tasks in minutes? Embrace the power of library sync and take your programming to new heights.

If you want to import or update music, coding, imaging, research numbers, your competition’s spins, or just need a library refresh where all songs move to specific categories, your MusicMaster Scheduling Consultant can help you get a library synchronization file set up to streamline your process.
Some quick tips to make sure your synchronization works flawlessly:
- Standardize your reports with the same columns and format.
- Use a unique identifier – Cart Numbers work great as a unique identifier.
- If no unique identifier is available, you can use the artist and title to match, but your MusicMaster data must match your source file exactly. Just make sure your Artist and Title match your research report, MediaBase report, or report from your consultant. This can be a bit of work the first time, but the reward is worth it.
Contact MusicMaster support today to get your library ready for ratings.
Keyword Control posted on April 30th, 2024
By Dave Tyler
I say it all the time, MusicMaster is such a robust and powerful piece of software, and it can do so many things that are likely underutilized by a lot of users. I am the same way. I have a Korg keyboard/synthesizer and I always figure at some point I will get around to really digging in further to see what it can really do…but most of the time I just wind up putting it “Grand Piano” and playing for 20 minutes and I’m done. However, I know that thing has vast, magical capabilities that I don’t know about. Today we may unearth one of those for you in MusicMaster!
In the song “Control”, Janet Jackson exclaims “Control, I want a lot of it”!!! Me too, Janet. So let’s talk about keywords.
Almost all programmers will be familiar with Artist Keyword separation. It keeps the same artists from playing again for a specific time frame that we set. It is one of the most important and most used rules in MusicMaster. But did you know you can also set up “Custom” separations for specific keywords? Let’s take a look at how and why we would do this.
If you are a Classic Rock or Classic Hits station, you probably have a ton of songs by The Rolling Stones, The Beatles, The Eagles, The Doobie Brothers, ZZ Top and more. While these are certainly core artists to the format, they have so many songs that it would be easy for them to schedule in a majority of the hours in your day. Let’s say you have a general Artist Separation rule of 1 hour and 10 minutes (kind of the industry standard), then those artists would be available to schedule just about each hour. Of course, you have other rules and goals in play that may nudge them around a bit, but simply because there are a lot of them, they always seem available.
I understand we are also getting into programming philosophy here and it is completely up to you to make your station sound the way you want it, and you may want these artists to play every hour, and it might be why you are the market leader. Then again, you might not want to be known as “Rolling Stones” station and choose to stretch the time between their plays a bit more, or you may want them to play more often because they test so well in your market that you feel you can’t play them too much! If you want that level of added control, you’ve come to the right place…let’s talk custom settings.
Before we get started, it is important to note that for custom settings to work you must already have a Keyword Time Separation or Hour Rotation rule (depending on which you are making custom settings for) in place for that category (either in the All Category Rules or in that particular category’s Unbreakable rule folder).
In MusicMaster, you can go to Dataset/Library/Keywords to open the Keyword editor.
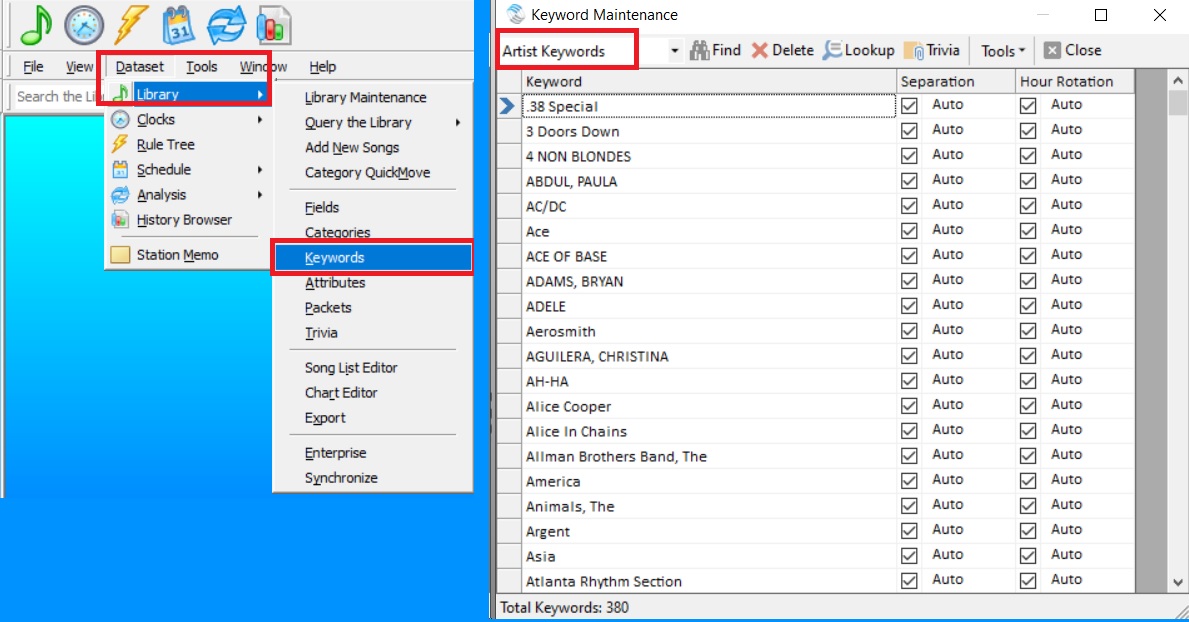
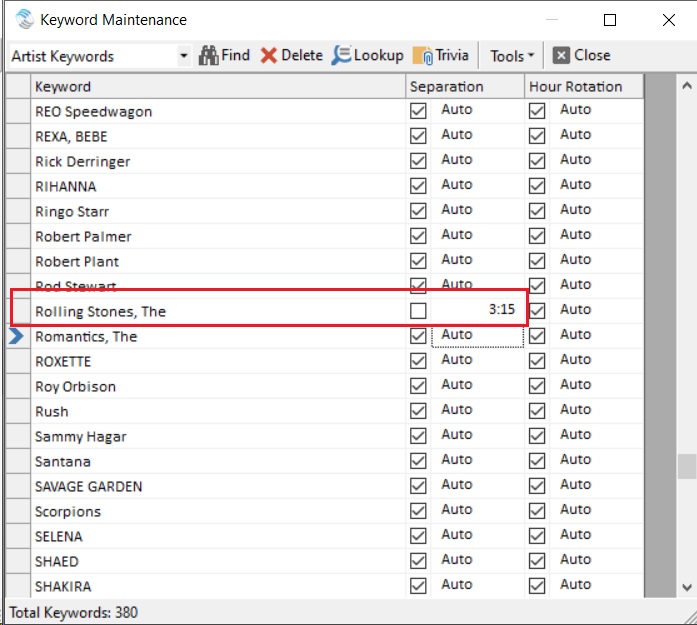
From the dropdown, I will choose Artist Keywords and then scroll down to the Rolling Stones. We see two columns to the right. One for Separation and one for Hour Rotation, and most will have a check in the box. If the box is checked this means that it is using the general overall value (in our example the 1:10 we mentioned earlier) as its time separation. If you uncheck that box, then you can set your custom time separation for that artist. In my example below I have set the Stones to a 3 hour 15 minute custom separation to keep them from playing too much. You can also use this tool to speed up the availability of an artist by shortening the length.
Another good example of using custom separations is for One Hit Wonders. I programmed an A/C station in the 90s, and I recall there being three artists that were trouble for me. Nothing against them but Dan Hartman “I Can Dream About You”, Matthew Wilder “Break My Stride” and A-ha’s “Take On Me” tested great and were an easy pass for my rules because they were all male, medium/up-tempo songs, and the fact that they were one-hit wonders meant they didn’t have any other songs to compete with. So once they met their Minimum Rest time, they were back up to the bat. Great songs, but they were getting way too much exposure. A custom time separation rule would’ve been a dream come true for me at that station!
This idea can also be used Novelty songs. A good example is Elmo & Patsy’s “Grandma Got Run Over By A Reindeer”. I remember it was about a week and a half after Thanksgiving and we were already playing a few Christmas songs an hour and we were getting calls that we played that song too much. I checked and it was literally the second time the song had played in the two-week period, but it is a polarizing song and it really needed to be relegated to a much longer rest as well as hour rotation so it wouldn’t make an appearance during the same shift. This is a good example of using a custom setting on your Title Keyword but also leads us to the other checked box: Hour Rotation.
Here is an excerpt directly from our Help section in MusicMaster that expertly explains this feature. Hour Rotation refers to the rotation of the keyword, not the song. For instance, you might configure a Keyword with a one day, one hour rotation rule. This would mean that if a song with that keyword played in the 6am hour today, no song by that Keyword would be able to play in the 6am hour tomorrow (provided the test is configured as unbreakable). This can be a very restrictive rule and is typically not placed on keywords that are core to your database.
Using these custom settings provides you with an additional layer of control over your library and the sound of your station. As always, if you have any questions just reach out to your MusicMaster dedicated representative.
Everyday I’m Shufflin’ posted on July 24th, 2023
by Dave Tyler
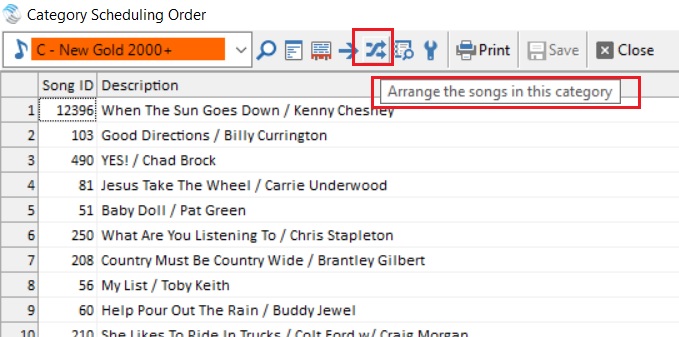
I get a call about once per week where a programmer is asking if it is possible to “Shuffle” the schedule order of a category. The answer is a big YES. To keep it simple before taking a deeper dive, to do a basic “Full Shuffle” go to Dataset/Schedule/Schedule Order and click on the “Arrange Songs In This Category” icon. You can also right click anywhere in the Info Bar and choose Schedule Order as well.
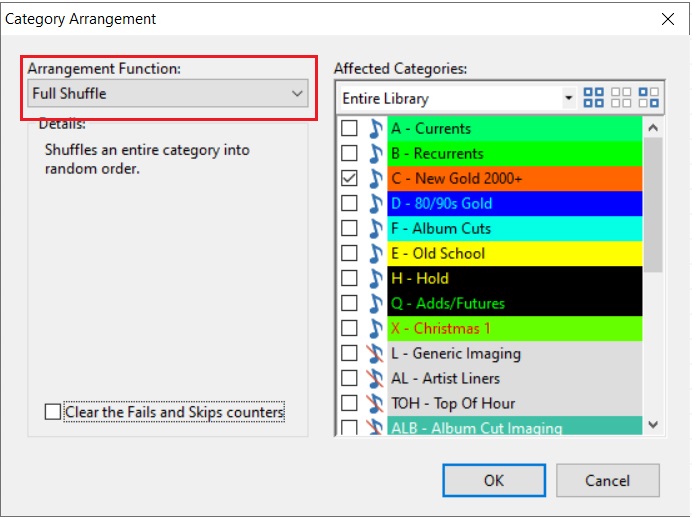
The next box that pops up defaults to the “Full Shuffle”. The Full Shuffle is simply a random shuffle of the category. Sometimes folks will choose this when they begin to sense a predictable pattern of a category and just want to freshen up the order. You can choose a single category or multiple categories.
It is important to note that if you are a song history buff and love looking at your rotations and histories and seeing that nice wave of a song moving through hours and quarter hours, that a shuffle will disrupt that pattern briefly upon the next scheduling session because the order has changed and therefore the pattern has changed. It will plane out again as you continue to schedule.
A full shuffle is kind of a generic shuffle just to mix things up, but MusicMaster offers many more options when it comes to how or what you shuffle. Clicking on the dropdown menu, you get these incredible options.

A quick look in the robust MusicMaster “Help Section” defines what each of these does.

For more information on how to use our great Help section check out this blog post: https://musicmaster.com/?p=8397
One of my favorite shuffle options is the “Optimize By Field”. If you have a new library and are adding a bunch of songs by a single artist, or perhaps your format has a huge amount of “Featured” artists on songs and it is a challenge to schedule because of this, then this is a pretty amazing feature. Using the example above, if I “Optimize by Field” and choose “Artist Keywords” it will separate all the songs by each artist as far apart from each other in the schedule order as mathematically possible. So, if you’re a Classic Rock station and just added 50 Rolling Stones songs to a category, then this will separate them from each other to make scheduling easier. My other example was featured artists on songs. Just about every format from Latin to R&B, Country to CHR is inundated with featured artists. When Optimizing by Artist Keyword, MusicMaster tries to optimize all of the artists on the song. Just plain cool! Now of course if you add 50 Rolling Stones songs, they are not going to schedule back to back even if they are in that order in the Schedule Order because of Artists Separation rules and others. But by shuffling this way, it makes the process easier from the start because the order is more natural and comfortable. Speaking of the difficulties of featured artists, here is a link to a blog with some cool ideas and solutions to deal with this: https://musicmaster.com/?p=7733
Another question I get a lot is “How often should I shuffle?”. There is not really a black and white answer to this. You don’t need to shuffle ever, but you may want to shuffle for a variety of reasons, many of which we discussed above. If you add a bunch of new music or feel like you are hearing the same songs scheduled near each in a similar order, then you may choose to shuffle. It really comes down to your philosophy and there is no wrong answer. The only thing to keep in mind is the shuffle does change the schedule order, which is what you want, but you can expect it to affect your history pattern initially. So if you see the hiccup in the pattern, it is nothing to be alarmed by.
Shuffling is just one more way MusicMaster helps you control and tailor the sound of your radio station.
Stack’em and Count’em: Numbering Song Rotation Order posted on February 7th, 2022
Stack ‘em and Count ‘em
By Chris Malone
Several brilliant mainstream format programmers have reached out wanting to zero in on the rotation of their cream of the crop Power songs and fully understand the scheduling pattern of the standard card file method in MusicMaster. Little known fact, you can establish the desired slot position, trace the slot, and even visually see AutoBurn in real time by creating a text field that serves as a numbering system for your Power Currents.
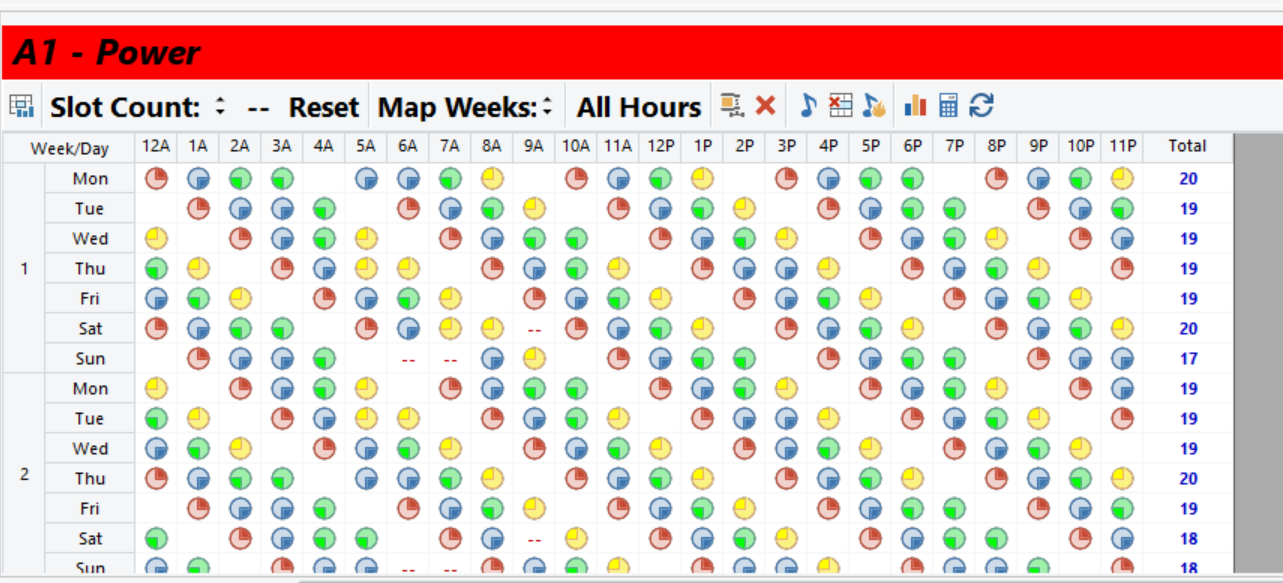
We can all agree this history graph reflects a mainstream, hyper turnover power category that looks spectacular inside the Turnover Analysis. To achieve such great rotation requires that a Power category bypass all category rules and have no specific category rules, so songs can plot in a natural order. Under Dataset, Schedule, Schedule Properties – you’ll also want a category like this to have a search depth of 1. The category order management (Dataset, Schedule, Schedule Order) should be switched to standard card file.
Now here’s where you zero in, you can create a numbering system that allows you to establish rotation position number for each song. It serves as a verification that the right things are happening as expected under the hood; furthermore, when a song is moved from Power Currents, a new song can replace that specific rotation position without disrupting the category’s natural turnover.
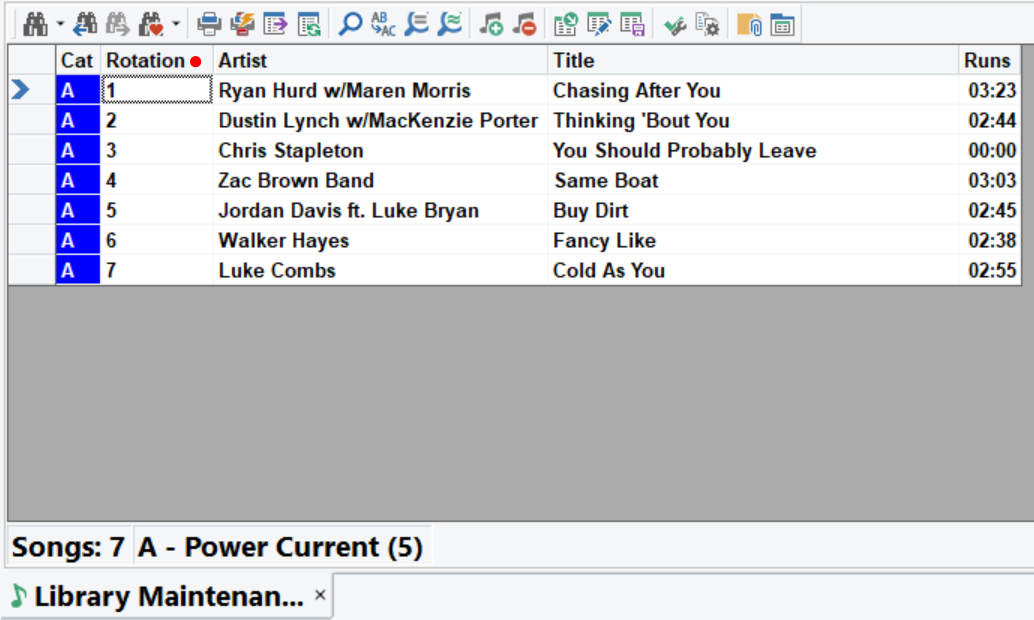
In this example, I’ve created a simple text field called “Rotation”, the songs in the category are numbered 1-7. Keep in mind this is a simple text field. There’s nothing dynamic or rule related to this field other than it allows the user to create a numbering system for these songs and create a desired stack order in the standard card file of this category. Remember, any number entered in this field will ‘travel’ with the song to any other category until the number data from that field is physically deleted or modified by the user.
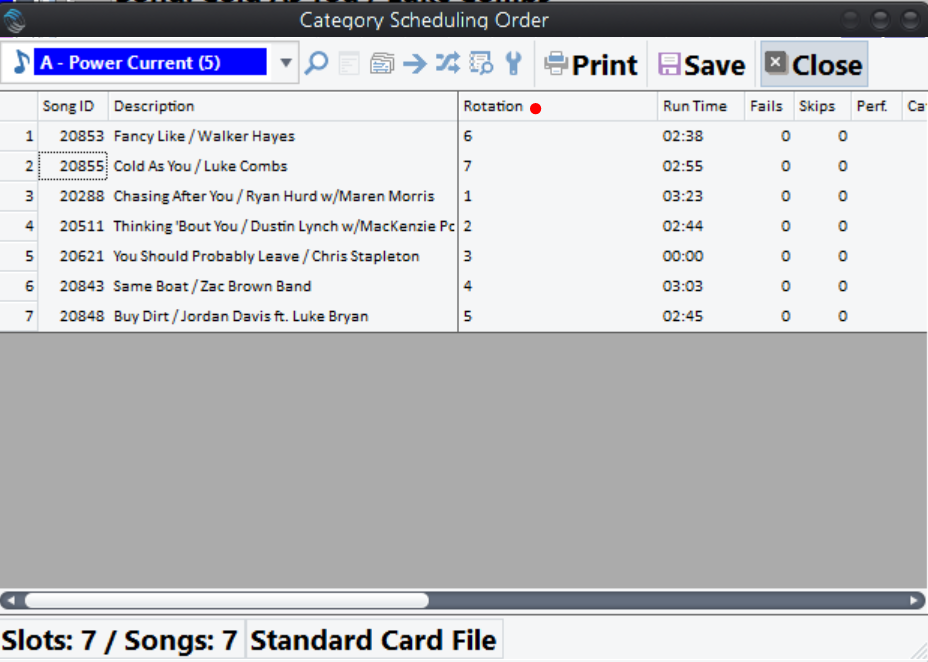
When you go to Dataset, Schedule, Schedule Order for the Power Current category, I can add a field to include the ‘Rotation’ field and I can put these songs in the desired schedule order and let it rip. A common misconception is that the schedule order is your desired rotation order and that’s not the case. The schedule order simply shows what song is next in the standard card file to schedule.
In the example above, the song at rotation position #6 is next up to schedule, in my desired rotation stack order. When a song is moved out of the category at any given rotation position, the incoming song can replace that rotation position in your desired stack order to prevent in wobbles in rotation.
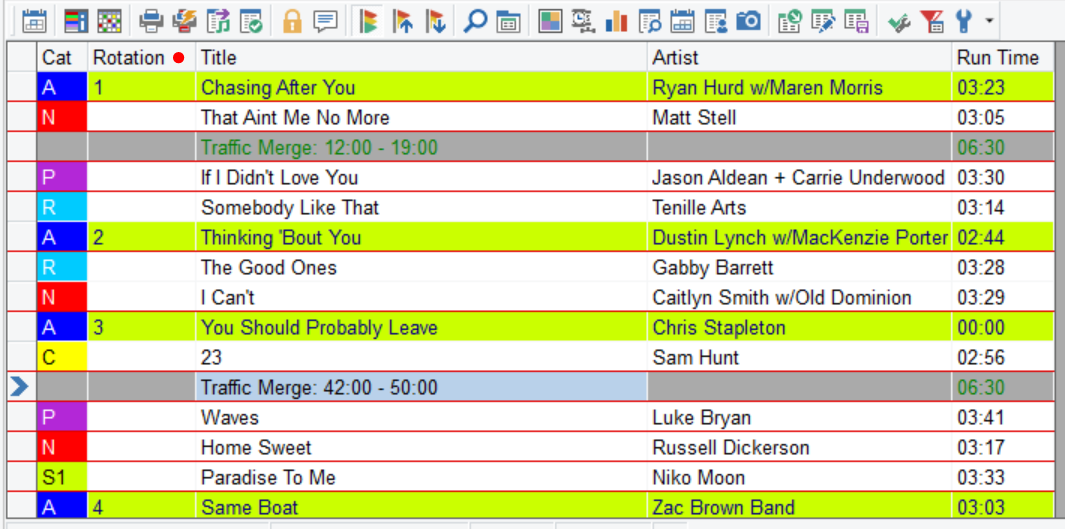
You can even add this “Rotation” field to your schedule editor to follow along to ensure your Powers are rotating in the standard card file order you designed through out the scheduled day.
For more on category order management or how to create a text field in your database, please reach out to your MusicMaster Music Scheduling Consultant.
Airplay Contracts posted on October 7th, 2019
By Jesus Rodriguez
Have you ever had to manage a song or promo as a priority? Have you ever been told that a song or promo should only air for a certain contract period? For our U.S. clients and some in certain parts of the world, your mind may be going a hundred miles per hour after that comment. (Let me take this moment to thank you for making MusicMaster the most used music scheduling software in the world!) That said, worldwide, many countries do not have the same regulations as others.
Here’s how to use this for either a song, a promo, or anything else that falls under this topic. Go to your library, right click on any element, and select Airplay Contracts. You will get the following screen:

If the item already has a contract, it will be listed here, or you can create one by selecting New. This will take you to the window where you can determine the Contract Period and its Daily Requirements, as well as the minimum plays. You also have the option to select days of the week where this contract should be applied.
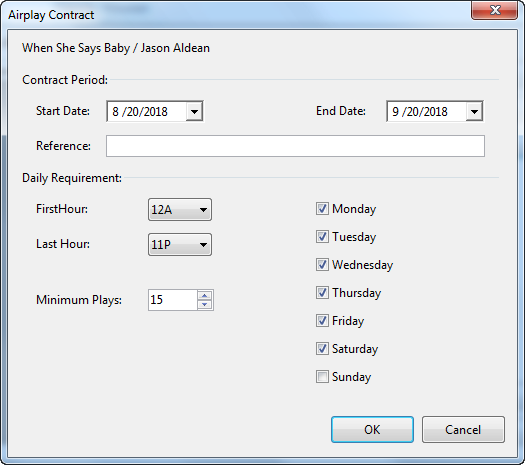
There are no additional steps to set this up. This was created for when minimum number of plays are needed for an item in your library. If there is a promo or song that must play 10 times daily for a month, then using this tool, you can specify the number of plays during the designated time. Now, keep in mind that these songs should play naturally and that this is not a method to force plays. There are also no rules or scheduling tools that work with Airplay contracts at this time, but you can run the Ready Check to see if there are any issues with the contract requirements.