
MusicMaster Blog
Optimizing Your MusicMaster Database for Peak Performance posted on October 28th, 2024
By Jerry Butler
Optimizing your MusicMaster database is essential to ensure it runs efficiently and meets your station’s specific needs. While not all settings may be appropriate for every station, reviewing the following areas can help you fine-tune your setup for optimal performance.
Category Size and Dig Depth

- Large Categories: If you have large categories and have the schedule properties settings to dig 100%, you’re testing every song each time you schedule that category. We see some stations have categories with 1000, 10,000, or even more songs in active categories. This can greatly impact your scheduling and editing time.
- Divide Large Categories: You might divide large categories into smaller ones or reduce the dig depth to test a smaller percentage of songs.
- Reducing Dig Depth or using Virtual Dig Depth (MusicMaster Pro): By reducing dig depth in your schedule properties, you are testing fewer songs, allowing for faster scheduling. If you are using MusicMaster Pro, consider using Virtual Dig Depth. This feature digs only as far as it calculates as necessary for the scheduled element before moving on, which can significantly speed up the scheduling process.
History Purge Settings
- Active vs. Archived History: MusicMaster uses active history for scheduling, while archived history is available for reports.

- Automatic Purge History: Ensure the “Automatic Purge History When Necessary” checkbox is selected. If not, you’re testing songs against history data stretching back to the start date, which can slow down the scheduling process. I’ve seen this where stations were testing years of history, and they didn’t realize it. Keep in mind, that if you need access to live logs for a specific amount of time, you’ll need that time reflected in your setting for active history. Once the logs have been archived, data is still available for reports, but logs can no longer be opened.
- Adjusting Active History Length: Most stations don’t need more than 90 days or 8 plays for active history. Very current-based formats may reduce this to 30 days, while classical stations might extend it to a year or more. Adjusting these settings reduces the amount of data tested, speeding up scheduling. It all depends on the size of your library and your rotations. Adjust these settings according to your station’s needs.
Rules: Review and Clean Up
- Identify Duplicates: Review your rule tree for unnecessary or duplicated rules. Duplicates can occur without you realizing it, especially between the “All Categories” folder and “Individual Categories”.

- Filter and Clean: Use the filter function to highlight where specific rules are active. You can do this by right-clicking on a rule on the right side of your rule tree from available rules, then clicking filter rule tree. The system will highlight your active rules on the left so you can see every category where the rule is active. You can clear the filter by clicking the green funnel with the X on the rule tree toolbar. Cleaning up redundant or outdated rules can improve system performance and streamline your scheduling process.
Schedule Editor Options

- Display Fields: The fields you display in the Schedule Editor can impact performance. The “Schedule Status” field, while useful, loads additional rule-testing information that can slow things down. Remove any fields you don’t need to enhance editing performance.

- Test Optimum Scheduling Goals: Under Tools > Options > Schedule Editor Options, uncheck “Test Optimum Scheduling Goals” if you don’t need them in the editor. Most stations test goals in the Automatic Scheduler, but not in the Schedule Editor. This can improve performance by reducing the load on the editor.

- Results Bar: If you don’t have the results bar showing, you can access it by clicking on the wrench or arrow next to the wrench on the schedule editor toolbar. Check the box next to the results bar to display. If you right-click on the results bar, you can customize it. Remove unnecessary panels you don’t need. If you don’t use results bar at all, remove all panels displayed to prevent items from loading in the background. This can also improve performance.
MusicMaster Data Location
- LAN and WAN Use: MusicMaster CS is optimized for use on both LAN and WAN.
- Server Storage: Storing MusicMaster Pro data on a server provides benefits like better security and access from multiple computers, though it might be slower depending on your network setup.
- Local Storage: For the fastest performance, many stations store their MusicMaster Pro data locally on the computer running MusicMaster.
Running Tools Purge
- Regular Maintenance: The Tools > Purge utility cleans up your database by reindexing and compressing it. It first creates a .bak file of your data, ensuring a current version is saved. Regularly running Purge can help maintain and improve performance.

Backup Strategies
Nothing will slow you down more than losing your data. Backups are IMPORTANT.
- Standard and Custom Backups: To protect your data, regularly run both standard and custom backups. Standard backups save your backup to the same location as your active database, while custom backups allow you to store backups elsewhere on a network drive, USB drive, or cloud storage.

- Quick Tip: The .bak file created during a Tools Purge can be renamed to .mmd and opened in MusicMaster. While not a replacement for a regular backup process, this has saved many programmers in a pinch.
Conclusion
By reviewing and adjusting these settings, you can ensure that your MusicMaster database is optimized for your station’s needs, helping you achieve the best possible performance. If you have any questions or need assistance, contact your MusicMaster Scheduling Consultant for expert guidance.
“Who Did That?” Tracking Schedule Editor Changes posted on September 15th, 2023
by Paul Ziino
Looking at the Schedule Editor, have you ever wondered “Who did that?” Here is a quick and easy way to find out.
First, you need to make sure that Dataset Security is turned on under Tools/Options/Dataset Security (as well as Users and Rights). This means each user will have a unique username and password for logging into the database. Once that is done, you can see who has made changes and when within the schedule editor.
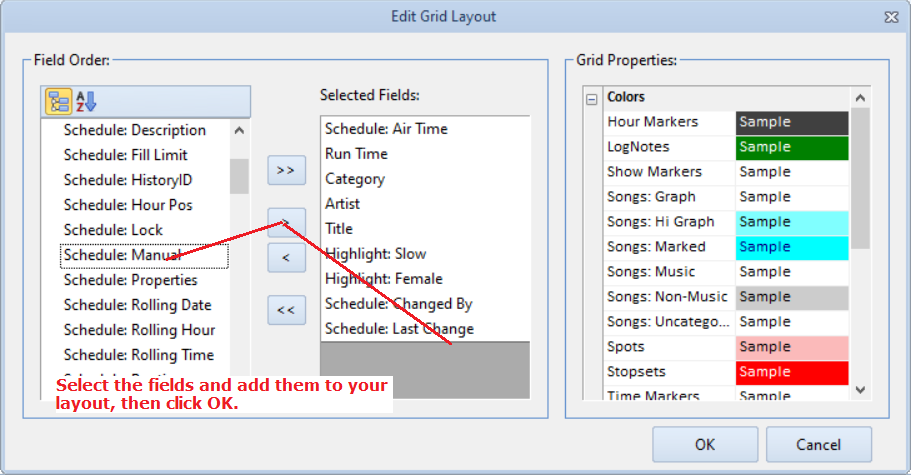
There are three fields you’ll want to add to your Schedule Editor view: Schedule:Manual, Schedule:Changed By, and Schedule:Last Change.
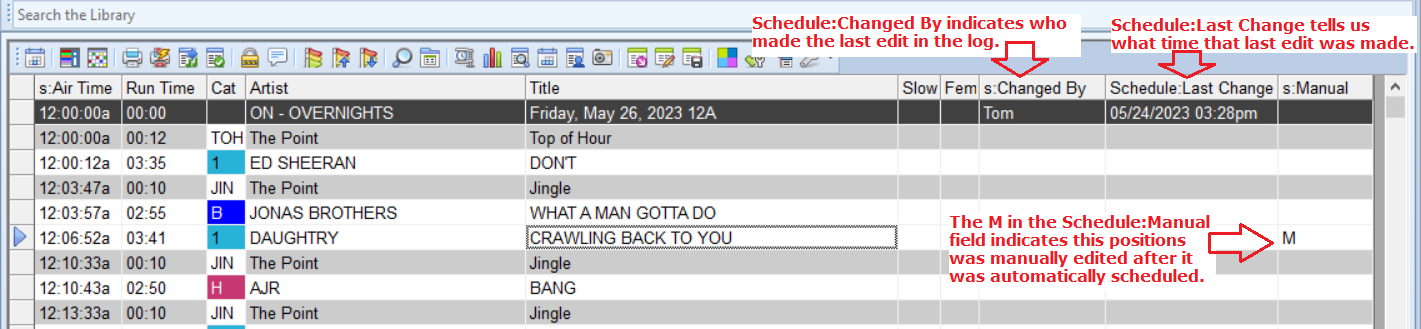
Now that your fields have been added to the view, you can see that Schedule:Changed By will tell us who made the last edit in the hour. Schedule:Last Change tells us when that edit was made. In the Schedule:Manual field, you will see a capital M on any position that was edited (not scheduled by the automatic scheduler).
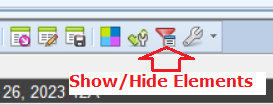
You need to display Hour Headers via the Show/Hide Elements icon in order to see the Changed By and Last Change field information.
Here we see Tom made the last changes at 3:28pm.
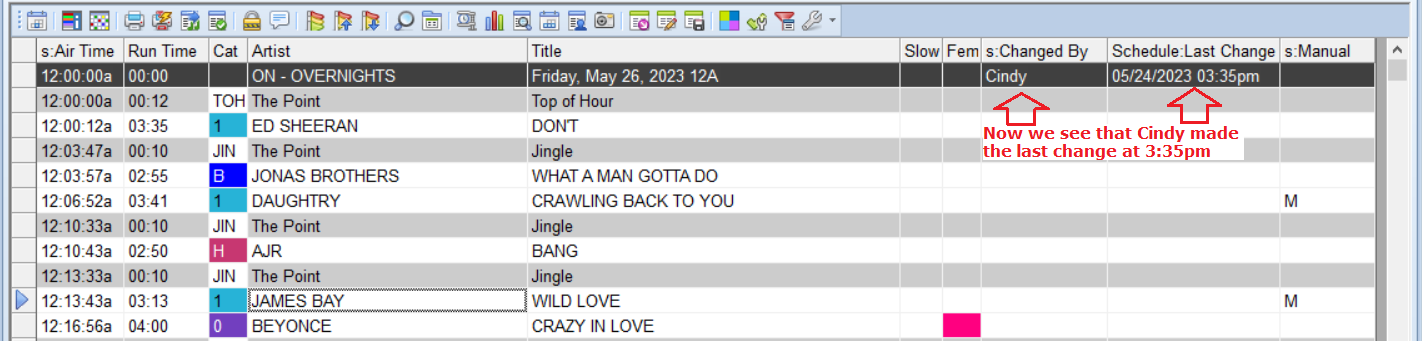
In the next picture, we see that Cindy made the most recent changes to the hour.
There’s also a handy feature to see what changes were made between the time you exported your log vs. the time your log was reconciled. You can do so with the History Snapshot.
At any time in the Schedule Editor, you are able to create a snapshot of the log by clicking the camera icon to Compare current history to a saved snapshot.

The first time you click the icon in a schedule you’ll create that snapshot. You can also set MusicMaster to automatically create a snapshot upon export.
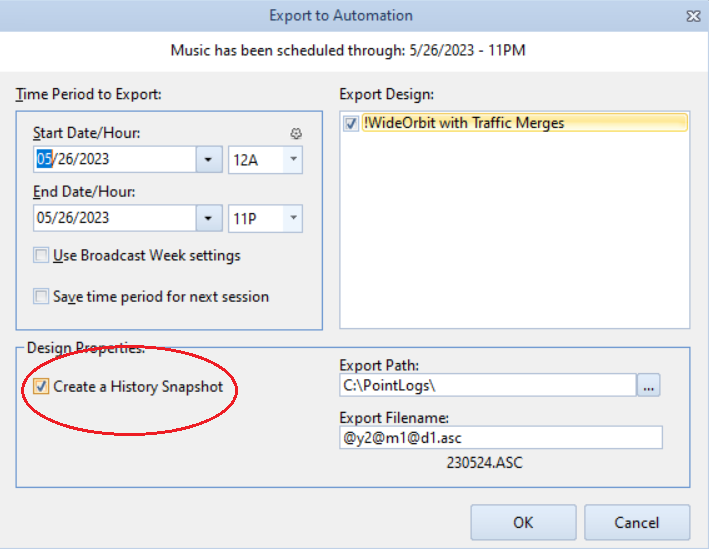
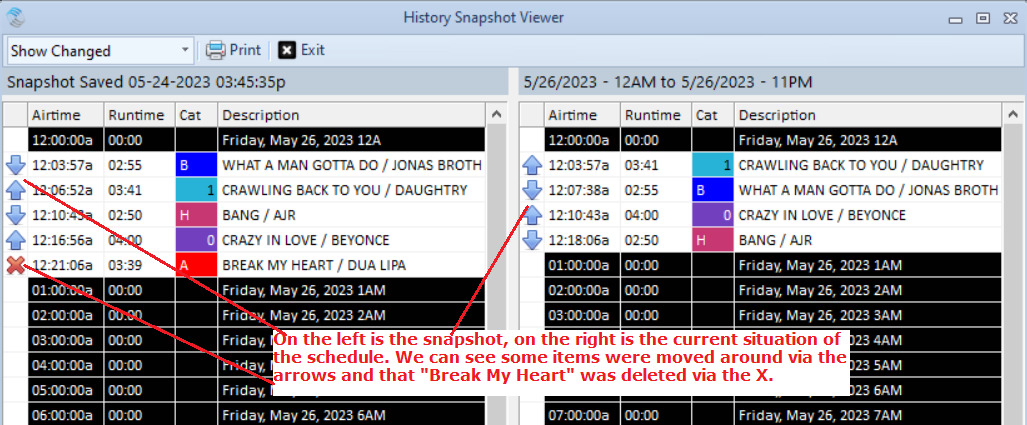
Once the snapshot is created, you can compare it to the log as it stands by clicking that camera icon in the schedule editor again. Then click Compare. Your display will allow you to Show All, Show Changed items, or Show Unchanged items. Here’s a sample of the Changed Items. Note, hours with no changes will just display hour headers in this view.
Need a hand setting any of this up? Make sure to contact your MusicMaster Support Consultant. They have the answers you seek!
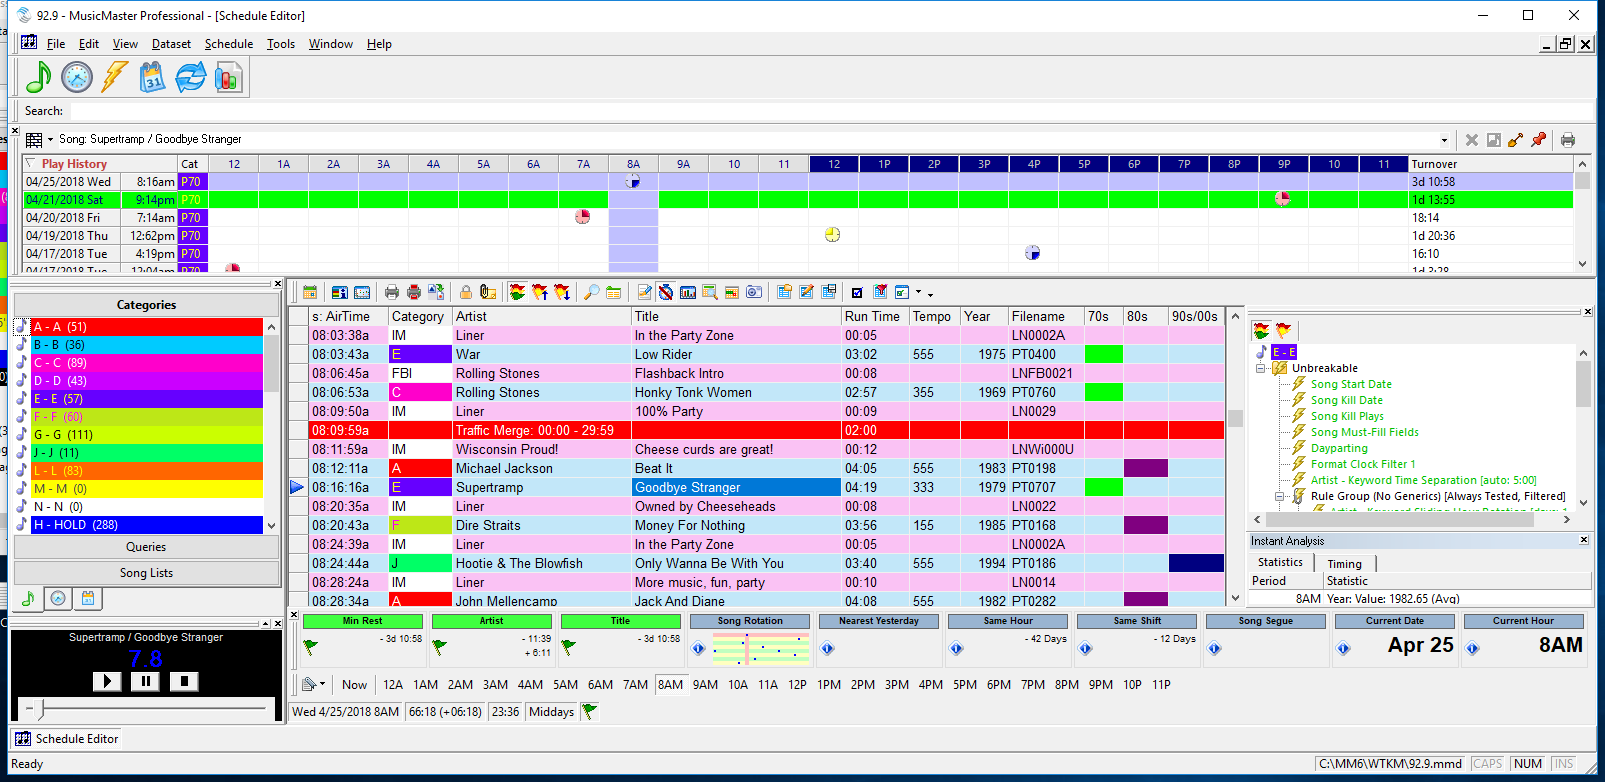
Customizing Your Results Bar posted on March 9th, 2023
by Paul Ziino
The Results Bar in your Schedule Editor can be set up to show a variety of information about the active song in the log. Today we review the various options.
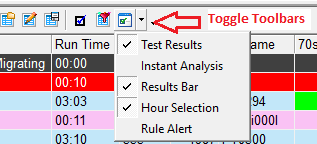
To turn on the Results Bar, click the pulldown on the right side of the wrench icon (Toggle Toolbars) then check “Results Bar.”

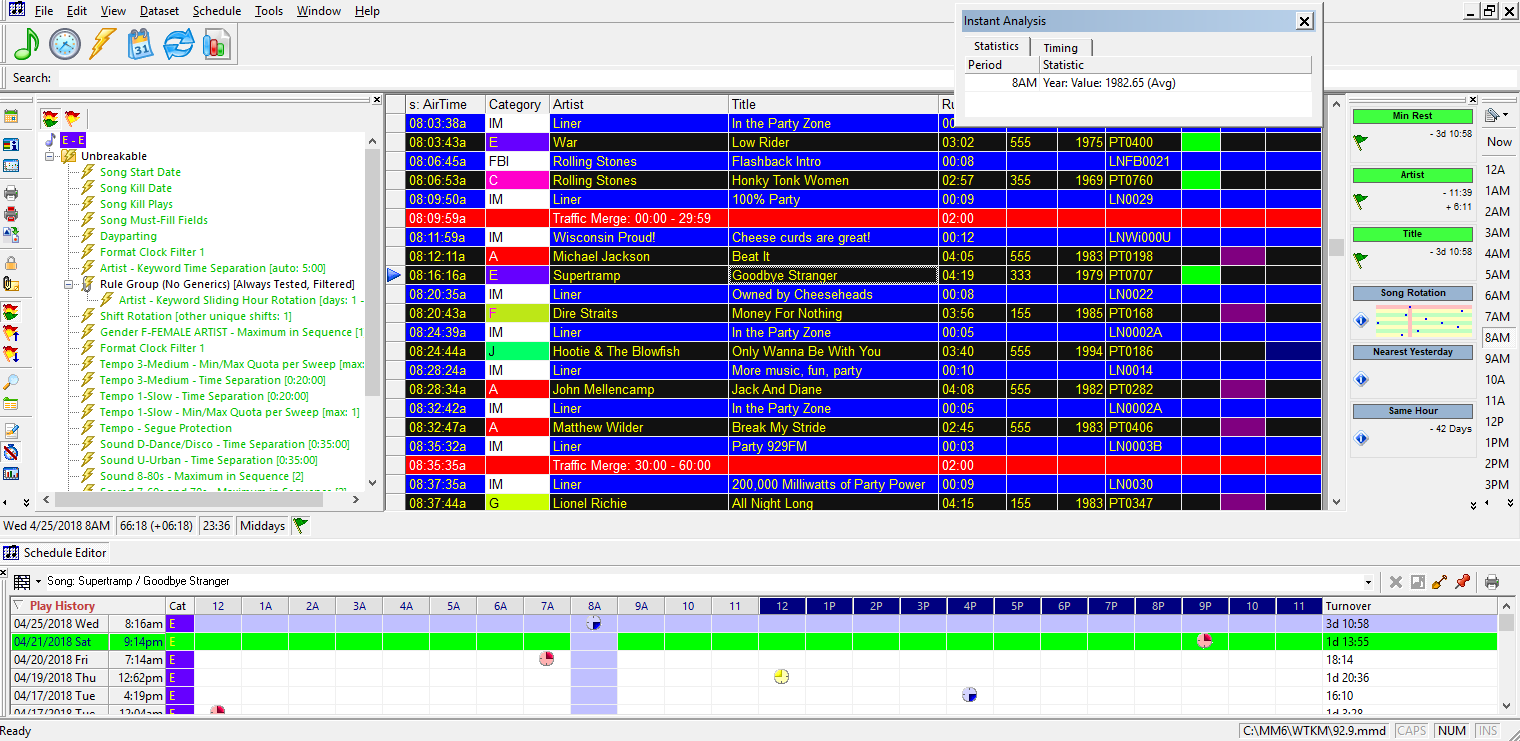
The first time you turn on the Results Bar it may be empty, or it may populate with a few items right away. Either way, you can customize it by right-clicking within and selecting Customize. You will be presented with a Customize Results Bar window that looks like this.
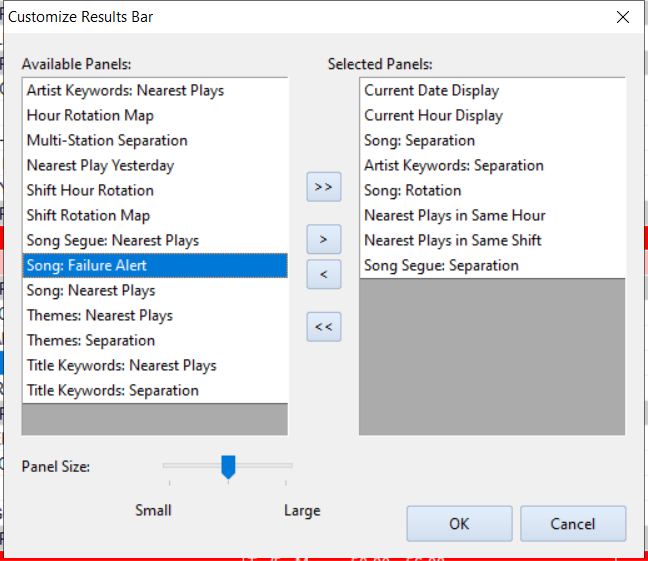
You will see available panels for any Keyword field’s Separation and Nearest Plays, Current Date and Hour Displays, Hour Rotation Map, Multi-Station Separation, Nearest Play Yesterday/Same Hour/Same Shift, Shift Hour Rotation, Shift Rotation Map, Song Segue Nearest Plays and Separation, Song Failure Alerts, as well as Song Nearest Plays/Rotation and Separation. Following is a breakdown of each and what they mean.
Current Date Display and Current Hour Display
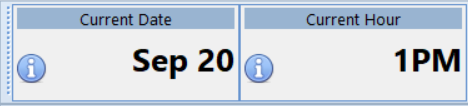
This tells you where your cursor is, on the date and hour.
Hour Rotation, Shift Hour Rotation, and Shift Rotation

Hour Rotation shows the song plays leading up to the play where your cursor sits.
Shift Hour Rotation shows the plays of this song within the same shift and indicates what shift that is.
Shift Rotation shows the shift sequence in which the current song has played, with dashes on either side of the current play selected.
Song Segue Nearest Plays and Song Segue Separation

Both these panels tell you similar information. Note that the segues are looking at the song where the cursor resides and the song that played before it. Song Segue: Nearest Plays looks back and ahead to when these two songs last played together (in either order), and when they will play together next (in either order). Song Segue: Separation displays this same info, but as a total of Days/Hours/Minutes.
Song Fail Alert, Nearest Plays, Rotation, and Rest

Song Fail Alert will display in Red if the active song violates an unbreakable rule, yellow if the rule is breakable, or blank if no rules are violated.
Nearest Plays tells you the date and time when that song was last scheduled or scheduled next time.
Song Rotation is a mini snapshot of the last 8 days of a song’s play history.
Song Rest tells you the amount of time back and ahead of a song’s play history.
Keyword Nearest Plays and Separation

Keyword Nearest Plays will show you the last/next time a keyword is scheduled.
Keyword Separation will show you the amount of time back and ahead that keyword is scheduled.
You will have a Nearest Plays and a Separation panel available for each keyword field in your database.
Favorites?
Of course I have my favorites—the panels I like to have in my display include Current Hour, Nearest Plays in Same hour and shift, Artist Keywords Separation, Song Separation, and Song Rotation.

Try the different panels out to figure out which work best for you and your station!
Virtual Search Depth posted on October 8th, 2018
By Paul Ziino
The Automatic Scheduler relies on settings in Dataset/Schedule/Schedule Properties to know how far to dig into a category before leaving the position unscheduled. This setting is listed as “depth.” The number here can be a whole number or a percentage. Setting it at 5 means MusicMaster will look at the first five songs in the stack to find a song to play. Setting at 5% tells MusicMaster to look at the first five percent of the items in that category—so if you have 500 songs MusicMaster will look 25 deep to find one to play. If no song in the available search depth works based on the rules set for that position, it is left unscheduled.
In the past, many programmers would use 100% depths to allow MusicMaster to look through every song in the category before giving up. This meant that a lot of songs were being tested even though we know they likely violate Minimum Rest rules. As such, this meant the auto-scheduling process would take longer than necessary. Now in Version 7 we introduce “Virtual Search Depths.” To use the Virtual setting, in the depth column of Schedule Properties, type the letter V or click the edit helper button.

With the virtual setting, MusicMaster calculates and adjusts the Search Depth based on how difficult it is to find a song for each element. This means that MusicMaster may not have to search as deeply for some positions, resulting in a log that schedules much more quickly while still getting the results you expect.
You can also disable a category from being auto-scheduled by using that setting or typing D in the depth column.
Virtual Search Depths is just one of many new features you’ll find in MusicMaster 7!
Schedule Editor Layouts posted on August 27th, 2018
By Paul Ziino
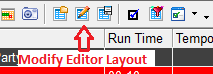
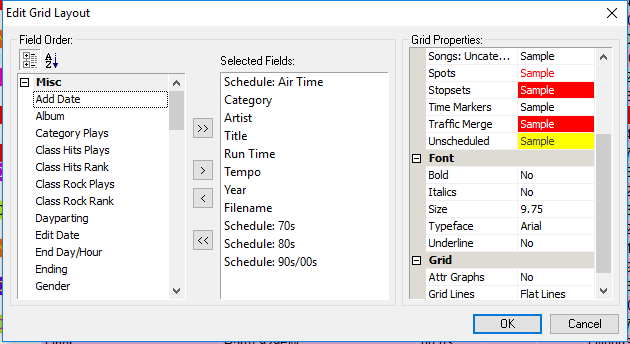
You can really make your Schedule Editor look just about any way you want. You can add and subtract fields via the Modify Editor Layout icon.
 Here you can also change the font, size, colors, and grid attributes.
 Click the Toggle Toolbars icon and you can turn on the Test Results panel, Instant Analysis, and more.
 Once you’ve turned on the Results Bar, right-click on any panel and select Customize to see all the different items available for review.

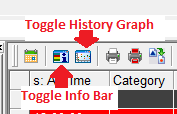
And with other icons you can toggle the history graph on and off, as well as the Info bar.
 With Show/Hide Elements you can hide different elements from view.
 You can turn off lognotes, only display the unscheduled items, hide specific categories, display hour and day counters, and more!
 Get it all set up just the way you want it, and you have a completely customized workspace!
 And with a few clicks and drags you can rearrange the whole thing and some color adjustments, you have a whole new look!!
Customization of your Schedule Editor is just one of the ways you can make your MusicMaster yours! Have any questions? Contact your Music Scheduling Consultant for help.
Setting your Pass Order, Search Depths and Combining the Pass posted on January 16th, 2017
By Marianne Burkett
Since coming on board with MusicMaster in 2005 after years of being in radio as a programmer in various places, I thought I knew a lot about scheduling music.
In the past, I’d always set my pass order from Currents first to my larger gold categories last and set the search depth to 30% or so. Now, I’ve changed my tune. I still schedule my currents first by the session. A’s schedule, than B’s, C’s etc. Then I combine the pass order for my larger categories, plus I now use 100% search depth in my larger categories.
How do you combine categories into the same pass? Go to Dataset/Schedule/Scheduling Properties, put your cursor on the category you want to combine, hold down the shift key, and drag your category up or down the list using the blue arrow. When you let go, you’ll see the pass order combine.
It will look like this:
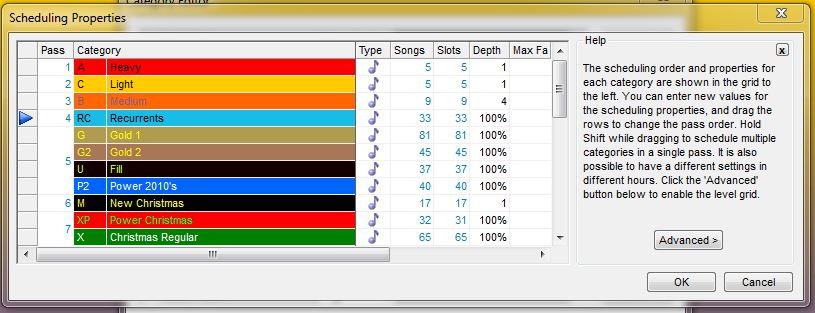
Heavy, Light and Medium all schedule one pass at a time. Notice Pass four contains Recurrents, Gold1 while Pass five contains Gold2, Fill and Power 2010s. Depending on your clocks, these categories build your hour in the order they are listed in each clock and move from the top of the hour to the end, then moving to the next hour.
Why is this a good thing? If you have a core artist in your currents or recurrents, the likelihood of that core artist scheduling from a category at the end of the pass order is pretty bleak. When you combine the pass order, MusicMaster schedules hour to hour with those combined categories and the core artists in your Gold categories have a far better chance of scheduling.
I also changed my search depth to 100% in the gold categories in the databases I work with. Initially, this also made me nervous, but my minimum rest settings in the unbreakable folder never fail, so there is really nothing to be nervous about.
When I tried these methods on a few formats I work in, not only did I get far fewer unscheduled positions, I got a better log and needed to make fewer edits.
It takes less time to do the logs when you allow MusicMaster to do the heavy lifting for you.
If you have any questions, contact your Music Scheduling Consultant.
Happy Scheduling!
Fail Alerts! posted on July 7th, 2014
By Drew Bennett
MusicMaster continues to listen to our users and add new features to our products. With the release of MusicMaster Pro 5.0sr13, you will now find a new feature called Fail Alerts. (more…)
Replacement Song Options posted on February 3rd, 2014
By Paul Ziino
There are lots of ways to make your MusicMaster database your own. Today we’re going to look at ways you can customize the Replacement Song Options.
Go to Tools/Options/Replacement Song Options. There are nine Search Modes and each one can be tweaked to give you exactly what you’re looking for when replacing songs in the Schedule Editor. (more…)
Tracking User Profiles in the Schedule Editor posted on October 29th, 2012
We get a lot of calls regarding the schedule editor and if there is a way to track who did what when scheduling a log.
We offer a field called Schedule: Manual that places the letter, “M,” in the field if a particular element was manually scheduled. You can always add that field to your layout to keep track of songs that were not placed by the auto-scheduler but were manually placed by someone working in the log.
MusicMaster Version 5 introduced two additional fields to give you a better idea of who did what and when in the Schedule Editor. First, though, let’s discuss Dataset Security and how it relates to our new fields.
The Dataset Security section of MusicMaster can be located by choosing Tool, Options, Dataset Security. This is where you can enable and disable Dataset Security. Just below this section is a sub-section called Users and Rights. This is where you can create new user profiles and assign permissions to the profiles, allowing or disallowing access to certain sections of the software or even certain tasks. However, Dataset Security can just be a way of tracking who logs in and out of the database, when they do that and the kinds of things they do when they’re in a section of the software like the Schedule Editor. For more information on setting up Dataset Security see our article on Database Security and User Rights.
Once you have built your user profiles and assigned your staff usernames and passwords for logging in to your data, you are ready to track those profiles in the Schedule Editor.
Open the Schedule Editor and choose the Modify Editor Layout icon. In the screen that appears, find the list of fields in the left side of the screen and look for Schedule: Last Change and Schedule: Changed By. Bring these two fields into the Selected Fields list in the middle of the screen by dragging and dropping them or using the single arrow icon pointing to the right. Drag and drop these fields to position them in the layout in the order you desire. Hit OK and choose the Save Editor Layout icon to save the layout.
Now, when a song is changed in the log or an unscheduled position is filled two pieces of information will display in these fields. Schedule: Last Changed will display the date and time of the change and Schedule: Changed By will record the profile used when the change was made.
This is a great way to keep track of changes in the log so you will know who does what and when! If you have any questions on this or any MusicMaster related topic, please contact your assigned Music Scheduling Consultant. Happy Scheduling!
5 Ways to Decrease Your TSE (Time Spent Editing) posted on September 3rd, 2012
By Marianne Burkett
While there are some who love editing logs for hours on end, most of my clients don’t have the time to check every history or segue for each song in a given day. Here are a few things to help you shave some time off of editing the logs without sacrificing your personal editing style! (more…)