MusicMaster Blog
Take Shortcuts! Publicado por Laurie Knapp en noviembre 29th, 2023
by Chris Hulsether
If you like to use your keyboard to hit a button or two and get where you want to go, you’re in luck! MusicMaster has all sorts of ways to help you whip through your database quickly and efficiently using your keyboard.
In this article, I will go over the many ways to use keyboard shortcuts. We have basic default keyboard shortcuts that can be used in your Library Maintenance, Schedule Editor, and more. Also, I’ll show you how to turn on and use our Hotkey Emulator, which will bring shortcuts you may have used before with other music scheduling systems. We also have a way to add your own customized hotkeys.
MusicMaster Shortcuts
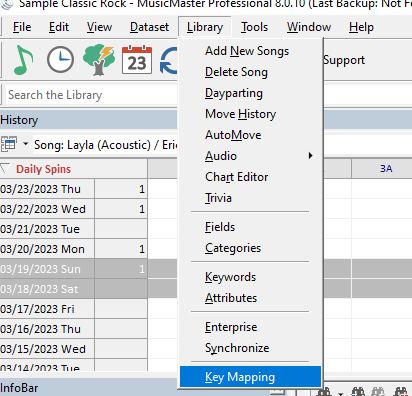
For reference, you can print off the list of all the shortcuts we have in the software. Go to Help/Index and search “Shortcuts”.
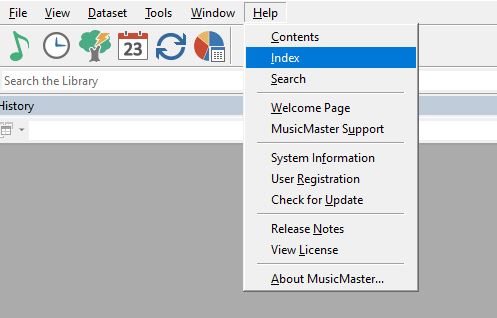
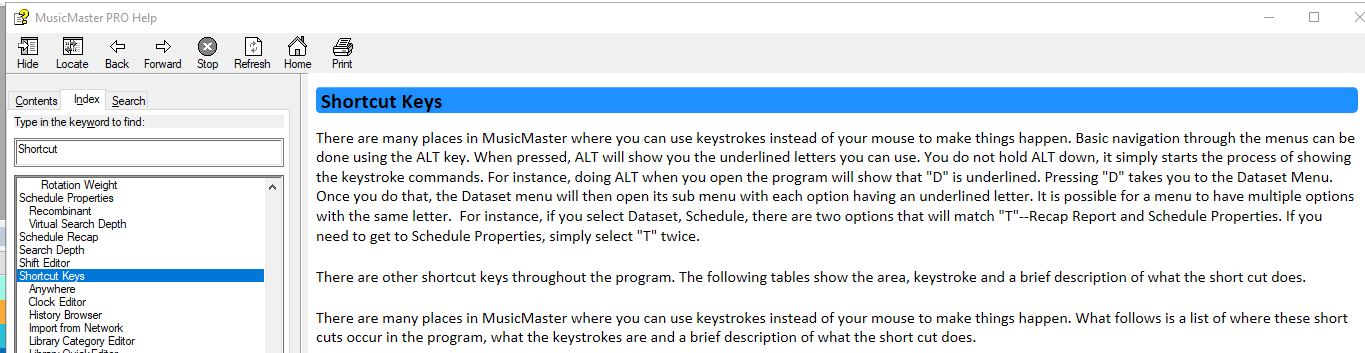
Then click Print and print to paper or PDF and save it where you want.

Here are some helpful shortcuts you can use in Library Maintenance:
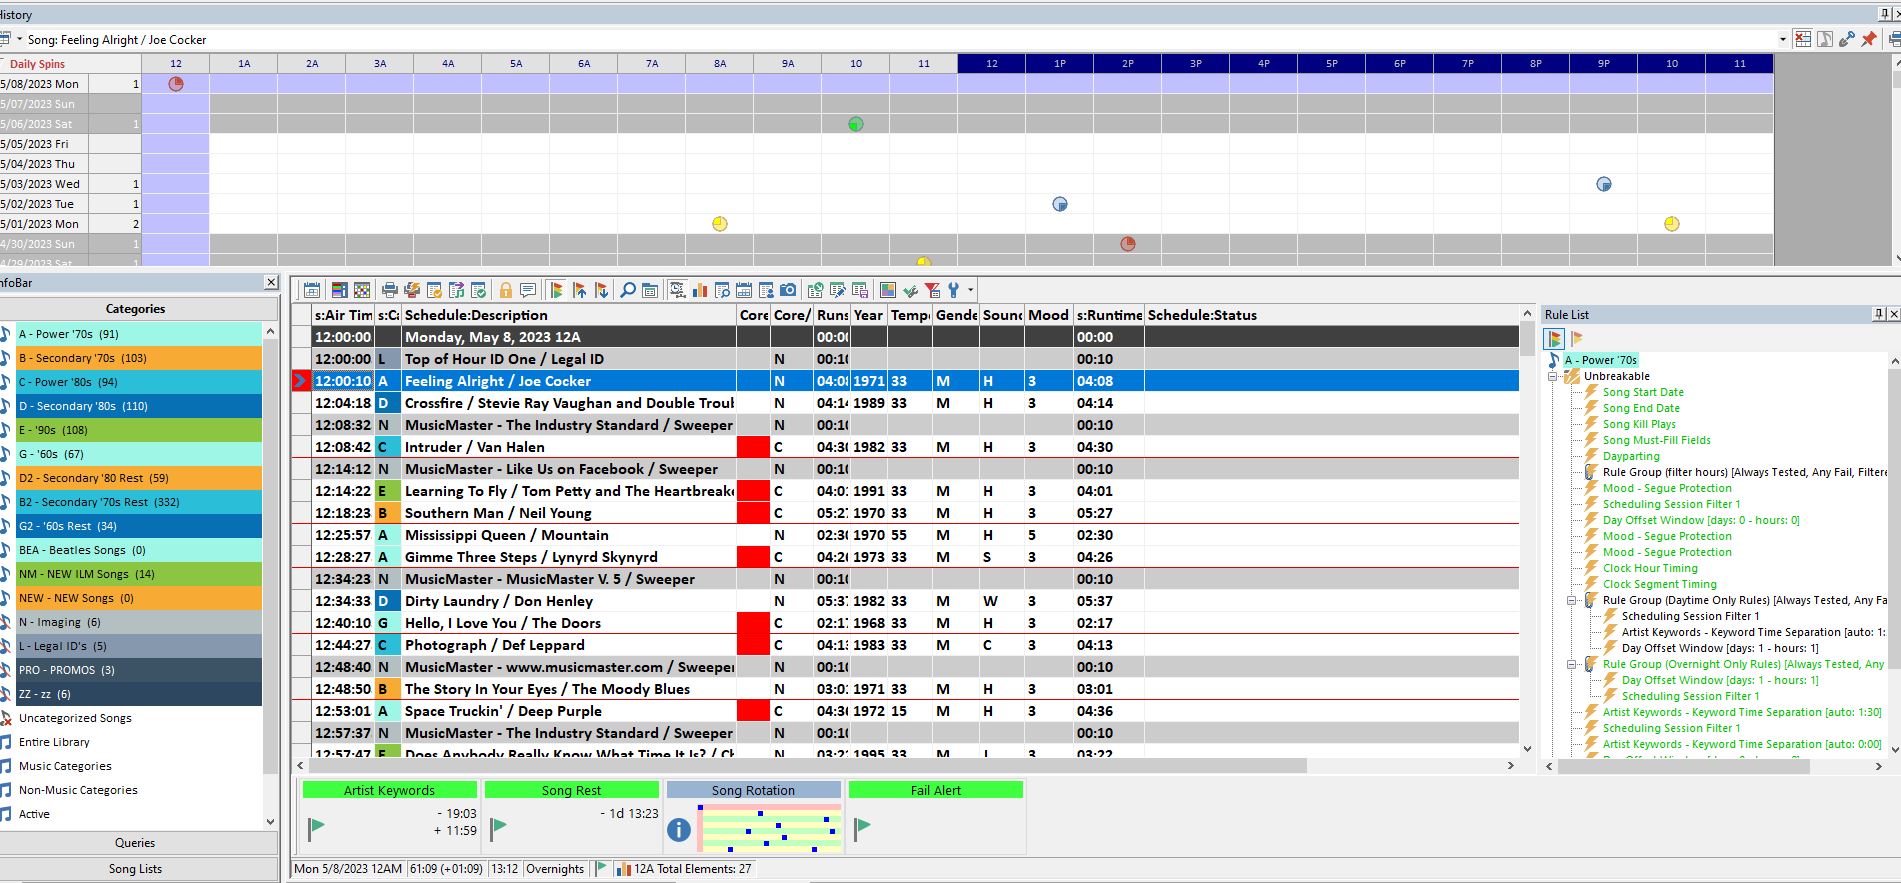
For example, you can hit F6 to view your History Graph and review how a song has scheduled throughout the weeks. When you need more room to review other songs in your library, hit F6 again and the graph closes.
F7 allows you to Mark a song. Typically, it’s marked in powder blue. You can mark songs for reference or use this to perform batch operations on all marked songs. If you right-click on your library grid to open the context menu, you’ll see options available for marked songs, such as Move, Copy, Delete, Merge, and Print.

Hit ALT+ F7 and the marking song utilities will open.

If you have a bunch of marked songs, SHIFT+F7 will jump to the next marked song.
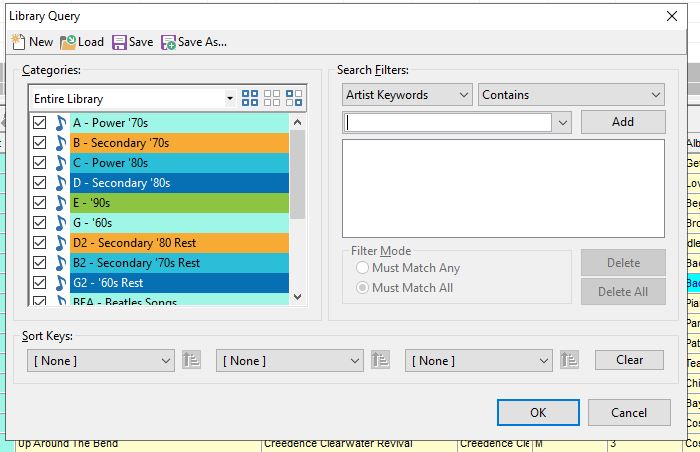
You can also open the library query window with CTRL+Q to search your library for specific things. Whatever field you are in when you hit CTRL+Q will become the search filter. For example, if you are in your Artist Keyword column and hit CTRL+Q on a song, the query window will already be set to search Artist Keywords.
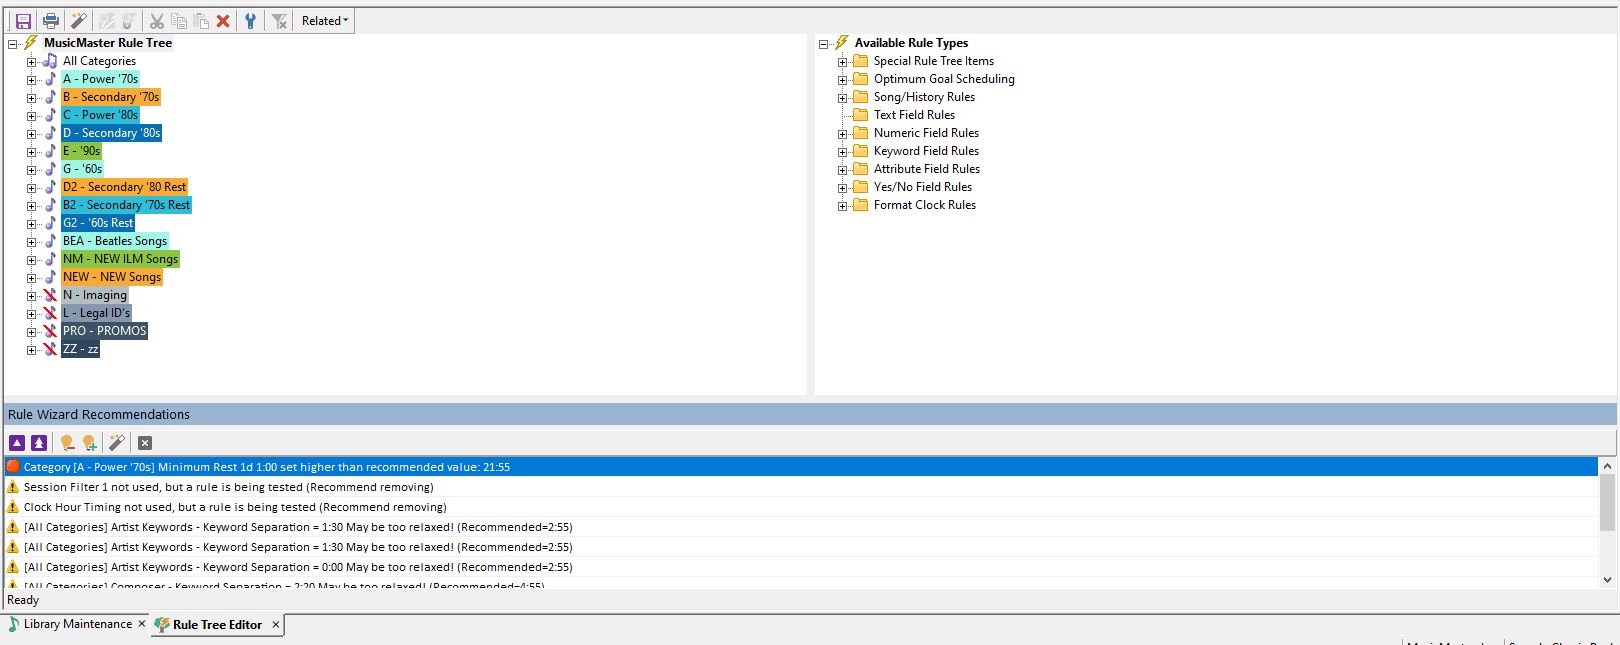
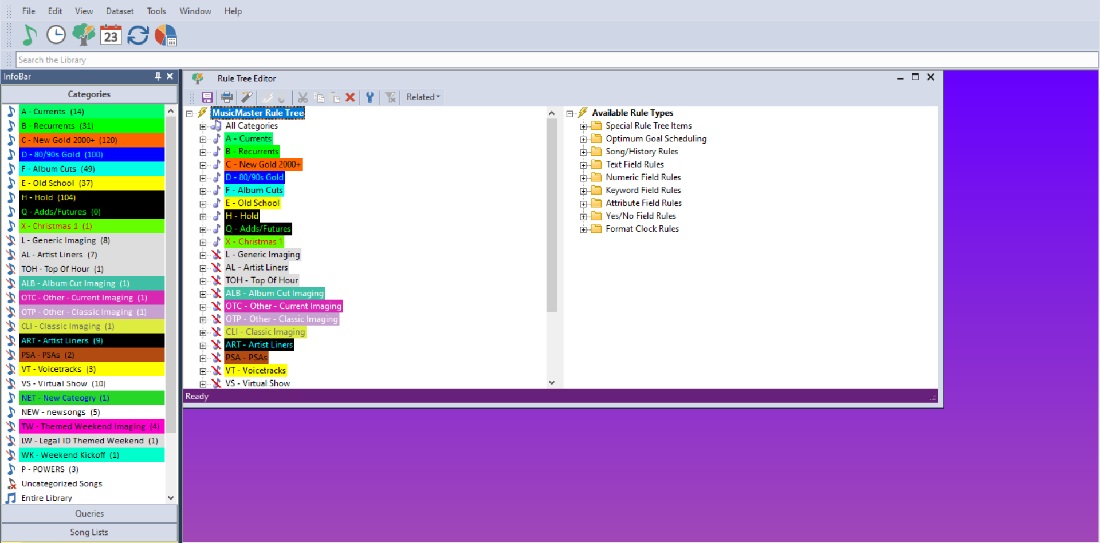
Heading over to the Rule Tree, you can use CTRL+W to open the Rule Tree Wizard and see recommendations for changes. (Learn about the Rule Tree Wizard here).
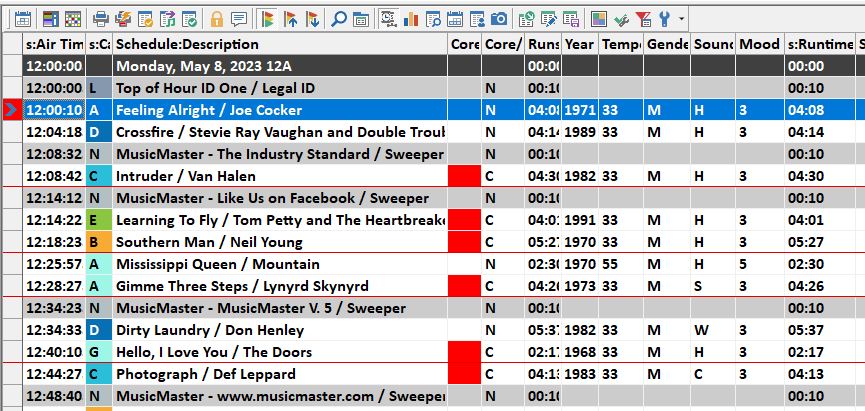
In the Schedule Editor, you can use F5 on two songs to swap them. Select the first song you want to move, hit F5, and you will see a red mark on the left side. Then select the other song you want to swap with and hit F5 again. The two songs will swap positions.
If you want to have more space to see your log and you have the History Graph and InfoBar open, you can toggle them on and off with F6 for the History Graph and F11 for the InfoBar.
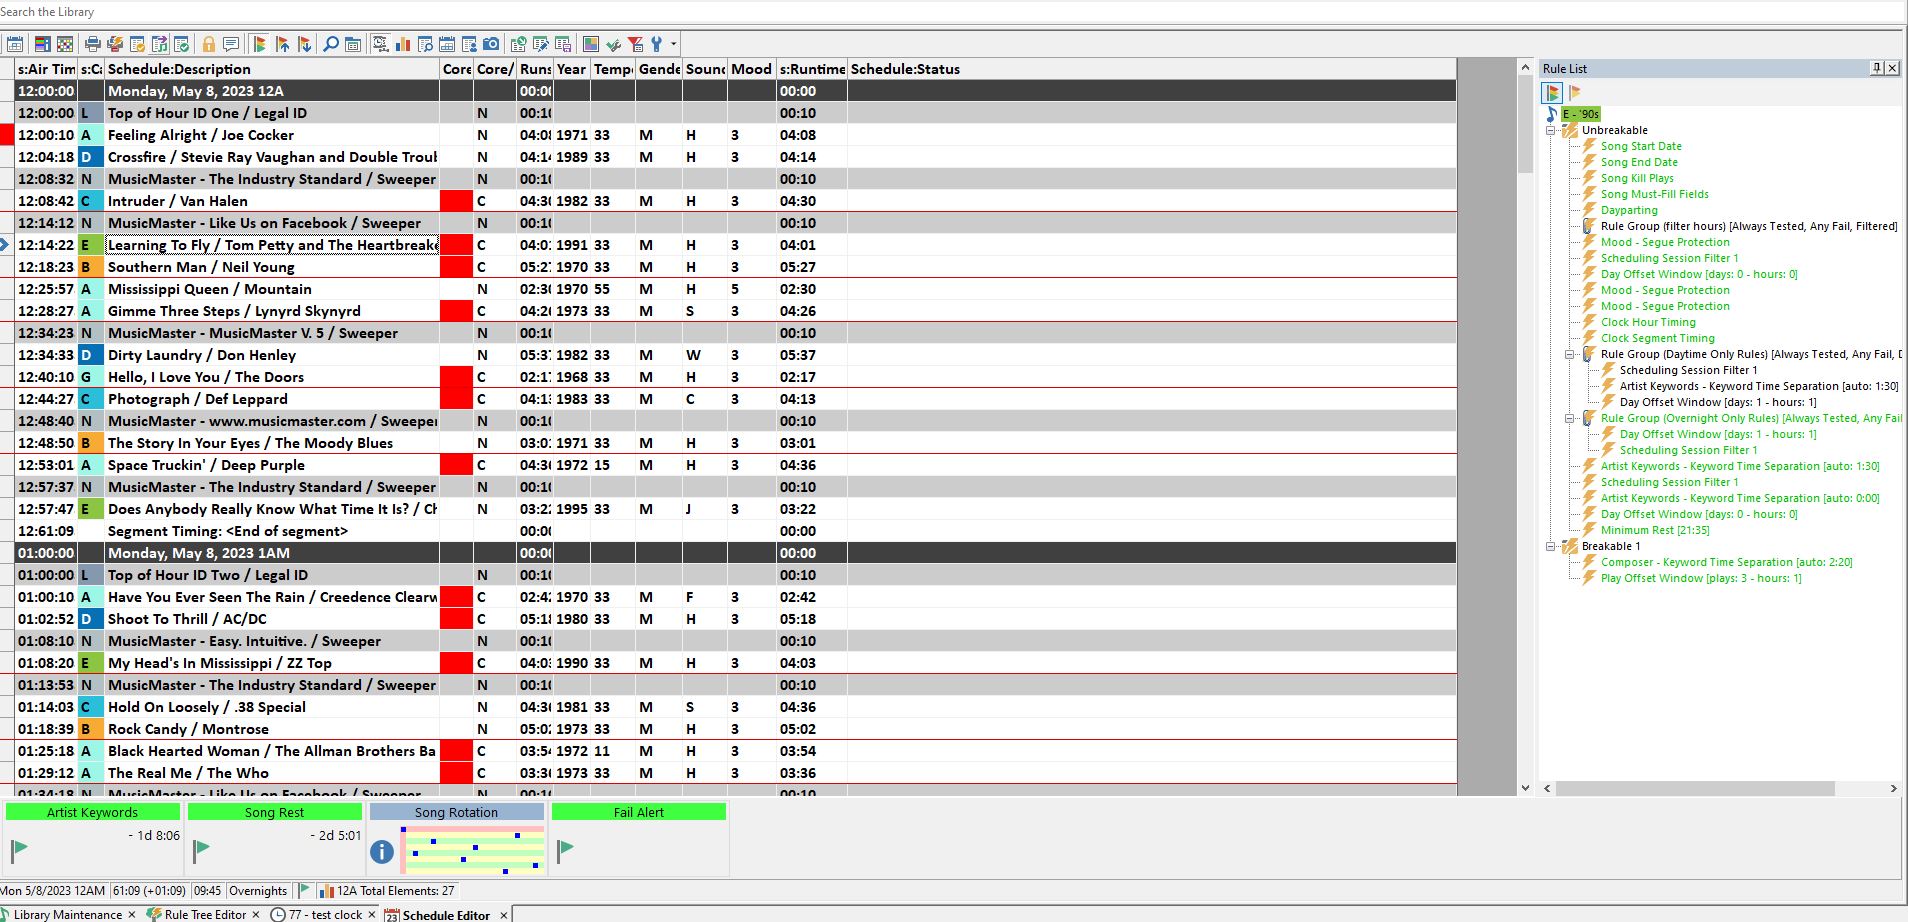
If you have rule failures or unscheduled positions as a result, you can use shortcuts to jump to each so you can replace the song. Hit CTRL+N to go to the next rule failure and Ctrl+P to go back to the previous rule failure.
HotKey Emulator
How about those Hotkeys you used to use in other software and still have the muscle memory for?
Go to Tools/Options/Additional Options:
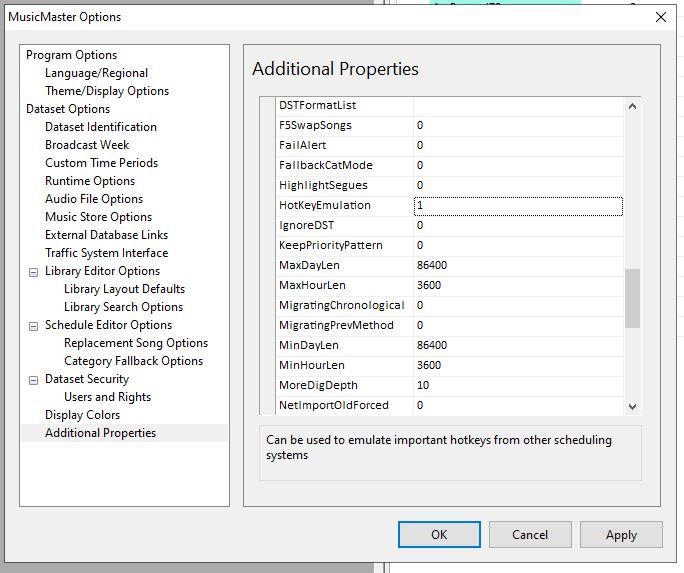
Change Hotkey Emulation to a 1 and these shortcuts will be turned on.
These hot keys will work on any non-editable field in the Editor. It changes nothing when you are in an editable field like Artist or Title. These functions are available:
1 – Search for songs where the Auto Match field matches the current song
2 – Search for songs where the Auto Match field matches the previous song
4 – Open the Vicinity Viewer
A – This requires the Additional Properties, AutoMatchField to be set to the Field ID of the keyword you wish to use. With the history graph then open, pressing “A” will change the graph to show the keyword display.
G – Select a song from a saved song list, where it first opens a box allowing you to select a saved list.
J – Swap songs
K – Load songs from the category of the current song into the replacement song window
O – Undo
Q – The Q Filter pops up a list of song attribute codes to search for
S – Schedule from selected category where a pop up lists the categories and the songs from that category
U – Unschedule the active element
X – Toggle the Element Mask to show/hide music and non-music elements
Y – Opens the Yesterday Window (the MusicMaster Schedule Review showing the log from the previous day)
Custom Key Mapping
This is where you can add some customization to your Shortcuts. It’s available both in the Library and Schedule Editor.
Let’s look at how to set this up in Library. Open your Library Maintenance, then go to the menu bar and click on Library > Key Mapping.
Now, you can add shortcut keystrokes to use while you go through your library.
Select the key you want. I selected ALT+1 for layout editor. This allows me to pull up the grid layout editor and add/remove things from my library grid. You can set one for saving your changes or loading a different layout.
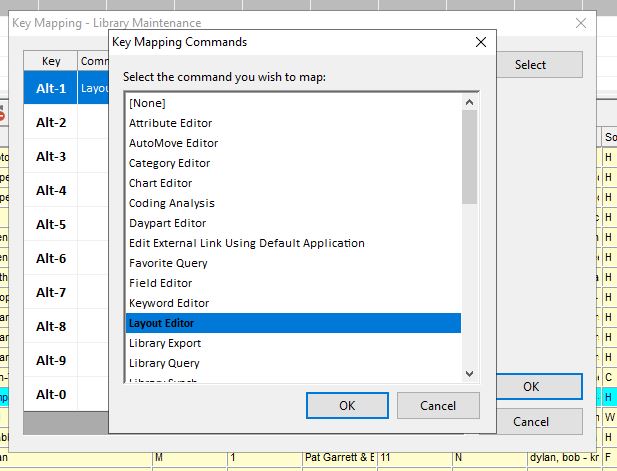
You can do the same to bring up things like the Attribute editor, Keyword editor, the Mass Changer and many other tools.
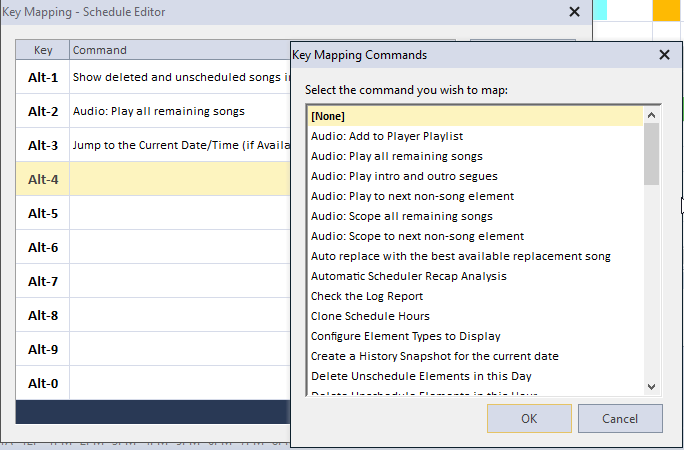
In the Schedule Editor, you can do the same. Shortcut options include various audio playback controls, replacement song functions, history snapshots, publishing to automation, navigating within your logs, toggling between layouts, and so much more!
Today more than ever, you need ways to take a shortcut and get more out of your database in less time. Contact your Music Scheduling Consultant for assistance.
Every Picture(disc) Tells a Story Publicado por Laurie Knapp en noviembre 13th, 2023
by Brian Wheeler
I recently embarked on a little adventure that may very well prove my insanity. After a friend told me of a large music collection sitting in a storage unit in south central Texas, I flew down and obtained a good portion of the collection. The cache was large enough to require the assistance of a good friend of mine, and you know they’re a good friend when they agree to hop on a plane with a few days’ notice to load a music collection into a moving van in 109-degree heat, then trek 1200 miles in 24 hours to get it safely home. For the sake of space and time, I’ve substantially condensed the portion of the story where we moved the collection. The journey fell short of Clark Griswold proportions, but it had its share of excitement.

A good music collection often speaks to the collector’s personality: the stories that have touched them, the life they’ve lived, the causes they’ve championed, the cultures in which they’ve immersed themselves. It’s usually a rich tapestry of the collector’s past. Music collections can be intimately vocal declarations of your life. For those whose lives are surrounded by music, their collections have checkpoints and pathways that reflect their life’s journey.

For example, I’ve caught glimpses of MusicMaster founder Joe Knapp’s collection. As you can imagine, it was vast and far-reaching. Did you know Joe is an unapologetic champion of garage rock? I fondly recall a conversation about a 45 record that my mother owned, a very regional single in the 60’s from The Defiants called “Bye Bye Johnny”, with the B side being a cover you may recognize: Bob Dylan’s “Maggie’s Farm”. As a child playing with my mom’s records (she supported my record spinning very early in life) I was drawn to the B-side almost instantly, but I had no idea that it was a Dylan tune until I’d heard his version a few years later. “Maggie’s Farm” is credited to ‘Bob Ryland’ on the Defiants record, hampering my eventual discovery.
Fast forward decades later, and my collection has grown and blossomed into a patchwork of snapshots in time, with musical threads that often run through a good portion of my life. I could probably tell you a story about 90% of my personal library if you were so inclined to listen. This is what makes the collection I’ve recently obtained so fascinating. Sadly, the prior owner of this collection is now deceased, having only lived until his mid-50s. The collection he left behind speaks of a life richly lived. There are signed records, CDs, and photos littered throughout the collection. He wrote to some of his favorite artists and they responded, often gushing about his writing prowess. Like Joe, he also loved garage rock as his collection is peppered with examples across the decades. He loved rockabilly, blues, punk, red dirt, Tejano, Surf, jazz, zydeco, and a wide variety of other music. I was impressed with his musical vision, having booked The Screaming Trees to a small club show in 1987 and bringing a band called Soundgarden to a tiny area club in 1989. He supported a wide variety of female artists in many genres, with a solid sampling of strong female voices throughout the collection. This gentleman also was a champion of the underdog and of the fallen. He was involved with fundraisers for musicians stricken with hard times. Upon researching a small stack of CDs within the collection, I learned that the former collection owner had created a Kickstarter campaign for a local musician that had passed away under mysterious circumstances, successfully backing the creation of a memorial CD to keep his memory alive. He did this all while dealing with serious health issues of his own, health issues that would eventually claim his life as well.
A personal music collection has soul. It has substance. It tells a story. The music contained within has its own stories, each told within its own context and language. It’s the stuff of life. From cavemen writing on walls to middle-aged guys writing blogs to kids starting their own podcast, I believe it’s part of the human condition for people to want to tell their stories. The urge to be heard and understood will never change. For those who love music, their collection is an extension of their identity. That’s why I believe that as long as there is music, there will be collections. I personally still believe in the power and value of tangible media. Of course, there are certainly many advantages to digital media, and most MusicMaster users know that their digital library is their lifeblood. But I still see substantial value in picking up a record or a CD and enjoying the presentation and feel of tangible media. Vinyl has enjoyed a huge resurgence and strangely, so has cassette and even 8 track tapes! I also think the CD renaissance is just around the corner. If you’re looking for me, I’ll be in my basement spending time with some recent arrivals.

MusicMaster Pro 8.0.12 Publicado por Scott Wirt en octubre 31st, 2023
MusicMaster Pro 8.0.12 is now available via Help, Check for Update. Here are some highlights from this release:
You can now program a custom backup profile to make additional copies of your backup file in up to three alternate locations.
The Library Search Bar will now use the default Library Maintenance sort key if it has been set.
New options for the MinMax Step Rules allow you to set the rule so the range is allowed in only one direction, and any transition in the opposite direction will count as a failure.
Reworked the metadata download in the CD Ripper to improve reliability.
You can find the full list of changes under Help, Release notes. Contact your MusicMaster Scheduling Consultant with any questions.
“U Got the Look” Customizing MusicMaster Publicado por Laurie Knapp en octubre 27th, 2023
By Dave Tyler
I am sure you’ve noticed that just about everything these days is customizable to your preferences. MusicMaster is no different. Some of us spend many hours a week in front of our computers using MusicMaster, so wouldn’t it be great if you could make it look just how you wan it to? Well…YOU CAN!
Of course you can color and style your categories by going to Dataset/Library/Categories and then choosing the Properties button.

You can even add your favorite picture or station logo to the background of the main window by going to Tools/Options/Dataset Identification.
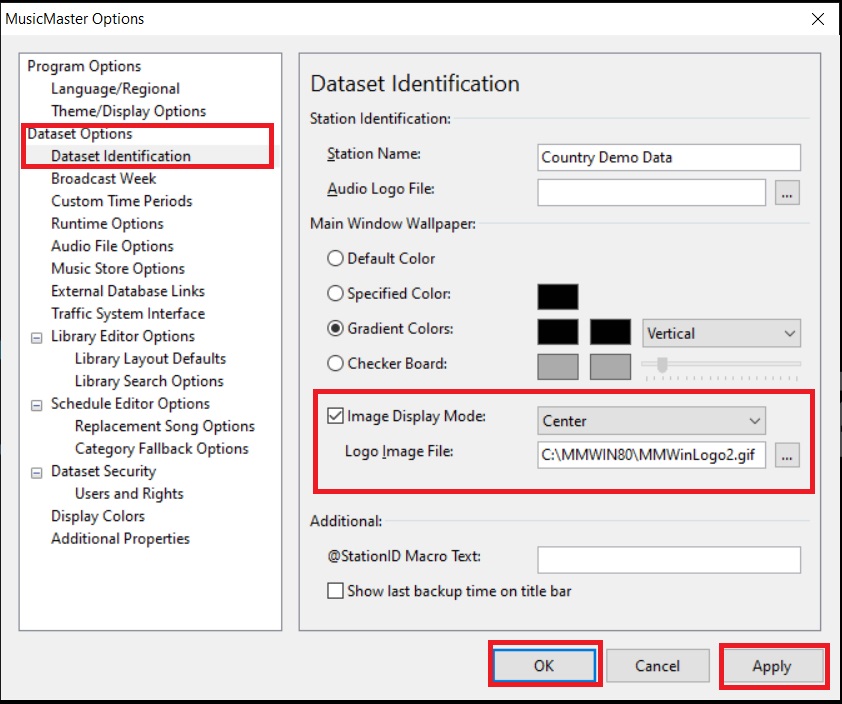
And just like that my sweet looking logo is right there!
![]()
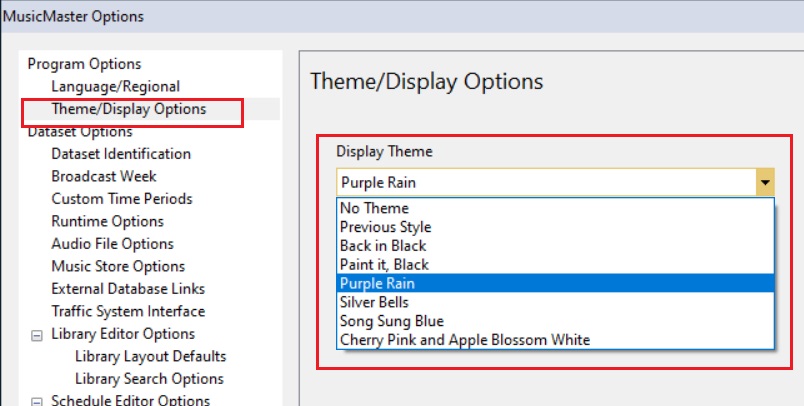
But wait, there is even more ability to customize in the Tools/Options area. See where it says Theme/Display Options? That’s the spot.
The title of this blog was inspired by the Prince song of the same name, so let’s dig in to some of the cool premade themes the MusicMaster team already has ready for you to use. Let’s start with “Purple Rain”….pretty cool don’t ya think?
I think it is pretty cool that there are several premade themes for you here to explore and play with.
For those of us that like simple, then you can choose No Theme. Or if you recently updated to version 8 from let’s say version 6 you might prefer the old style of icons you had in 6. Selecting “Previous Style” will get it back to that look for you.
We’re in radio…. This is supposed to be fun right? I love it when I am helping a client and I see that they have totally made the program to look the way they want to see it. I have seen some crazy color schemes, etc. We spend a great part of our lives working and cultivating the sounds of our radio stations. Enjoy it….your way!
Export & Import Your Clocks! Publicado por Laurie Knapp en octubre 2nd, 2023
by Vicky James
Last time we connected I shared with you a How-To on cleaning up your clocks. Well, this time around I wanted to take that discussion a bit further. I had a client reach out because he was working on creating a new HOT AC format but was totally bummed…. Why? This guy absolutely loved the clocks that he’d created from his Mainstream Station, which included the lognotes and traffic breaks that would be literally the same in the new station with only a few modifications.
There were a couple of ways that he could’ve done this. Had he cloned the old database and wiped it clean, all of the work he’d done in the new database would essentially be lost. So I suggested he use the Export and Import Clocks feature, which was totally unbeknownst to him, and we were able to save his work!
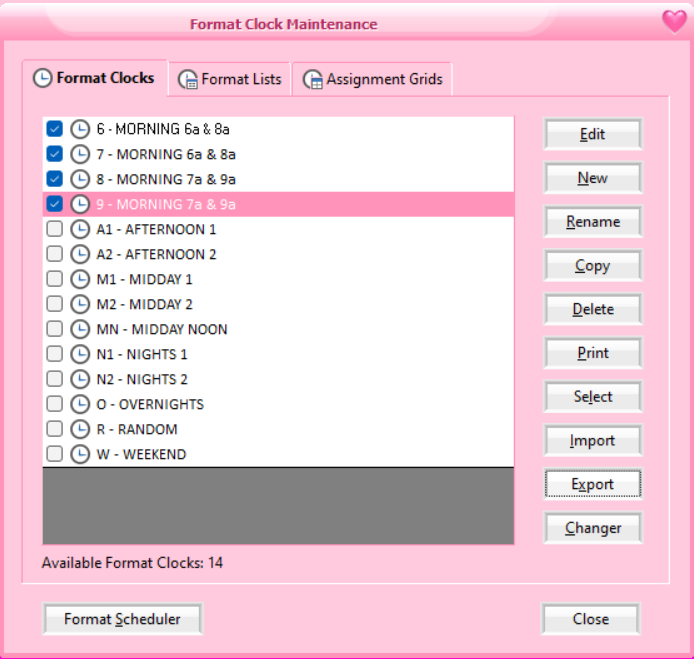
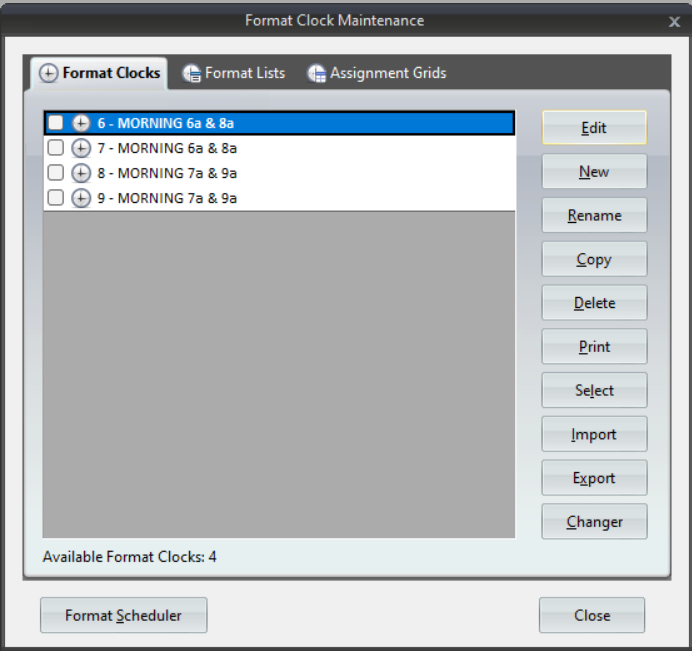
Let’s navigate to the Clock icon in the toolbar, which opens the Format Clock Maintenance panel.
![]()
Here you will select the clocks that you want to export.
Set the destination to Save the exported clocks to.
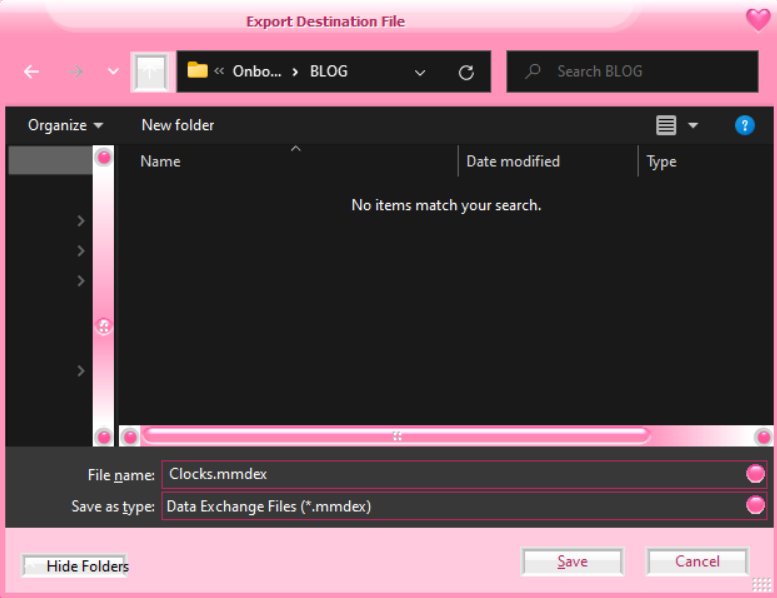
Once they are saved, the number of clocks exported will confirm.
Now let’s open the database that you would like to Import the Clocks into.
Once open, let’s go back to the Clock icon to again open up Format Clock Maintenance.
This time, click Import.

Now, you will click on the gray icon to navigate to the location of the saved 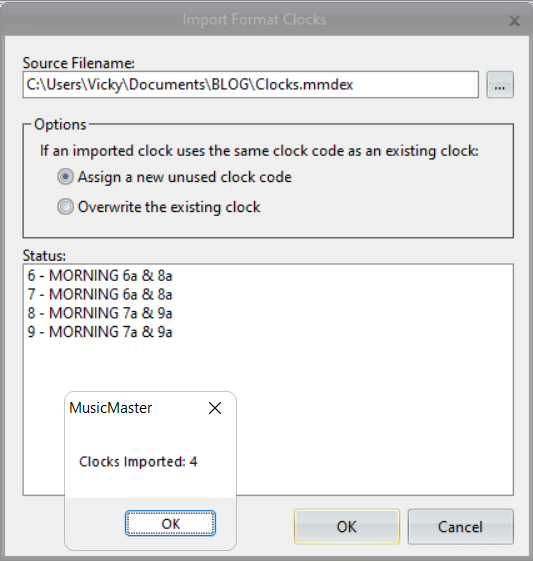 Exported Clocks.
In this case, I assigned a New Unused Clock Code since I didn’t have any clocks in this database yet, but you can also overwrite existing clock codes if you want.
Once you select OK, the clocks will be imported into the database as seen in the image below, and you can move forward in making the modifications needed to the clocks.
If you have any further questions about how to Export or Import Clocks in MusicMaster, contact your Music Scheduling Consultant for more in-depth guidance!
A Shift in Listening Requires a Shift in Thinking Publicado por Laurie Knapp en septiembre 27th, 2023
by Brian Wheeler
There are a good number of ways to manage rotations in MusicMaster. Hour rotation rules are a powerful tool to correct wayward rotations of a category. One such rule is the Shift Rotation rule. The concept is fairly straightforward. You can define the shifts your station employs, then ask MusicMaster to encourage the songs that are scheduled to find different shifts when scheduling. But is this concept outdated?
I discussed this very topic with our own Founder and President, Joe Knapp. He originally broached the subject in a conversation regarding rotations in general. We both agreed that ‘destination listening’ seems to be a rare thing these days. Listener habits are simply not that regimented anymore, and if they are, it’s more than likely going to be due to listeners tuning in for a talk format. There are exceptions to this of course. But even if you do have jocks that warrant shift rotation rules to protect rotations, it’s important to be aware of the limitations of a shift rotation rule.
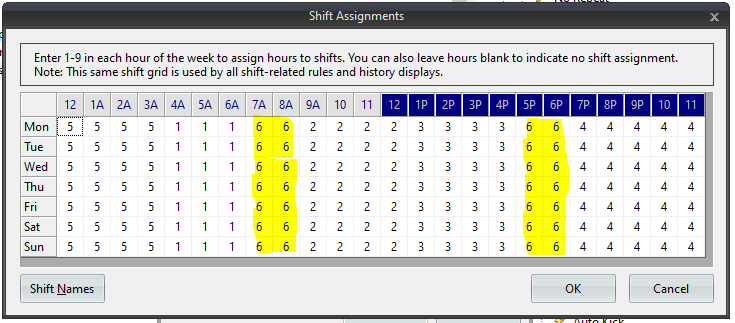
Let’s take a look at a typical shift rotation grid. To use a shift rotation rule in its pure form, you must first establish your shifts. A typical setup may look like this:
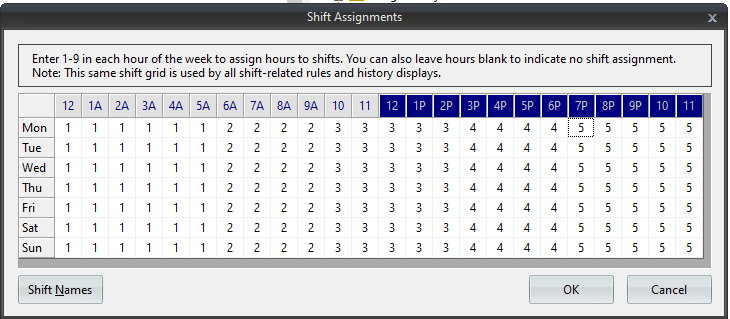
In this case, overnight is shift 1, mornings are shift 2, middays are shift 3, etc. Once the shifts are established, you can now ask MusicMaster to ensure that songs that play in one shift do not return to said shift until that song has been scheduled in X other shifts. Pretty simple stuff, right? But what if a particular song plays at 2:57pm, then plays at 3:08p the next time it plays? As far as the shift rotation rule is concerned, this is a perfectly legal move. This is why one must not use shift rotation as your sole source of rotation protection. It’s a fine start, but it shouldn’t be the only hour rotation rule you use if you’re using hour rotation rules at all.
Since we’ve arrived at the notion that most listeners aren’t destination listeners, is the shift rotation rule a tool of the past? Not necessarily. You can also use the shift rotation rule to protect regions of the day. The shift rotation rule doesn’t necessarily have to mirror your actual shifts. You can set up your shift assignment grid to simply reflect 3-hour windows of time, for example. See below:

In this setup, we’ve regionalized the day without necessarily defining actual on-air shifts. The purpose of this would be to keep the songs moving into different areas of the day without specifically confining the songs to proper shifts. Note the overlap of 11p into the first two hours of the ‘overnight’.
Here’s another grid that I’ve employed at stations I’ve programmed. This grid is a bit of a hybrid of the actual shift rotation grid, but I’ve created a shift for drive time. The idea is to mainly protect the drive times in the morning and evening. If I’ve played a song in EITHER the morning or afternoon drive, I want the song to play in X other regions before it returns to drive time.
It’s important to mention that these rules are quite effective when set up mindfully. You’ll not want to apply a shift rotation rule to a category that is only used in limited hours, for example. Doing so can choke out a category and cause MusicMaster to no longer be able to schedule them. For this reason, it’s suggested that these and any other hour rotation rules are applied on a category-by-category basis, or perhaps using a rule group to isolate specific categories that must adhere to the hour rotation rules. I also recommend setting a Max Days setting on these rules, which essentially ‘lets MusicMaster off the hook’ by establishing a day in which the rule no longer has to be enforced. Let’s face it, sometimes there’s an expiration on rules, as many days have rolled by and the importance of advancing the song into a different shift takes a back seat to getting the song played again.
In most cases, my recommendation is to set individual hour rotation rules for each category as one size rarely fits all. As always, if you have questions regarding shift rotations or any other hour rotation rule, reach out to your Music Scheduling Consultant here at MusicMaster!
A New Way to Sort Your Library Publicado por Laurie Knapp en septiembre 21st, 2023
by Paul Ziino
Starting in MusicMaster Pro 8.0.11, you can change the default sort order of your library when you open categories via the Info Bar. By default, MusicMaster’s library sorts by Song ID, the internal number that keeps track of your songs. Song ID started at 1 with the first song added. The second song added was 2, and so on. Once a song is deleted, its Song ID is never repeated in the library.
With this new feature, you can change that default sort order. If you’d rather your library opens alphabetically by Artist or by Title, you can make that adjustment. Go to Tools/Options and under Library Editor Options you’ll find Library Layout Defaults. Here you can pick a different field (instead of Song ID) for the Library Maintenance Default Sort Field.
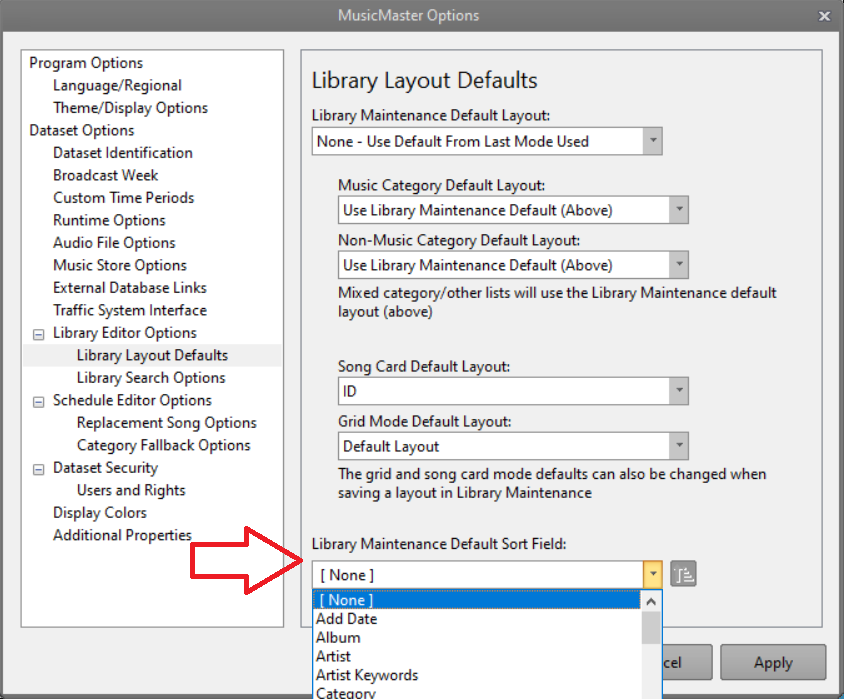
If you leave the setting at [None] there will be no change. But if you change it to Artist, now when you double-click a category from the Info Bar list, that category will open sorted as you’ve indicated. Maybe you want the library to sort by Title? Or what about by your automation asset code? Or any other field in your data. Whatever you desire, you can set it.
For assistance with this or any other MusicMaster items, call or email your MusicMaster Scheduling Consultant today.
“Who Did That?” Tracking Schedule Editor Changes Publicado por Laurie Knapp en septiembre 15th, 2023
by Paul Ziino
Looking at the Schedule Editor, have you ever wondered “Who did that?” Here is a quick and easy way to find out.
First, you need to make sure that Dataset Security is turned on under Tools/Options/Dataset Security (as well as Users and Rights). This means each user will have a unique username and password for logging into the database. Once that is done, you can see who has made changes and when within the schedule editor.
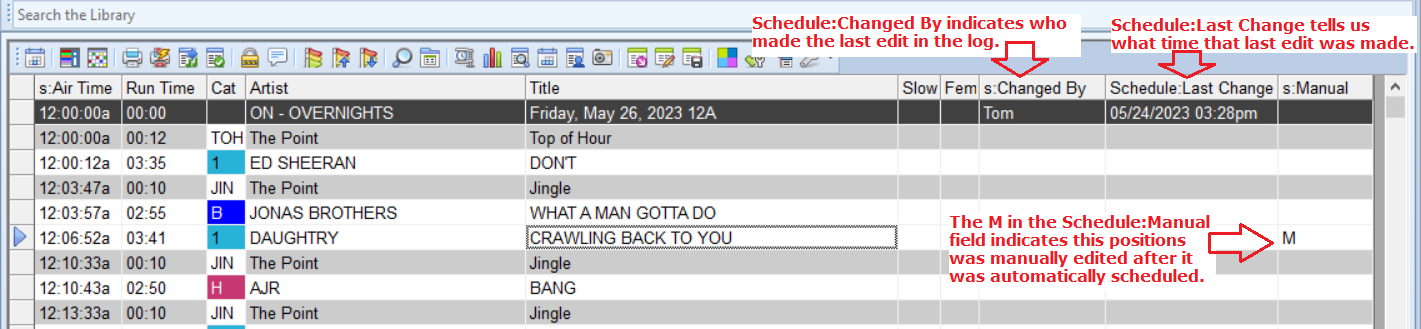
There are three fields you’ll want to add to your Schedule Editor view: Schedule:Manual, Schedule:Changed By, and Schedule:Last Change.
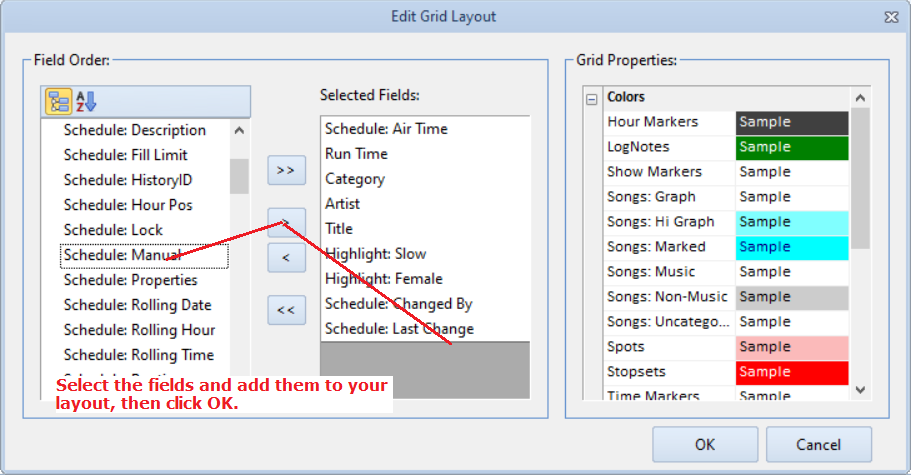
Now that your fields have been added to the view, you can see that Schedule:Changed By will tell us who made the last edit in the hour. Schedule:Last Change tells us when that edit was made. In the Schedule:Manual field, you will see a capital M on any position that was edited (not scheduled by the automatic scheduler).
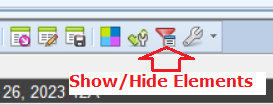
You need to display Hour Headers via the Show/Hide Elements icon in order to see the Changed By and Last Change field information.
Here we see Tom made the last changes at 3:28pm.
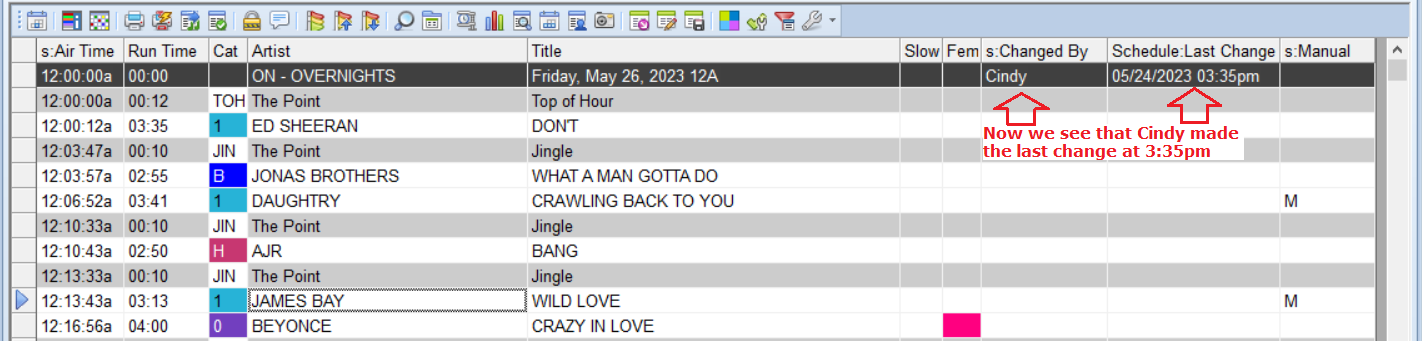
In the next picture, we see that Cindy made the most recent changes to the hour.
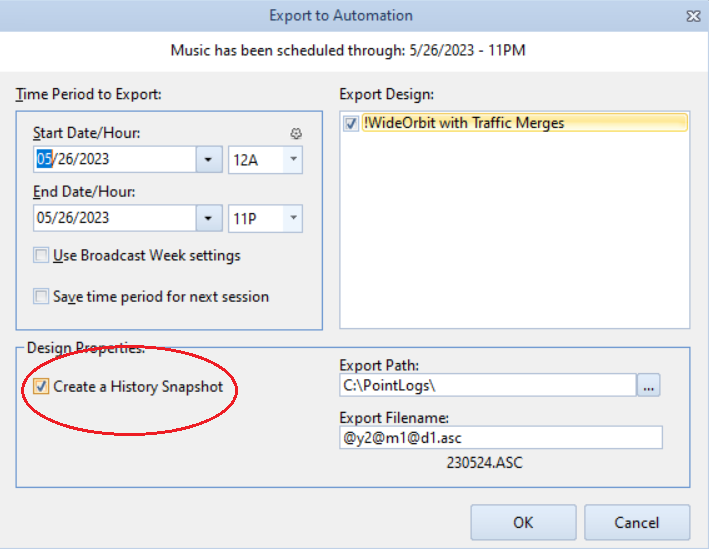
There’s also a handy feature to see what changes were made between the time you exported your log vs. the time your log was reconciled. You can do so with the History Snapshot.
At any time in the Schedule Editor, you are able to create a snapshot of the log by clicking the camera icon to Compare current history to a saved snapshot.

The first time you click the icon in a schedule you’ll create that snapshot. You can also set MusicMaster to automatically create a snapshot upon export.
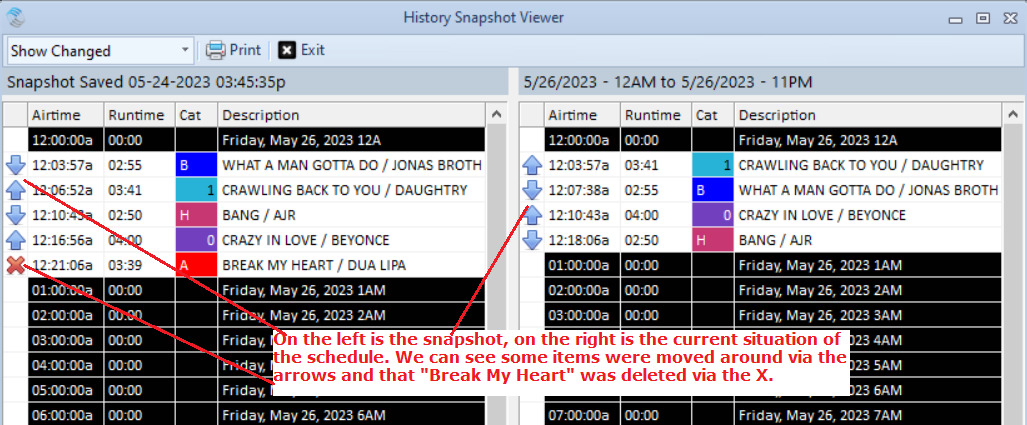
Once the snapshot is created, you can compare it to the log as it stands by clicking that camera icon in the schedule editor again. Then click Compare. Your display will allow you to Show All, Show Changed items, or Show Unchanged items. Here’s a sample of the Changed Items. Note, hours with no changes will just display hour headers in this view.
Need a hand setting any of this up? Make sure to contact your MusicMaster Support Consultant. They have the answers you seek!
MusicMaster Pro 8.0.11 Publicado por Scott Wirt en agosto 30th, 2023
MusicMaster Pro 8.0.11 is now available to you under Help, Check for Update. Key changes are as follows:
You can now set the default sort order when opening up song lists in Library Maintenance from the Infobar. This is located in Tools, Options under Library Editor Options, Library Layout Defaults.
You can now adjust the way the Schedule Editor matching value search functions (Ctrl-1/Ctrl-2) work when you are searching a multiple keyword field. The choices are Primary Keyword Only, Match Any Keyword or Match All Keywords. This setting is in Tools, Options under the Schedule Editor Replacement Song Options.
When using the Scheduling Recap function in the Schedule Editor, you can now choose to do this by Song ID to see all attempts to schedule a song, or by History ID to just see all attempts that were made to schedule a specific element.
You can now force a confirmation prompt when you try to drag a song in Library Maintenance to a Song List on the InfoBar and that song is already in the selected Song List. g.
If you pause the Audio Player and then switch to a different song before resuming playback, the play button and F12 will start playing the new song, but clicking the pause button again will resume the paused song.
Improved the speed of loading data in the Scheduling Calendar
You can find the full list of changes under Help, Release notes. Please contact your MusicMaster Scheduling Consultant with any questions.
How MusicMaster Oldies Works Publicado por Laurie Knapp en agosto 21st, 2023
How to Make 56,000 Oldies Sound Like a 590-Song Format
by Joe Knapp – Founder/President, MusicMaster
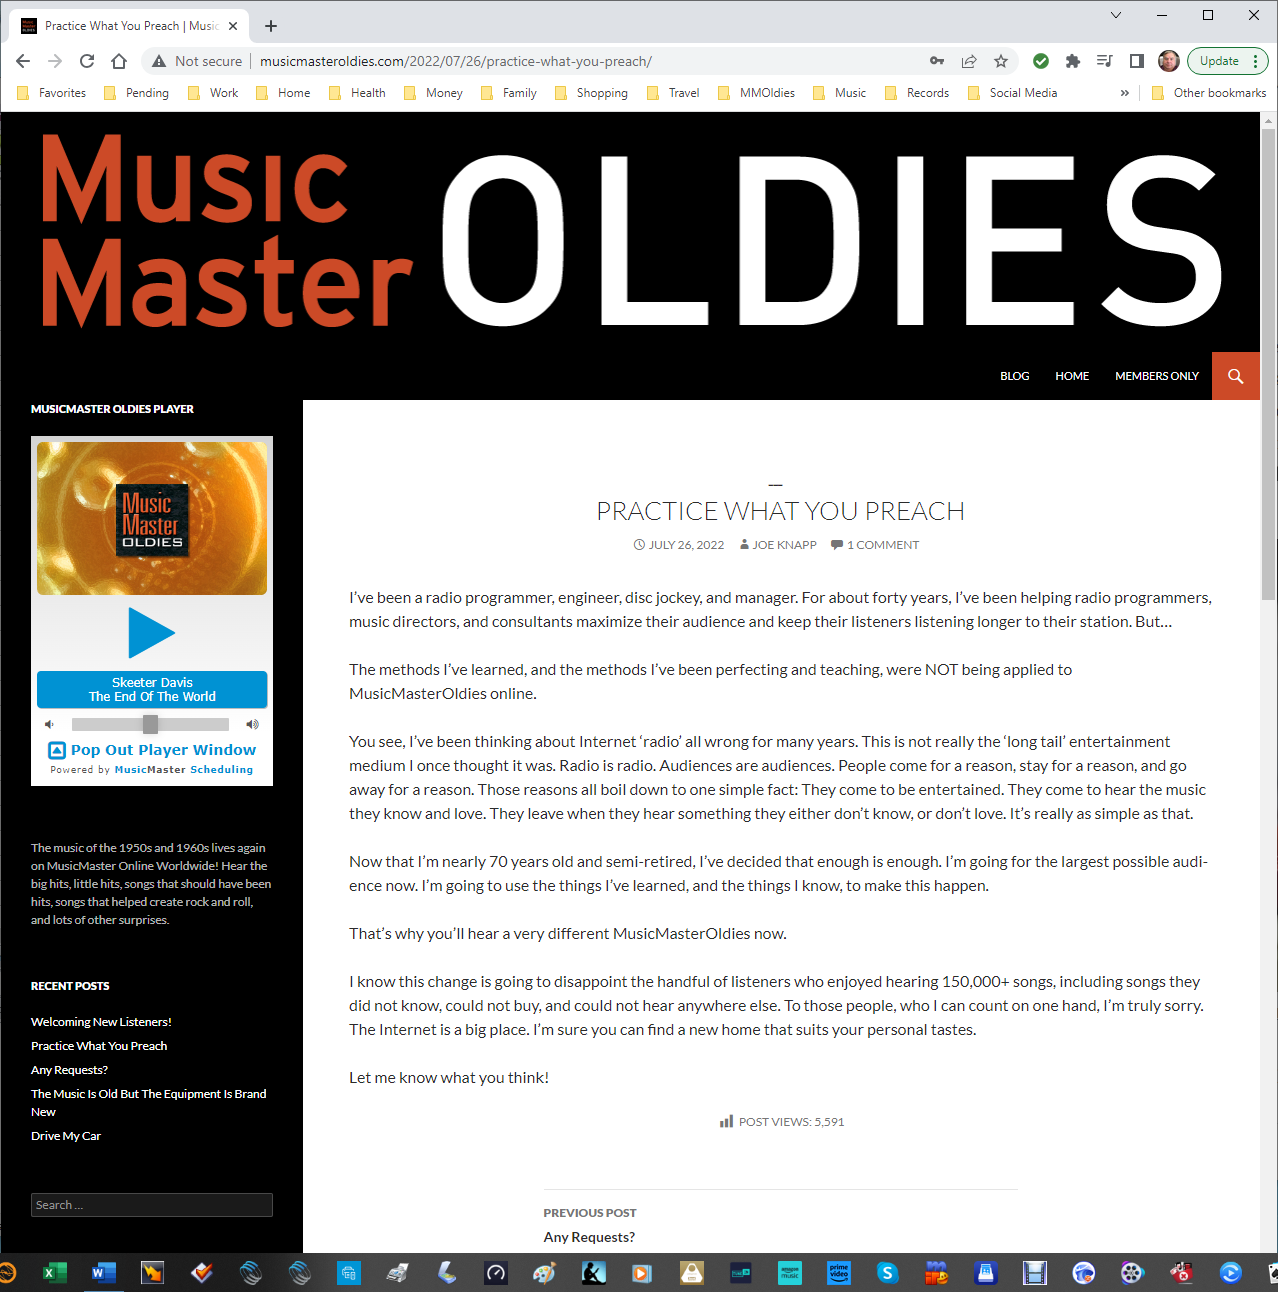
Listen to MusicMaster Oldies, streaming now on Live365, TuneIn, and iHeart, and you’ll hear something that sounds like a tight-formatted oldies format. But listen long enough and you will hear over 56,000 songs. How long do you have to listen to hear them all? Maybe ten years.
You can also hear it using the pop-out player on the MusicMaster Oldies Blog.
There are about 2,500 average listeners (and growing) and each of them listens for an average of one hour. The concept is based on a blend of philosophies. Terrestrial radio stations build cume by playing only the hits. Internet streams often go the “long tail” route and play everything under the sun. MusicMaster Oldies plays only the hits, but occasionally blends in one of those deeper cuts using imaging to turn them into special features.
Here’s how it works.
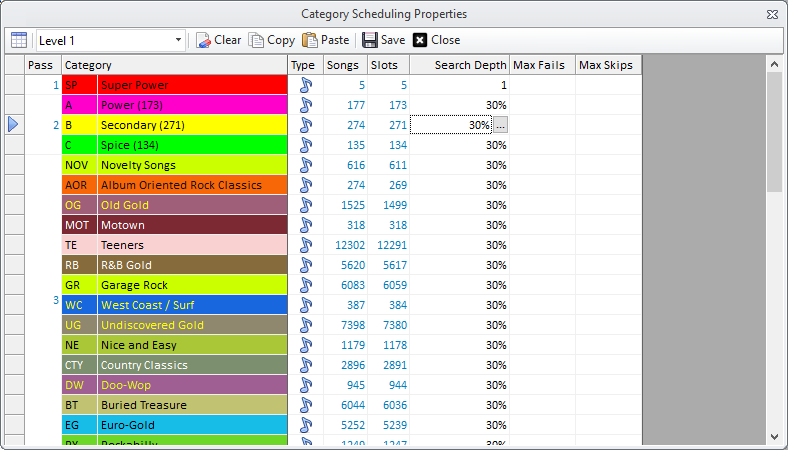
There are actually 591 songs in the active rotation, excluding songs by the Beatles and Elvis.
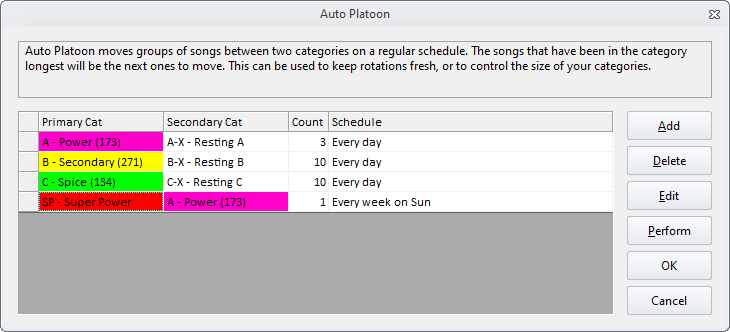
There are five songs in a Super Power category and you’ll hear one of them every hour. That’s five-hour rotation. These are specially selected “core” songs that are ultra-familiar and timeless music. Using Auto-Platooning, one of these songs is replaced every Sunday with the most rested song of the same type from the A-Power category. This keeps things tight, but fresh. It takes five weeks to replace all five songs, and just under two years to cycle all the “core” songs from A-Power into this SP-Super Power category.
The A-Power category has 173 cream-of-the-crop oldies from 1955-1973 and we play ten of them every hour. That’s a 17-hour turnover. 94 of these songs are marked as “core” and the other 83 are not. Every day, using Auto-Platooning, three of the non-core songs that have played the most are replaced with three from the AX – Resting A category that have rested the longest. Each non-core song rests for about three months before swinging back into action. The core songs never rest.
The B-Secondary category contains 274 songs and we play seven of them every hour. That’s a 1-day 15-hour turnover. Ten of the most played songs are swapped with ten from the BX – Resting B category that have been resting the longest. It takes about six months to cycle all these songs in and out of rest. You can barely notice these swaps because they happen very gradually!
The C-Spice category contains 134 songs, and we play one per hour. That’s a 5-day 14-hour turnover. Ten of these songs are also swapped with the most rested songs in the CX – Resting C category every day. It takes about six months for all of them to swap in and out of active rotation.

The three “rest” categories contain 237 (for A), 1324 (for B), and 1689 (for C) songs.
Here’s an example of songs you might hear in each category:
- A Core: Association – Along Comes Mary
- A Non-Core: Bee Gees – I’ve Gotta Get A Message To You
- B: Beach Boys – Good Vibrations
- C: Alice Cooper – Elected
The Beatles and Elvis have a ton of material and their familiarity and mass appeal make their songs somewhat interchangeable.
There are two Beatles and Elvis categories, Primary and Secondary, that alternate every hour. That’s a total of four categories. In each hour you’ll hear one from a Primary and one from a Secondary. There are 67 songs in the Beatles Primary (5-days 14-hours) and 274 songs in the Beatles Secondary (22-days 19-hours). There are 45 songs in the Elvis Primary (3-days 17-hours) and 239 songs in the Elvis Secondary (19-days 21-hours).
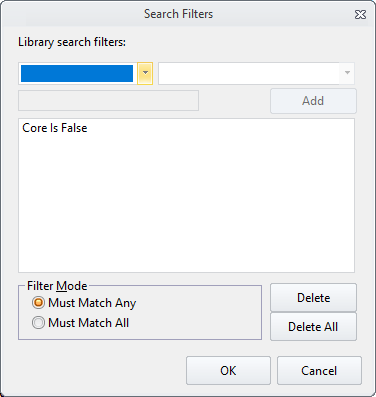
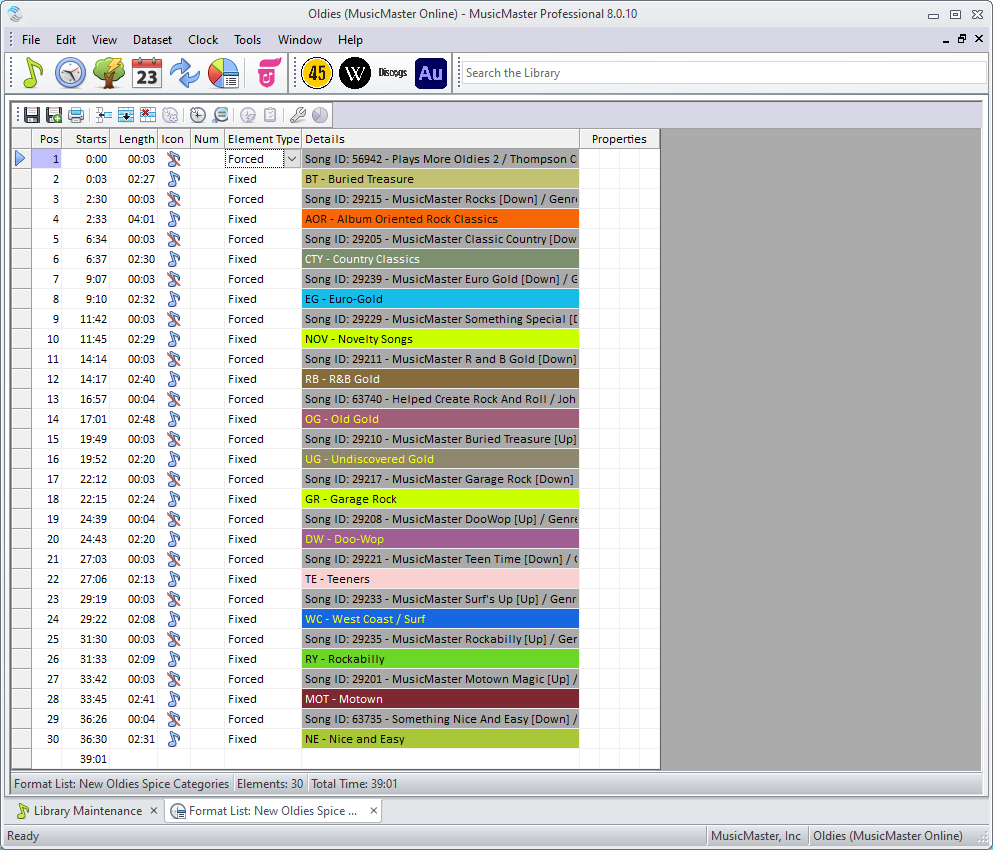
But where are the other 55,000 plus songs? Good question! They’re in separate categories that rotate with associated imaging in a Format List. Only one of these categories is called for every hour, and it takes 15 hours to hear just one song from each. Here are the names of these specialty categories and an example of what’s in them:
- Buried Treasure: Beach Boys – Wendy
- Undiscovered Gold: Bob Dylan – Highway 61 Revisited
- Euro-Gold: Adam Faith – Cheryl’s Going Home
- Doo-Wop: Herb Lance and the Classics – Blue Moon
- Garage Rock: Next Five – Little Black Egg
- Teeners: Ginny Arnell – I Wish I Knew What Dress To Wear
- West Coast-Surf: Lively Ones – Pipeline
- Rock Classics: Jimi Hendrix – Fire
- R&B Gold: Bobby Bland – Call On Me
- Motown: Marvin Gaye – Stubborn Kind Of Fellow
- Rockabilly: Carl Perkins – Pink Pedal Pushers
- Country Classics: George Jones – White Lightning
- Nice and Easy: Frank Sinatra – The Lady Is A Tramp
- Old Gold: Doris Day – A Bushel And A Peck
- Novelty Songs: Playmates – Beep Beep
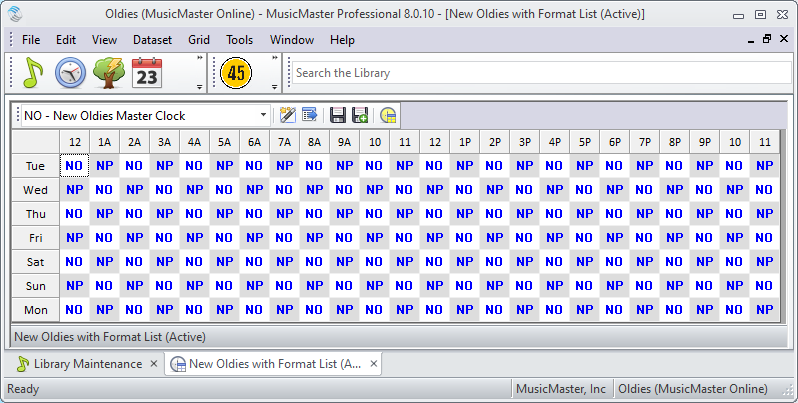
There are only two Format Clocks that alternate every other hour, just to flip-flop those Beatles and Elvis categories. Here’s what one of them looks like:
- Station ID
- SP – Super Power
- B – Secondary
- A – Power
- C – Spice
- A – Power
- BS – Beatles Secondary (or Power)
- A – Power
- B – Secondary
- A – Power
- B – Secondary
- A – Power
- B – Secondary
- A – Power
- Format List: New Oldies Spice Categories (Two elements, imaging first, then rotating through:)
- BT – Buried Treasure
- AOR – Rock Classics
- CTY – Country Classics
- EG – Euro-Gold
- NOV – Novelty Songs
- RB – R&B Gold
- OG – Old Gold
- UG – Undiscovered Gold
- GR – Garage Rock
- DW – Doo-Wop
- TE – Teeners
- WC – West Coast / Surf
- RY – Rockabilly
- MOT – Motown
- NE – Nice and Easy
- A – Power
- B – Secondary
- A – Power
- EP – Elvis Primary (or Secondary)
- A – Power
- B – Secondary
- A – Power
- B – Secondary
- Hour Timing: 59:40 – 60:20
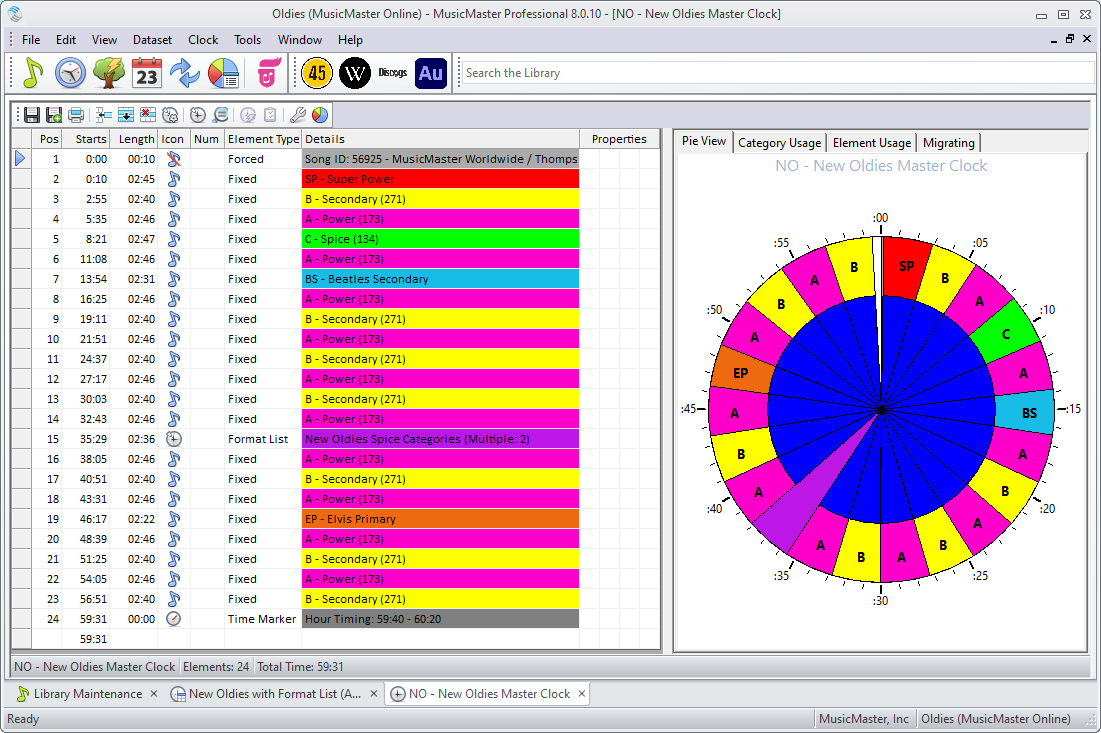
Each clock ends with an Hour Timing marker and an Hour Timing rule is applied to all categories. This keeps each hour within plus or minus 20 seconds of 60 minutes. I run Ready Check before exporting to make sure each day isn’t over or under scheduled. That never happens!
There are a few other tricks hidden under the hood. When I schedule music, I do one week at a time using ganged pass orders and scheduling just the SP-Super Power category first for the entire session. Then I run a second pass to schedule everything else, this time scheduling each hour before going on to the next hour. The A, B, and C categories are scheduled first, then all the others. There are never any unscheduled positions, and log editing is never required. It takes about an hour to schedule each week.
The rules are very simple because I lean on Optimum Goal Scheduling to do most of the heavy lifting.
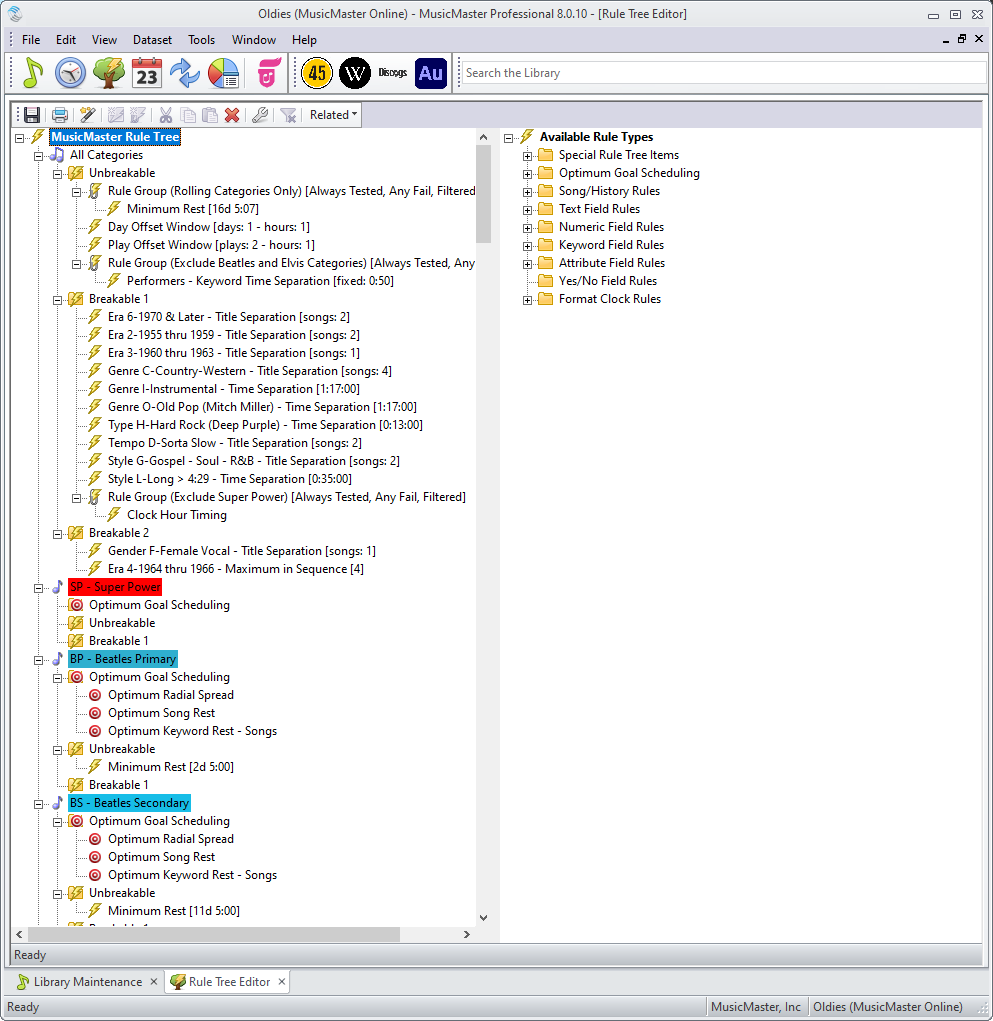

Of course, this same concept should work for just about any gold-based format if you dare to try it!
If anyone has any suggestions for me that might improve things a bit, please let me know. Just don’t suggest that I play fewer songs! This is still a work in progress as I add even more songs to the specialty categories and remove songs that just weren’t very good (probably payola adds).