
MusicMaster Blog
Analyze Your Schedule geposted von Webmaster am Dezember 5th, 2016
By Paul Ziino
There is so much you can do with Instant Analysis. Here are a couple ideas.
Curious how much slow music you’re scheduling? Or how many rock tunes? You can see this all broken down by hour, day, or custom time period. Here’s how to set it up.
In the Schedule Editor, click the Schedule Analysis icon, then the Instant Analysis tab.
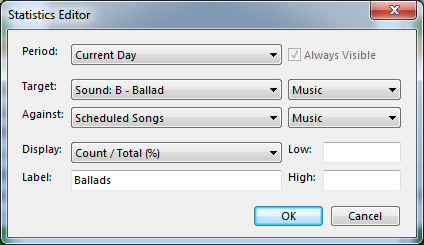
Click the Add button. On the Statistics Editor screen you indicate the time period (current hour, current day, or any available custom time period).
The Target is what you wish to analyze. For this example, we’re looking at Ballads and we’re testing only Music.
Against is what you’re comparing. Do you want to know the total as compared to the total elements in the log, only song elements, or only scheduled song elements? We’ll pick Scheduled Songs, and we only want to count the music songs. I like to see the Count/Total which tells us how many ballads and what percent of the log that equals. We can label this and set low and high thresholds as desired.
Click OK and close the Schedule Analysis window. Now click the Toggle Toolbars icon, select the Toolbars tab and check Instant Analysis.
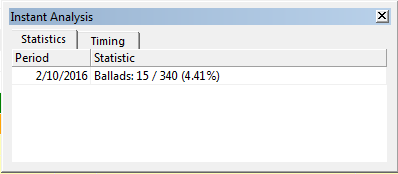
That tells us that 15 of the 340 music elements scheduled in the log for February 10th are coded as Ballads, which equals 4.41% of the music.
You can use the same process to check for tempo, gender, Canadian content, or any other attribute.
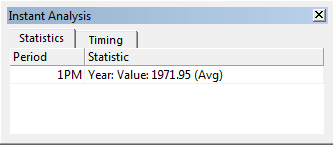
I’m interested to see what the average Mood is by hour. I go back to the Schedule Analysis button, the Instant Analysis tab, and click Add. This time I set my Target as Mood: Value, testing only against Music, and I wish to display the Average Value. I choose to do this for the current hour—the display will update as I move my cursor from one hour to the next.
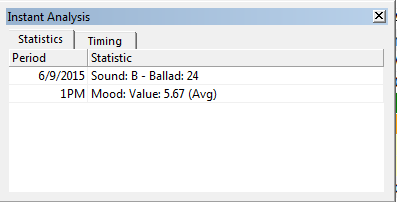
So for 6/9/2015 I have 24 ballads throughout the day, and the 1pm hour has an average mood of 5.67 (on a nine-point scale).
Along the same lines as the average mood, I can also display average year—assuming year is set up in the database in a numeric field.
Need assistance setting up your Instant Analysis? Contact your MusicMaster Scheduling Consultant today!
CRTC Reports and How to Run Them geposted von Webmaster am November 28th, 2016
By Drew Bennett

O Canada! Where pines and maples grow; Great Prairies spread and lordly rivers flow…and where 35%** of a broadcast hour’s musical content must be Canadian! Today, we’re going to look at CRTC (Self-Assessment) reports and how to get accurate information from MusicMaster when you need to keep track of CANCON.
Music Promo Teasers on Demand geposted von Webmaster am November 14th, 2016
By Jesus Rodriguez
This year has been so much fun hosting so many Genius Days. I have been blown away by the amazing response I have received over a part of the Genius Day that I host. It is a part of the session where we discuss some really cool things you can do with Special Sets in the clocks in order to create on demand promos that can be used as music teaser. This takes your music promotion to another level!
Have you ever been in a situation where you’re making music changes and your promos are now old? How about when you submit an email to production to create new promos and they never get it done fast enough? What about when you heard your promo and by the second day it already sounds stale because of it being overplayed.
Check out this short video to see what you could be doing. I bet you will be blown away!
If you liked what you saw let’s get you started on using this feature. Below is a link to a step-by-step tutorial of how to set up your very own music promo on demand.
https://youtu.be/7VBvEusmVVg
There are so many other things you can do with Special Sets. We have a blog series of four articles detailing more of the features you can create.
I hope you can utilize this way of creating some music promo teasers on demand! If you need any assistance, please contact your MusicMaster Scheduling Consultant.
Curing The Ugly Report Blues geposted von Webmaster am Oktober 31st, 2016
By Dave Tyler
If you are one of those programmers who likes a tangible, hard copy of your log in your hands or maybe you need to print out all of the songs in a category for research or an upcoming special, MusicMaster has the tools to make it look exactly how you want it to look. Let’s take this printed list of George Thorogood songs for example.
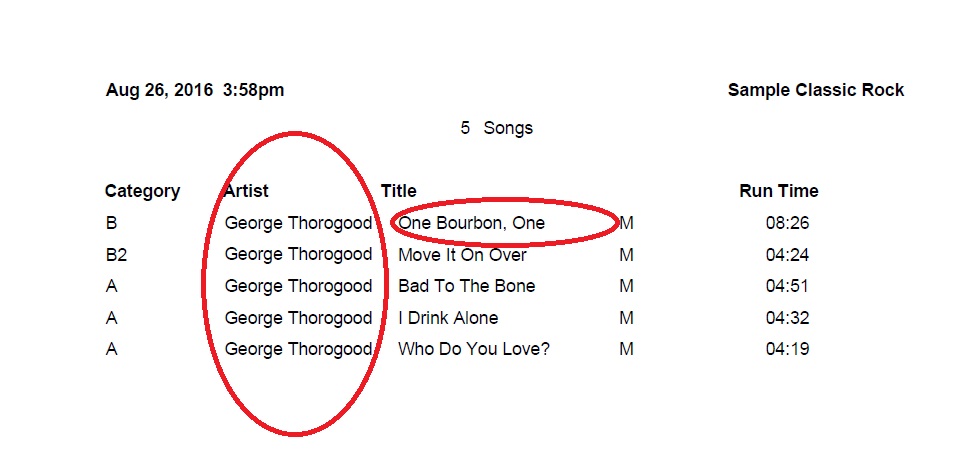
Sure it lists the songs but there are a couple of things missing. First off where are the Destroyers, George’s backup band? And who wants just one Bourbon? I want the Scotch and Beer too! The problem is my log is too crowded to get all of this info in. So let’s pretty this thing up first by clicking our printer icon then the edit button when the Custom Library Reports box opens. (mehr …)
It’s all About the Upgrades geposted von Webmaster am Oktober 17th, 2016
By Drew Bennett
Let’s talk about that green thing under your office desk. I’m not talking about last month’s lunch that you inadvertently left next to the trash bin (and forgot to throw out.) I’m talking about the little green license key you have plugged into the back of your laptop or PC at the office. (Oh, it’s red, you say, in a server room far, far away? This blog article is still for you.)
We get a lot of calls about upgrading to the latest version of MusicMaster and many times, it’s tough to know what version you are running. Today, I’m going to show you how to monitor the status of your license key within MusicMaster and how to check to see if you are licensed to run the latest version. (Hint: You are likely eligible to run the latest version and if not, it’s easy to upgrade. Just call us!)
First, let’s cover how to find out what version of MusicMaster you are running. There are several ways to find out:
1. Check the upper left corner of the software above the Menu Bar. The version and service release number may be listed here.
2. Head to Help, About MusicMaster. You will see a similar screen to this:

Notice the MusicMaster version is in bold along with the service release. (In this case, the service release is SR-2.)
3. Head to Help, Release Notes. The version you are running is referenced near the top of the ReadMe file:

Great! Now, when you call MusicMaster Support, you’ll be ready with your version number. These three places can tell you what version you’re using and they give a good clue as to whether or not you’re running the latest version.
Now that we’re armed with the version we’re running, what about upgrades? What if you’re running 5.0 SR-16? Are you eligible to run 6.0? Here’s how to find out. Head to Help, User Registration. This is the screen that appears:
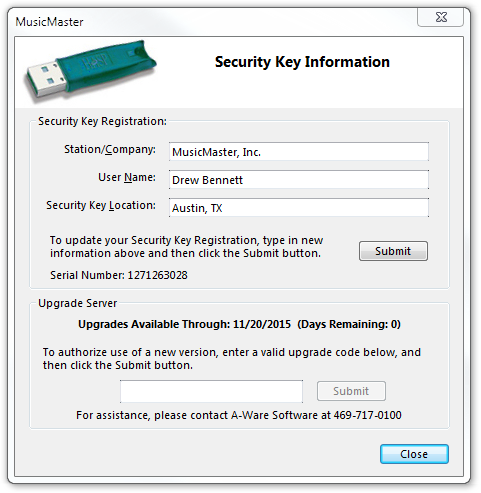
You’ll notice any station information at the top and this can change. You are free to update these fields and submit them to us so your key contains up-to-date information. Below this information, we display your key’s serial number.
Check out the Upgrade Server section of this screen. In it, you’ll see “Upgrades Available Through: xx/xx/xxxx Days Remaining: x” This is the most important information in this screen because it tells you if you are licensed to upgrade your software. In the example screenshot, there are zero days remaining and this key is not eligible to upgrade. Your key may show days remaining and if it does, it’s your clue that this key is licensed for the latest version of MusicMaster. Go ahead and upgrade to the latest version!
In certain cases, codes are needed to upgrade a key. That code can be placed in the field inside the Upgrade Server section. Choose Submit to upgrade a key. In other cases, your key upgrades automatically. Call your Music Scheduling Consultant for help or questions.
Now you know how to check your version of MusicMaster in three different ways. You’re also ready to check any key to find out what version(s) it is licensed to run. If you have any questions about this or any MusicMaster feature, please don’t hesitate to call your assigned MusicMaster Scheduling Consultant and happy scheduling!
Toolbox for building coding rules in MusicMasterPro geposted von Webmaster am Oktober 3rd, 2016
By Marianne Burkett
I love Genius Days. Why? Even after working at MusicMaster for years and years, I always walk away with some new tidbit of information to help programming my music and content even easier.
Typically, when I build rules – I use the Library analysis feature for the entire active library for specific coding, to decide on what kind of separation or quotas I will use in the rules. At the last Genius Day I attended, our founder – Joe Knapp, showed me something I have never used before: Coding Turnovers!
Go to Turnover Analysis. At the bottom of your screen you’ll see your Turnover Graph. Above the graph are some small icons. Third icon from the right is the icon you click to bring up Coding Turnovers
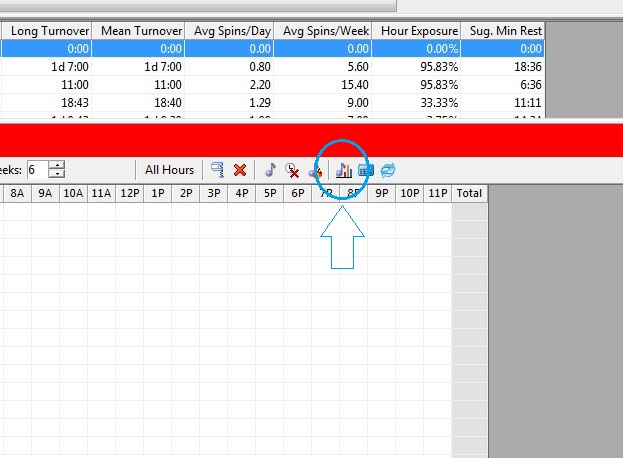
When you click on this, you’ll see a field selection prompt. You pick your field in MusicMaster.
Not only do you get the percentage that you get in Library Analysis, but you also get the projected turnover rates for each code! This is a tremendous piece of info. In the example below – it tells me what amount of time I can actually use in the rules to separate these codes.
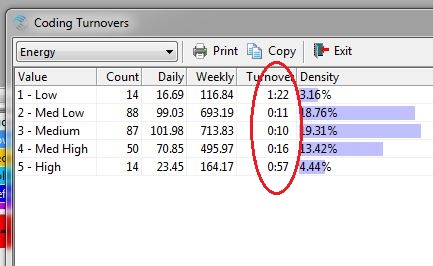
With this kind of information at your fingertips, you can build title or time separation rules with confidence. You could perhaps use the Turnover column in the Breakable Folder as your base rule and relax it a bit in Unbreakable.
I love helping you troubleshoot your Rule Tree and scheduling challenges and I guarantee that now when you call me for help, I’ll be using this tool.
Happy Scheduling!!
Combos and Schedule Properties geposted von Webmaster am September 19th, 2016
By Paul Ziino
A customer called a few weeks ago and said, “I love my combo positions, I get minimal unscheduled positions, but I get more As than Bs or Cs. Is there a way to even out the plays among those three categories in the combo?”
To refresh your memory, Combo clock elements allow you to schedule songs from multiple categories and MusicMaster will step down to the next category in line based on the pass order in Schedule Properties when no song meets the criteria from the first category. Basically, if your pass order is A, B, C, D, E and you have a Combo position scheduling from A, B, and C, MusicMaster will try the A category first, if no A works it will then try songs in the B category when it’s the B category’s turn in the pass order. If no B works, then MusicMaster will try songs in the C category when it’s the C category’s turn in the pass order.
Here’s our solution.
Go to Dataset/Schedule/Schedule Properties and click the Advanced button. Here you are able to establish up to 9 different levels of the pass order. So level 1 could go A, B, C, D, E, but level 2 could go B, C, D, E, A and level 3 could go C, D, E, A, B and level 4 could go another way and so on. You assign the levels to the grid in the upper half of the screen, and as you switch from level to level you establish the pass order and depth settings in the lower half.
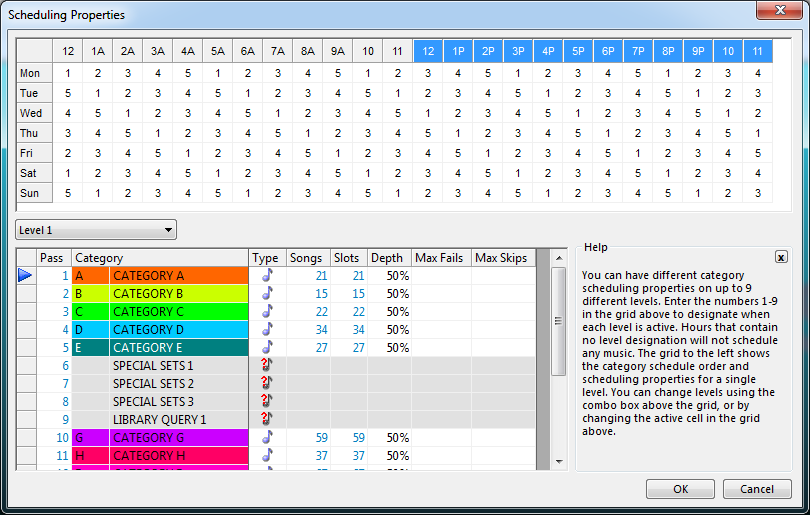
In my example I have 5 levels. When in level 1, the A category is first. When in level 2 the B category is first, and so on. So in level 1, my combo position of A, B, and C will try the A category first. If no A works, then a B will be attempted. If no B works, then a C will be tried. If no C works, then the position will be left unscheduled.
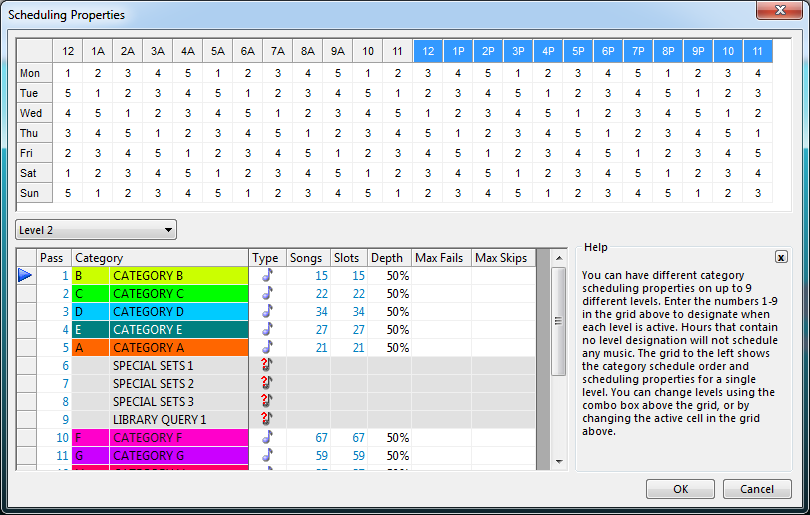
In level 2, the B is attempted first, then the C, and the A is in the last pass.
When you run the automatic scheduler you’ll see categories bouncing around in that process because MusicMaster schedules pass 1 from each level first. So at midnight it’ll start with the A category, but in 1am it’ll start with the B category, and in 2am it’ll start with the C category with that first pass.
The end result for my customer was a more even use of those categories within his combo positions. Of course, she was thrilled! When you have MusicMaster-related questions, make sure to contact your Music Scheduling Consultant—we’re always here to help!
Clone Your Database & Go Crazy! geposted von Webmaster am September 5th, 2016
By Dave Tyler
Have you ever thought about making some wild changes to your database but you are afraid to because if it does not work the way you want it to you’ll have no way back? I’ve been there too! It reminds me of my early days in the business when I would edit a spot or song on reel-to-reel. Every cut and splice meant there was no going back; total commitment! Sometimes it worked out sometimes it didn’t. Then came computers and non-destructive audio editing where you could have as many copies of a track as you wanted and all of them are in pristine, original quality. Make a mistake, try again no problem. There is a similarity here with your MusicMaster database. Let me explain.
Let’s say I am running a Classic Hits station and have always had my categories as A-60’s, B-70’s, C-80’s etc. to keep things simple but I am considering completely overhauling my categories to be more like A-60’s British, A2-60’s Psychedelic, A3-60’s Pop, B-70’s Love Songs, B2-70’s American Rock, etc. These are some pretty big changes and if I make those changes and it proves to be a train wreck I have a lot of work to do to get things right again. MusicMaster has you covered. Just open your Datafile Manager and select the database you want to clone then click the “Clone” button.
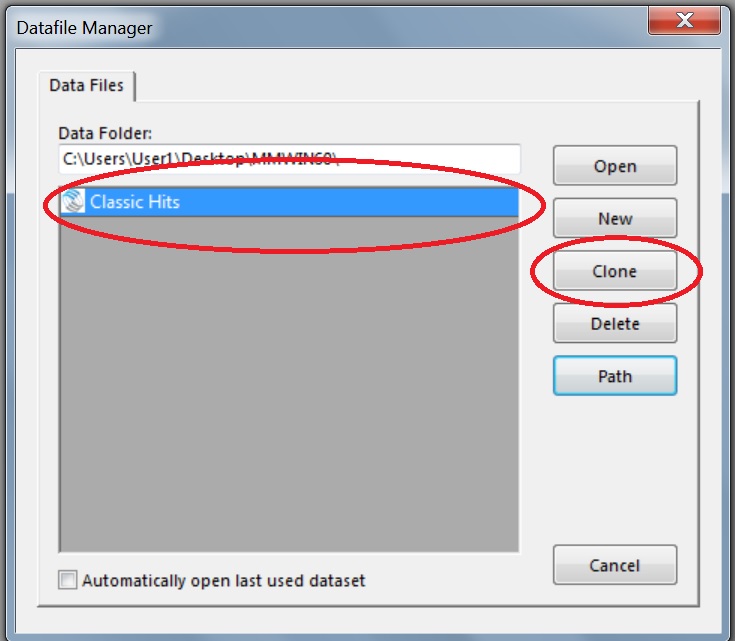
Once you do this another window will pop up with a box that allows you to name this new version(Clone) of your database something that will differentiate it from the original. In my example I am calling the clone “Classic Hits – New Concept” so I know this is the one I can fool around in.

This clone is an exact copy of the original database and includes your Export Design and all of your current settings, clocks, grids etc. You can make all of the changes you have been dreaming about and it will not affect your original database at all. Change your categories. Shake up your Rules or start all over with new rules. Create new clocks to reflect your vision using your new categories and Auto-Schedule to see if it works the way you want it to. All the while, you can continue to use your original dataset to schedule on the air. Since this a clone, you might schedule out six weeks and then review history graphs to confirm the change is what you want.
Once you are satisfied, you’ll have two choices: If you’ve done this testing quickly enough, you could simply begin exporting from this clone. If there is a gap in the logs scheduled, you could reconcile the aired logs into the cloned data and proceed or you could make the changes in your on-air data knowing the changes have been tested and will do what you want.
Cloning is a great way to try out new things in your database in a non-destructive way, completely shaking things up while preserving what you know already works. As always, remember to make backups of your data before making any big changes. This too gives you a way back. Have fun!