
MusicMaster Blog
Triple Feature: Traveling for the love of music, Trip 1 Publicado por Laurie Knapp en marzo 28th, 2024
Traveling for the love of music, Trip 1
by Brian Wheeler
3 trips. 3 adventures. All three largely music-driven excursions to break up the monotony of winter and to feed our wandering souls. I strongly encourage any music lovers to try to incorporate travel and music. It’s a wonderful and rewarding experience. For my next three blogs, I’m going to share with you my recent sojourns.
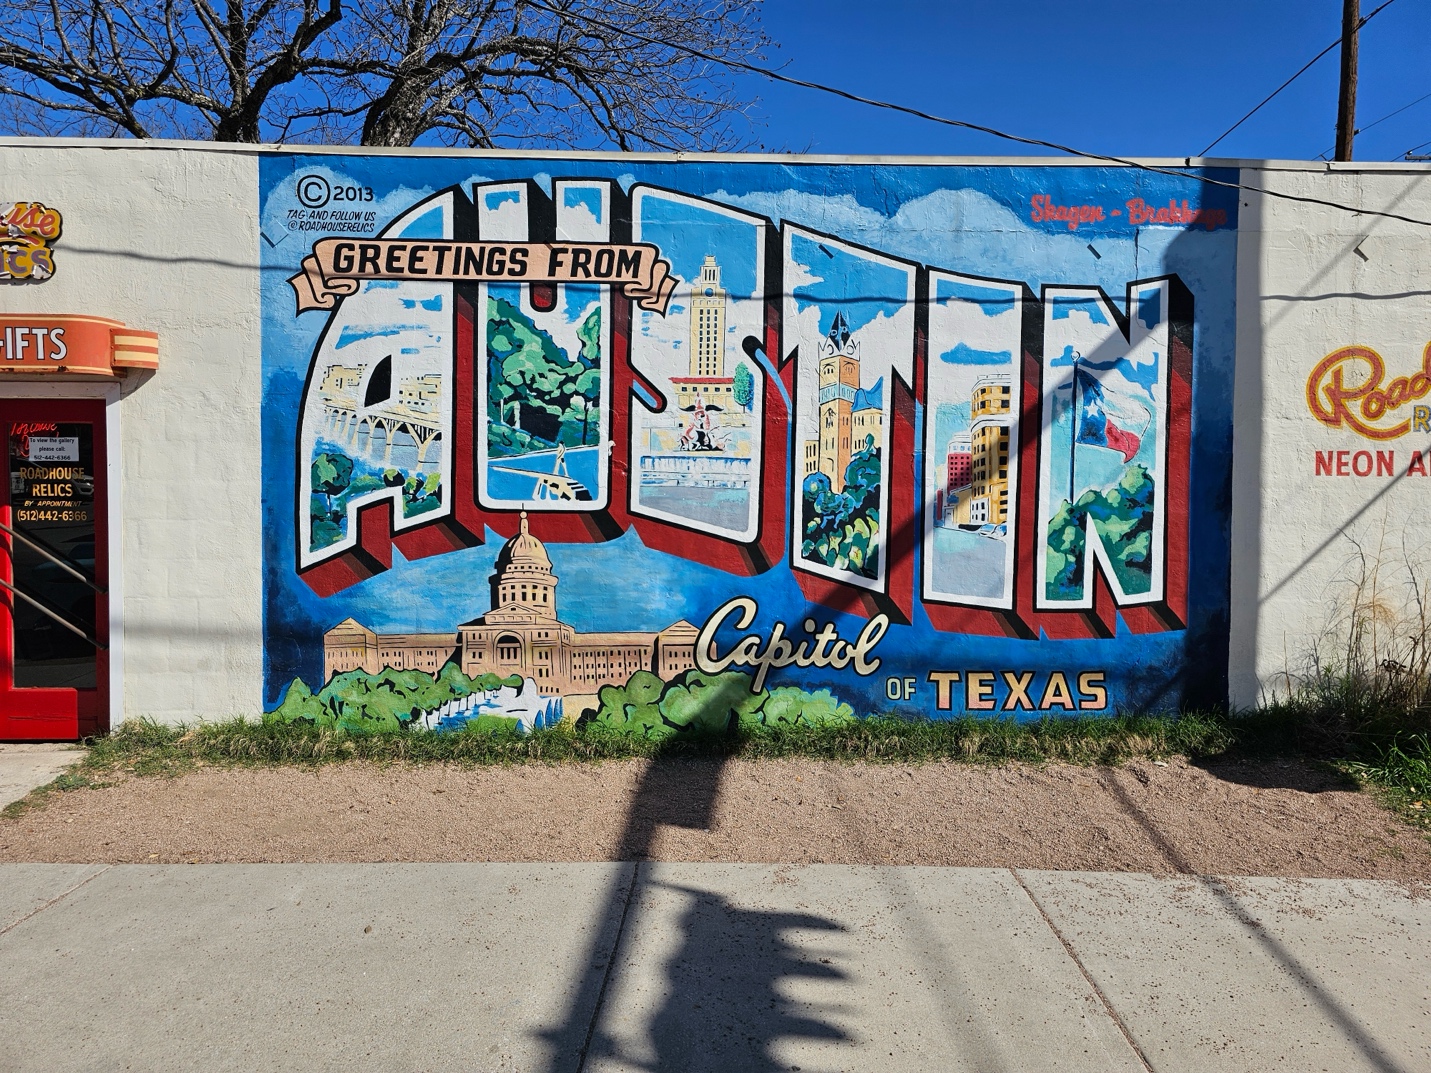
Our first of three trips begins in Austin, Texas. Austin has built quite a name for itself in recent years. Known as a music Mecca of the south and rivaled perhaps only by Nashville, Austin has grown in leaps and bounds in recent years. I recently visited Austin to immerse myself in the music, culture, and local fare, as well as to learn more about the community’s ‘keep Austin weird’ mantra. My wife Stacy is always game for a travel adventure and we both love live music, so we set off for the Live Music Capital of the World to see what makes this town tick.
We arrived in Austin just a couple weeks before South by Southwest, but there was still plenty to do. We secured tickets to see The Dead South, a folk-bluegrass combo that hails from Regina, Saskatchewan. Make no mistake, this is NOT your father’s folk-bluegrass band. With a penchant for dark lyrics and earnest delivery, their shows have a punk/goth ethos akin to Bauhaus, but with mandolin, banjo, acoustic guitar, and stage apparel that would put them on the streets of 1800’s Deadwood if you didn’t know better.
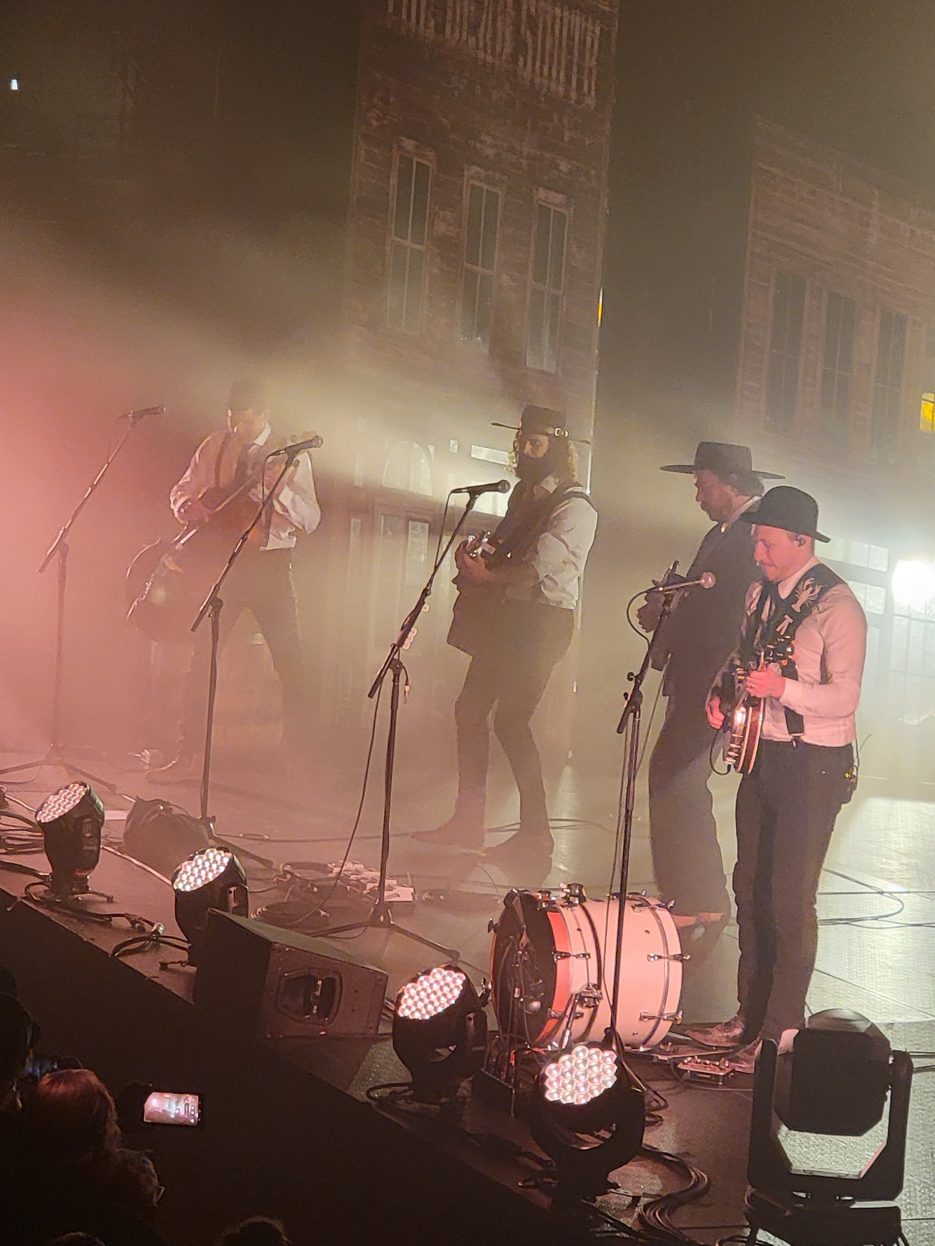
What made this spectacle even more special was the venue. Austin City Limits Live. I’ve watched Austin City Limits as far back as I can remember. This venue is now home to the longest-running music series in television history. That’s cool enough right there. But the artists that have graced these halls along with the performances that have been witnessed make this hallowed ground for a music fan. The oversized photos of musical greats in action was such a sight to behold. The venue itself isn’t very old and was quite reminiscent of the Cosmopolitan in Las Vegas, with its shallow balconies and spacious floor. I found the crew at the venue to be friendly and quite knowledgeable about music and the history of ACL as well. It was a lovely visit, and I’d encourage anyone who loves music to make the pilgrimage.
So, what makes Austin “weird”? Stacy and I took an ‘off-the-beaten-path’ tour to find out more about the “Keep Austin Weird” mantra. We enjoyed the Karaoke Cab on the way to ACL, singing songs at the top of our lungs with the windows down. Then there’s the Museum of the Weird, the mystical Zilker Botanical garden, you can even play a rousing round of Chicken S*** Bingo, where you lay your bet on which number a hen will leave her ‘mark’ on a bingo board. If she ‘graces’ your number, you win a prize! Weird, indeed!
We also visited the Elisabet Ney Museum on our tour. Elisabet was an accomplished sculptor and created many impressive pieces up until her death in 1907. She was commissioned to create many notable busts, including Stephen F. Austin and Samuel Houston, as well as foreign dignitaries such as Otto von Bismarck and King Ludwig II of Bavaria. She led a fascinating life and was a champion of the local flora and fauna, mandating that the grounds around her studio grew wild as sort of a mini-habitat.

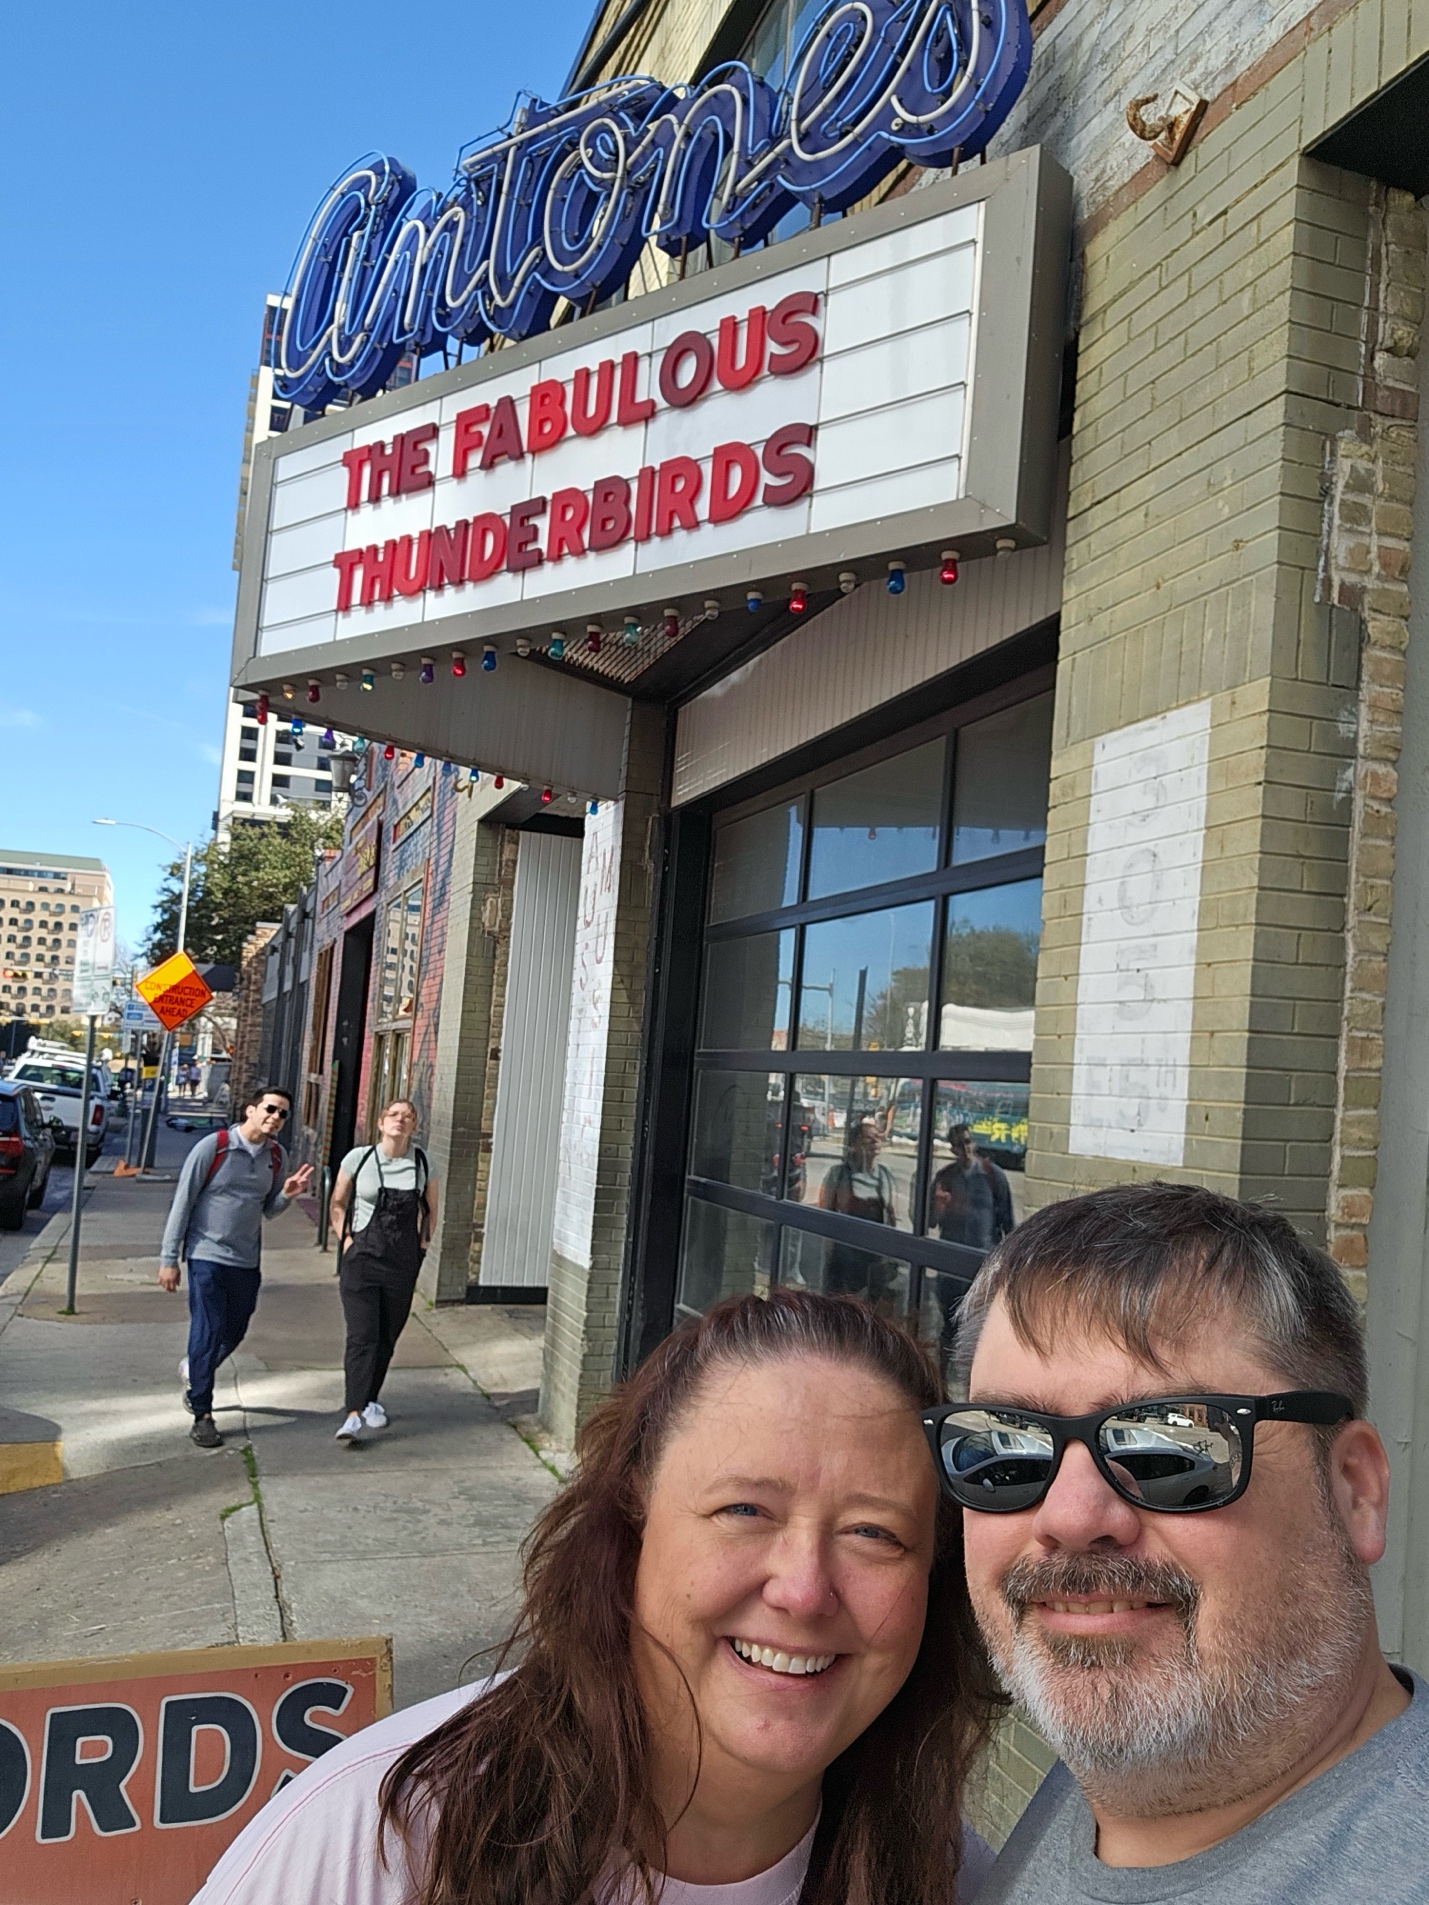
Many musicians that carved their own niche have made Austin their sanctuary. Willie Nelson moved to Austin in the 70s and has called the Austin area home ever since. Roky Erickson, member of the 13th Floor Elevators and pioneer of Psych Rock, called Austin his home for a good number of years as well. Musician Gary Clark Junior also resides nearby and own’s part of Antone’s, a storied music club in Austin. These are just a few of the many artists that call this weird, wonderful town home.
Speaking of Antone’s, it was a treat to visit its neighboring record store, Big Henry’s. While listening to the Fabulous Thunderbirds perform a soundcheck, we browsed the rare vintage vinyl and show posters next door.
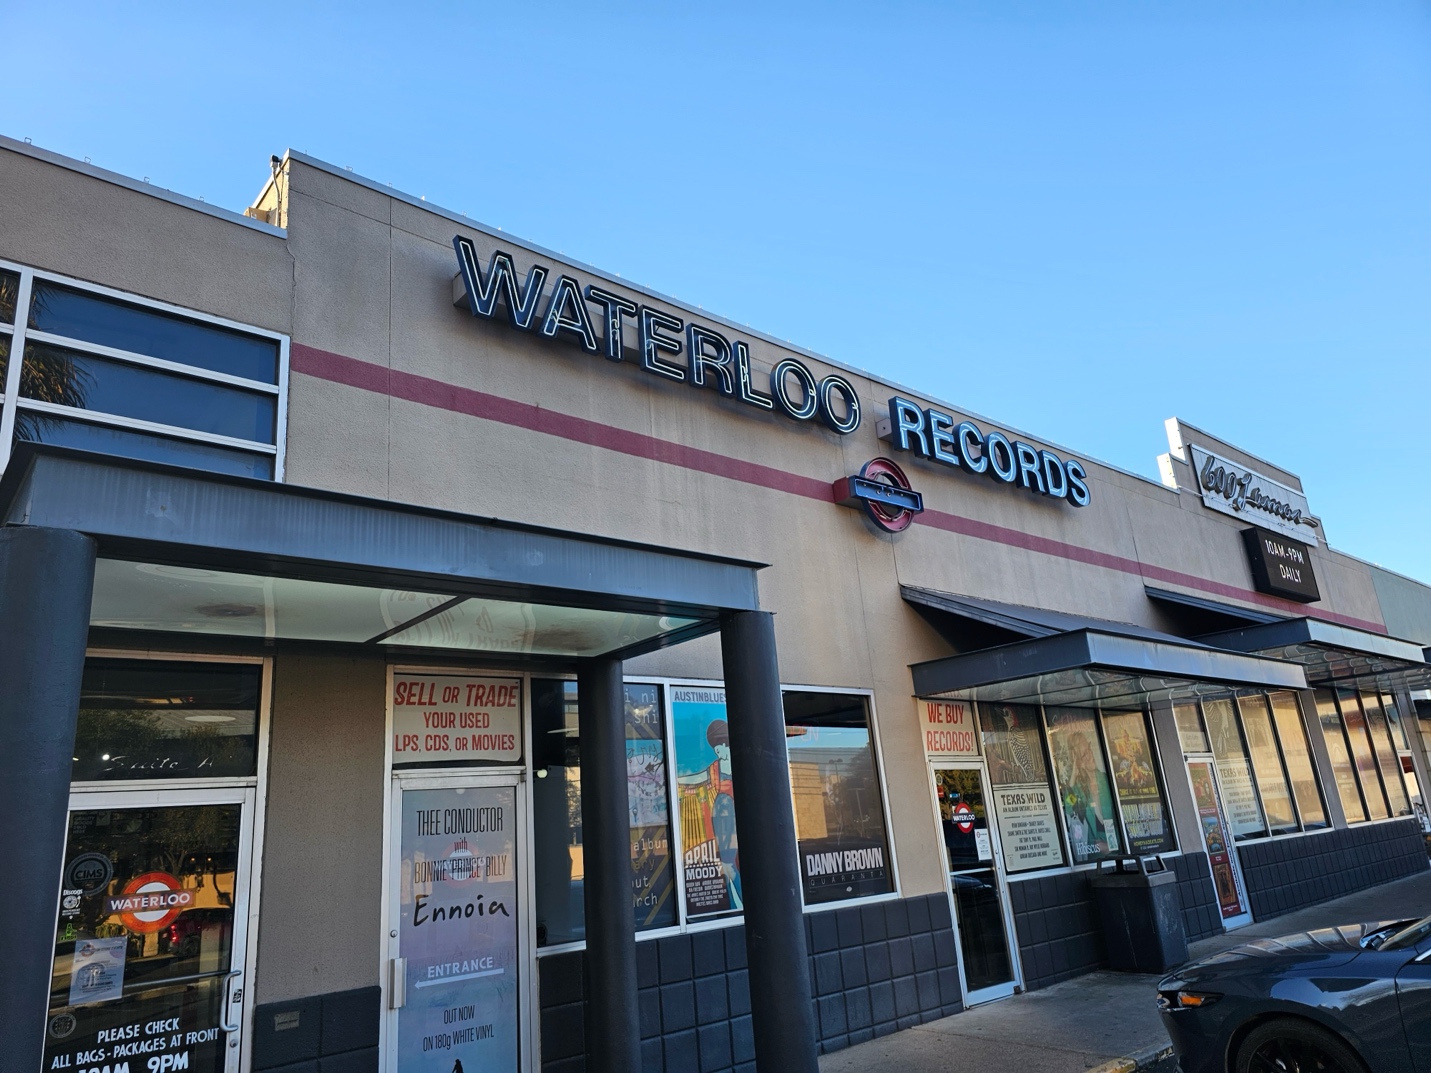
Having had a taste of the bountiful vinyl-hunting, we continued to slake our thirst for music at some of the area’s offerings: Waterloo records, Antone’s Records, and End of an Ear. We managed to find some tasty tunes at each location.
“Weird” counterculture may be a hallmark of Austin, but it isn’t the extent of what defines this cool music town. Art, music, the people, and I can’t believe I didn’t mention the FOOD are just a few of the many reasons you should make a visit to this must-experience destination in the heart of Texas.
Always Something There To Remind Me Publicado por Laurie Knapp en marzo 15th, 2024
By Dave Tyler
I don’t know about you, but I walk in a room and forget why I came in here probably 5 times a day and that’s on a good day! I remember a day when as a morning guy I did 530a-10a, cut some spots, maybe did an appearance, and my day was over. These days, we all wear so many hats that we need reminders. I use the alarm feature on my phone for all kinds of things from paying bills to taking chicken out of the freezer to thaw for dinner. But did you know that MusicMaster has its own handy reminder system built-in?
You can also use it to send updates to people who work in the same database. At many stations/companies, there are many users in the same MusicMaster database, with different folks responsible for doing different things in the log daily. As a morning guy for more than 30 years, I would not see my buddy who did afternoons or evenings for week at a clip sometimes. Sure, I could leave a note on their desk, but if that person also had work to do in MusicMaster that day, wouldn’t it be nice (yea I heard the Beach Boys too when I said that) if it was possible to leave a note in MusicMaster for them?
I gotcha’ covered and it is super easy too.
When you are in the Schedule Editor just click on the Create/Edit a Memo icon. When it pops up enter notes you want and then click save.
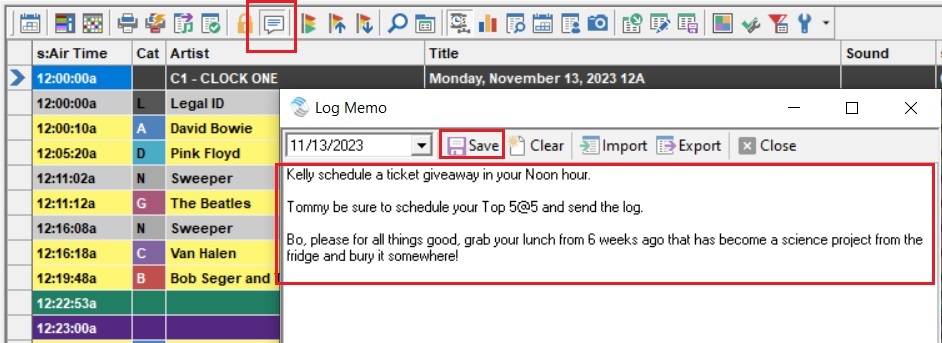
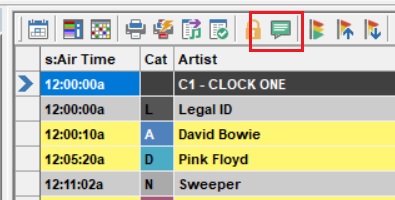
Now when someone open the log that Memo icon is green which means there is a memo.
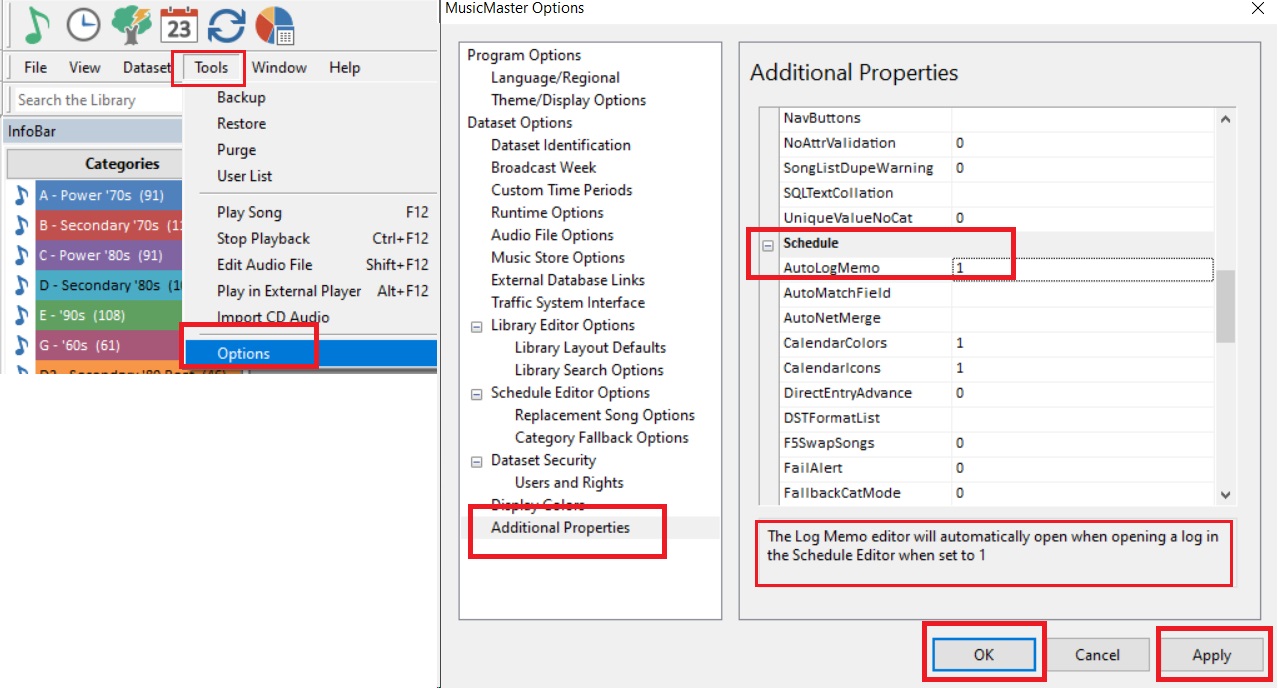
Now I know what you are thinking……yes that’s cool and all but I don’t think Kelly, Tommy and certainly not Bo are going to notice that little green icon…can I make it more obvious? I’ve been waiting on you to ask that and the answer is YES!
Go to Tools/Options/Additional Properties and on the right-hand side scroll down to the “Schedule” section and change AutoLogMemo from a “0” to a “1” and voila! When someone opens the log, the memo will pop up!
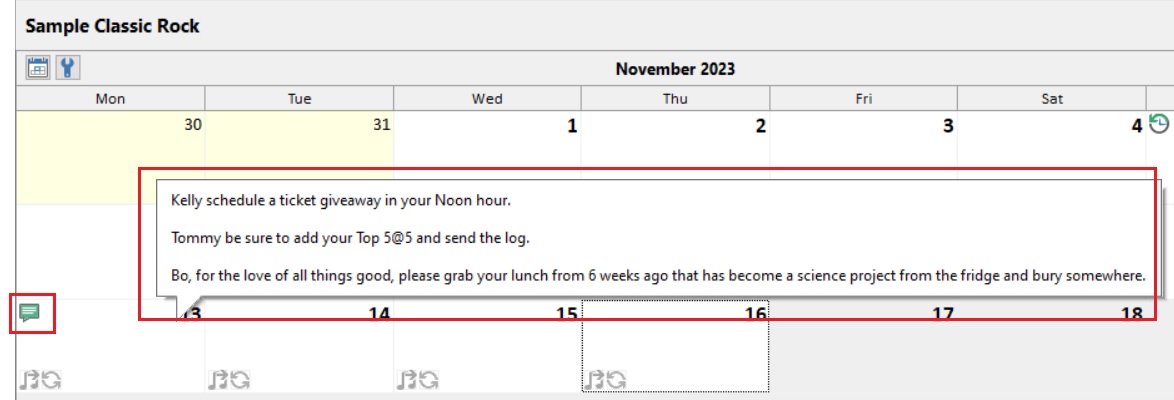
But wait there’s more. When users open the Schedule Calendar, not only will they see our spiffy green Memo icon on the day, but if they hover their cursor over the top of the date, it will show them the memo!
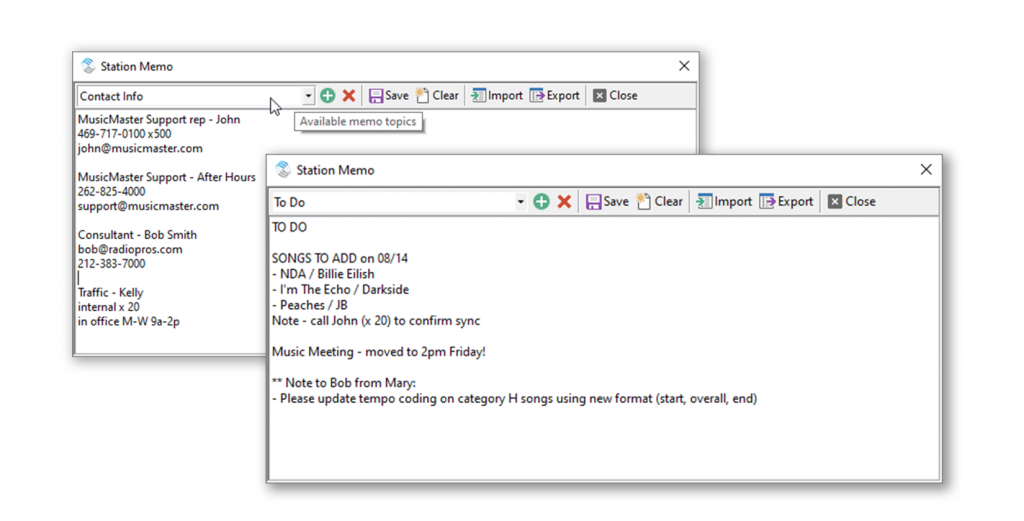
Furthermore, memos aren’t just for Logs! Sometimes, you might want to leave a more general message or reminder, or even store some information that everyone can reference, such as the phone number for your MusicMaster Scheduling Consultant!
That’s when a Station Memo comes in handy. You can find them in the Dataset menu, right at the bottom. Here, you can add and save different memos. Anytime you or anyone is in the database, they can pull up these station memos for reference. Below is an example of two memos I have saved, one with important contact info, and one with a To Do list that everyone can see!
Yep, we’ve thought of everything. From this point forward it will be up to you to remember to write the memo… maybe set an alarm for that!
Keyboard Shortcuts on the Web Publicado por Scott Wirt en marzo 15th, 2024
MusicMaster CS for the Web runs within your browser, which has keyboard shortcuts of its own. So, some hotkeys are unavailable to MusicMaster CS for the Web.
Fortunately, many functions using hotkeys in MusicMaster can also be accessed other ways. We’ve also added new ways to access some functions on the web.
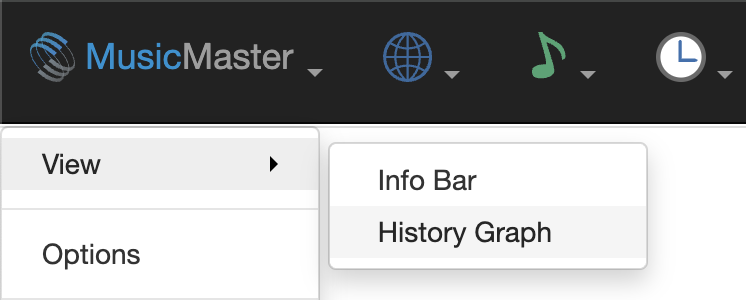
History Graph
In the Desktop, you could toggle the History Graph using the F6 key. On the Web, you can find it in the View menu, located under the MusicMaster logo.
We’ve also added new toolbar buttons in the Library and Schedule Editor to toggle it on and off.
Swap Songs in Schedule Editor
In the Desktop Client, you may have used F5 to swap songs. On the Web, you can still double-click a song in the pointer column (the small left-most column) and then double-click the pointer column for the song you wish to swap with. There are also swap options available in the new Selected Element toolbar menu in the Schedule Editor.

Open Replacement Songs Panel
In the Desktop Client, you may have used F9 to look for replacement songs in the log. On the Web Client, you can still double click the song (in any column besides the pointer column) to open replacement songs.
Welcome to the MusicMaster CS for the Web Publicado por Laurie Knapp en marzo 14th, 2024
Now you can connect to MusicMaster Client-Server directly from your browser – no Windows computer or software installation required.
The Web Client complements the Desktop Client, with most key functions for everyday tasks already available on the Web, and more to come. You can use both clients together, and changes you make in one will be reflected in the other.
Despite differences between how Web and Windows applications work, we’ve made an effort to keep the Web version familiar to you. You’ll find similar menus, and where available, operations like context menus and drag-and-drop. Just like in Windows, multiple parts of the software can be opened within the same screen.
Click ahead to familiarize yourself with some of the key differences between the Web Client and the Desktop Client.

Which Rules are a Top Priority? Publicado por Laurie Knapp en febrero 27th, 2024
By Chris Hulsether
What rules are the most important? Which ones do you want to pass first? Why does it matter? That’s what we are talking about here.
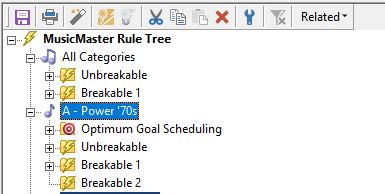
First, let’s break down the Rule Tree. You will have folders for Breakable and Unbreakable Rules.
The first folder you see in the tree is for All Categories, and it includes Breakable and Unbreakable folders. These rules apply to all categories. So, if you have a gold-based format and you want to apply Artist Keyword Time Separation to every song, drag the rule over from available rule types and place it in one of the folders. This will apply to All Categories, and you won’t have to put the same rule in each category.
But what if you want the rule to apply to MOST categories instead of ALL categories? Right click on All Categories and select Rule Tree Properties. That’s where you can select which categories should be bypassed. Meaning they will not be subject to rules in All categories.

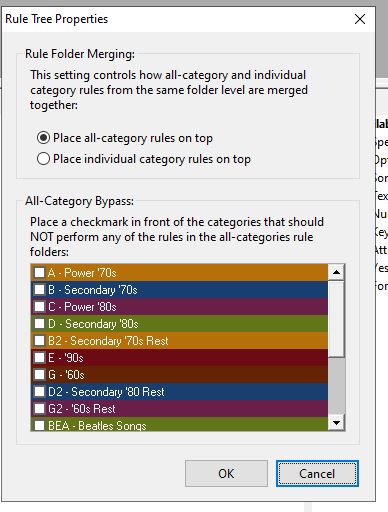
You can then set rules for those categories inside each individual category’s folder where they can play by different rules. Typically, Imaging categories or small high rotating current music categories would have different rules than the rest of your categories.
You can also set which rules should have highest priority. By default, the All-Categories rules get tested first and then the individual categories get tested. But in the Rule Tree properties, you can switch it so that Individual categories are on top, and the Individual category rules will be tested first. Once an Unbreakable rule fails in All Categories, the Automatic scheduler will not bother to test against the others. So, whatever rules you list first are most important. You should have your rules listed in order of importance. For example, if you list a Sound code rule first and a song fails that rule, it will keep it from scheduling, but if Artist Keyword Time Separation is more important you may want the song to clear that rule before testing other rules that may not be as important.
Of course, MusicMaster will stop testing once it fails an Unbreakable Rule, and that song will be skipped. But it will also stop when it fails the first Breakable Rule. That song may still be in the running, but MusicMaster will move onto checking the next song to see if it performs better. There’s no point in worrying about lower priority rules if a higher priority one fails.
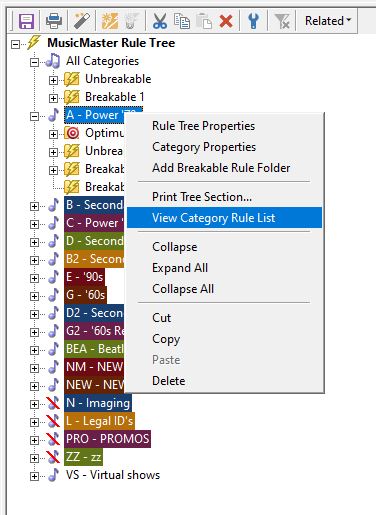
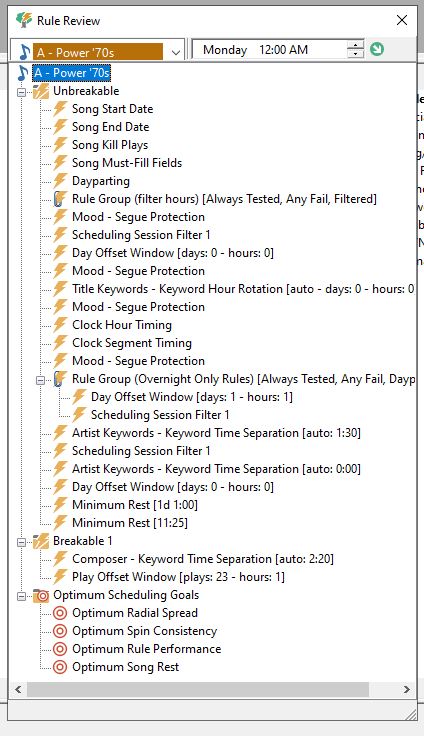
To see the order in which your Rules are tested, you can bring up the Rule List. Right-click on the category in your Rule tree and select View Category Rule list. This will show you the order in which the rules will be tested.
Note that you can also create more Breakable folders if you need. For example, right-click on Breakable 1 and choose Add Breakable Rule Folder, and a Breakable 2 will be created.
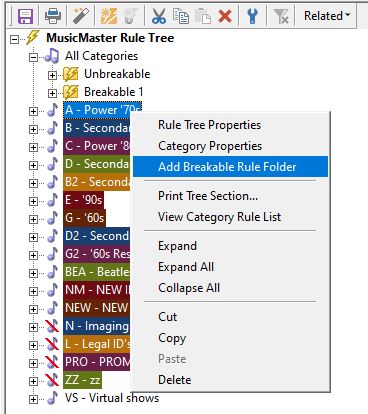
You may ask: Why would you want to have multiple Breakable rule folders? It has to do with the way the rules are all merged together when testing. Remember, rules are tested in order of importance. So the rules in each Breakable folder on your rule tree will merge with the rules in their corresponding numbered folder. This keeps all your higher priority rules above your lower priority rules, no matter which category folder they came from.
Prioritizing your rules can make it easier for the Automatic Scheduler to find the best songs possible for you and can reduce the number of unscheduled songs you may get. If you have any questions, talk to your Music Scheduling Consultant.
“Where Are You Now?” Finding Your Database File Publicado por Laurie Knapp en febrero 26th, 2024
By Dave Tyler
Ok admit it, when you saw the Title of this blog you simultaneously heard Jimmy Harnen singing his 1989 hit right? Don’t worry…me too! I loved that tune and spun the wheels off it at my radio station! Ok back to business. When it comes to using MusicMaster for your radio station there is nothing more important than your database. Your database and everything in it, the rules and codes, special sets, song lists, and all of tweaks you’ve made is the secret sauce that makes your station stand out to the listener. Try to get McDonald’s to tell you what Big Mac sauce is or Coke to give you their recipe…not gonna happen. And you should be equally protective of the hard work you’ve invested into making your radio station(s) sound so dang great!
It is important to keep your database healthy, and my colleague Vicky James wrote a great blog on housekeeping tips you can read here: https://musicmaster.com/?p=8665. She also wrote another great article on new features in MusicMaster 8 that will make sure you never forget to do the all-important backup, which you can read here: https://musicmaster.com/index.php?p=8845.
Ok, so we know our database is the most important thing we have to keep the sound of our station on track and winning but…where is it? There are several reasons why you may need to know where it is located. I get multiple calls every week from folks needing to install MusicMaster on a new computer, or maybe they have an issue that requires them to send their database to me to diagnose. Regardless, it is essential to know where your database is located. It is easy to find out.
- Open your station in MusicMaster
- Click on Help/About MusicMaster/Data Folder
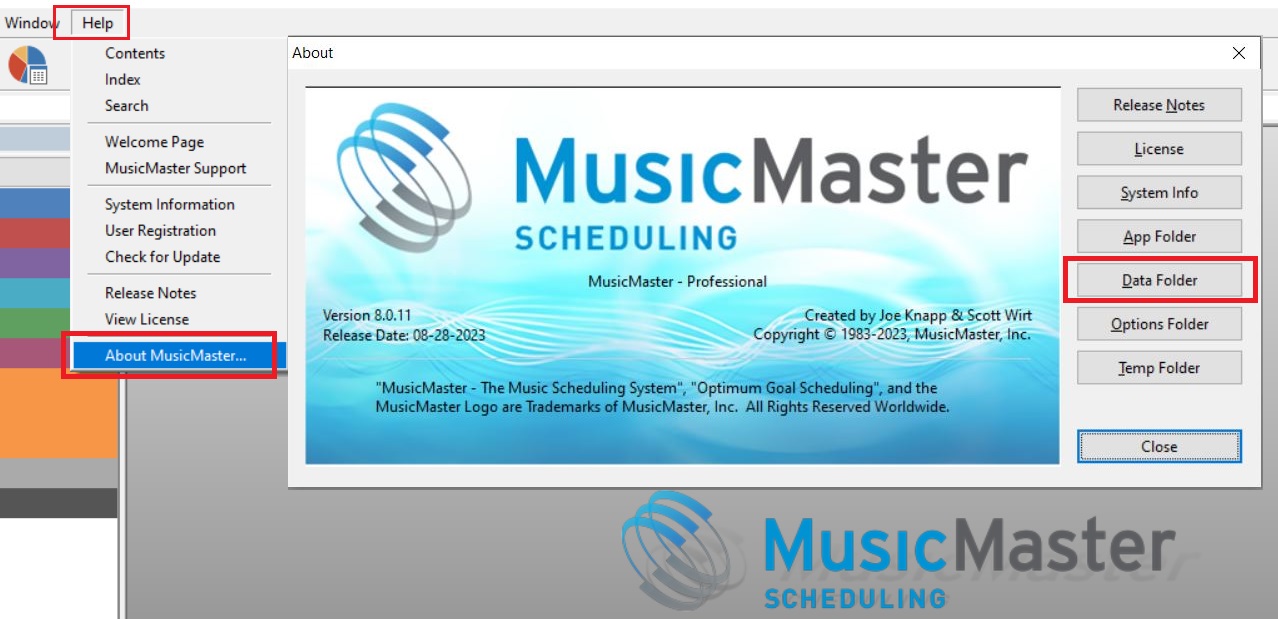
This opens up Windows Explorer and you can see your database file. In this example, the database is Sample.mmd. You will potentially see many other files in here as well. For example, you will likely see a “.zip” file. This is your backup. To the right, it will tell you when you did that backup in case you need to do another. You might also find “Def” files. These definition files do specific tasks when you use them, like manually reconciling your music and syncing your library.
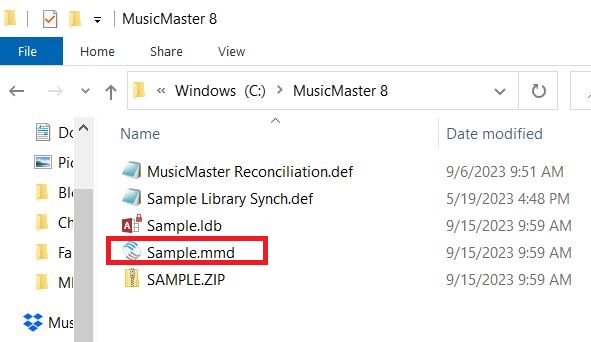
If you happen to be moving your database to a new computer, then it would be important to not only copy the database (.mmd) file but also bring the “Def” files along too so you can continue to do all of the things you are used to doing. Also notable is if you look in your data folder and do not see “Def” files, that is not a problem. If you have them, you need them and if you don’t have them, you don’t necessarily need them.
Knowing where your database is located is of the utmost importance. Your database holds all the secrets and if lost it would mean starting over. Yuck! Know where it is, protect it, and back it up. If you have any questions your MusicMaster Scheduling Consultants are here to help.
Max Plays Per Day Publicado por Laurie Knapp en enero 29th, 2024
By Jesus Rodriguez
We often get calls where the perfect song with no rule violations plays way too many times in the day because it is the perfect item for any scenario in your station’s music log. The question that comes up is if there is a way to prevent a song form playing so many times, and the first thing most clients think of is minimum rest. That can help, but once that rest is accomplished, guess which song will likely be able to schedule right away?
Instead, you can use Max Plays Per Day. I realize that Max Plays Per Day is not a rule that many know exists, so I decided to write a blog on that topic, and it is a very easy one at that too.
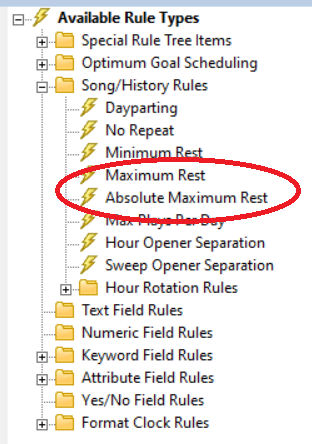
The Max Plays Per Day Rule is located here:
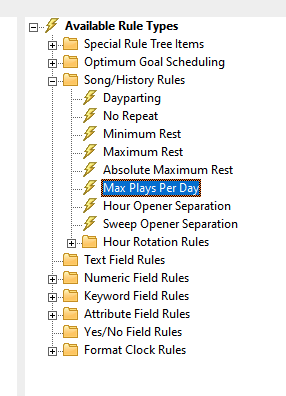
Drag and drop it into your desired category or rule section.
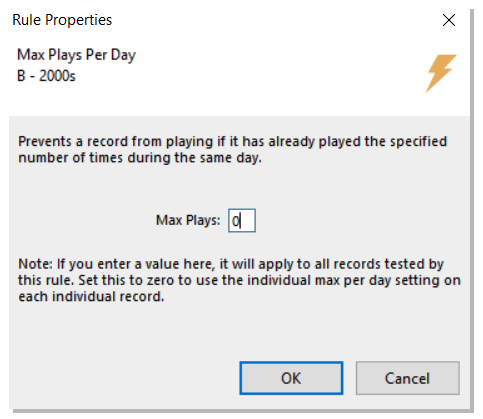
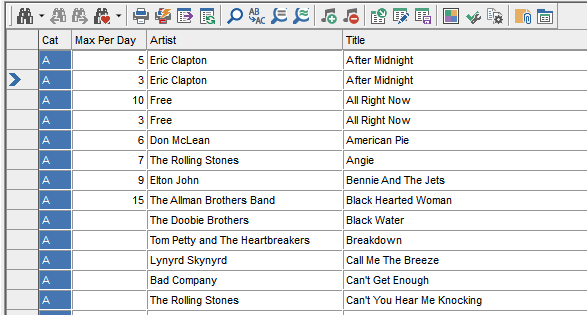
You can then place a number representing the quantity of plays that any given song will be allowed to play from within that category. However, if you place a zero there, you can control the quantity of plays each song will be able to play individually on a song-by-song basis. Placing a zero will allow you to have a different number of maximum plays per day per song so they are not all the same, as they would be if you were to place a number here within the rule tree.
If you decide to place a zero to give each song a different max number of plays per day, there is an additional step to assign the play count per day to each song. You will have to open your category in the Library and include the Max Per Day field in your library grid view so you may type in the amount of plays you prefer for each song. Remember, you still have to have the rule in the rule tree in order for this to work, but it must be set to zero.
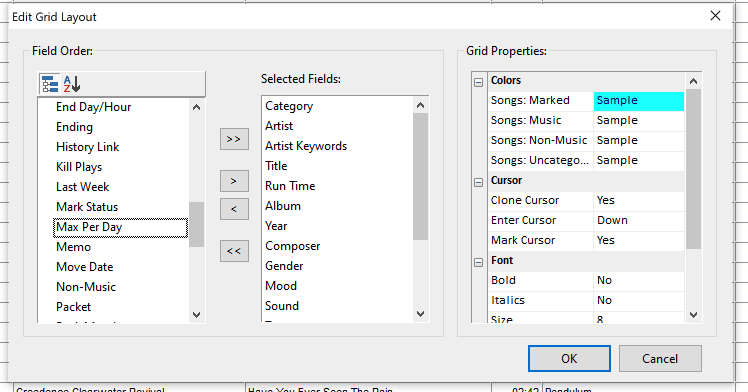
Once the field is added to your view you may begin to place the desired number of plays per each song. If left blank that item will continue to rotate as it always has in the past with no restrictions.
We hope this will help you with controlling your number of plays per day. If you have any questions on this topic, please contact our team of music scheduling support representatives.
Maximum Rest vs Absolute Maximum Rest Publicado por Laurie Knapp en enero 22nd, 2024
by Paul Ziino
There are lots of rules available in your Rule Tree. I see these two used frequently, but they are often misunderstood.
First, what does Maximum Rest do? When you place Max Rest in your active Rule Tree, it acts as a turnoff point. Once the time has been met as set in your Max Rest rule, any rules that come after it are turned off, thus making the song a priority for scheduling. Here’s my rule list for category H-Hot Recurrents.
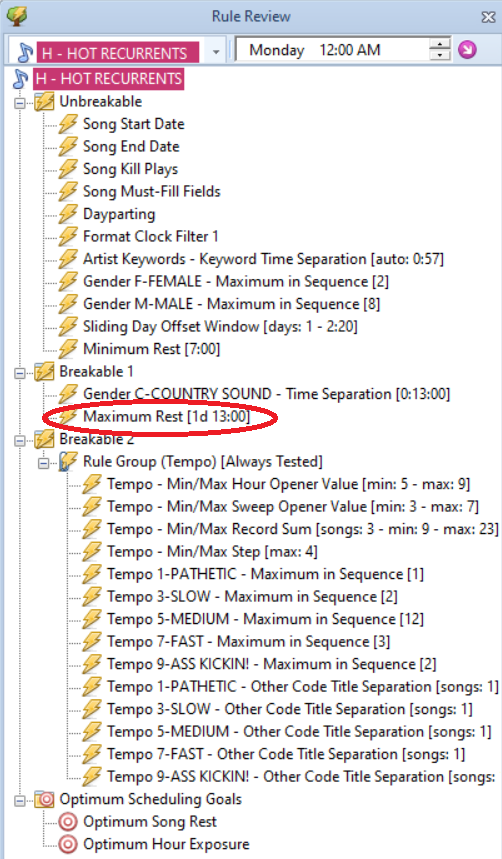
Max Rest is set to 1d 13:00. Once a song has rested longer than 1d 13:00, Maximum Rest will turn off the rules that follow. Basically, once a song has rested 1d 13:01, we no longer will test the Tempo rules in this example. You will see this in the Schedule Editor represented by rules that are listed in black—black rules are not being tested. (The two rule groups that appear in black do so because they have time restrictions and are not being tested at this point in the schedule.)
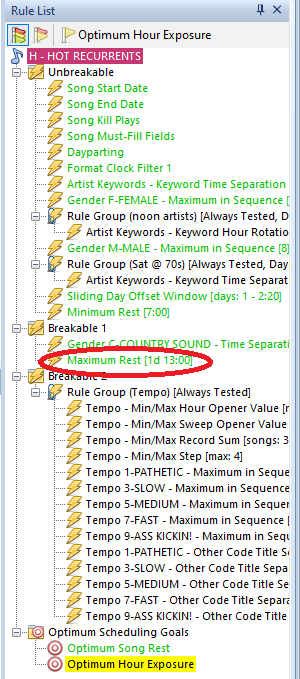
Notice I said Maximum Rest turns off the rules that come after it. Maximum Rest does not turn off Optimum Scheduling Goals. So if the Goals are in place, they will still play a part in the automatic scheduling process.
But there is another rule option available if you really want to ensure the song plays, no matter what. If Absolute Maximum Rest is exceeded, the song is immediately scheduled right then and there without regard to any existing rule failures or Optimum Goals.
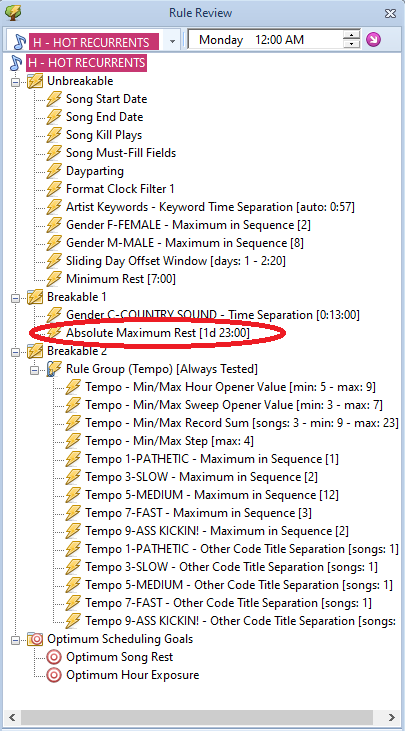
To summarize, Maximum Rest will turn off the rules that come after it, while Absolute Maximum Rest turns off the rules and the goals that come after it in the rule hierarchy.
As always, if you have questions on this or any other MusicMaster related topic, don’t hesitate to reach out to our support team. We’re happy to assist!
No More Forgetting to Make a Backup! Publicado por Laurie Knapp en diciembre 19th, 2023
by Vicky James
Over the years, I’m sure you’ve heard your MSC remind you of the importance of backing up your database.
First things first… What is a backup? A backup saves all the hard work in which you’ve spent years, days and countless hours building your MusicMaster database. It breaks my heart when a station is attacked by ransomware, which is becoming more and more common, and that hard work is LOST. Let’s not even talk about the unthinkable… when a scheduling computer decides to kick the bucket and with a recent backup, that MusicMaster data dies right along with it!
The good news is, we’ve released a few new tools in MusicMaster Pro that make backups even more convenient for you!
With the release of MusicMaster Pro 8.0.9, you now have Backup OPTIONS! Backup Options allow you not only to set a reminder but also gives you the option to make a backup at that very moment when prompted.
Here’s a brief refresher on how to make a backup, and more importantly a guide leading you in setting the new Backup options.
Under the Tools menu, the first option is Backup.

Once the Backup window is open, you’ll see that MusicMaster tells you when the last backup was performed. As for the types of backups, Standard and Custom, you can read more about them here: https://musicmaster.com/?p=43
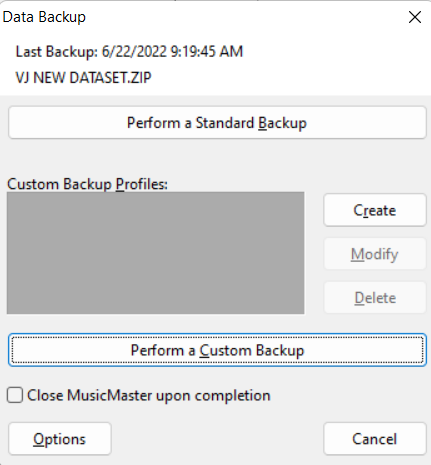
But in MusicMaster Version 8.0.9 or later, the new OPTIONS button is what the hype is about!! Click it and you’ll see the following:
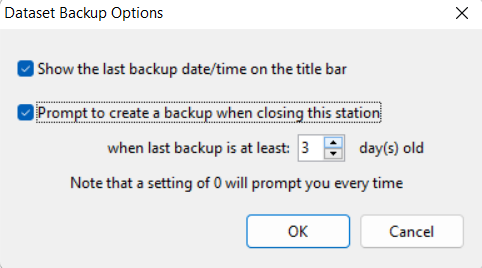
This new MusicMaster feature Backup options has to ways to remind you of taking a backup!
The first option is a reminder displayed in the Title Bar display, so you can always see the date/time of the last backup while you’re working in the database.
Here’s how the title bar appears when you select that setting in Backup options.

The next Backup option prompts you to create a backup upon closing the database.
You have the option to specify the number of days to request a backup from the last one taken. This value can be set to 0 prompting you every time you close the station database, or you may increase the number or days. In the example shown above, MusicMaster will now ask me if I would like to make a backup if it’s been at least 3 days since the last backup was made.
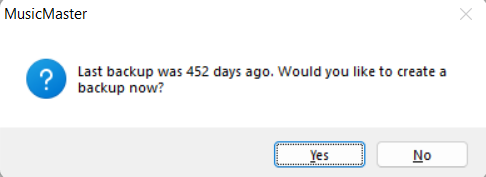
When closing the database, this prompt below appears showing me the last backup and asking if I would like make a backup now.
But wait, there’s more!
In the service release of 8.0.12 for MusicMaster Pro, you also have options to save copies of your backups in more locations!
Since joining MusicMaster, I can’t tell you how many times I’ve heard the statement, “I don’t know where MusicMaster backups go!!!” This is often in response to me asking, “Do you happen to know the location of the backup we’ve made?” or “When was your last backup?”
Team MusicMaster has now expanded the CUSTOM BACKUP feature allowing you to save it in up to not one, not two, but three locations! This is especially helpful if you want to store a copy in another location for safety (such as Dropbox or an external thumb drive). Or maybe you want to send a second copy somewhere you can easily find the file and send it to your consultant.
Here’s the beauty:
Go to Tools menu, Backup. Click Create for a new Profile or Modify a current profile.
Enter the location for the alternate backups here. I’ve created two additional copies of backups on both my External drive and Dropbox folder.
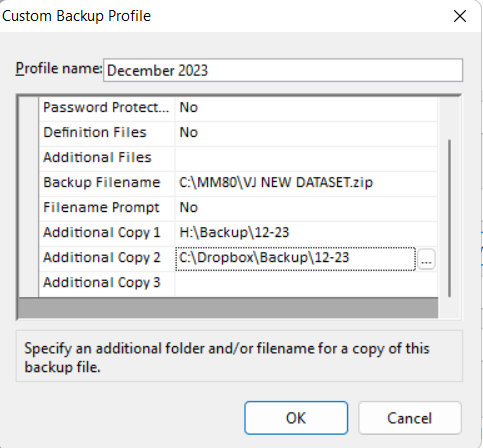
Once the locations are set in the profile, click OK. Next, you can then Perform a Custom Backup to be saved safely in each location.
If you have more questions about these new Backup options, contact your Music Scheduling Consultant directly to help!
From Rock to Jock; Musicians in Radio Publicado por Laurie Knapp en diciembre 11th, 2023
by Brian Wheeler
Passion. It’s a common thread among broadcasters and musicians. You need passion to get into and stay in both industries. Passion is what drives and fuels us. For that reason alone, radio and musicians are a solid match. While not every musician has the chops to make interesting radio, there are at least a few artists I’ve found that have hit the airwaves and are carving a niche for themselves in the broadcast world. To get a glimpse of radio from their perspective, I caught up with Brian Vander Ark of The Verve Pipe and Ron Keel of the bands Keel and Ron Keel Band. I would be remiss to not include Steve Gorman, formerly of The Black Crowes and currently doing mornings on KQRS in the Twin Cities, but he politely declined to participate.
Brian Vander Ark recently signed on with WLAV-FM in Grand Rapids, Michigan as their afternoon drive host. It’s a sort of homecoming for him, as he grew up in western Michigan. Along with appearing on podcasts, Brian’s also had a YouTube channel for several years.

Ron Keel launched his syndicated radio program called Streets of Rock N Roll in 2012. In 2014, Ron signed on as the midday host at KBAD-FM in Sioux Falls, South Dakota. KBAD folded in 2017 despite solid ratings, but Ron’s syndicated program marched on. In 2022, Ron launched RFK Media LLC and continues to broadcast on that platform.

I asked Brian and Ron to tell us a little bit about their respective stations and how their initial interest in broadcasting came about.
BVA: I was approached by Michelle (McKormick) and Gregg (Henson) about the possibility of doing a show – I jumped at the chance.
RK: KRFK is a hard rock and heavy metal streaming station administered by my company RFK Media. It is not a hobby station; although I love what we do this is still a business, so it’s built to succeed and deliver an entertaining listening experience for people who love this kind of music. The playlist is as diverse as they come, featuring all genres and eras, the legends, the rising rockers, and some of the artists and songs that may have fallen through the cracks over the years.
While the meat of the sandwich is the music, we’re also proud to host the best syndicated shows in the business – headliners like Eddie Trunk, Charlie Kendall’s METALSHOP, Dee Snider, Joe Elliott from Def Leppard, and many more throughout the week.
My interest in broadcasting stems from hosting my own weekly syndicated show, STREETS OF ROCK N ROLL, since 2012. I graduated to hosting the midday show on KBAD 94.5 FM in my adopted town of Sioux Falls, and learned so much from the rock radio royalty that surrounded me.
How has the audience responded to your show?
BVA: The response has been very positive, which is inspiring. I think once I get my footing and start choosing more of the playlist, everyone will enjoy it even more.
RK: My show STREETS OF ROCK N ROLL is an acquired taste – it’s not for everyone, and I’m cool with that. That’s my hour to create the kind of show that I would personally enjoy; always built around strong feature interviews with rock stars and other celebrities, and usually about 90% new classic rock. Some people just want to listen to “You Shook Me All Night Long” and “Pour Some Sugar On Me,” but as a fan I’m still excited to discover new music and share it with my friends, and that’s what we do on the STREETS OF ROCK N ROLL.
What drew you to radio/broadcasting?
BVA: Nothing specific, although I wear my love of classic rock on my sleeve for sure.
RK: I’m an entertainer by nature, a storyteller, a musical artist. Radio is another outlet for me to entertain people. The inspiration to dive in came from friends and heroes like Kevin DuBrow, Dee Snider, and Alice Cooper who paved the way with their radio shows; you hear these guys having fun, you want to host your own party. So in 2012, while performing on the legendary Monsters Of Rock Cruise with dozens of other rock artists and bands, I just wandered all over the ship with my portable recorder getting quotes and soundbites from all the rock stars and the fans, edited all that together with the music from those artists and some commentary, and all of a sudden the STREETS OF ROCK N ROLL was in high gear.
Can you share some memories of listening to the radio, both growing up and later while in the music industry?
BVA: Absolutely. WTAC in Clio (Flint) had a huge influence on me – I used to let the AM station play all night when I was a kid— many of the songs incorporated themselves into my dreams.
RK: The common story about being a kid in the 70’s, and that first little AM transistor radio was like a bridge to another world – turning the dial and exploring all the different styles of music, from stations in faraway exotic places like Chicago! I would sleep with it under my pillow all night long.
Then of course there’s no thrill like hearing your own music on the radio for the first time, every artist remembers that.
As I really began to mature as a songwriter, my head started filling up with my own songs, and listening to other music becomes a distraction. It’s still that way now, as I have a half dozen songs spinning in my brain at any given time. So I gravitate to talk radio – sports, politics, public broadcasting and especially Coast To Coast AM, the iconic late-night paranormal show. I listen to that type of programming when I’m in a creative phase, and then when I’m creatively exhausted, I’ll binge-listen to music for weeks. That’s why I usually take a break from hosting my radio show a few weeks every year to focus on songwriting.
As a successful musician, you enjoy a unique perspective when it comes to your on-air product. You’ve been on the music side of the product and the mic side. How does this play into your role and personality on the station?
BVA: I’ve always had a sarcastic or sardonic approach to talking about the things I love. Having a sense of humor towards music and the industry has been an important element- it kept me sane through all of those years. So my approach with the show is very much the same. People will either get it or they won’t, but I’m guessing they will and we will be able to build a massive audience.
RK: At first, the rock star thing was both a detriment and a benefit; there’s always been a comfort factor between me and the artists I interviewed, because we could relate to each other. There’s always a lot of common ground. But when I first started, the performer in me was trying to “put on a show” – in my business it’s always New Year’s Eve, the 4th of July, Halloween, everything’s overdone. But I found that the working class, which is really my audience, were just regular people trying to make it through another day. I learned two invaluable lessons doing live radio on KBAD for two years: one, just be yourself, and two, you’re not trying to entertain a million people – you’re just spending the day with that one person out there listening on the job.
In your opinion, what makes ‘good radio’?
BVA: Good radio is a host that can usher you from one song to another with ease. Genres are crossed, and it all makes sense with the on-air personality being the common thread.
RK: That’s a great question, because the medium has evolved due to the streaming revolution and the decrease in full time disc jockeys. Rock n roll is especially meant to be a shared experience – not a solitary listener with a curated playlist. It should be live, dangerous, unpredictable, fun, and interesting. Most of the shows on KRFK are pre-recorded and syndicated, but the hosts are fans first and that tangible human excitement is something you can’t get from Spotify or YouTube Music. Good radio must have an identity, a sense of community; no matter if you’re broadcasting from a tower or streaming online, you gotta treat those listeners like family, not like customers.
As a singer/songwriter, you can relate and tell stories which potentially lends itself to interesting on-air content. What advice would you give other musicians about considering an on-air role as a radio personality?
BVA: Be honest. Be forthright. Don’t hold back. Get into trouble on occasion.
RK: The same advice my mentors gave me – just be yourself. And always remember you’re not talking to a million people, you’re talking to that one guy on a construction site, or that girl at the office with her earbuds in, or that trucker who’s just trying to stay awake. You’re not trying to hold a sold-out arena in the palm of your hand. It’s really cool that at any given point, I’ve got 25,000 people tuned in, but if I think about it that way I’ll start “acting” and radio listeners don’t relate to that.
What would you tell radio stations that might reach out to an artist for a potential on-air position?
BVA: I’ll wait for the ratings to come in before I comment 😉
RK: I would tell them to reach out to me at RonKeel.com, because I have twelve years of experience on the air, and my show is available for syndication – let’s take your listeners on a ride down the STREETS OF ROCK N ROLL!
Anything else you’d like to add?
BVA: Nothing really! Thanks, dude!
RK: Well, I want to thank you for the opportunity to share some thoughts and feelings on radio, a topic that I’m obviously passionate about. I owe a huge debt to friends in the industry who have helped steer me in the right directions and taught me so many valuable lessons; I like to think I have a nice balance between being able to listen and learn while still doing things my way, and the proof is streaming right now at http://KRFKradio.com.
A big THANK YOU to Brian Vander Ark and Ron Keel for taking the time to participate and share their thoughts.