
MusicMaster Blog
Don’t Get Stuck In Traffic Publicado por Laurie Knapp en noviembre 25th, 2025
by Dave Tyler
Ok, so the word “Traffic” has a negative connotation in most cases, but inside a radio or TV station, the more traffic the better! We’re talking about the spots that pay the bills and keep the tower pumping more wattage to the cottage and ohms to the homes! Money baby!
So, what does this have to do with Music Scheduling? Well, it depends on your needs. Some folks want to see their traffic spots in the Schedule Editor so they can time their hours out a little more precisely, while others have automation systems that require a single combined music/traffic log to be exported.
To keep things simple, let’s just go over bringing traffic into MusicMaster for timing purposes. I will also go over how to import other “.Def” files for library synchronization and reconciliation. Creating a “Def” definition file for any of these is a topic for another day, but great information can be found in our Help section with a simple search. Your dedicated MusicMaster Support rep can help you as well.
This feature is available in all versions of MusicMaster, but I’ll be demonstrating it in MusicMaster CS and the Web Client.
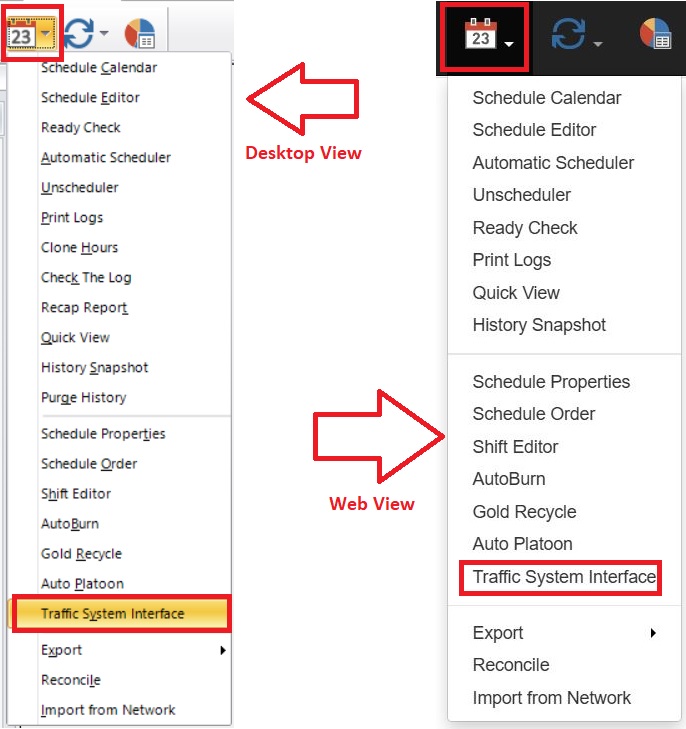
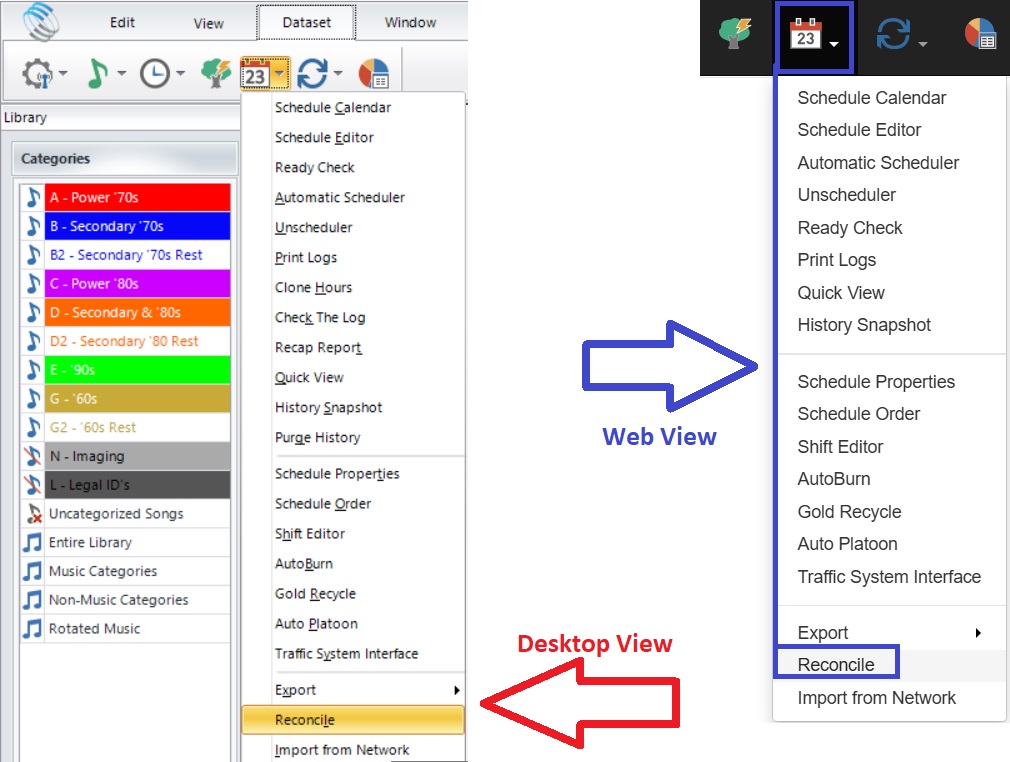
First things first, we need to import a “Def” file. To do this, click on the dropdown for the Schedule Calendar and select “Traffic System Interface”. Below is how this looks in our CS Desktop and Web versions:
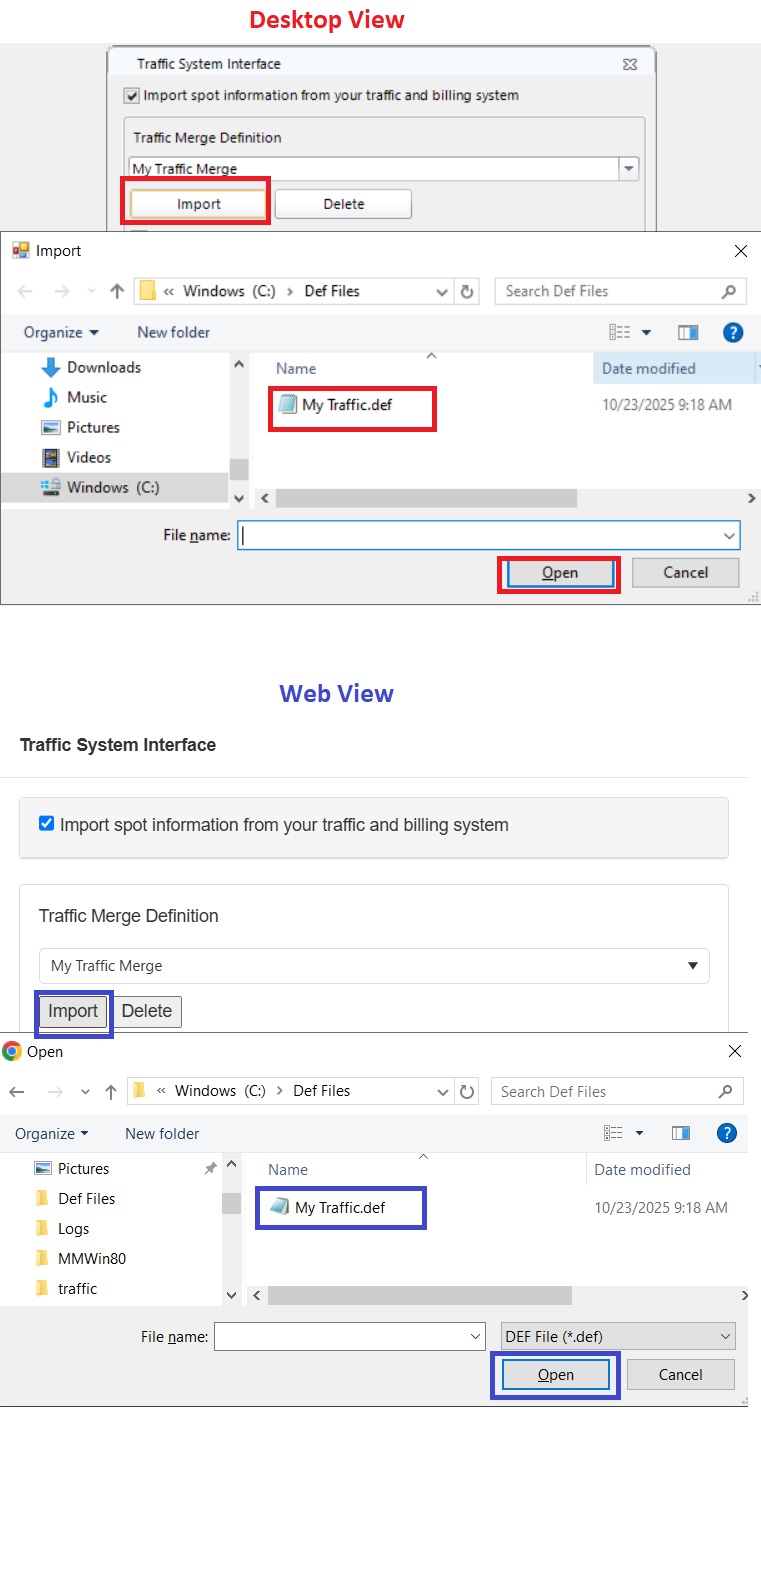
Once selected, the Traffic System Interface box will pop up. There are a couple of things we need to do here, but first, let’s import our Traffic Definition file. This is the file written to import the information from the traffic log into our MusicMaster Schedule Editor. Once you locate your def file, click “Open”, and it will import into your station. Here are the dual looks from the desktop and Web clients:
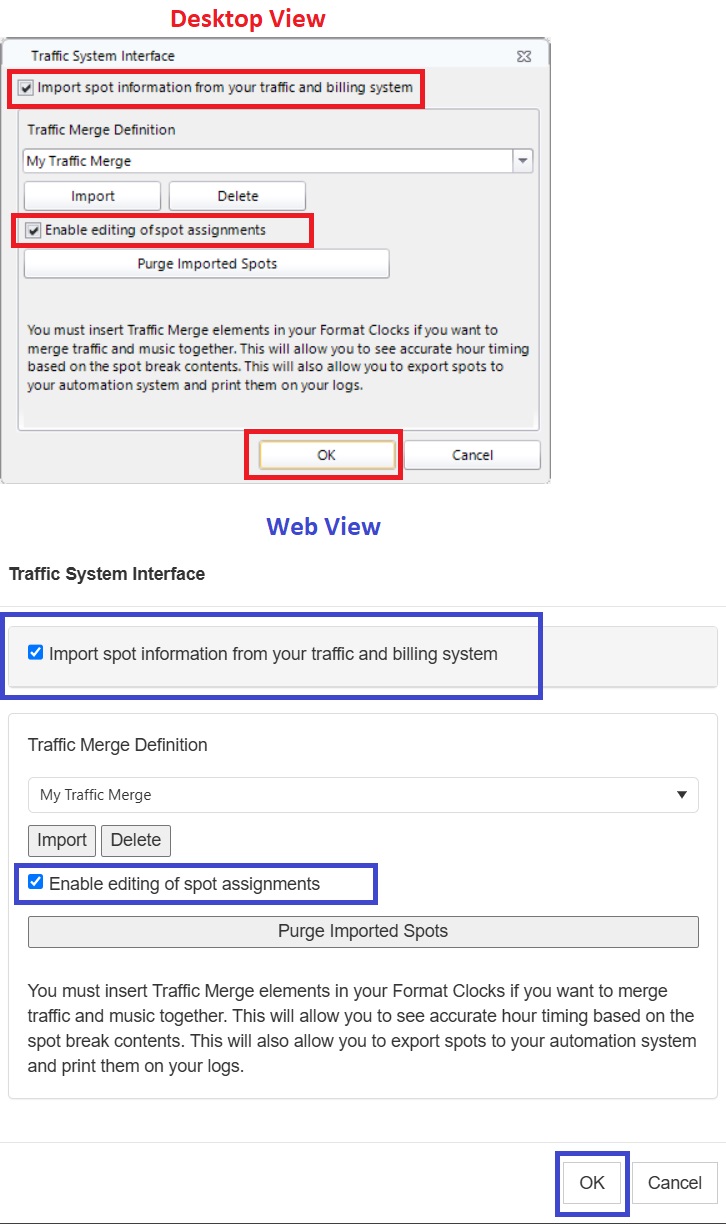
Nice job! Now that it is imported, we’ll get to those other things I had mentioned we needed to knock out. We want to check the boxes for “Import Spot Information from Your Traffic System” and if you are exporting traffic from MusicMaster you may want to “Enable Editing of Spot Assignments”. If you’re like me, if I am going to export traffic along with music, then having the ability to edit the order of the spots to keep the same voice or a similar client away from each other would be important. If not, then leave this unchecked.
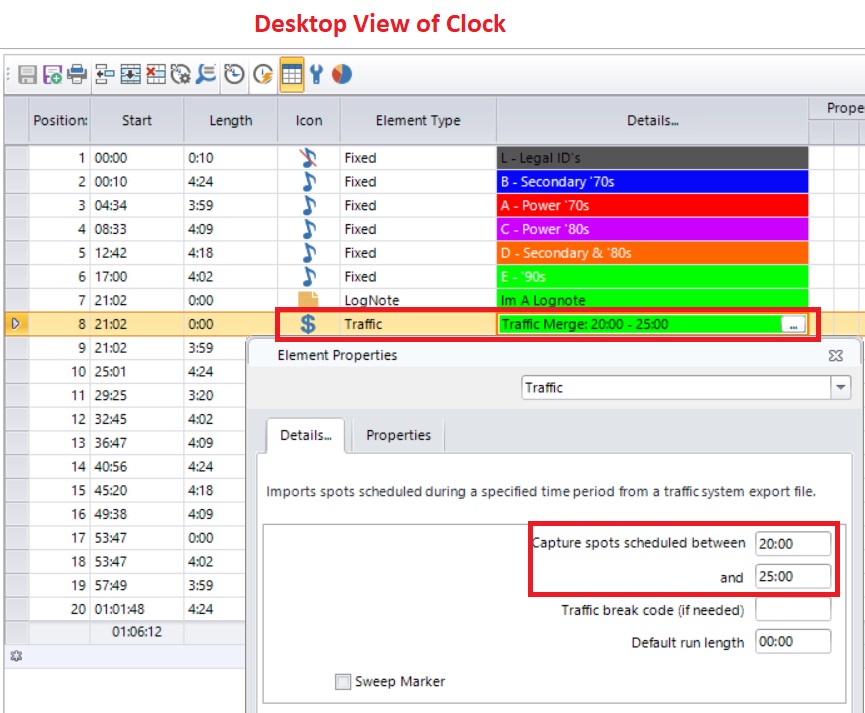
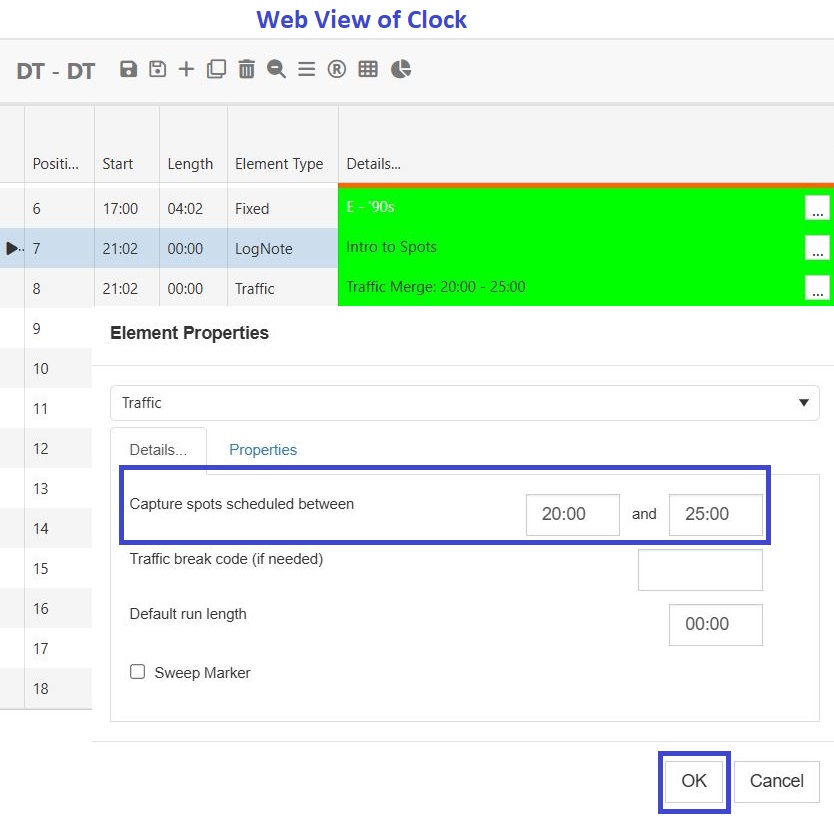
Alright, we are cookin’ with gas now! We have successfully imported the def file, so what’s left to do? We need to set up our clocks with “Traffic Merge” elements. It is important to note that these Traffic Merge points can be wider/longer than the actual stopset. Think of them as funnels that suck in the spots from the traffic log and place them where you want them in the music log. In my example, I have a 20:00 Break that is 3 minutes long. I make my Traffic Merge point a bit wider to make sure it grabs all the spots scheduled for this time. I set it to capture any spots sent from my Traffic Department between 20:00-25:00 after for this hour. It is necessary to know when your traffic is being sent. If your Traffic Director is sending your 20 break spots at 19:00 after and your merge is looking for spots between 20:00-25:00 this will result in a “Loose Spot(s)”, and you will not see it in the editor unless you right-click on the traffic merge and choose “View Loose Spots”. You want to be on the same page with your Traffic Director on this point. Here is what the Traffic Merge will look like in your clock(s).
You will need these positions in any clocks you want to see traffic in. Save your clock(s) and enter them in the desired assignment grid (unless they already are in there).
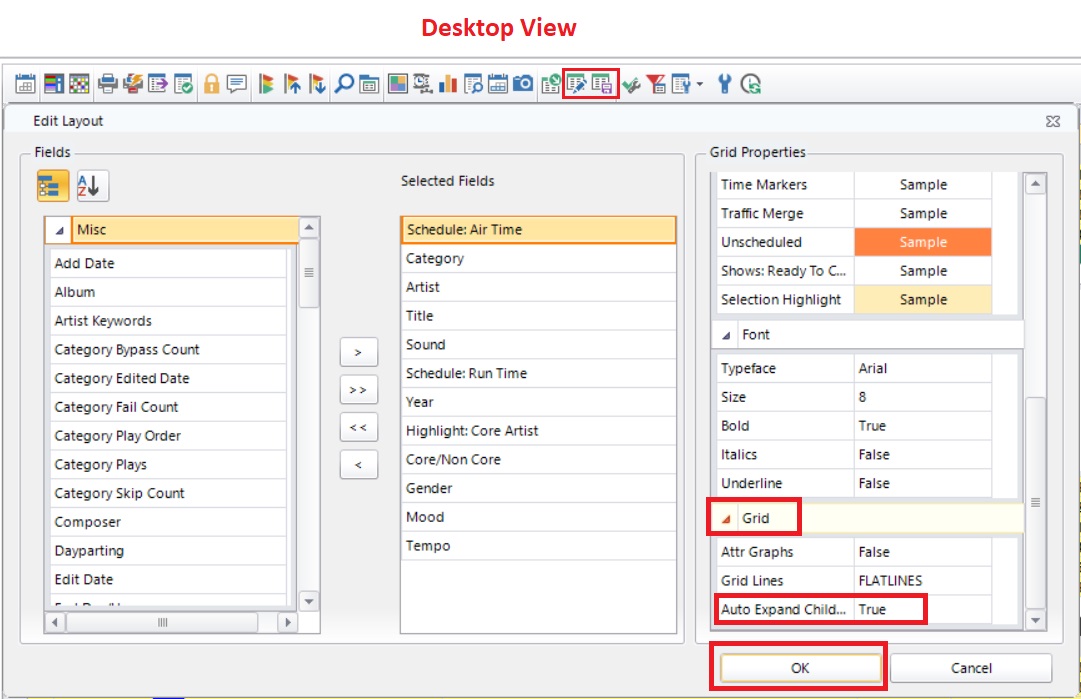
Now we want to do a little work in the editor layout, so open your Schedule Editor and then click “Modify Editor Layout”. Scroll down on the bottom right until you reach the “Grid” section. You want “Auto Expand Child” set to “True”. This will allow MusicMaster to display the spots when you open the editor. With it set to false, there would be a small dropdown arrow to the left of the Traffic Merge position that you could click to see the commercials. Once done, click OK and then save the layout by clicking the small “Save” icon to the right of the Modify Editor Layout button. If the other parts of the above setup have been done, this step is not necessary in the Web version.
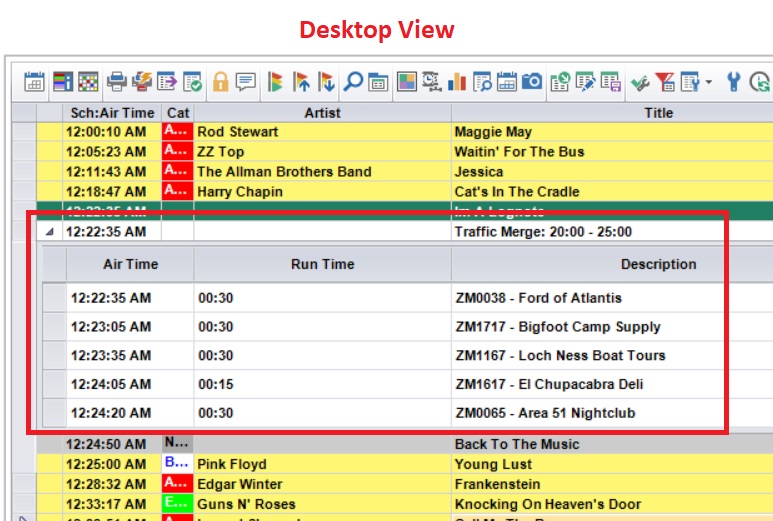
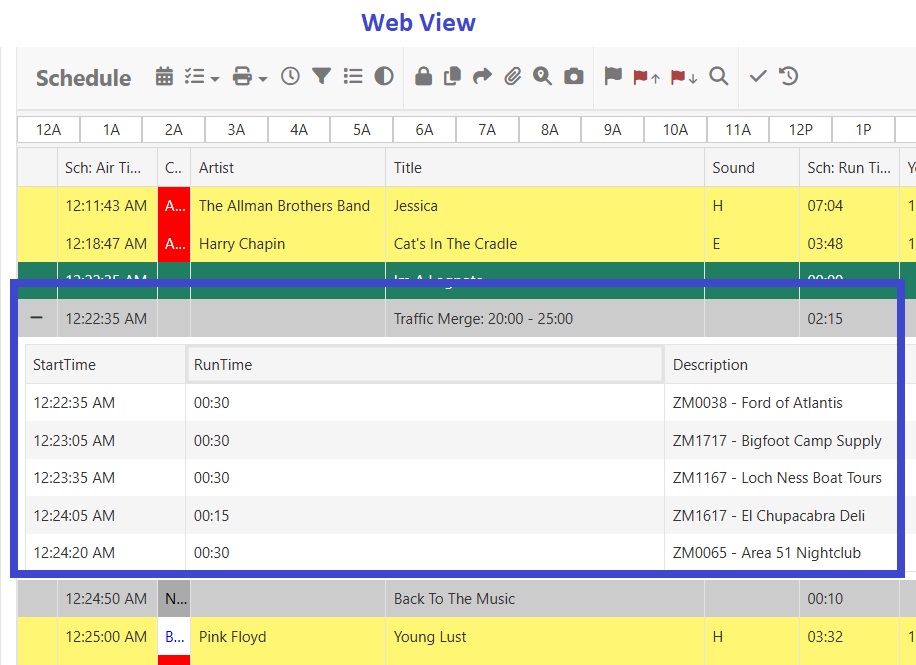
We have finally arrived at the grand reveal! Let’s open the Schedule Editor to a date that we know the traffic logs have already been sent, and voila! Spots!
Before wrapping things up here let’s look at how we can import a reconciliation and/or a Library Sync def file. Reconciling will update your logs in MusicMaster with what aired in automation. This is helpful if you have extra songs at the end of each hour that often get bumped, or if jocks change songs out during their airshift. This also assures your BMI/ASCAP, CRTC, Sound Exchange etc. reports are accurate.
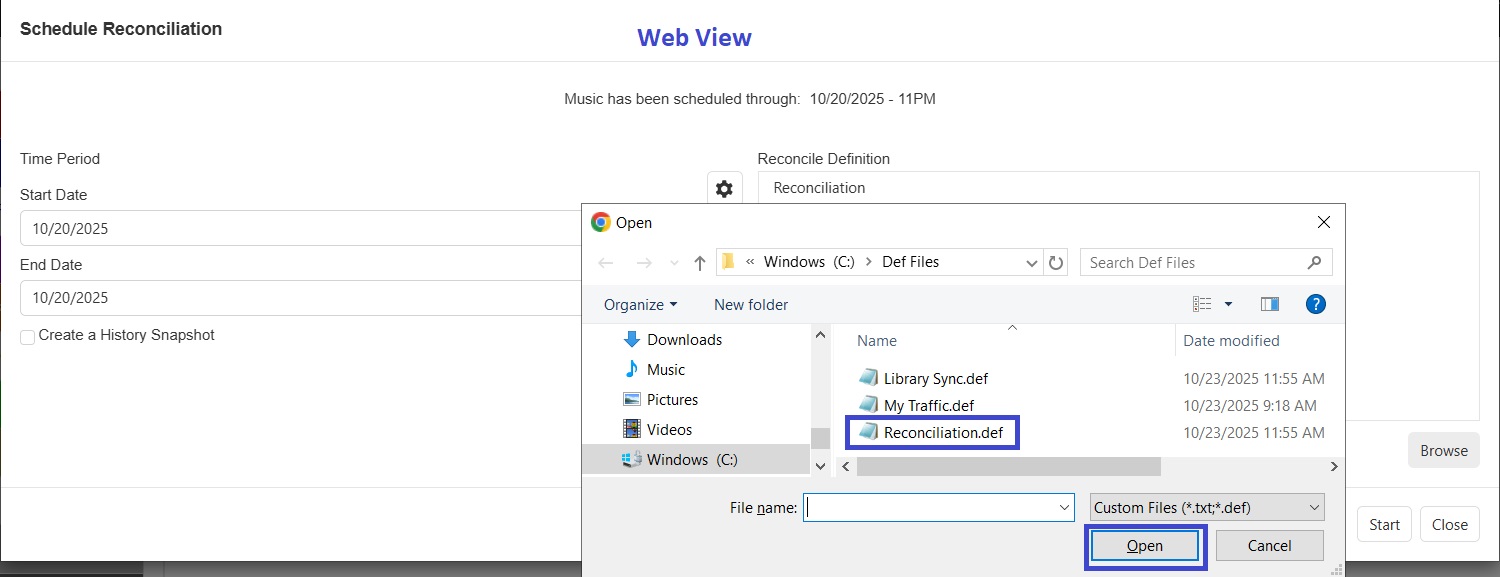
To import a reconciliation file, click on Schedule/Reconcile:
Now you can click the Browse button and find the def file you need and click OK.

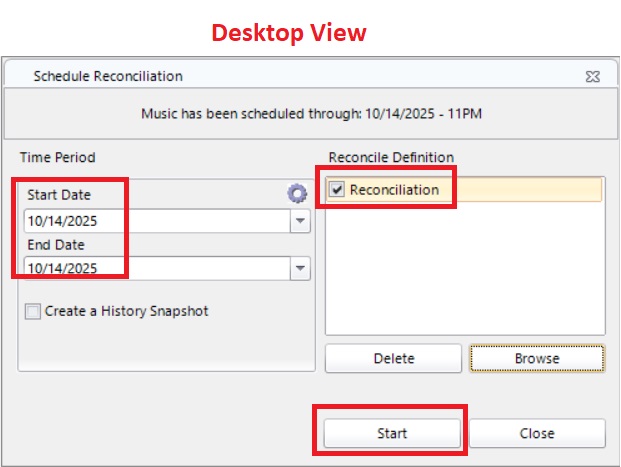
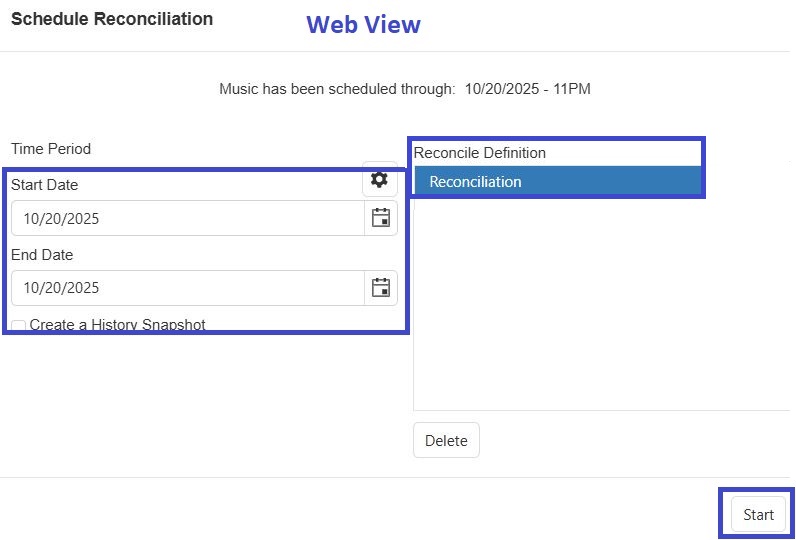
You can reconcile your past logs by going to Schedule/Reconcile and selecting the dates you want to reconcile, make sure the box is checked for the def file, then click Start.
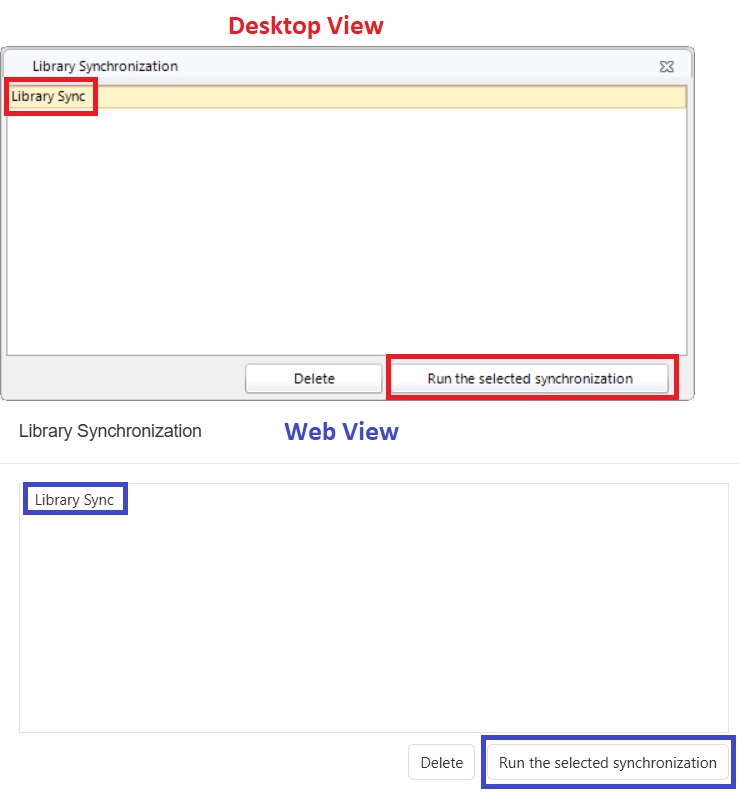
Moving on, let’s import a Library Sync file. Library Syncs are used to add or update metadata (song and song info) from your automation system into MusicMaster. Importing the Def is similar to both the traffic and reconciliation processes. Click on Library/Synchronize.
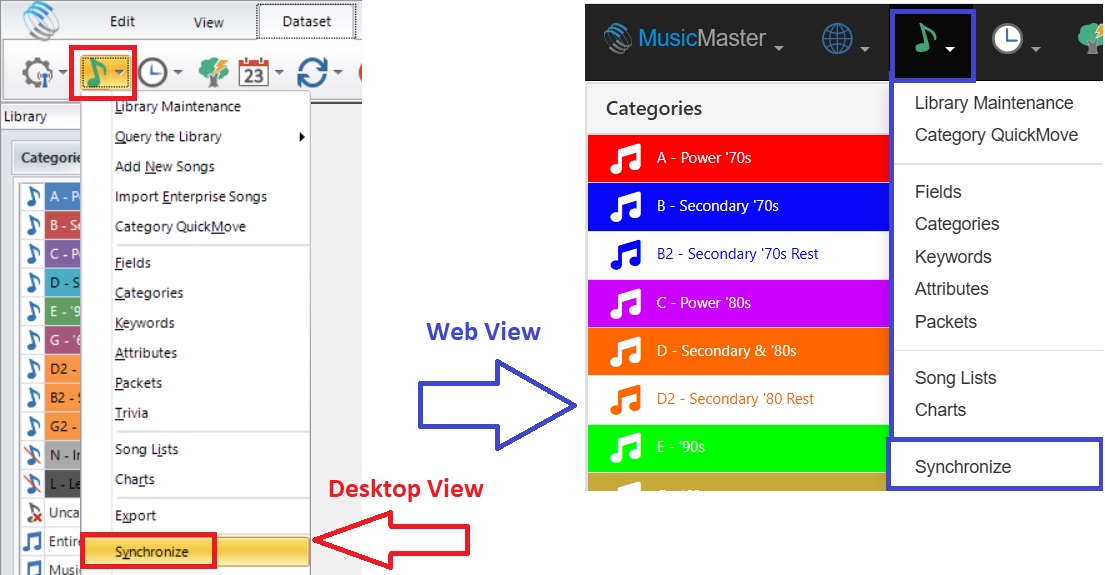
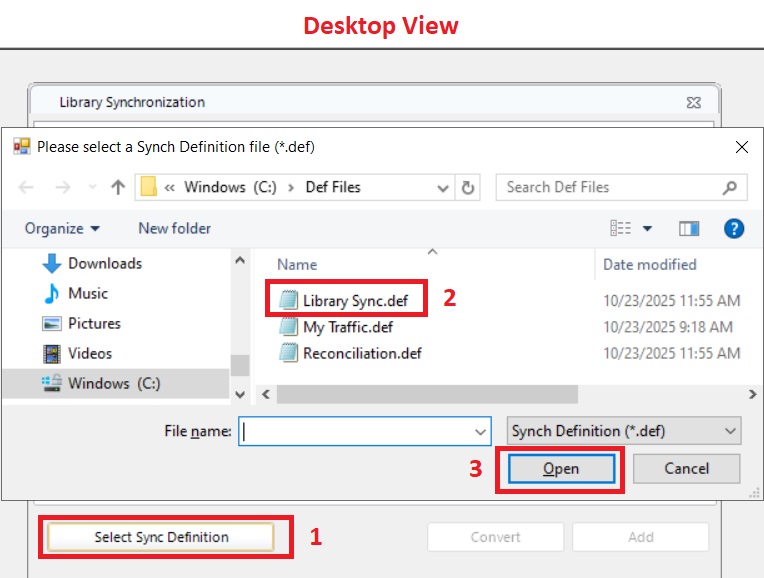
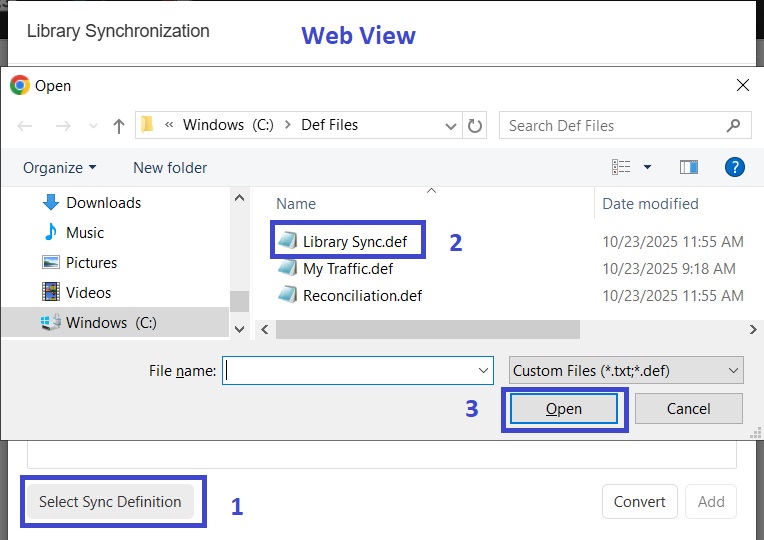
Click to select the Library Synchronization Definition file from the location where you saved it. Click Open.
Once selected, if the “Add” button is not available, you may need to click “Convert” first, then “Add”.
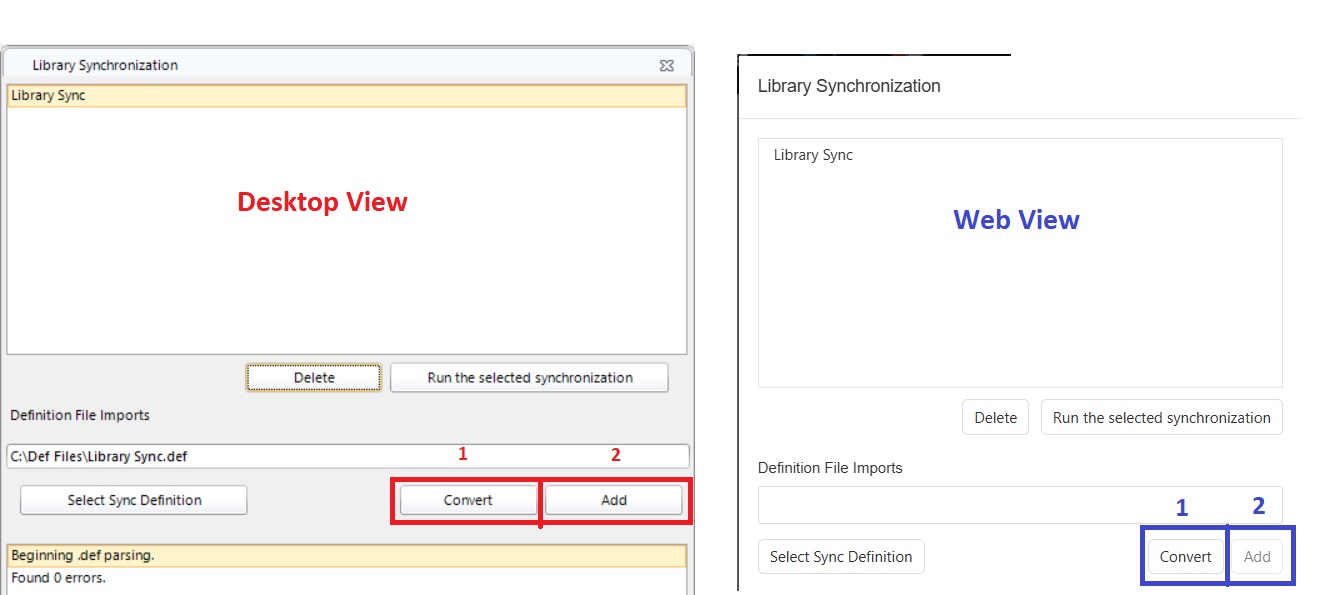
Now you can synchronize your library by going to Library/Synchronize and running the file.
And that, my friends, is how you can import your Traffic, Reconciliation & Library Synchronization definitions into MusicMaster, as demonstrated in our CS Desktop and Web versions. It is worth noting that it is not necessary to do this process in both the Desktop AND the Web clients. Doing it in one does it for the others because they all reference the same database.
As always, if you have any questions, please contact your dedicated MusicMaster Scheduling Consultant.
Save Time with Category QuickMove Publicado por Laurie Knapp en noviembre 24th, 2025
by Vicky James
Back In the Day… I recall years ago being in a music meeting when the process of jotting down music changes, taking them back to my office, and manually making the changes in each category was still a thing. Nowadays, you can easily access categories and instantly make moves by dragging elements to the target category using Category QuickMove. You can also make changes to the song card data here as well! This feature is ideally used in smaller categories and allows up to 8 categories to be reorganized at a time.
QuickMove is available across all versions of MusicMaster: Pro, Client-Server, and the Web Client. We’ll demonstrate it using CS.
Click Dataset, Library, and Category QuickMove.
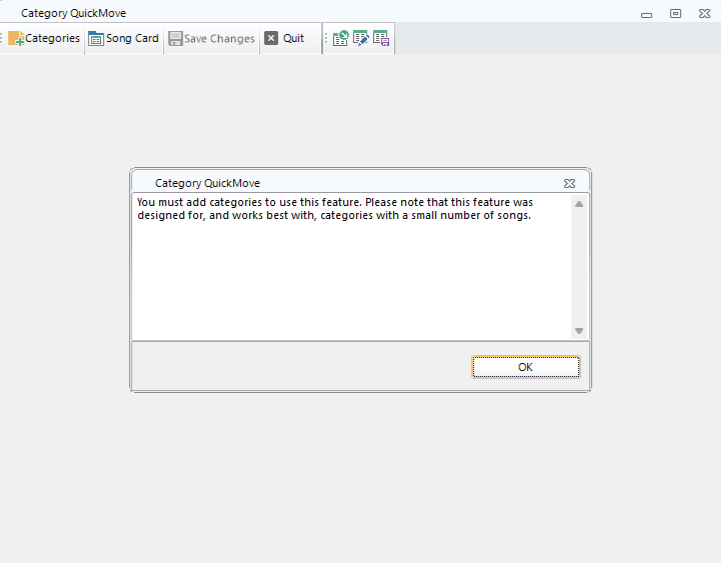
Note that the feature prompts a reminder that QuickMove works well with small categories.
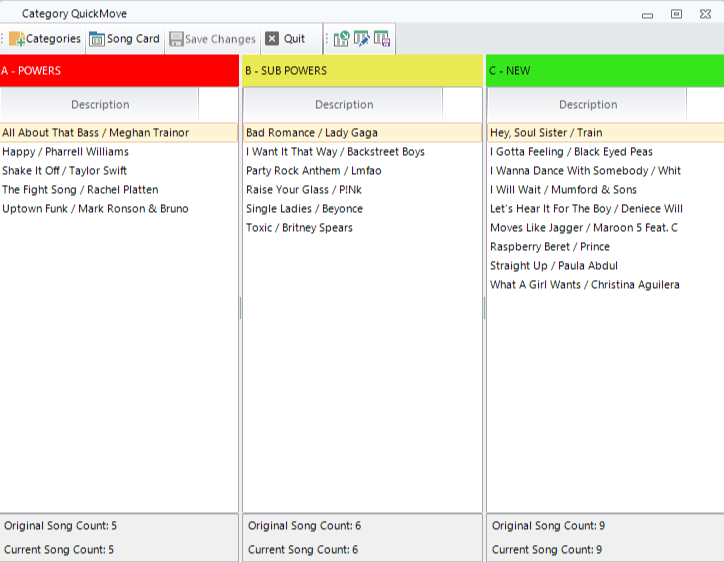
Choose the Categories that you would like to view in QuickMove. You must select at least 2 and up to 8 categories, if needed. It will populate with only the description of each element. First, we will create a layout.
Select Modify Layout and add the fields you would like to view in the panel seen above. I suggest, at a minimum, adding the Title, Artist, and IDs to the view.
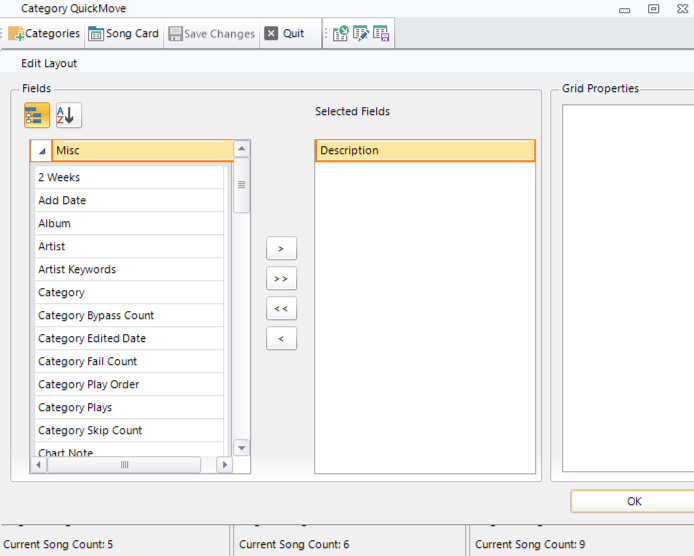
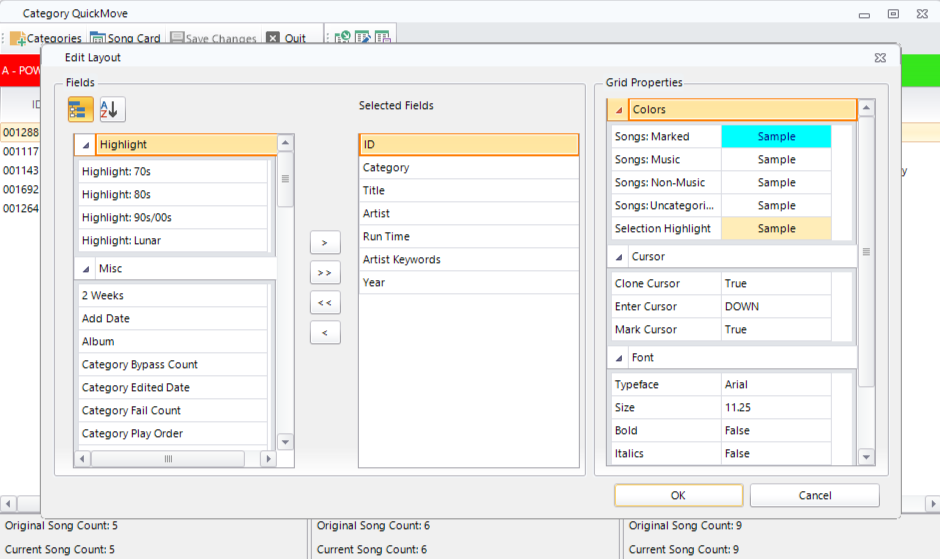
Once the layout is set, SAVE your layout.
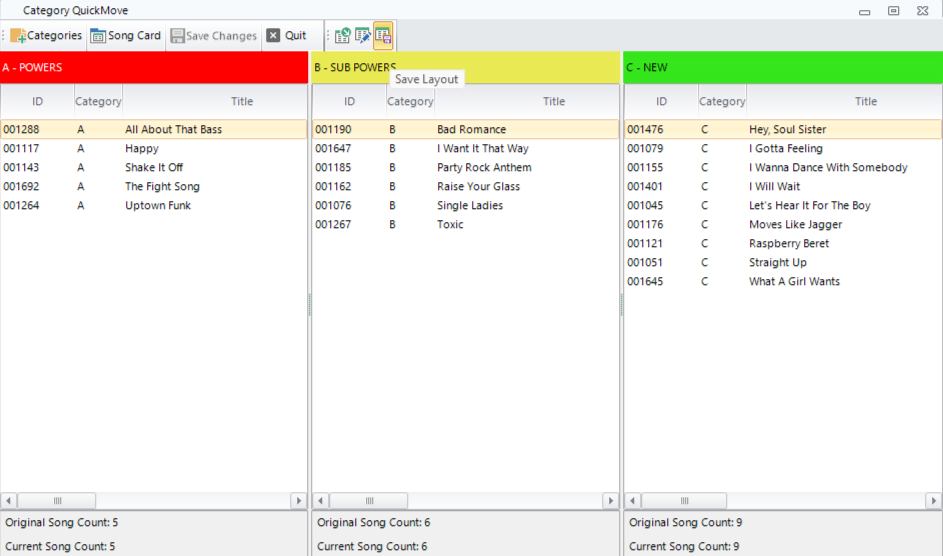
Now that the view is configured, you can quickly click and drag elements to the new category. Notice the Song Count at the very bottom of the window shows the previous category song count, along with how many songs have been added or subtracted. Since the number of songs in your category affects your rotation patterns, you may want to track these changes to keep the counts consistent.

Category QuickMove is also available in the Web Client, complete with drag-and-drop capabilities!
The Power of Shows: Bringing Structure and Creativity Together Publicado por Laurie Knapp en octubre 31st, 2025
by Chris Hulsether
Why Shows Matter
Every great station runs on rhythm, flow, and structure. Shows bring all of that together by giving your programming a clear framework. They make it easy to organize your content, manage long form segments, and control how songs and elements appear. When you use Shows, you’re not just scheduling time, you’re building an experience for your listeners. From morning drive to weekend countdowns, Shows help your station sound polished, consistent, and professional every single day.
Shows Made Simple
Shows are one of the best tools you can use to bring your programming together in MusicMaster. Think of a Show as a big container that holds other elements like songs, imaging, liners, or talk segments. A Show defines a time frame, but it doesn’t have to stay within a single hour. You could start a Show 30 minutes into the hour and let it run for several hours if you want.
The beauty of Shows is that they give you structure and flexibility at the same time. You can apply rules that control what plays and how often. You can run operations on a single Show without affecting others. Once you understand how to create and manage them, Shows become a powerful part of your daily scheduling routine.
Both MusicMaster Pro and Client-Server enable you to define a block of time as a show using Show Markers in your clocks. This comes in handy as a reference when exporting or printing a show logs. However, Client-Server has additional tools for configuration, as well as rules for scheduling songs in a show-aware manner. We’ll walk through all of that in this article:
Creating a New Show
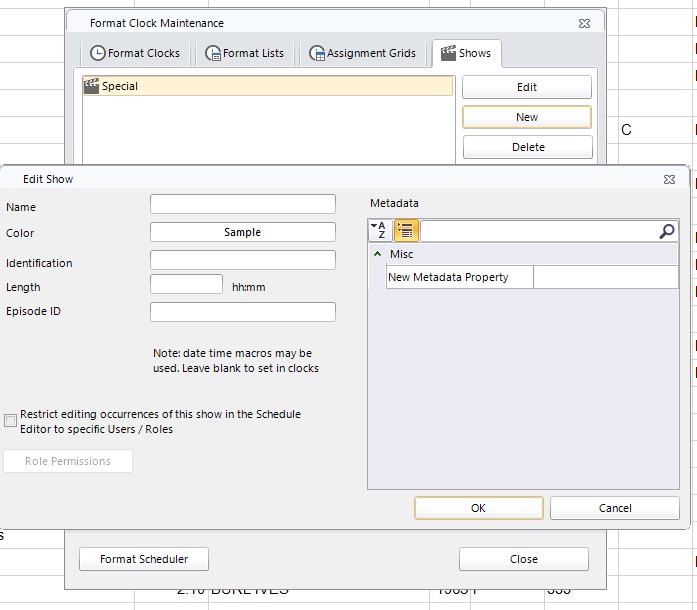
To start, in MusicMaster Client-Server, go to the Clocks menu and select Shows, then choose New. This opens a fresh Show setup where you can fill in the details that define how it looks and behaves.
Same thing in the Web Client:
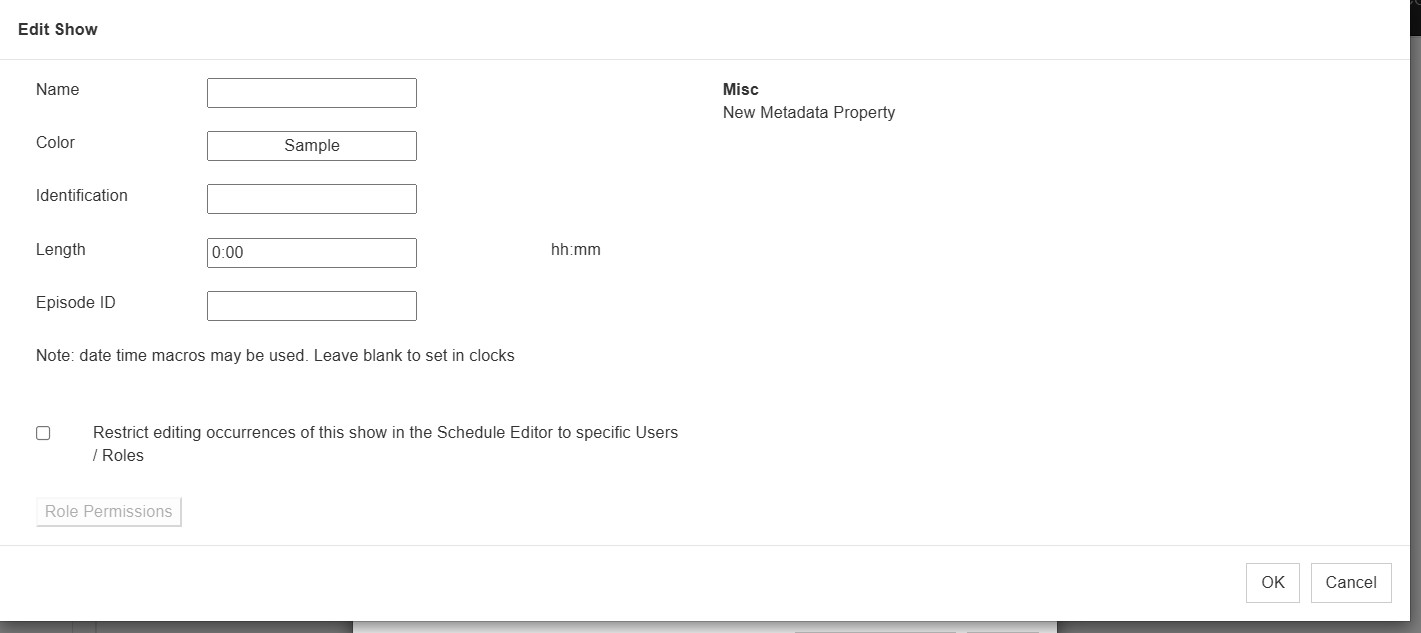
Name
This is the main title of your Show. Choose something descriptive so it’s easy to find later.
Color
Pick a color to represent your Show. This color will appear in your Shows listing in Format Clock Maintenance and in the Schedule Editor. It’s a great way to visually separate different programs at a glance.
Identification
This is a secondary description for your Show, handy if you want to add a subtitle or more information about the content.
Length
Set the total time for your Show. You can make it longer than 60 minutes if needed. Use the format HH:MM, such as 02:30 for a two-and-a-half-hour program.
Episode ID
Add a code or macro that helps identify each episode. For example, you might use a date or production number. If you use a date/time macro, it will automatically appear beside the Show name in the Schedule Editor.
Restrict Editing
If you only want certain people to edit this Show, check the box for Restrict Editing. Then click Role Permissions to choose which users or roles can make changes. This helps protect your setup from accidental edits.
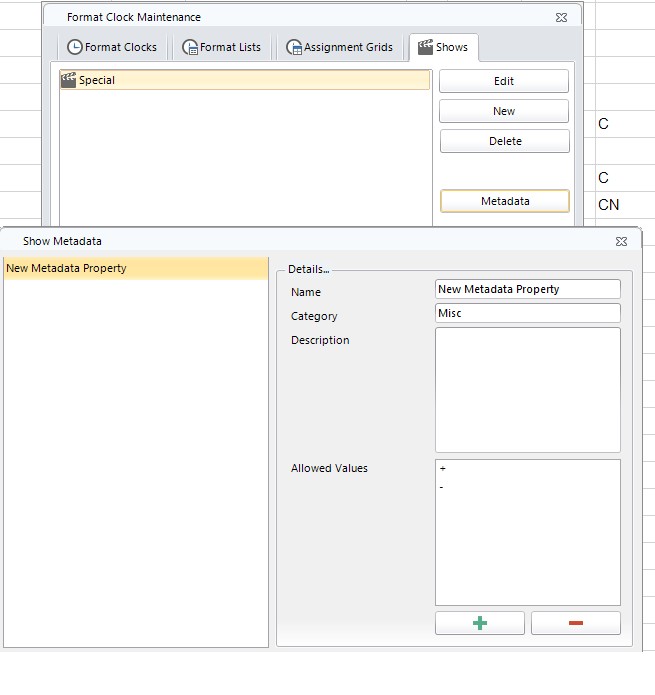
Understanding Metadata
Metadata is extra information about your Show. It gives you the flexibility to record details that might not fit anywhere else. You can use Metadata in two ways: as simple notes or as structured fields with selectable values.
Some examples of simple Metadata include copyright details, host names, or producer information. Examples with values could include a field for Video Display where you can choose between color and black and white, or an Audio field where you mark whether something is live or studio quality.
To create Metadata, go to the Shows page in Format Clock Maintenance. At the bottom left, use the add or delete buttons to manage your Metadata items. On the right, you can enter the specifics:
Web Client:
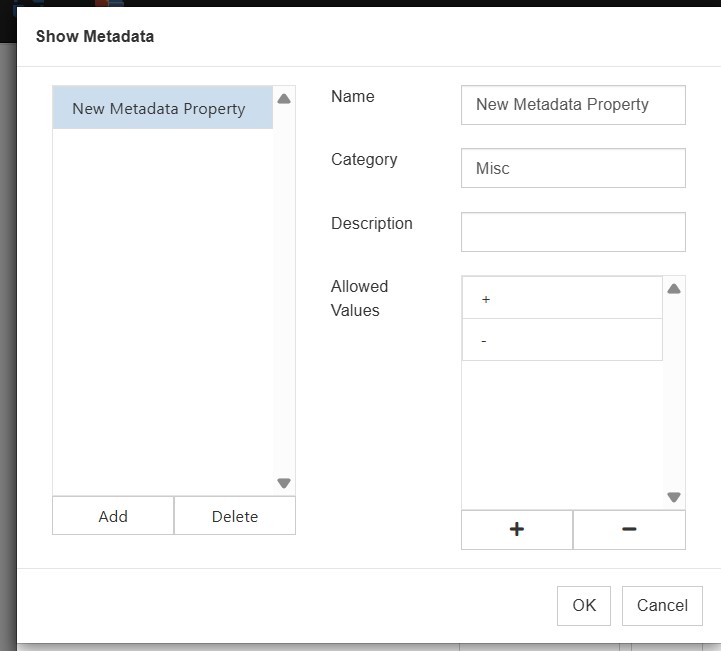
- Name is the title of the Metadata.
- Category is a general label grouping related to Metadata together.
- Description gives a longer explanation of what the Metadata represents.
- Allowed Values are the list of options you can select from when using this Metadata in your clocks.
When you add a Show Marker in your clock, any Metadata you’ve created will appear as an option, complete with the drop-down list of allowed values.
Shows in the Schedule Editor
Once your Shows are built, they’ll appear in the Schedule Editor like any other element in your log. Double-clicking on a Show opens the Edit Show box, which displays all the information you set up earlier. Some functions are not available in the Web client yet, such as the ability to double click on the Show element in the schedule editor.
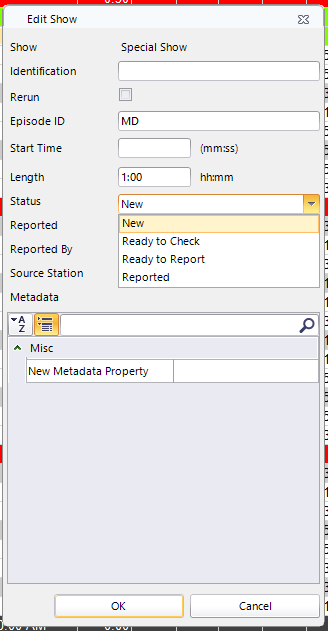
You’ll also see a Status drop-down that helps track where a Show stands in your workflow:
- New means the Show has just been created and not yet reviewed.
- Ready to Check means the Show is set for review.
- Ready to Report means it’s been reviewed and is waiting to be reported.
- Reported means it has been finalized and logged.
The Schedule Editor will also show the date and time when the Show was reported, who reported it, and what station it came from if it was imported from another source.
Operations You Can Perform with Shows
Once Shows are created, you can use them throughout the system in several ways. Look for the gear icon, then use the dropdown to select a specific Date or Show.
Web Client:
The available operations include:
- Export to Affiliates
- Export to Automation (not available in Web Client)
- Export to Web (not available in Web Client)
- Import from Network
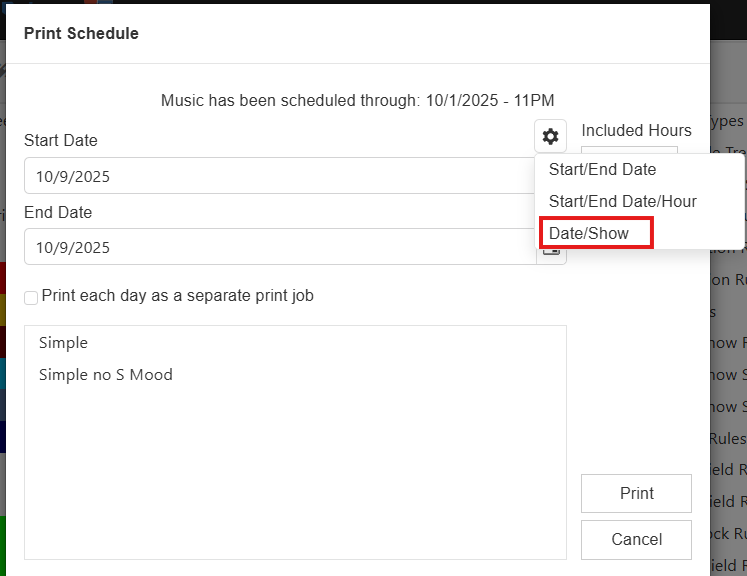
- Print Logs (with a design page for printed versions)
- Unschedule a Show if it needs to be removed
These options make it easy to move or share Show data and maintain consistency across stations or networks.
Rules That Keep Shows Running Smoothly
Rules make Shows work intelligently by controlling how songs and keywords appear. There are three main types of rules to consider in your Rule tree.
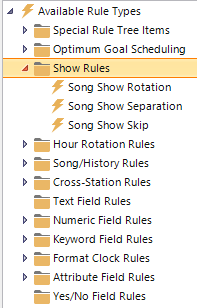
Keyword Show Separation
This rule prevents certain keywords from appearing too close together within the same Show. It’s helpful when you have recurring themes or artist names you want to space apart. For example, if you run a morning and afternoon Drive-Time Show, you can set the rule so the same keyword won’t appear in both Shows within a certain timeframe. The key is balancing your Show length with the separation value, so the rule works smoothly without unnecessary fails.
Song Show Skip
This rule controls how many Shows must pass before a song can play again. If you set the skip to two, that song won’t play for two full Shows after its last play. Keep in mind that this rule counts each Show instance separately, even if they share the same name. It also doesn’t prevent a song from playing more than once within the same Show.
Song Show Separation
This rule prevents songs from repeating within a single Show. The longer your Show and the higher your separation setting, the more distance you’ll create between repeated songs. For example, a five-hour Show with a six-hour separation rule means no repeats at all. The same setting at three hours could allow some repeats if they pass other scheduling rules. Since each new Show resets this rule, it helps to review your Show lengths and clock grid placement to choose the best setting.
Bringing It All Together
Shows are the heartbeat of your format structure. They give you creative control while keeping everything organized and flexible. With Metadata, color coding, permissions, and customizable rules, you can fine-tune every detail. Once you get comfortable using Shows, you’ll find that they simplify scheduling, make your logs cleaner, and open up new ways to manage and present your programming.
When everything is in place, your Shows become the framework for a schedule that runs smoothly, sounds consistent, and reflects your vision from start to finish.
If you’re ready to explore more ways to make Shows work for you, reach out to your Music Scheduling Consultant. They’ll be happy to walk you through ideas, help you fine-tune your setup, and make sure your Shows are running exactly how you want them to.
Importing Enterprise Songs in MusicMaster CS Publicado por Laurie Knapp en octubre 31st, 2025
by Brian Wheeler
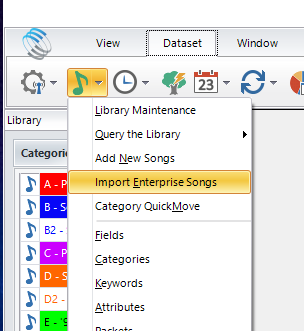
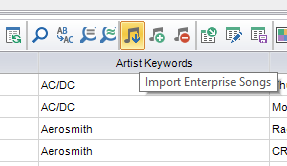
How cool would it be to be able to add songs to your station with just a click or two? I want to highlight a feature in MusicMaster Client-Server and the Web Client that allows you to ingest songs that are in the Enterprise database but not currently in your specific station.
This feature can be accessed through the Library menu, or when in the Library Maintenance menu, you can click on the icon on the toolbar to access the function.
To access this in your station, you must first have rights to access Enterprise and the setup. Once you have rights, you can add or modify the available assets in your station.
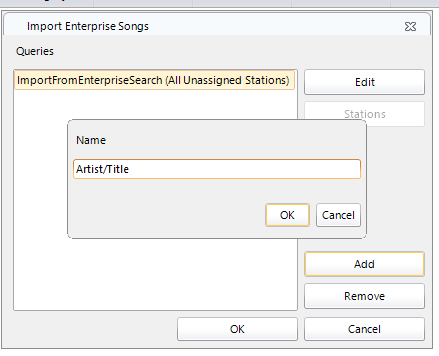
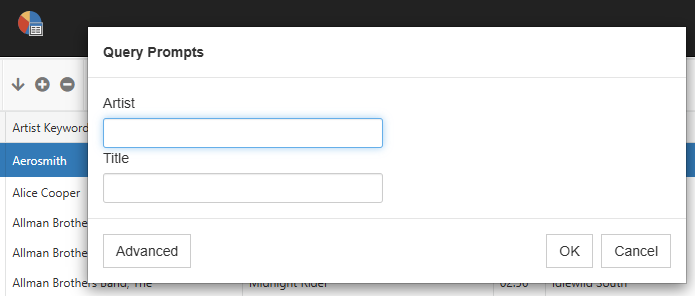
To configure the query that will enable your search of the available assets in Enterprise, you must first open Import Enterprise Songs within Enterprise. It’s here that you’ll provide a query for users to find songs they want to import into their station.
Add a new query, starting with the name of the query. Try to be specific in the description so it’s easy to tell precisely what the user can find using this query.
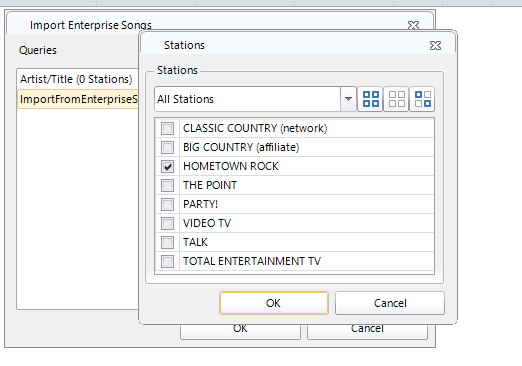
Now select the station(s) you want to receive these new songs.
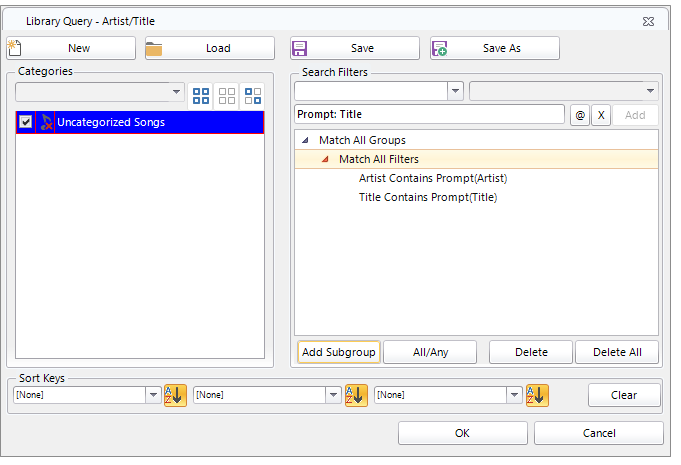
The last step will be to create the actual prompts. Use the Query Prompt steps you’d normally use to create a Query, then save your settings.
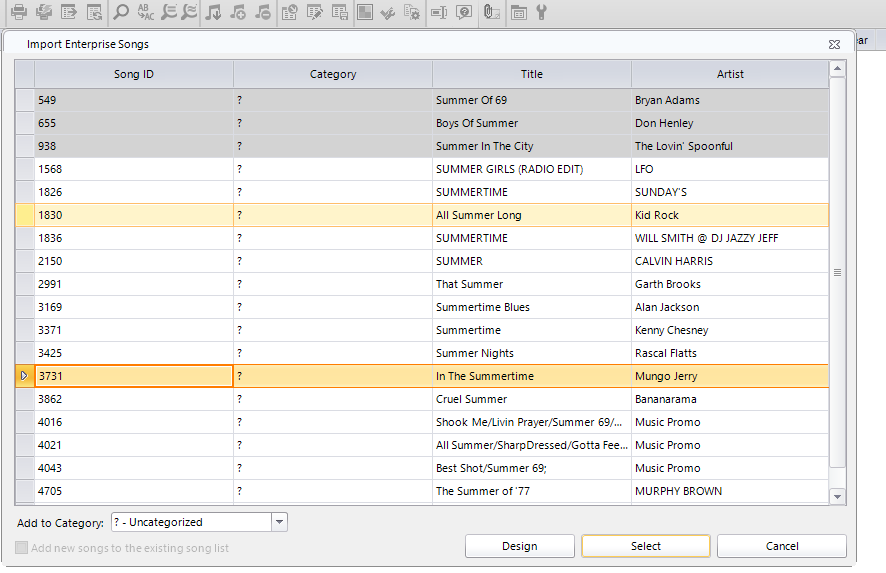
Now that the preliminary settings are in place, if a user decides to import songs from Enterprise, they can click on Import Enterprise Songs at the station level and proceed to find their desired songs for importing.
This is how the query looks in the Web Client, which is similar to the CS view.
In this case, I’m looking for “Summer” songs for a bit I’m doing for a weekend show. The songs in gray are songs that already exist in the station. White songs are not currently in the station. I’ll select two more songs (seen here in gold) that are in Enterprise for my purposes.
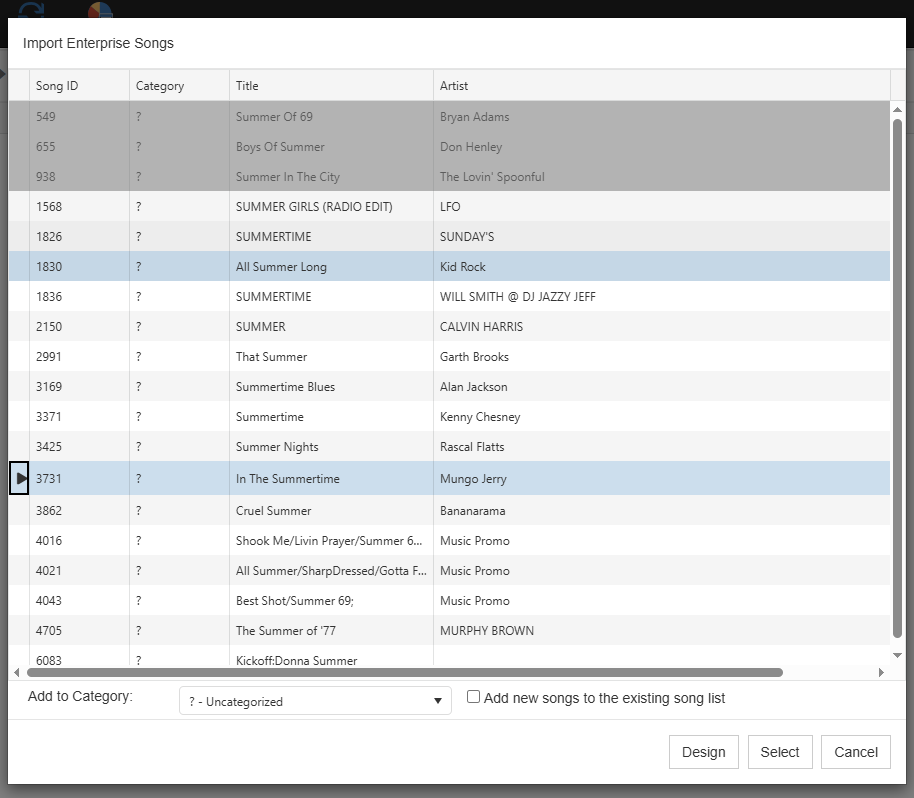
and in the Web Client:
You may see that I elected to drop these songs into my Uncategorized folder. You can select any category to drop those songs in from Enterprise.
As with a library layout, you can add additional fields to the view by clicking on the Design option and adding fields to the view.
Now I’m ready to click Select and add these songs to my station! Pretty slick. Later, I can move these songs to any category I wish.
Of course you can use quite a few fields in your query, so if you’re searching for music with more subtle features, perhaps songs that match a mood or theme, you can search for those as well. As long as the songs exist in Enterprise and are coded accordingly, you can find them and import them.
If you have more questions regarding this or any other feature in MusicMaster CS or the Web Client, feel free to contact any of the MusicMaster Scheduling Consultants to get the answers.
MusicMaster Pro 8.0.16 Publicado por Scott Wirt en octubre 20th, 2025
MusicMaster Pro 8.0.16 is now available. You can update now via Help, Check for Update, or download from the MusicMaster website. Changes are as follows:
- The Format Clock Editor properties column for clock filters now shows a new icon for Library Query elements that have query filters.
- Improved the accuracy of the progress bar on the Automatic Scheduler status dialog.
- Improved the Optimize by Field arrangement function when used on a multiple keyword field when there were songs where multiple heavily used keywords appeared on the same songs.
- Adjusted the way Exact Hour Timing works when the TimingFlexibility option is enabled. This will now have a greater ability to leave positions unscheduled in favor of using longer songs to hit the timing requirement early.
- The Schedule Editor function to remove all remaining unscheduled positions will now take the broadcast week into account.
- When reconciling elements via Nexus, it is now possible to change the song that played in an element while you are updating the start time and runtime.
- Updated Special History Reports for Finland, Hong Kong and Italy
- Corrected an issue that could cause an application crash after changing to a different station
- Additional fixes and minor improvements
You can find the full list of changes under Help, Release notes. Please contact your MusicMaster Scheduling Consultant if you have any questions.
Sharing Logs Across Your Network Publicado por Laurie Knapp en septiembre 29th, 2025
by Paul Ziino
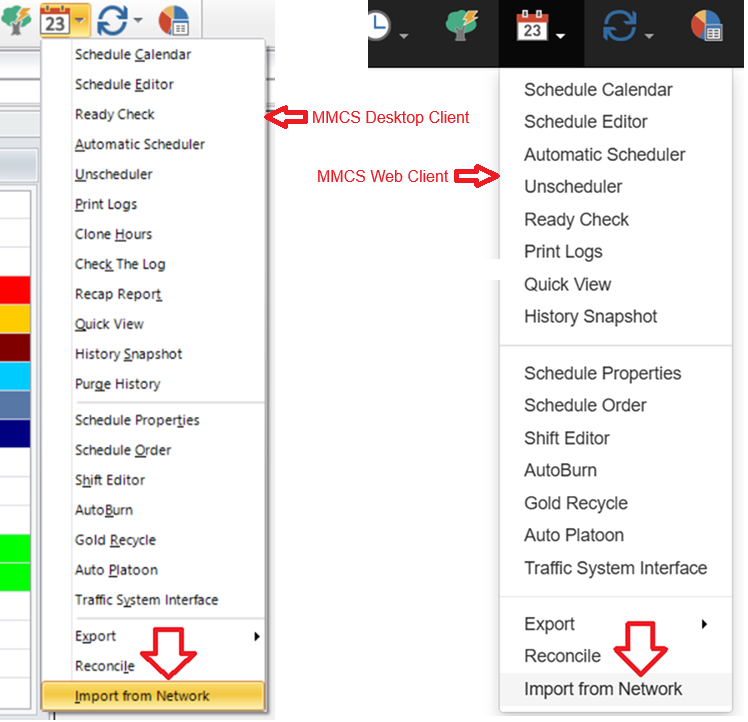
Many stations are part of large organizations who wish to schedule a format once and share that log with all the other stations of that same format. This can be done quickly and easily in MusicMaster using “Import from Network.” In the example below, we’ll be doing this in MusicMaster CS and the Web Client. This tool is also available in Pro, but CS has even more features!
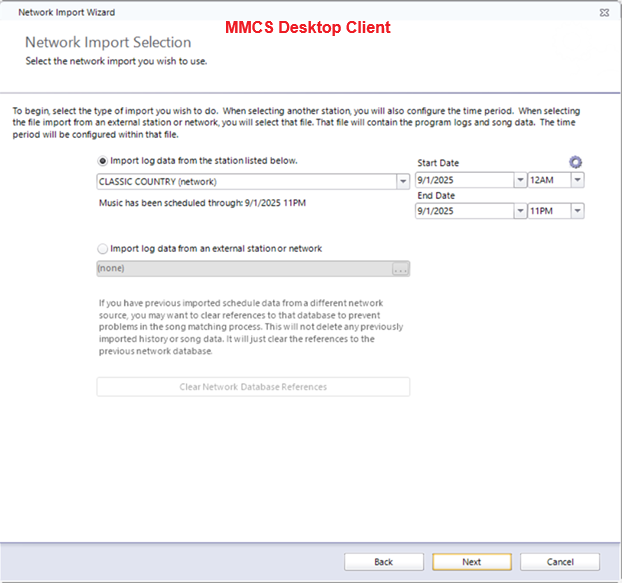
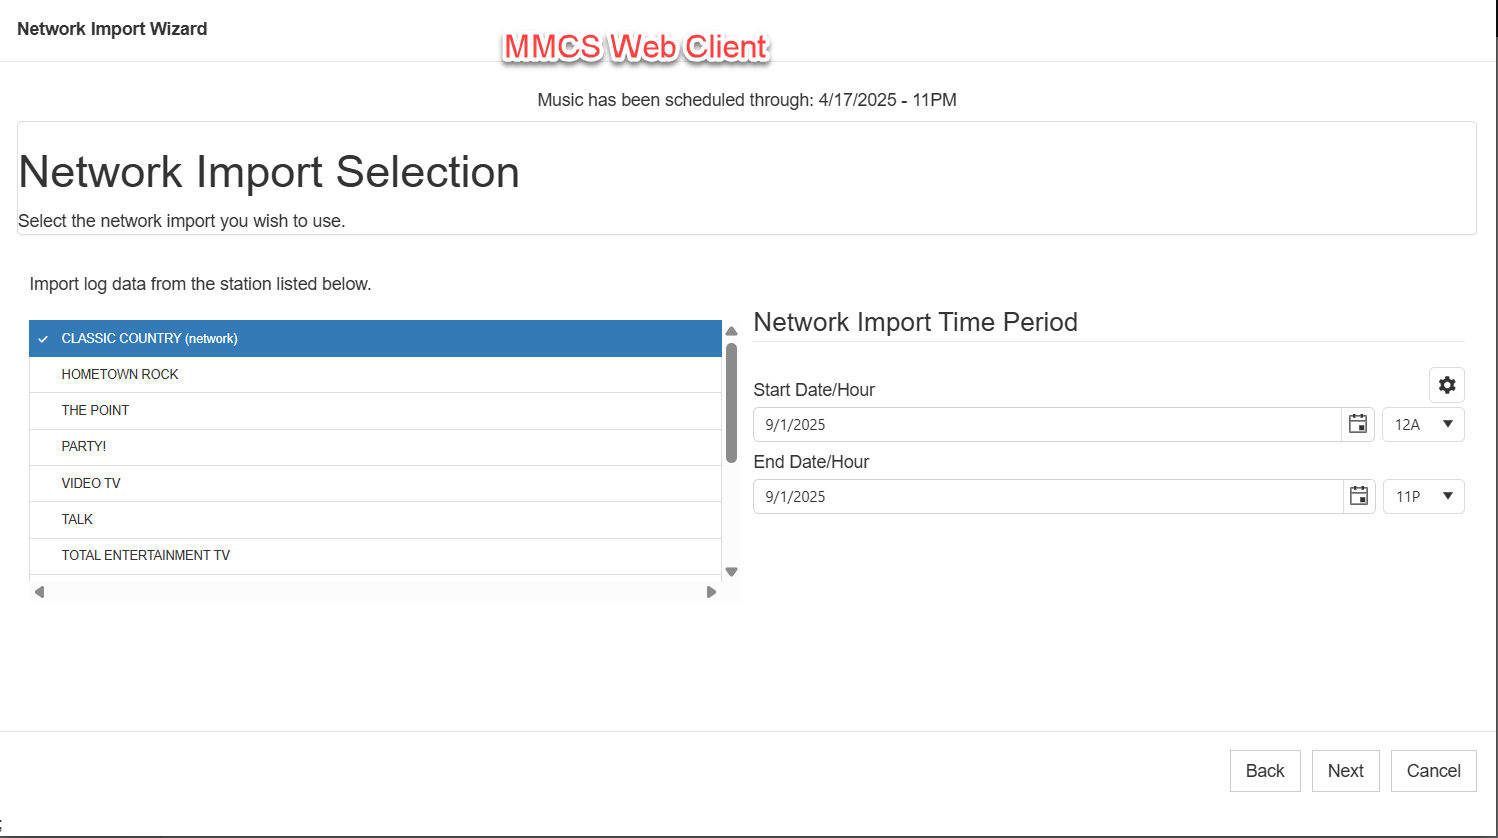
In your base station—we’ll call that the “network”—schedule the date in question and edit it completely. Now open the target station—the “affiliate”—and go to Schedule/Import from Network.
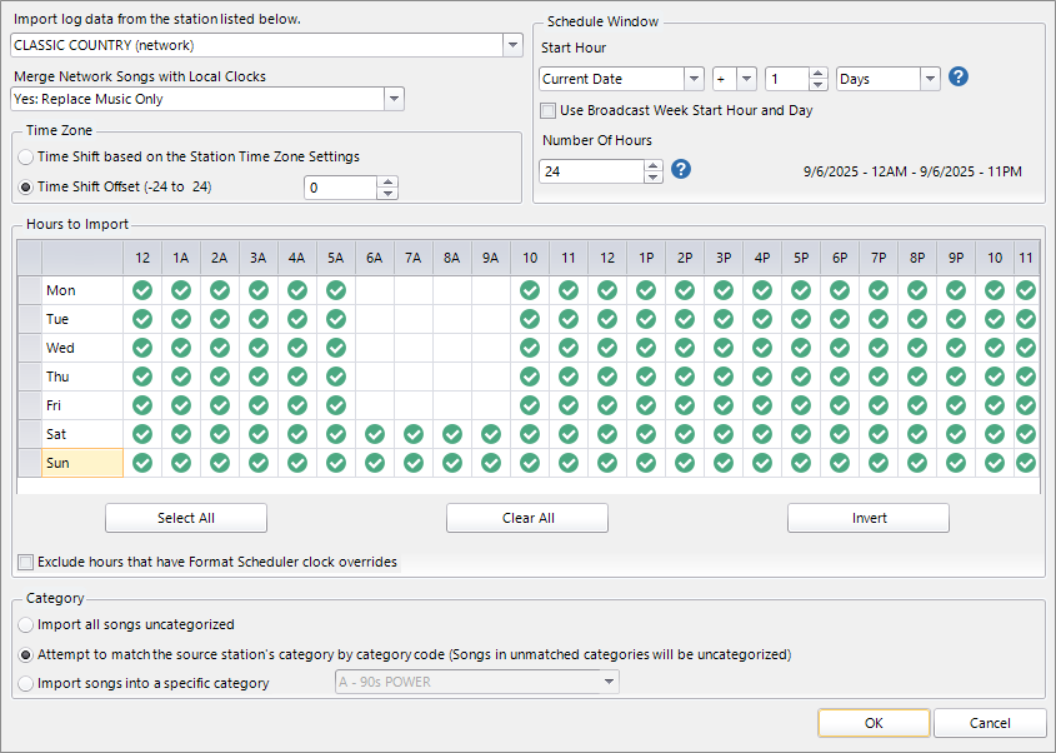
The next screen that appears will allow you to choose the station you want to import from and the dates/times you intend to import. Note, you can also choose to import from an external station or network that also uses MusicMaster but is not part of your company’s Enterprise.
Click Next to get to the Network Import Time Period. Here you can skip hours you don’t want to import. In the images below we are skipping the network’s morning show so it can be scheduled locally. On this screen you can Time Shift if you wish, exclude hours that have overrides via the Format Scheduler, and determine how you want to merge the network songs with your local clocks.
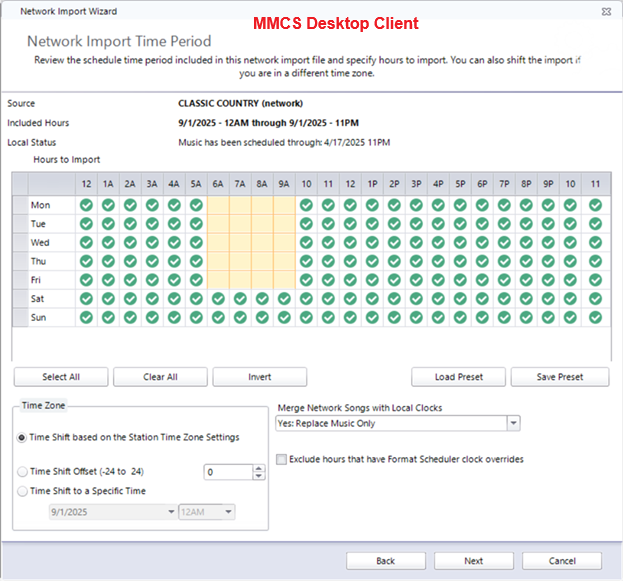
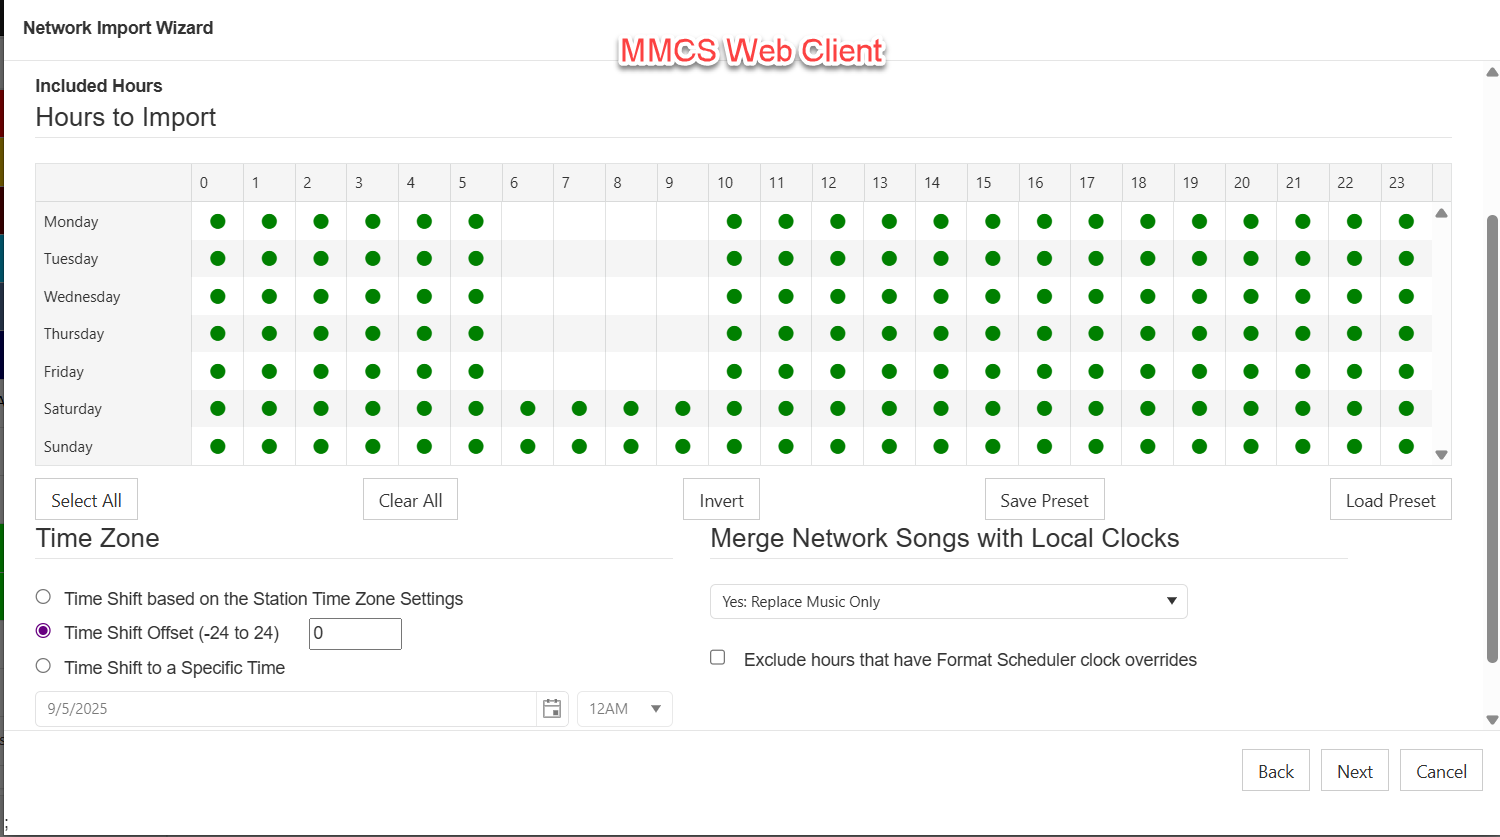
For the Merge Network Songs setting you have multiple options. There are three that we see most often.
1) You can import the full log from the network station—this overwrites everything from your local clocks with an exact match to what is scheduled in the base/network station by selecting “No: Use Network Log Only.”
2) You could replace only the music elements with the music items scheduled in the network via “Yes: Replace Music Only.”
3) Another option allows you to choose specific categories you want replaced in your local affiliate station and what categories from the network you want to replace them with “Yes: Replace Specific Categories.”
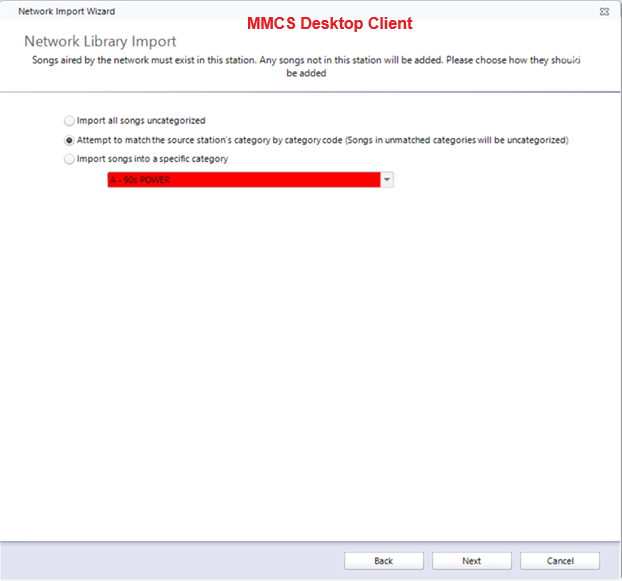
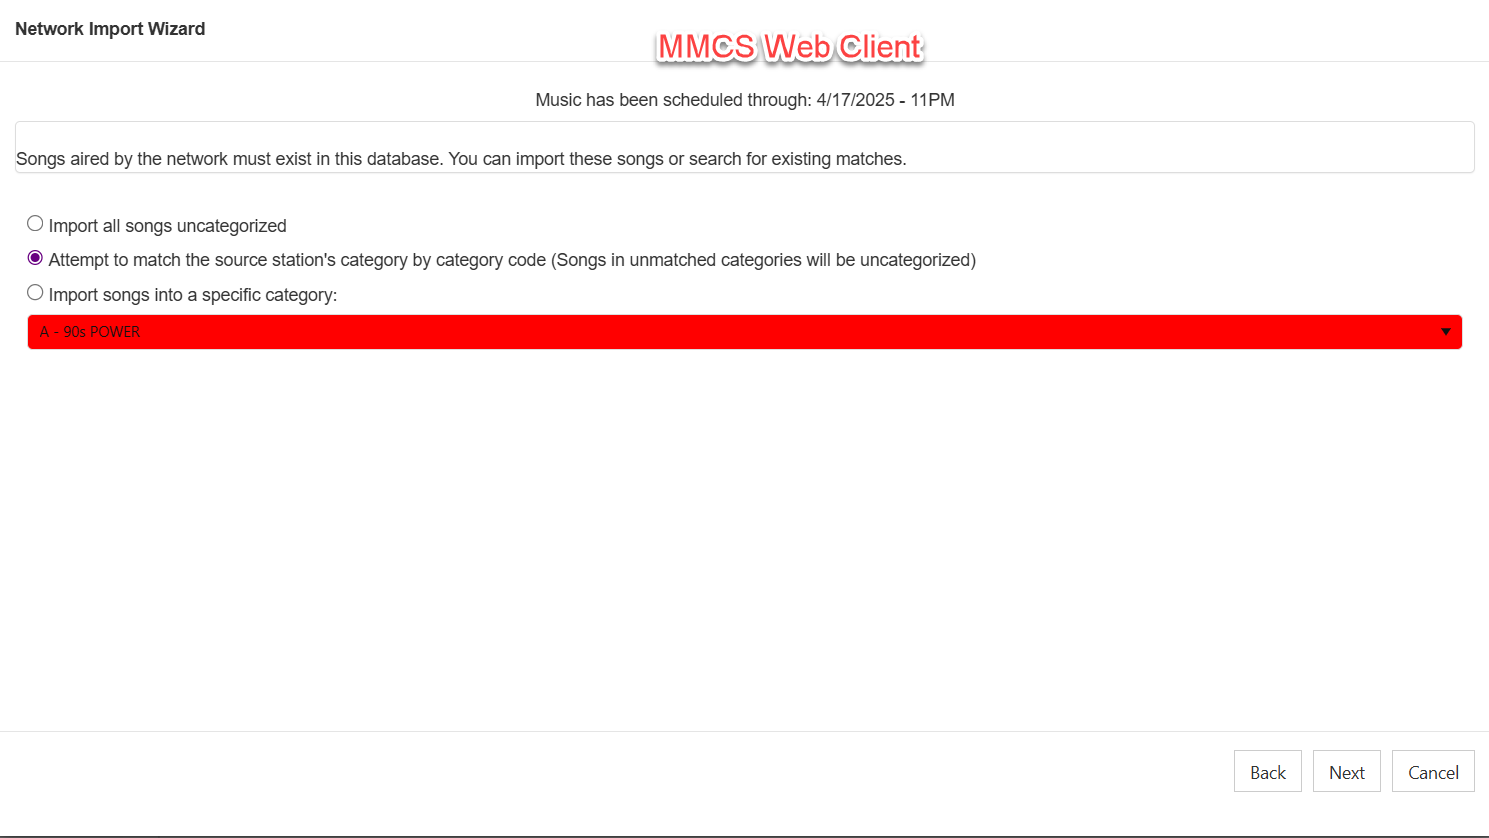
Once you have that configured, click Next to get to the Network Library Import. Here you indicate where you want the songs from the network/base station to go in your local/affiliate station. If the songs are in the same categories in the network and affiliate stations, I would recommend you “Attempt to match the source station’s category by category code.” This way songs that are in Category 1 in the network will also be in Category 1 in the affiliate. If you don’t want the network songs to match up with those already in your station, you can “Import all songs uncategorized.” Your third option is to “Import songs into a specific category” that you can specify.
Click Next and you’re all set to click Finish (desktop client) or Import (web client) to finalize the import from your network.
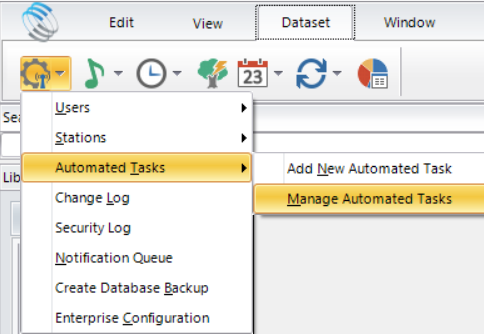
Now if this is something you wish to do on a regular basis, you can set up an automated task to do it for you (in the desktop client)! Click Enterprise/Automated Tasks/Manage Automated Tasks.
Set your Task Type to “Import from Network” and set your Station for the affiliate data. You can tell MMCS how often to run this task and at what time to do so.
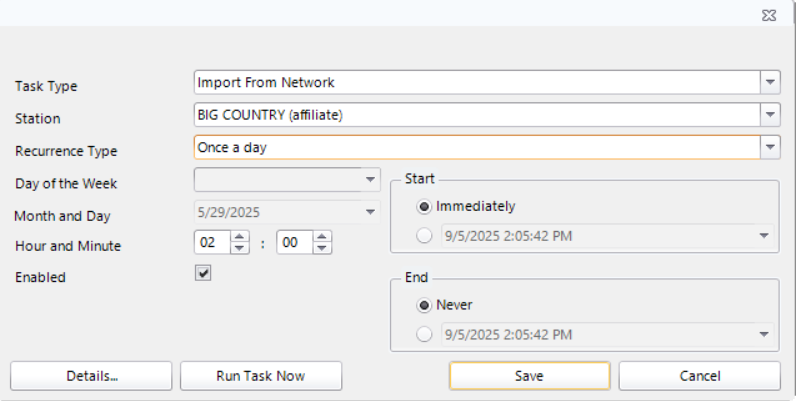
(Please note, the Month and Day you see listed is only an example when greyed out. If you choose to run a task once a month, then you can indicate month and day.)
Click the Details button to finish setting up your task. Here you will indicate the network station, how you want the songs merged, time shifting, hours to be imported, etc. This should look familiar as it has the same settings we covered earlier.
When you click OK, you’ll return to the previous screen where you can save your automated task.
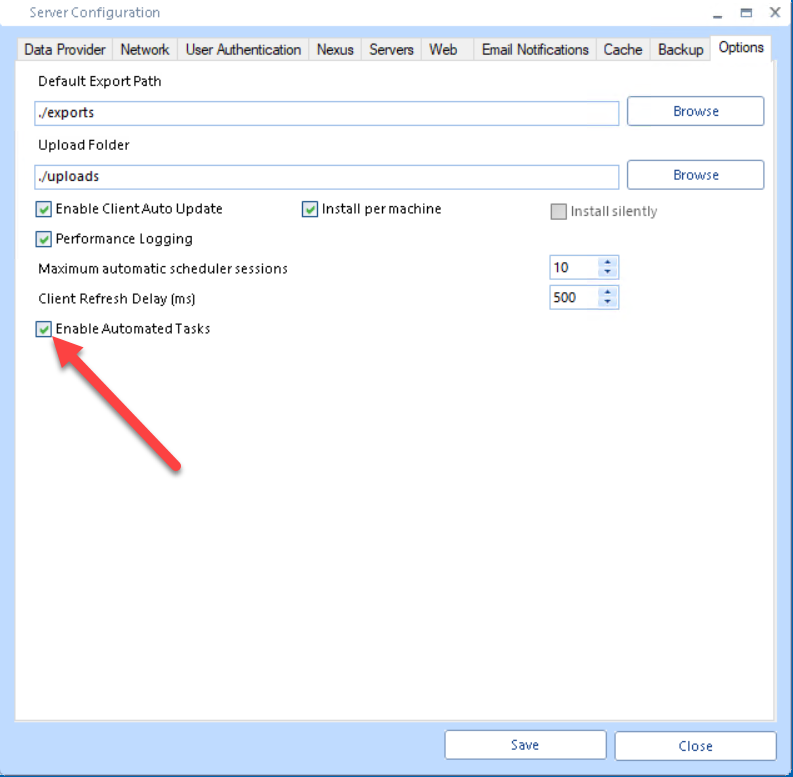
One last thing, make sure your administrator has automated tasks turned on at the MusicMaster Server Monitor (tray app) in the Server Configuration’s Options tab, otherwise your automated tasks will never run.
We have customers all over the world using Import from Network and automated tasks to do it for them. If you’d like to join that group, just let us know. Your MusicMaster Scheduling Consultant will be happy to assist you.
Gold Recycling Publicado por Laurie Knapp en septiembre 29th, 2025
by Vicky James
Are you looking for ways to expand your database without adding more music? Do you notice that songs in a deeper category aren’t getting full exposure? Gold Recycle allows songs that are played during a specific time to be recycled or returned later during a specified time.
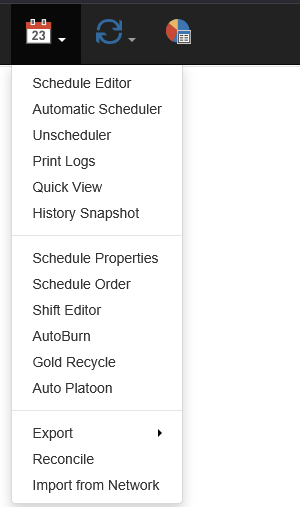
You can access the Gold Recycle by going to Dataset, Schedule, Gold Recycle.
In this example, I will configure the Gold Recycle to take songs that are scheduled during a five hour period during the day and bring those songs back to be potentially scheduled again in the overnights IF they meet the rule expectations. This way, you aren’t burning songs in the overnight that could potentially have played instead the next day during peak hours. Note that whenever Gold Recycle is implemented during the recycling hours, the Minimum Rest rules are overridden and not tested.
If you have a median turnover of less than two days, the songs in the category typically get the exposure expected; therefore, I recommend this only for categories where the songs’ turnover is greater than two days.
Select the icon to create a recycle period.

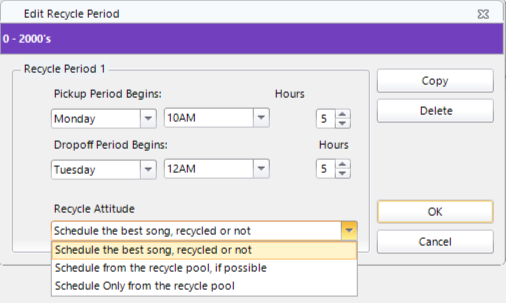
Once open, the gold recycle will populate a box. You will select the category and indicate what time songs will be picked up to rotate, and then specify what times those songs can be dropped off and played again.
You should note that the Recycle Attitude must also be decided, indicating how you prefer the songs to be scheduled.
- Schedule the best song, recycle or not – simply means that during the drop off period, you want the best song scheduled for that position, even if it wasn’t recycled from the pickup period.
- Schedule from the recycle pool, if possible – means that during the dropoff period, it’ll try to pick songs that played during the pickup period, but only if they don’t break Unbreakable rules. If it can’t find one, it’ll just scheduled a song from the normal rotation.
- Schedule Only from the recycle pool – meaning when this category is scheduled in the dropoff, only songs scheduled from the pickup period will be scheduled. If it can’t find a song that meets the Unbreakable rules, it’ll just leave the position unscheduled.
Once you have selected the category and configured the pickup and drop-off times, you will receive a box, as shown below, displaying the first recycling period in the now-set category.
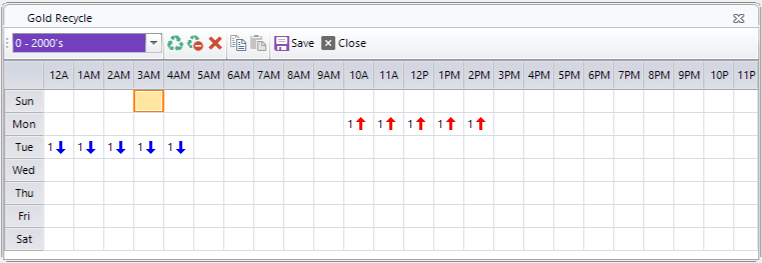
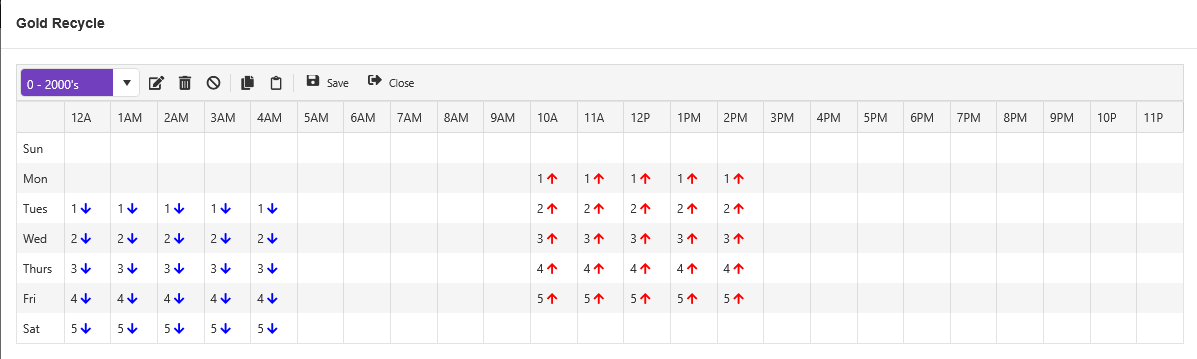
Next, I will configure the remainder of the week’s gold recycle, shown in the image below.

If at any point in the setup, you need to delete a period, the recycle icon with the minus removes the recycle period.And if you need to delete a Gold Recycle Setup altogether, the red X icon removes the setup in its entirety.
Gold Recycle is now set up for five recycling periods and is ready to save. Be mindful that if you attempt to close without saving your setup, MusicMaster will prompt you to save before continuing, in case you forget to do so. 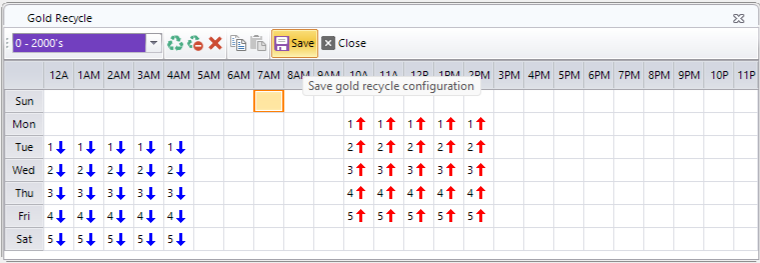
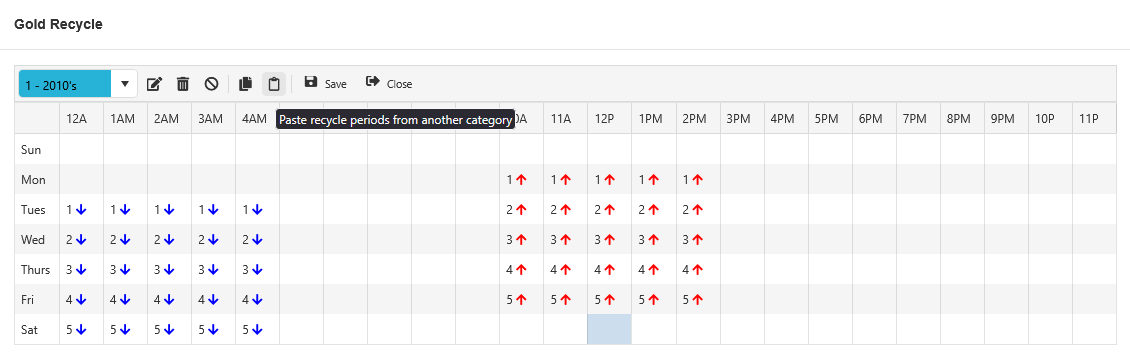
Let’s say you want to copy the Gold Recycling Period from this category to another. Simply select copy.

Next click the drop down and navigate to the category you want to add the recycling period to and click the paste icon.
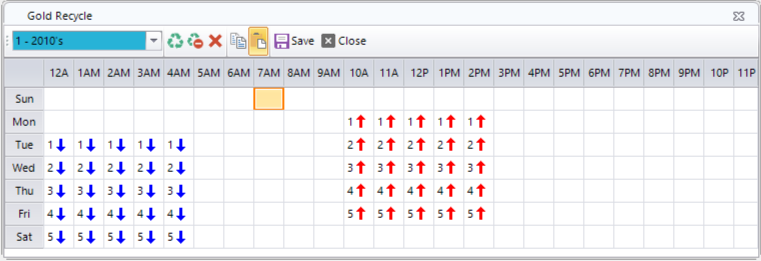
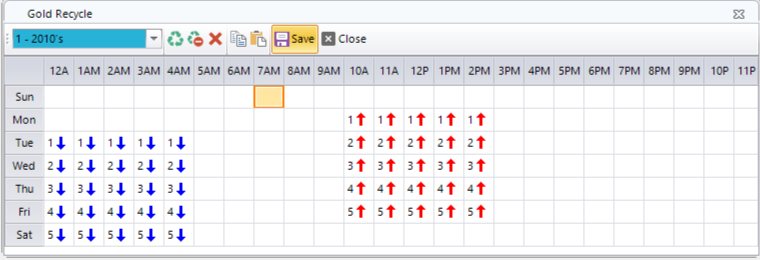
After the recycle period populates, you can then save this recycling period in this category.
Setting up Gold Recycle in the Web Client?
The steps are similar… Let’s do it step by step in the MusicMaster CS Web Client!
Click the Schedule Icon and Gold Recycle.
Next, I will create the recycling period. 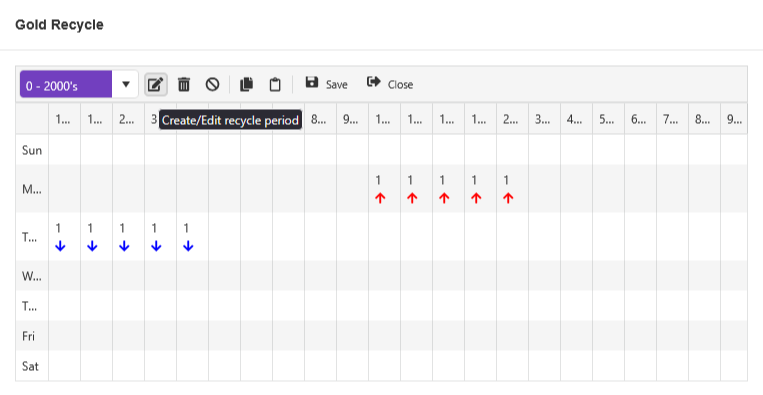
After the recycling period has been completely configured, save.
Should you at any time decide you want to delete a recycling period, you can select the trash can and dump that time. And if you decide that you want to clear the entire Gold Recycle from a category, click the remove icon next to the trash can. You can also copy the Gold Recycle from one category and paste it into another using the copy and clipboard icons.
 If you would like more help with setting up Gold Recycle, you can always reach out directly to your MusicMaster Scheduling Consultant!
AutoMove and AutoPlatoon in MusicMaster CS and Web Client Publicado por Laurie Knapp en septiembre 2nd, 2025
by Brian Wheeler
Not unlike a shopkeeper, programmers sometimes like to rotate inventory to keep things fresh. Some programmers will just move a few songs in manually, perhaps after getting research or after sensing a listening trend. But did you know there are a couple of handy tools to keep your product moving besides simply moving songs from one category to another? We’re going to discuss AutoMove and AutoPlatooning. While this feature is available in MusicMaster Pro, we’ll focus here on its use in MusicMaster CS and the CS Web Client.
AutoMove is a tool that lets you schedule selected songs to move from one category to another after certain conditions are met. To access this feature, you simply open a category, then right click within the category. You’ll see the Move feature, which includes the ability to set up AutoMove. The premise here is that you’re able to tell MusicMaster where to move this song and when to move it. Do you want to move songs seasonally? Enter a date for the song(s) to be moved. Do you want to rest songs after they’ve played a certain number of times? Enter the number of plays that should occur before the move should happen. Here is a sample view of what you may see when setting up AutoMove in MusicMaster CS.
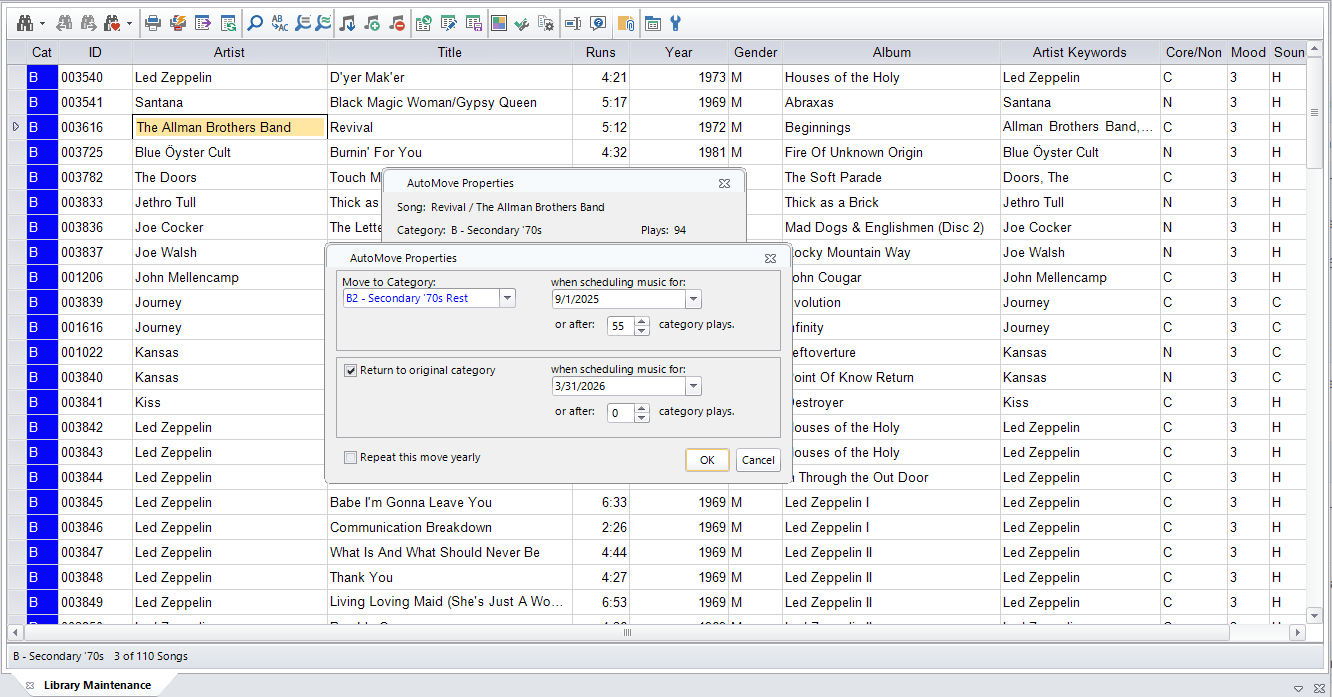
As you can see, I’m afforded the ability to AutoMove songs after x number of plays. I can also return songs to their original category by a pre-determined date. I can set up the Automove to execute these steps yearly as well.
How Automove appears in the Web Client: 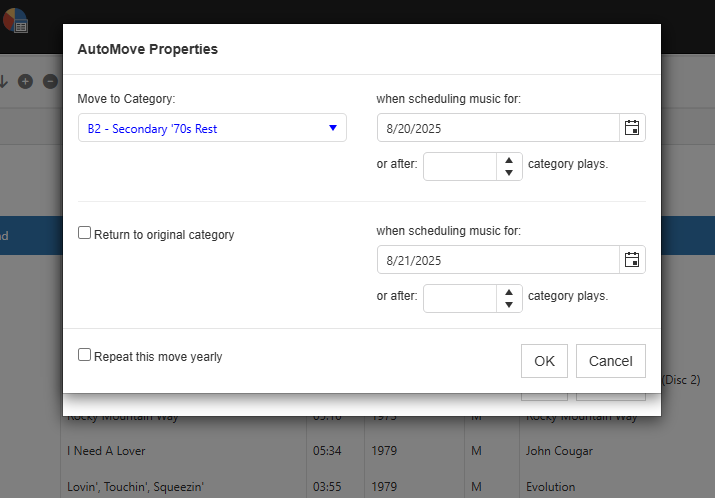
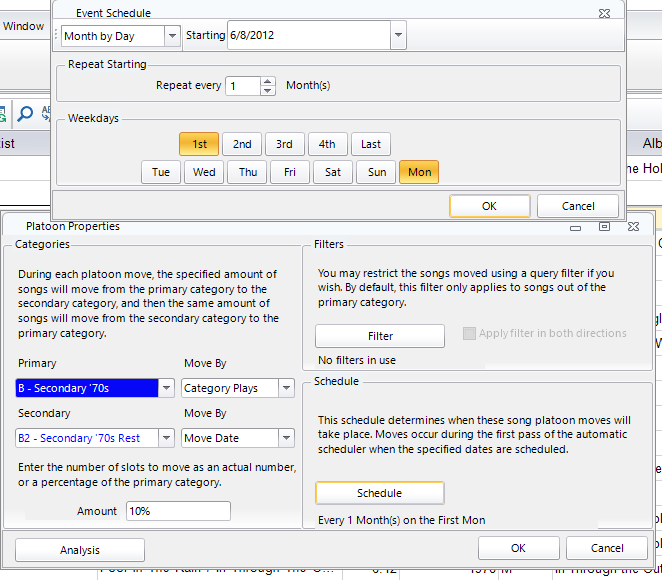
Auto Platoon has a similar capability but also enables you to set additional filters and gives you the ability to control when and how many songs get moved. In this case as seen in CS, I’ve elected to move 10% of the B category into a hold category the first Monday of each month. The songs that are chosen to move will be determined by category plays.
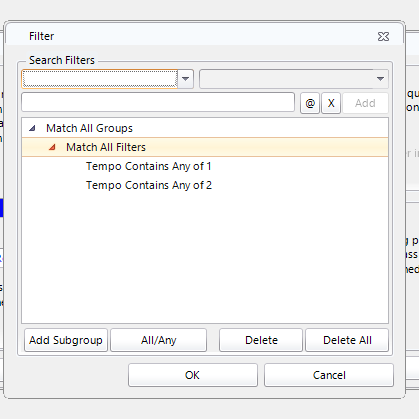
As a variation, I later chose to include a filter, only moving songs that had a tempo filter. That means that when my AutoPlatoon kicks in, the only songs that can be considered in the platoon must be slow songs (tempo 1 or 2) that occur in my active category. It’s not a commonly used filter, but it demonstrates the possibilities when thinking about how one may use the AutoPlatoon feature.
In this next photo we demonstrate another AutoPlatoon configuration seen in our Web Client. I’ve got the AutoPlatoon set to move 10 songs monthly on the first of the month. As you can see, 10 songs move into a hold category, and 10 songs will move from your hold category into the active category. This takes place when scheduling the date indicated on your AutoPlatoon settings. 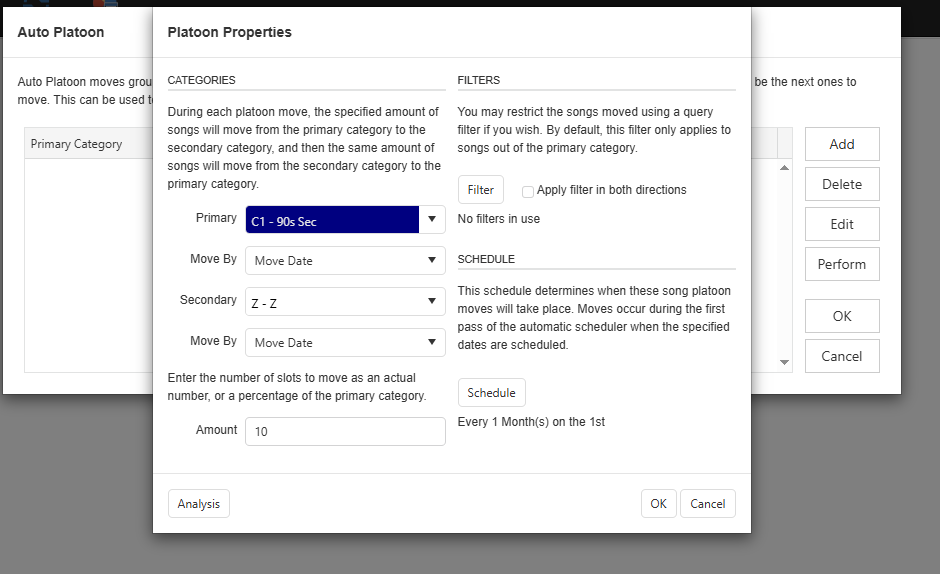
AutoMove and AutoPlatoon are two very useful tools to keep things fresh in your station. As always, if you have questions or would like to discuss these or any other features in MusicMaster, your MusicMaster Music Scheduling Consultants are only a call or an e-mail away. Reach out! Let’s talk.
All Together Now (Scheduling Multiple Stations at One Time) Publicado por Laurie Knapp en julio 30th, 2025
by Dave Tyler
For many years, the need for each of us at the radio station to wear more hats has increased. The idea of being just a Production Director or just an afternoon talent is long gone. Today, you might be the PD doing the morning show, followed by assigning production, cutting spots, sitting in a meeting with sales, doing a live remote, and back to voicetrack for your sister station. In many cases, we are programming multiple stations, and in extreme cases, multiple markets! There doesn’t seem to be enough hours in the day, right? Enter MusicMaster CS.
MusicMaster CS has a powerful set of tools, functions, and even automated tasks ( for more on Automated Tasks, check out this blog….brilliantly written by….um…well, ok, I wrote it, but it is still pretty solid!) https://musicmaster.com/?p=11521>.
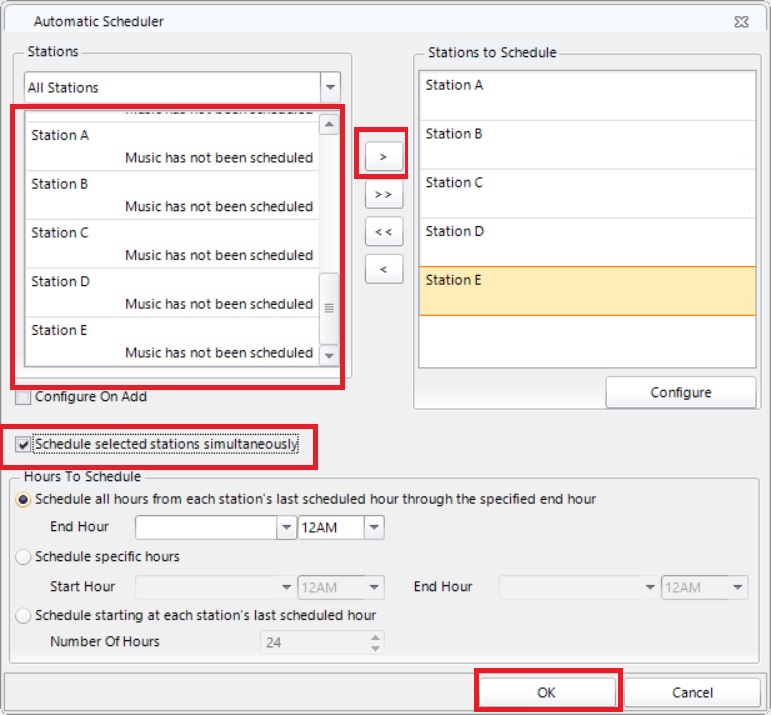
Let’s say I am the Market PD and I need to schedule music for the week for several stations. Using MMCS, I no longer need to do them one at a time. I can schedule all of them at the same time! Crazy right?! Here’s how you do it. Just open the Automatic Scheduler in the Enterprise and select the stations you need to schedule. Configure your settings. Check the box to “Schedule Simultaneously” and click OK.
It is an incredible time saver, but now that you’re sitting there in disbelief, it is time for me to blow your mind! Remember earlier when I mentioned Automated Tasks? You can set up an Automated Task to do the scheduling at a time you prefer. Imagine having MMCS schedule your stations for the entire week while you’re at home sleeping! Review my Automated Task blog to see how. It is pretty cool to walk into the station the next morning and only have to edit/massage the logs. Heck, you can even set up an automated task to export the logs!
MusicMaster CS solves a lot of problems and gives today’s modern user/music scheduler some incredible abilities to lift our mounting responsibilities and allow us to pay attention to the really important details of our workday.
Importing/Exporting clocks within MusicMaster CS/Web Client Publicado por Laurie Knapp en junio 26th, 2025
by Brian Wheeler
Sharing clocks between databases is a very useful feature in MusicMaster Pro, and it becomes even easier to share in MusicMaster CS and MusicMaster Web Client.
There are two ways you can share your clocks in CS and Web Client. The traditional way of exporting the desired clocks and creating a Clocks.mmdex file is still possible. But I’ll also show you a new way to share clocks on these platforms.
In this photo, I demonstrate how to export clocks using an .mmdex file. You simply select the clocks you wish to share from your source station and select Export. At that point, MusicMaster will create an external file called Clocks.mmdex.


Once this file is saved, you simply go to your target station and import the Clocks.mmdex file to introduce these new clocks to your target. Note that items like forced elements pointing to specific song IDs will not carry over and must be reconfigured in your target station.

And this is how this feature looks in our Web Client. Very similar.

This is a fine way to share clocks from station to station in MusicMaster Pro, CS, and the Web Client.
In MusicMaster CS and the Web Client, sharing clocks is even easier AND more complete! In addition to the ability to share clocks as you always have in MusicMaster Pro, there is an additional way to share clocks, INCLUDING forced elements and other items that would traditionally need to be re-configured for your target station. I’ll explain.
Sometimes in the course of sharing clocks, there are elements that are unique to the source. Forced elements, etc. can’t be shared because they aren’t sourced the same from station to station. This is largely because Song IDs are used for forced elements and those numbers are unique to each database in MusicMaster Pro. With CS and the Web Client, your shared clocks will no longer yield unknown elements, as all those resources are shared at the Enterprise level. As a result, you are able to get the entire clock, elements and all.
Here’s how sharing clocks looks in MusicMaster CS. As an example, I’m ingesting clocks from another station within my network, taking a couple of clocks from my Classic Country station and ingesting them into my Hot Country station. I simply select the source station, then select the desired clocks.

The interface is identical in the Web Client. You simply indicate the source from which you’ll take clocks, select the desired clocks, and ingest them into your target station. Again, no more unknown elements, as you’re sharing these clocks internally.

The result is a seamless transition of your clocks from one station to another, elements and all.
As always, if you have any questions about this or any other feature, don’t hesitate to reach out to your MusicMaster MSC for more information!