MusicMaster Blog
Combos and Schedule Properties posted on September 19th, 2016
By Paul Ziino
A customer called a few weeks ago and said, “I love my combo positions, I get minimal unscheduled positions, but I get more As than Bs or Cs. Is there a way to even out the plays among those three categories in the combo?”
To refresh your memory, Combo clock elements allow you to schedule songs from multiple categories and MusicMaster will step down to the next category in line based on the pass order in Schedule Properties when no song meets the criteria from the first category. Basically, if your pass order is A, B, C, D, E and you have a Combo position scheduling from A, B, and C, MusicMaster will try the A category first, if no A works it will then try songs in the B category when it’s the B category’s turn in the pass order. If no B works, then MusicMaster will try songs in the C category when it’s the C category’s turn in the pass order.
Here’s our solution.
Go to Dataset/Schedule/Schedule Properties and click the Advanced button. Here you are able to establish up to 9 different levels of the pass order. So level 1 could go A, B, C, D, E, but level 2 could go B, C, D, E, A and level 3 could go C, D, E, A, B and level 4 could go another way and so on. You assign the levels to the grid in the upper half of the screen, and as you switch from level to level you establish the pass order and depth settings in the lower half.
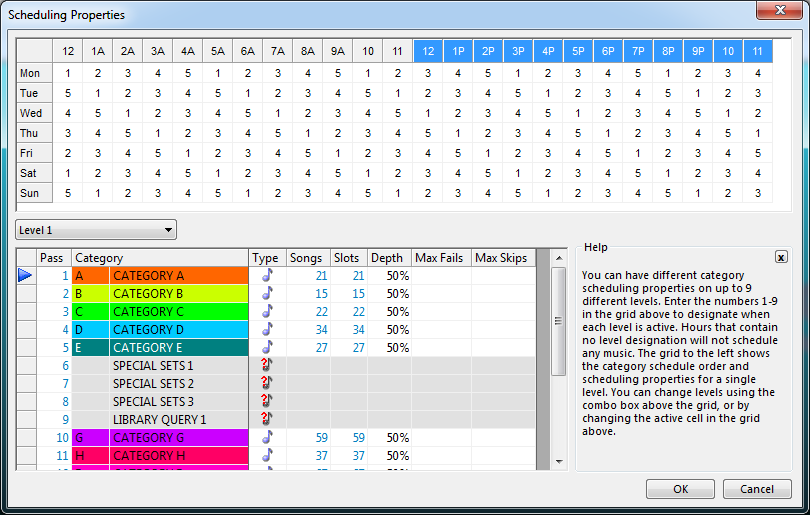
In my example I have 5 levels. When in level 1, the A category is first. When in level 2 the B category is first, and so on. So in level 1, my combo position of A, B, and C will try the A category first. If no A works, then a B will be attempted. If no B works, then a C will be tried. If no C works, then the position will be left unscheduled.
In level 2, the B is attempted first, then the C, and the A is in the last pass.
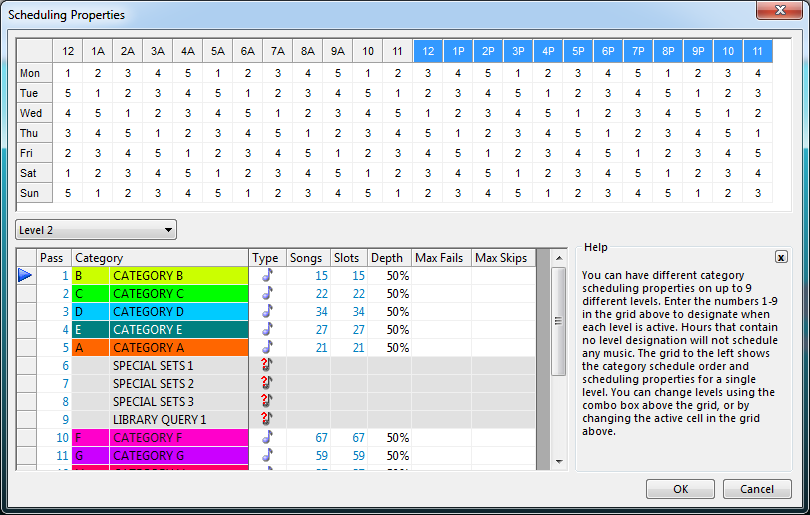
When you run the automatic scheduler you’ll see categories bouncing around in that process because MusicMaster schedules pass 1 from each level first. So at midnight it’ll start with the A category, but in 1am it’ll start with the B category, and in 2am it’ll start with the C category with that first pass.
The end result for my customer was a more even use of those categories within his combo positions. Of course, she was thrilled! When you have MusicMaster-related questions, make sure to contact your Music Scheduling Consultant—we’re always here to help!
Clone Your Database & Go Crazy! posted on September 5th, 2016
By Dave Tyler
Have you ever thought about making some wild changes to your database but you are afraid to because if it does not work the way you want it to you’ll have no way back? I’ve been there too! It reminds me of my early days in the business when I would edit a spot or song on reel-to-reel. Every cut and splice meant there was no going back; total commitment! Sometimes it worked out sometimes it didn’t. Then came computers and non-destructive audio editing where you could have as many copies of a track as you wanted and all of them are in pristine, original quality. Make a mistake, try again no problem. There is a similarity here with your MusicMaster database. Let me explain.
Let’s say I am running a Classic Hits station and have always had my categories as A-60’s, B-70’s, C-80’s etc. to keep things simple but I am considering completely overhauling my categories to be more like A-60’s British, A2-60’s Psychedelic, A3-60’s Pop, B-70’s Love Songs, B2-70’s American Rock, etc. These are some pretty big changes and if I make those changes and it proves to be a train wreck I have a lot of work to do to get things right again. MusicMaster has you covered. Just open your Datafile Manager and select the database you want to clone then click the “Clone” button.
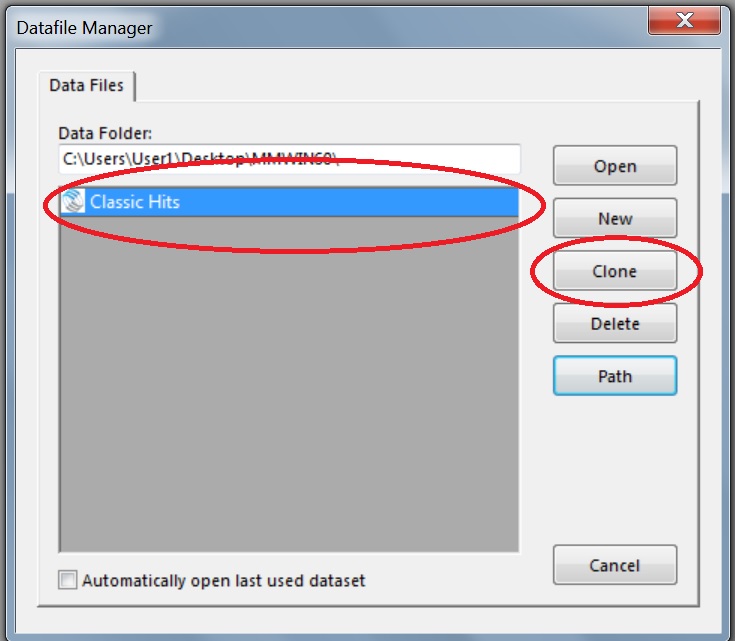
Once you do this another window will pop up with a box that allows you to name this new version(Clone) of your database something that will differentiate it from the original. In my example I am calling the clone “Classic Hits – New Concept” so I know this is the one I can fool around in.

This clone is an exact copy of the original database and includes your Export Design and all of your current settings, clocks, grids etc. You can make all of the changes you have been dreaming about and it will not affect your original database at all. Change your categories. Shake up your Rules or start all over with new rules. Create new clocks to reflect your vision using your new categories and Auto-Schedule to see if it works the way you want it to. All the while, you can continue to use your original dataset to schedule on the air. Since this a clone, you might schedule out six weeks and then review history graphs to confirm the change is what you want.
Once you are satisfied, you’ll have two choices: If you’ve done this testing quickly enough, you could simply begin exporting from this clone. If there is a gap in the logs scheduled, you could reconcile the aired logs into the cloned data and proceed or you could make the changes in your on-air data knowing the changes have been tested and will do what you want.
Cloning is a great way to try out new things in your database in a non-destructive way, completely shaking things up while preserving what you know already works. As always, remember to make backups of your data before making any big changes. This too gives you a way back. Have fun!
Replace Songs Better posted on August 22nd, 2016
By Jesus Rodriguez
In MusicMaster 6.0 we have many new features that have been introduced. One of my favorites has to be the Rule Filters within the Song Replacement Tool.
When you are in the Schedule Editor I am sure you may have had to replace a song or two within your log by clicking on F9 or double clicking on your song, fill an unscheduled position or add a song. I bet there have been many times when you have to decide to override a rule and replace the position with a song that breaks a rule because it was only off by a little bit from the rules parameters.
What if I told you now you can make your rules a little more flexible for that one position on the fly? Just think of the possibilities! We all want that perfect log and set our rules up to do that for us. Occasionally a rule is more difficult to accomplish as our library changes. Adding or removing songs changes the number of songs with specific sound codes, tempo codes, or anything you might be testing. Instead of you taking a shot in the dark of what song you think will be the best one for that position when you override the broken rule you can have this great new tool find it for you.
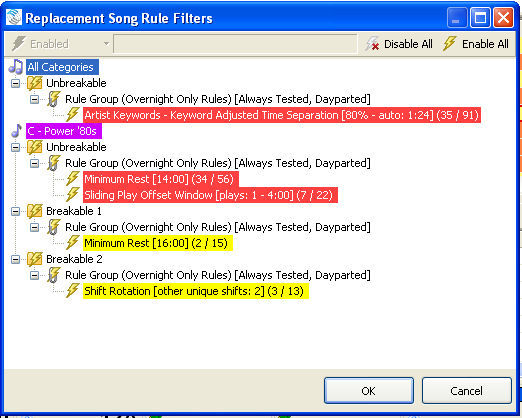
When you get to the song replacement window you will see a new tool called Rule Filters. The Rule Filters tab will only appear when you are filtering your songs using the flags for Hide Unbreakable Failures or the Show Only Perfect Songs. Once you click on this amazing new tool you will see a window come up called Replacement Song Rule Filters.
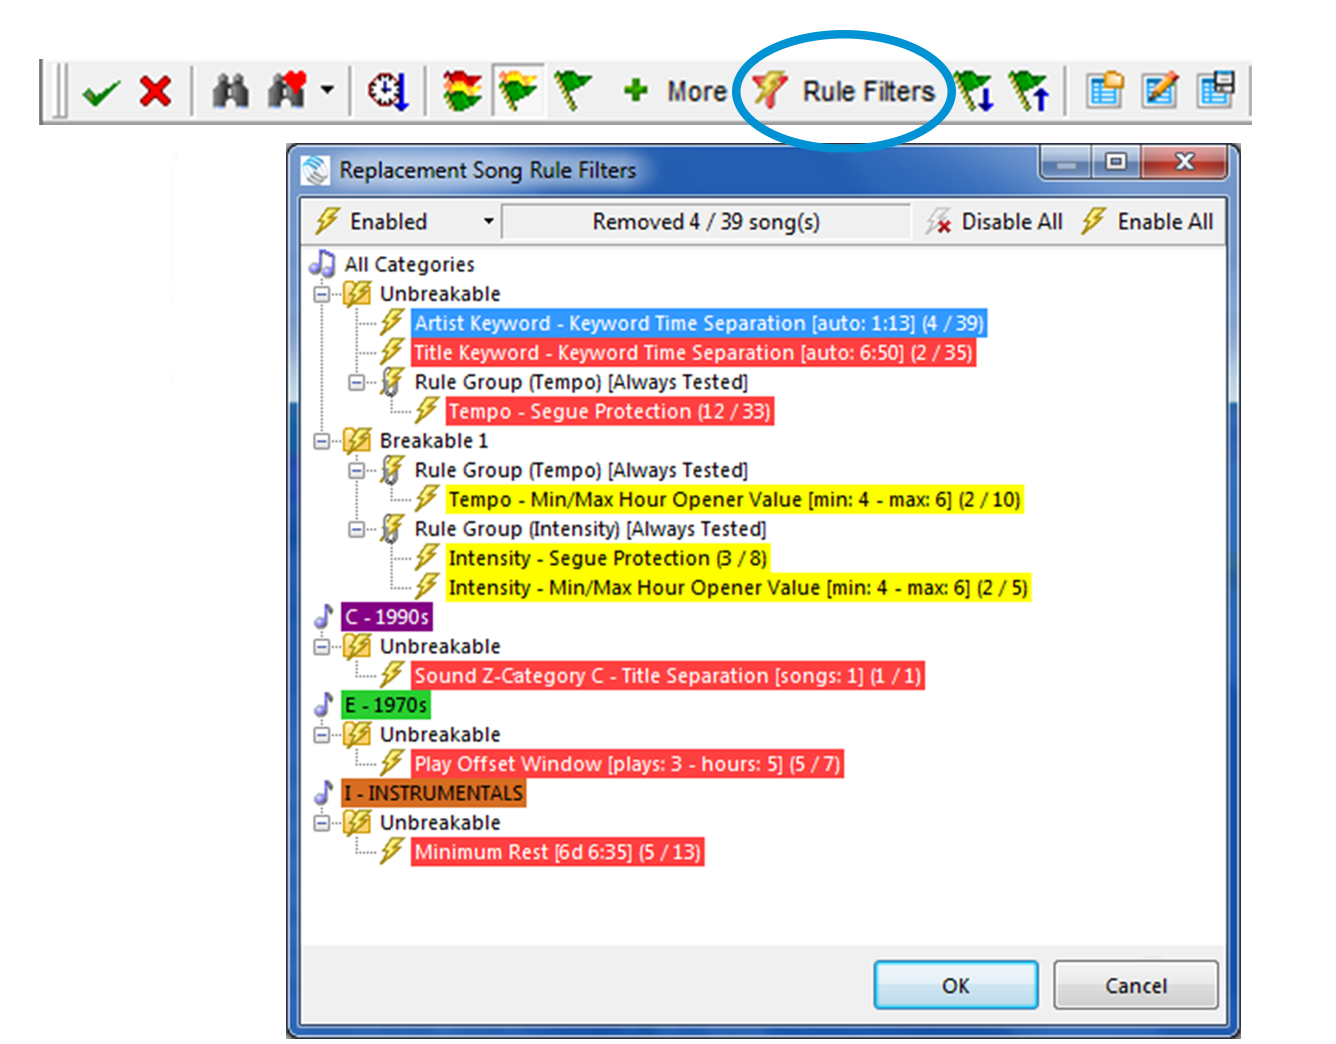
At a glance this looks very similar to your Test Results and for the most part it accomplishes a similar scenario for you at a glance with some additional advantages.
Right away I am sure things look pretty familiar and easy to understand but as a quick reminder let’s dive into the obvious. The red background is showing us the Unbreakable Rules failures and the yellow the Breakable rule failures.
When you first open this tool you will see that the first tab Enabled is not activated, the center box is empty, and you only have two options to either Disable All or Enable All the rules that are giving you problems in finding the perfect song. You can think of the Disable and Enable All tabs as an on and off switch for your rules. This may seem like a quick fix to find a song within your Song Replacement Window but shouldn’t we try to find the best song?
Lets learn how we can find the best song while simply relaxing the rules a little. Lets look at each one of the items in the Replacement Song Rule Filters Menu Bar from left to right for you to reference as we go along.
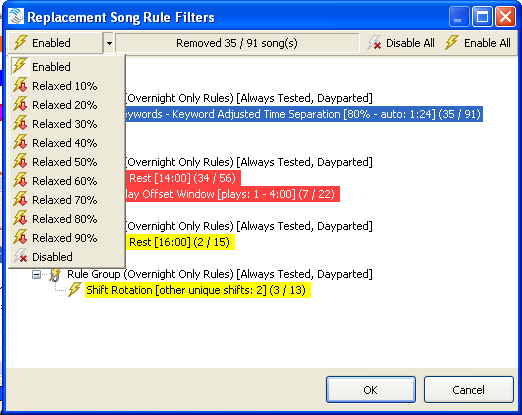
First click on the rule you wish to relax. You will see that once you’ve selected a rule your Enabled Tab, the first one on the Menu Bar, becomes active and the second bar now has some information on it. The information you see is the same note that is detailed to the right of the broken rules letting you know the number of songs that have been removed from the total amount of available songs due to this rule being broken. You now have the ability to relax the rule for this position using the first button by clicking on the Enabled button. You will get a dropdown of options to relax the rule by a percentage of your choice and even go as far as disabling it for this position in the log. You can repeat these steps for all or as many rules as you wish to relax for this position. As you do this you will see your test results change in the amount of songs you now have available after relaxing the rule or rules. If you were done here you could click OK and see the additional songs you just made available by relaxing your rules.
The third and fourth tabs Disable All and Enable All as mentioned earlier are simply an on off switch for your broken rules. You can also turn any rule on or off by double clicking on it to specifically Disable or Enable it.
After you’ve picked a replacement song, the next position you look at will have all the rules in full effect again. You can now follow the same steps on the new position to see what changes you can make to see more replacement songs.
I hope that this new tool helps you find the perfect song for any position in your log. It is great for when you find yourself having to make a replacement by simply relaxing your rules just a little bit for that one position.
If you have any questions or would like any personal training on this new feature, please contact your MusicMaster Scheduling Consultant.
Filling Unscheduled Positions via Saved Queries posted on August 8th, 2016
By Paul Ziino
We’re going to go through two processes here. The first step is creating a Saved Query in MusicMaster. To do so, click on Dataset/Library/Query the Library/New Query. This opens the Library Query box.

Here you can create queries for all sorts of things in your library. For example: query for songs with high test scores, songs with low burn scores, songs within a certain genre or gender, specific categories, the sky is the limit! Once you’ve built the query click the “Save As” icon then name the query. Now that you’ve saved this query it will be available to you in Library Maintenance and in the Schedule Editor.
In the databases I schedule, I keep a pretty tight rotation. So much so that sometimes I get unscheduled positions and there is just nothing available in that category that passes the rules. So I’ve built a saved query that looks through all the songs in my five non-power categories. I’ve labeled this saved query as “Replacement Search.” Now when I’m editing a log, I keep the Info Bar open on the screen and switch it to the Queries display. From here I am able to drag a saved query into a position in the Schedule Editor, and the replacement window automatically populates with all the songs from that saved query that can work in the desired position. It saves me a bunch of steps as opposed to creating the query each time I wish to fill the unscheduled position.
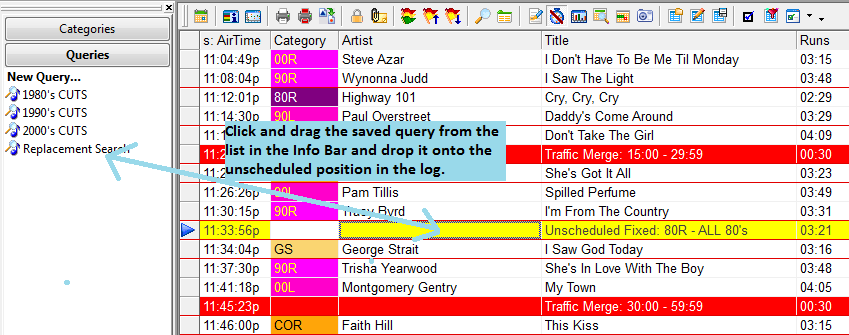
You can also right-click the unscheduled position and select “Schedule Song/Search using a saved query,” then select the desired query. Both methods will give you the same result, but I find the drag and drop method much quicker.

For tips like this and lots more, make sure to check out the Blog Archive or contact your MusicMaster Scheduling Consultant!
Seven Signs of a Dysfunctional Database posted on July 25th, 2016
By Drew Bennett
It’s a challenge to keep a radio station’s database in the best shape it should be. Day in and day out, you’re making changes, moving songs around, adjusting rules all to keep the station sounding the best it can. Maintaining a database can be a real challenge and perhaps it’s time to ask for more money. Your job is super important! When you open a database to take a look around, you’ll know with some certainty whether the database is being properly maintained or not. Today, you can compare your data to the seven signs of a dysfunctional database.
- Incomplete Song Cards
This is one of the earliest signs that something is wrong in the data. You can also bet that there’s something wrong on the air, too. If your data is incomplete, it’s impossible for your rule tree to maximize your library and generate a good log. If Artist Keywords are missing from songs or if song cards contain incomplete attribute fields, the database is in trouble. Rules aren’t able to test and pass or fail all songs. The spirit and the sound of the station can’t be achieved without complete data so look here first when grading the dysfunction of your database.
- Fuzzy Rules
A Rule Tree can be an antique store or it can be a tech store. Antique stores tend to be full of old junk. Some of it works and some of it doesn’t but it’s all old. A tech store is clean, up to date and with the latest and greatest to offer. How long has it been since you’ve checked out your Rule Tree? What do you sell over there, grandfather clocks or Apple watches? If you’ve scheduled the station with a rule tree that has been tinkered with and touched by former programmers who don’t work there anymore, you’re running an antique shop and it’s time to close down and re-open a Sharper Image. When it comes to Rules, it’s important to know exactly what you sell, what rules you have in place and how they work. Your rules help you create the sound of the station and the mix of music in the log. Knowing exactly how they work and exactly what you have in there is quite possibly the biggest point to take away from this list of seven signs.
- Neglected Turnover
It’s a FACT: There’s not a rule in the world that will save you from terrible turnovers. If your Power Gold category plays every 12 hours and you’re frustrated that your Shift Rotation rule keeps failing, don’t blame the rule. Blame the turnover. Perfect logs start with perfect turnovers. If you add songs to a category or take a category away from a clock, you’re changing the turnover and it’s one of the most important things to consider when you schedule music. If turnover is bad, the whole database is bad.
- Hidden Settings
Remember when we talked about former programmers in your Rule Tree? The same goes for hidden settings in the software. “I had no idea I was Gold Recycling the Recurrents!” “You mean to tell me I’ve been Auto Platooning 50% of my Gold category every Sunday?” Take a look around the software and make sure the right lights have been turned on and the right lights have been turned off. You never know when an AutoMove is causing your unforeseen heartache. Tools, Options, Additional Properties is another good place to look. Hidden settings that other users have placed on the data can cause you to pull your hair out if you have no idea they’re being used. Speak to a Music Scheduling Consultant who can take you on a tour of the software to make sure it’s nice and tidy.
- Multiple Copies of the Data
It’s great to keep copies of the data so you can test out new scheduling methods or check out a new feature. It can get dangerous when you become confused as to which database is the official data. Delete old data you don’t use and make it a policy never to have more than one other copy of the data that is being actively edited. This will save you from updating the wrong data or worse, deleting the wrong database.
- No Reconciliation
Reconciliation is important when scheduling music for two main reasons: you must report to certain agencies and governing bodies with a list of what you played on the air and songs that did not play must get placed back in the stack so they can be played and exposed to your audience. If you don’t reconcile by hand or by automation, it will cause your reports to become inaccurate and songs won’t rotate as they should.
- Dirty Clocks
Another big sign that you’ve got dysfunctional data are the clocks you have listed in format maintenance and how they look inside. Do you have two hundred clocks listed but you only ever use six? Do you have relic lognotes inside your clocks that reference automation systems you don’t even use anymore? Use the Select functionality in Clocks to select clocks you don’t use anymore and remove them. Hunt out old lognotes and references to old automation systems by using the Lognote, Purge feature. This will only remove those lognotes that are not in any clocks or logs. It will keep your data cleaned up and ready for another change down the line!
Can you think of other signs that indicate a database needs some work? Pass it on to us! Do you need to speak to someone who can help you clean up your data and get it back in shape? Call your assigned Music Scheduling Consultant for more and happy scheduling!
Custom Hot-Keys posted on July 11th, 2016
By Dave Tyler
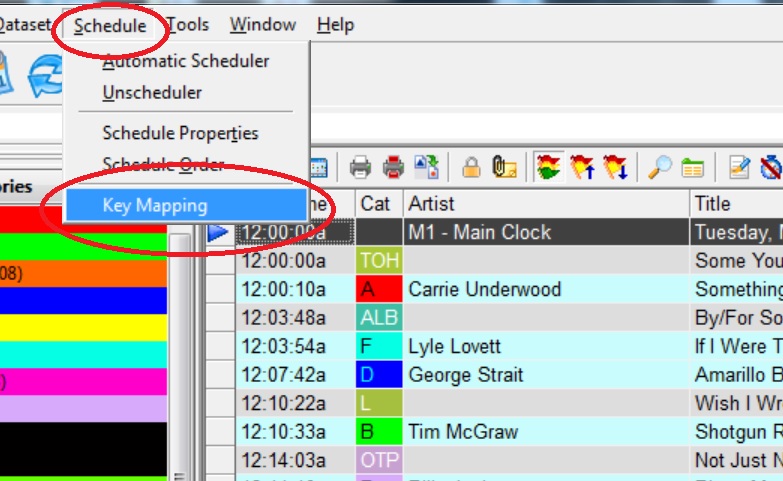
One of the reasons MusicMaster has become the music scheduling software of choice is because of your ability to customize what see and how you use MusicMaster. MusicMaster users from all over the world are excited about the many new features and tools within MusicMaster Pro 6.0 and one of those is Custom Hot-Keys or Key Mapping! Key Mapping allows you to create hot keys that you want and need in both Library Maintenance as well as the Schedule Editor. For our example we will work in Library Maintenance.
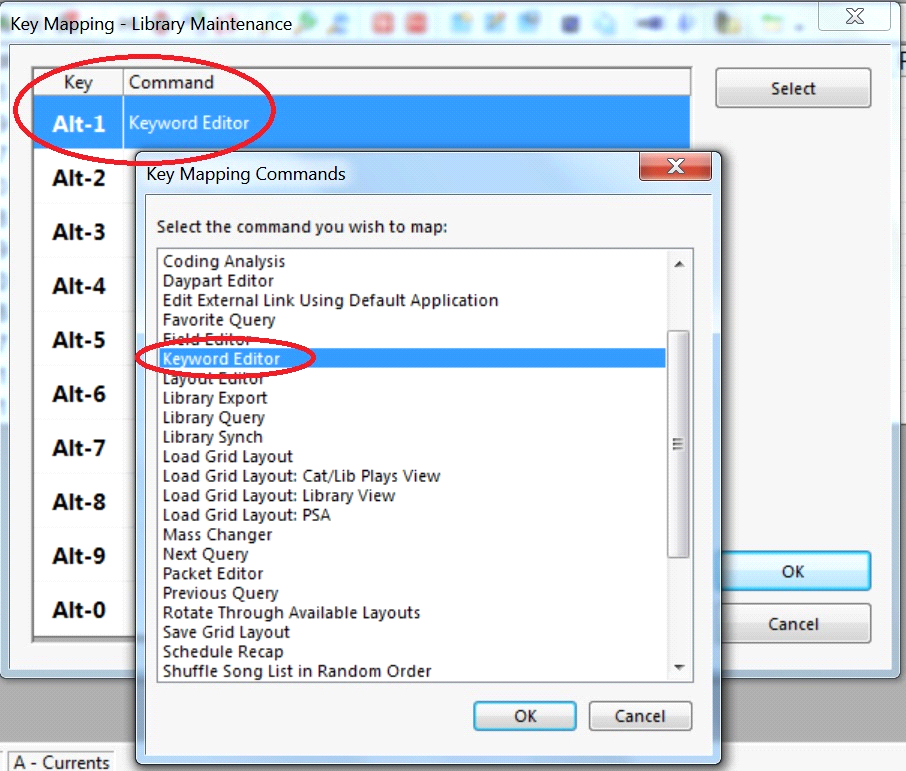
To get started open any category and then go to Library and Key mapping.
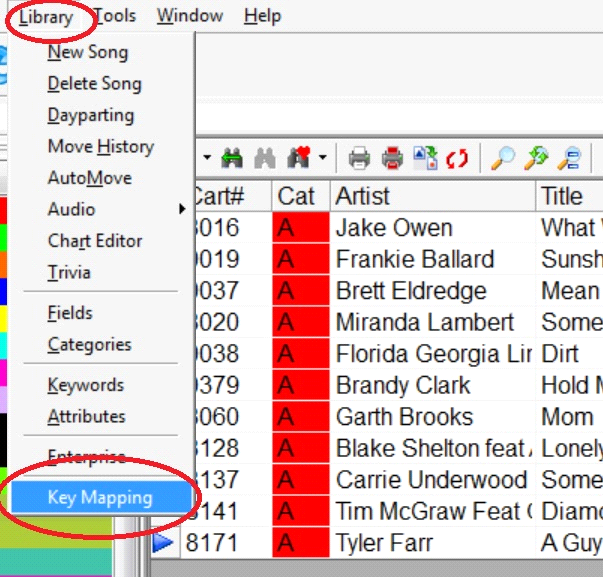
The next screen will give you 10 blank shortcuts (Hot-Keys). By double clicking on the empty box you can choose things that are important to you while in Library Maintenance. In my example I want to add a shortcut for the Keyword Editor so if I spot Keyword issues I can fix them on the fly. Simply select “Keyword Editor” click OK and it is automatically assigned to the hot key “Alt-1”.
While I was working in Library Maintenance I noticed I had a Keyword issue with Jake Owen’s keyword entered incorrectly as Owens, Jake. Keeping that “s” in there will mess up my Artist Separation and could cause Jake to play back with another one of his songs potentially.
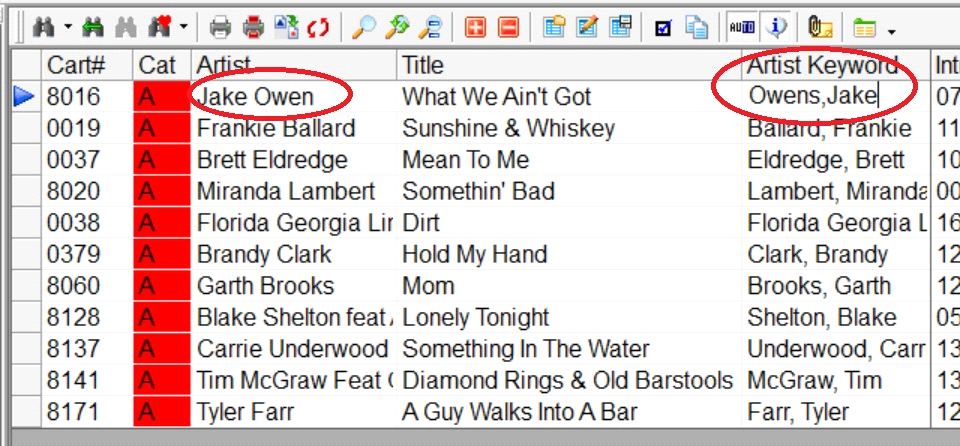
I can use my new Hot Key by pressing Alt-1 and MusicMaster 6.0 will bring up the Keyword Maintenance window where I can see that I have two keywords for Jake Owen. I can simply rename the incorrect one so it matches the correct one. MusicMaster will combine the keywords. As I add more songs by Owen to my database AutoComplete will only show me one entry by Jake.
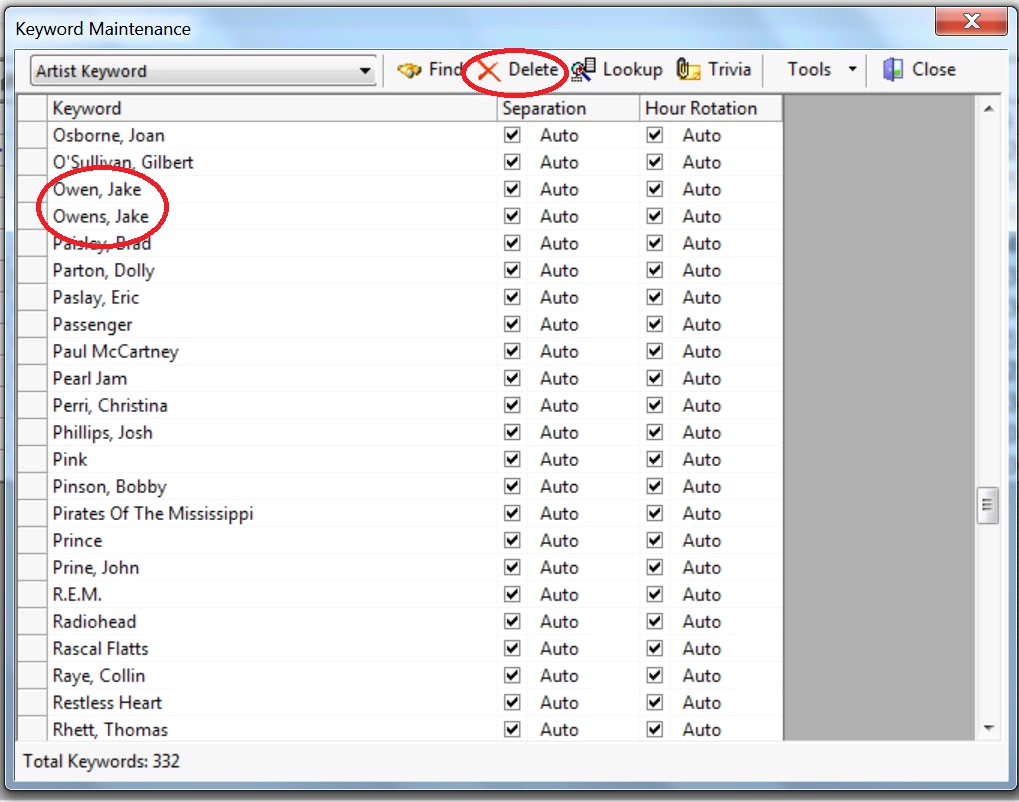
Now I can add the correct Keyword and my Artist Separation rule will work properly.
This is only one of 35 functions that I could use on my Hot Keys in Library Maintenance! If you like what you see in Library Maintenance then get ready because in your Schedule Editor there are 42 functions available to you. Let’s explore a couple of the actions that will make editing your logs a breeze as well! The set up is nearly identical for the Schedule Editor. Simply open a day then click Schedule followed by Key Mapping and begin customizing your personal Hit Keys.
Now let’s check out the many helpful functions that you can map to make your editing life easier. One example would be the ability to have a shortcut to Export to Automation.

But it doesn’t stop there….remember you can create up to 10 of these custom hot keys. You might want to access some of the other amazing features available in 6.0 like History Snapshots or the ability to Load a Grid Layout. MusicMaster Pro 6.0 offers a variety of time and click saving options so you can navigate your workload quickly and can then focus on the things that matter like getting the sound you’re hearing in your head onto the air! Custom Hot Keys is one more time saving feature in MusicMaster Pro 6.0 that allows you to make your station sound better…faster!
Cleaning up your Keywords posted on June 27th, 2016
By Jerry Butler
I get calls from time-to-time from programmers saying that their artist, title or composer separation isn’t working correctly. Call numbers increase on this issue in the weeks leading up to Christmas with title separation. Keep in mind separation rules look at your artist keywords, title keyword and composer keywords. After analyzing the data, we often find that some of the entries are spelled just a bit different. In order for the keyword separation to work correctly, all spellings in the specific keyword have to be exactly the same. How can you check this quickly? Many programmers including myself would go through the library, sort and compare the artists or titles on each song card.
Here is an easier, faster, more thorough way to correct your keywords: make those changes in your keyword maintenance window.
Click on Dataset, Library and Keywords. Use the dropdown menu to select the keyword that you need to check. For demonstration purposes, we will check the Title keyword.
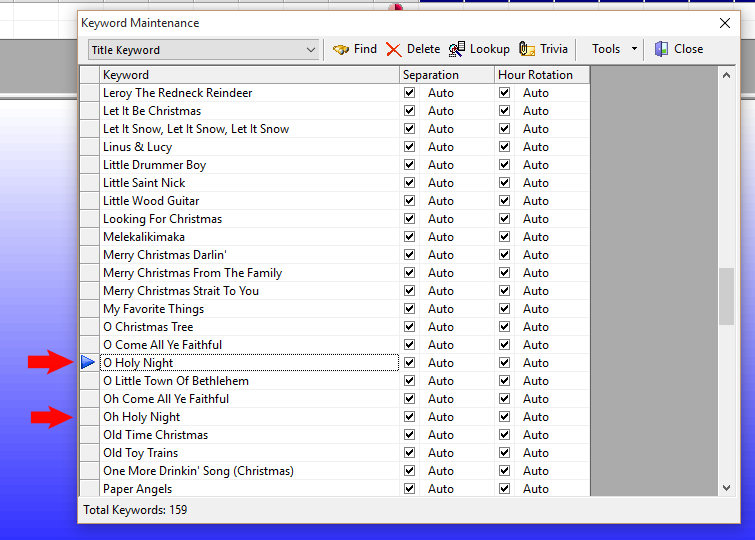
I’ve highlighted entries for “O Holy Night” and “Oh Holy Night”. In order for the title separation rules to work correctly, these need to be exactly the same. Rather than changing every single song card, you can make the change for all songs right here. I’m going to change “Oh Holy Night” to “O Holy Night”. To do this, just click on the line and type the change. When I press [enter], I receive a prompt letting me know the keyword already exists and asking me if I would like to combine the two. Click yes and any songs with ”Oh Holy Night” will be updated to “O Holy Night” and your rule will separate the titles correctly.

Check your keywords today and make sure your station’s artist, title and composer or any other keyword separation is running the way you want it to.
Meet Mr. Extra Flag in the 6.0 Test Results Panel posted on June 13th, 2016
By Jesus Rodriguez
In this blog we will answer the mystery behind the Extra Flag in your Test Results Panel in MusicMaster 6.0! I guess it would only be appropriate for me to introduce you two. Mr. Extra Flag say hola to MusicMaster’s coolest User. Awesome User say hello to Mr. Extra Flag!
So now that we all know each other let me tell you a little bit about my friend Mr. Extra Flag. He only likes to come out and play when you have selected the triple flag icon on your test results panel. He is not too fond of partying alone because he only has two outfits a yellow flag and a red flag. Unless his triple flag buddies are selected he will just stay in hiding. When he does come out to play you can hover over Mr. Extra Flag and see what the violation is that his red or yellow flag outfit is representing. You can also click on Mr. Extra Flag and he will take you straight to the rule that has the violation like a VIP.
Some people like to still have the entire list of rules on their test results panel screen but the downside to that is that if you have a lot of rules you can’t see what the failure is at a glance. With the extra flag option you can now easily see and pinpoint what it is that failed. This is great if your rule tree is really extensive so you can quickly see what the issue was with your rule tree.
If you were a user that only needs to know what the rule failures are then the double flag feature that we have had for years would possibly be best for you. However, if you want to know where the rule failure occurs within the complete list of your rules then the triple flag setting with the option to use Mr. Extra Flag would be the best solution for you so you no longer have to scroll up and down looking for the rule that was broken.
Dynamic Flow and the Art of Music Scheduling posted on June 6th, 2016
By Marianne Burkett
I just experienced the pleasure of helping a client go through a process of format concept to completion. The new format sounds terrific and better than he expected. Good sounding radio doesn’t just happen. All the great music in the world played back to back won’t keep your audience locked in if it’s not scheduled correctly.
While discussing the importance of what I term as “Dynamic Flow”, I painted this picture for my client: ”You know how awesome and comfortable it is to sit at the seashore and listen to the ocean waves.” When you sit on the beach, the ebb and flow of the tide make it appealing to be still for long periods of time. You don’t really think about the sound, but you know you can sit there for a long time without being bored or stressed.
I want dynamic texture everywhere in my daily music logs. This is where the rubber meets the road for increasing TSL/Time Spent Listening. For instance, when a song writer composes a hit song, song dynamics is critical to that song’s success or failure. It’s a very rare instance that you’ll hear a song doesn’t have some kind of dynamics change somewhere in the middle of the track, at the bridge. If all songs were sonically the same tempo, energy and texture at the beginning, middle and the end, they’d be downright boring. It’s no different when you think in terms of a full quarter hour of time with what songs are playing on your station! Are they different texturally, in tempo and in style? If you’re listening to your station and it wears you out… you might have a dynamics issue. If you’re listening and you get bored, you might have a dynamics issue. When you mix it up, it becomes interesting to listen to. The station sounds focused and unique and your listeners stick around for longer periods of time.
So what can you do to ensure you’re not “fatiguing” the listener? Other than spending hours meticulously hand scheduling your music, you can accurately code your music for tempo, energy, mood, sound and gender. You can review your library analysis on each code to determine how many or how few your active music library contains and apply rules to “scatter” the codes through the quarter hour, half hour or full hour.
Put together strategically, your station has its own unique fingerprint of sound. Even if you are playing the same exact titles as your competition, your coding is subjective based on what YOU think it is, therefore your station can sound different and BETTER than the competition, depending on how you schedule the music.
If you’d like to know more about making your station stand out from the crowd, feel free to contact me directly or contact any of the Music Scheduling Consultants here at MusicMaster.
The History Graph and Editing a Log posted on May 23rd, 2016
By Dave Tyler
We all work hard at getting our music to sound just right. You created your categories, plotted them in your grid and assigned the Rules to govern them. Although most of the time things are running great we all get unscheduled positions in our clocks. With the release of MusicMaster there is now a new feature you might just love to give you a better visual of what is happening at that position and in that hour.
This new tool works when you are in your Schedule Editor AND have the History Graph in your view and set to either “Daily” or “Weekly Spins”. See the example below for selecting the History Graph so you can see it.

In my example below you can see that I am editing the position where Don Williams is playing and everything is fine with that selection.
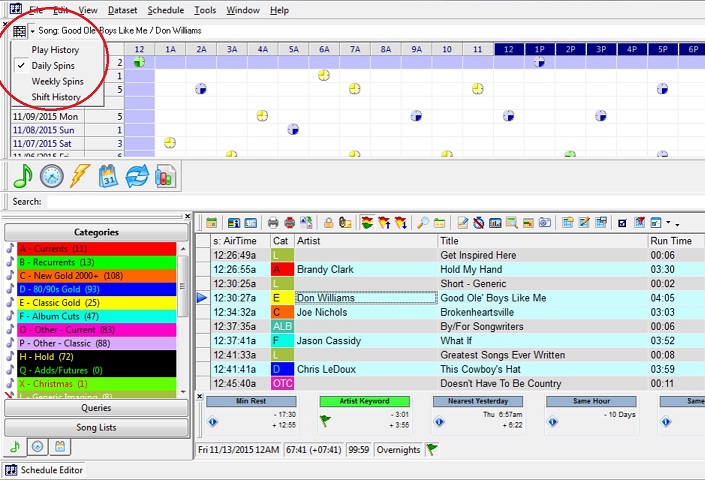
Now when I attempt to look in another category for a replacement song by using Direct Entry (also a new feature in 6.0) I choose my A category and the Brandy Clark song. This is obviously a poor choice being that the same song is scheduled just before this position; however look at all of the information available to you on this choice.
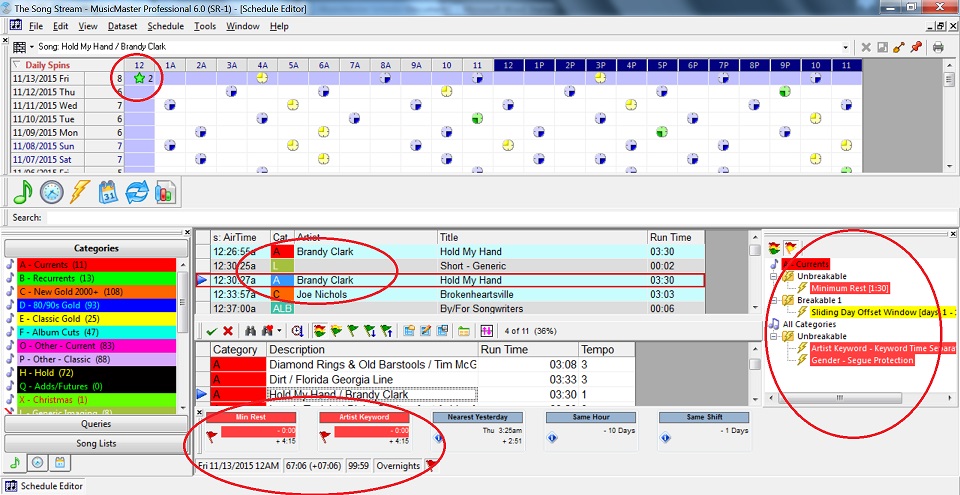
The Schedule Editor provides the red flags for Minimum Rest and Artist Keyword in my Results Bar on the bottom as well as my Test Results Toolbar on the right that displays a Gender issue as well. Look at the top in the History Graph. Now you can see that “Star” icon, which is the location of the proposed play plus there is a number (“2”) to show how many times this song is scheduled in this hour. Depending on your screen display, you now have several places where MusicMaster will alert you to the problem.
This is another way that MusicMaster gives you all of the tools you need to program and nurture the sound of your radio station(s)! As always if you ever have a question, do not hesitate to ask one of your Music Scheduling Consultants.