
MusicMaster Blog
Migrating Position Wizard and Flex Rules Analysis posted on March 7th, 2022
By Laurie Knapp
In Version 8, it’s easier than ever to use Migrating Positions with Flex Rules. There’s a new wizard for adding Migrating Positions, a Pattern Builder which shows you sample clock assignments, and more display information to indicate potentially problematic Flex Rules settings.
About Migrating Positions
Migrating Positions are not new to MusicMaster Pro Version 8, but in case you have never used them before, here is an overview of how they work.
With this clock element type, you can add variety and spontaneity to your clocks, while still maintaining control. You can add a certain number of Migrating Positions into the clock and specify which categories these slots may be filled by. While scheduling, MusicMaster will assign one of those specified categories to each available Migrating Position. That assignment can be totally random, or you can add layers of control using Flex Rules.
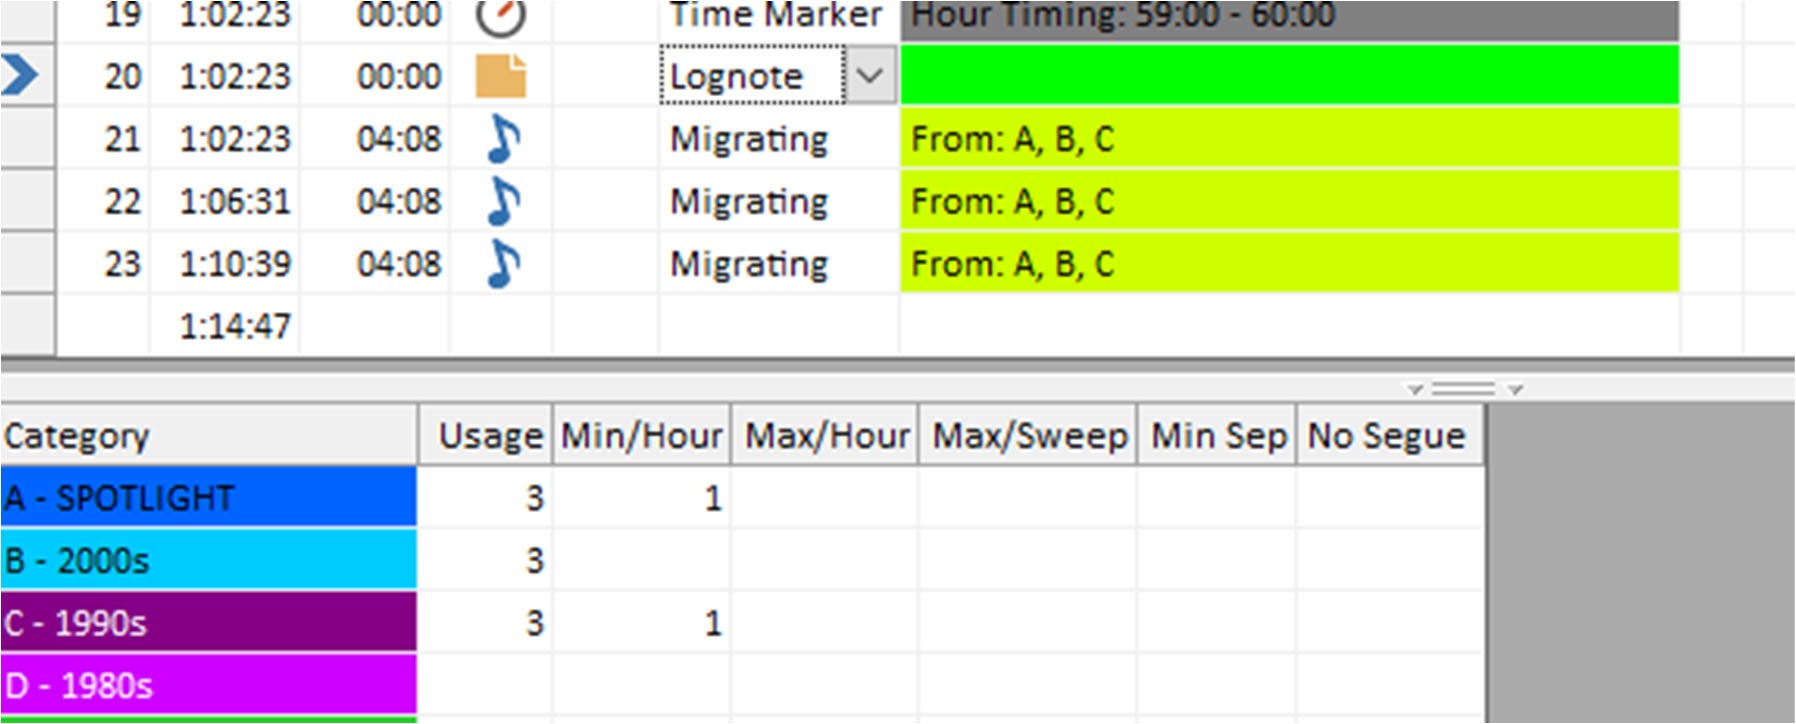
Here’s an example of a clock that uses all Migrating Positions.
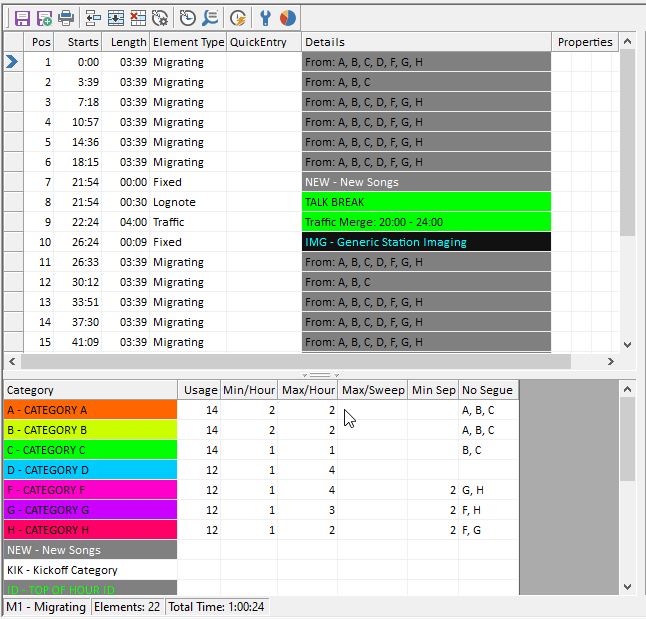
The Flex Rules are set up in the bottom panel. Here’s what each column indicates:
Usage tells you how many Migrating Positions are available for that category.
Next, you can specify the Minimum or Maximum number of category plays you want per hour or sweep, counted amongst Migrating Positions only.
You can also set a Minimum Separation you want to have between plays of the same category. Unlike the Min/Max, this will take into consideration all other category positions in your clock. Note: If you don’t want Non-Music categories to be counted, go to Tools > Options > Additional Properties, and under the Clocks header change FlexSkipNonMusic to 1
Finally, in the NoSegue column, you can specify any other categories that this category is not allowed to play against. This also looks at all other category assignments in your clock.
For more on Migrating Positions, check out this blog article: https://musicmaster.com/?p=866
New to Version 8
Live Entry Warning
Previously, MusicMaster would warn users if some of their Flex Rules were potentially problematic or not mathematically possible. In Version 8, MusicMaster will now detect even more potential issues.
Just like before, you will be warned if the minimum category plays exceed the number of available migrating positions. But now, as an example, you’ll also be warned if your minimum separation value or “no segue” settings will prevent that category from meeting the minimum quota. The entry will appear red and you can mouse over that cell to see a tooltip that explains what the problem is.
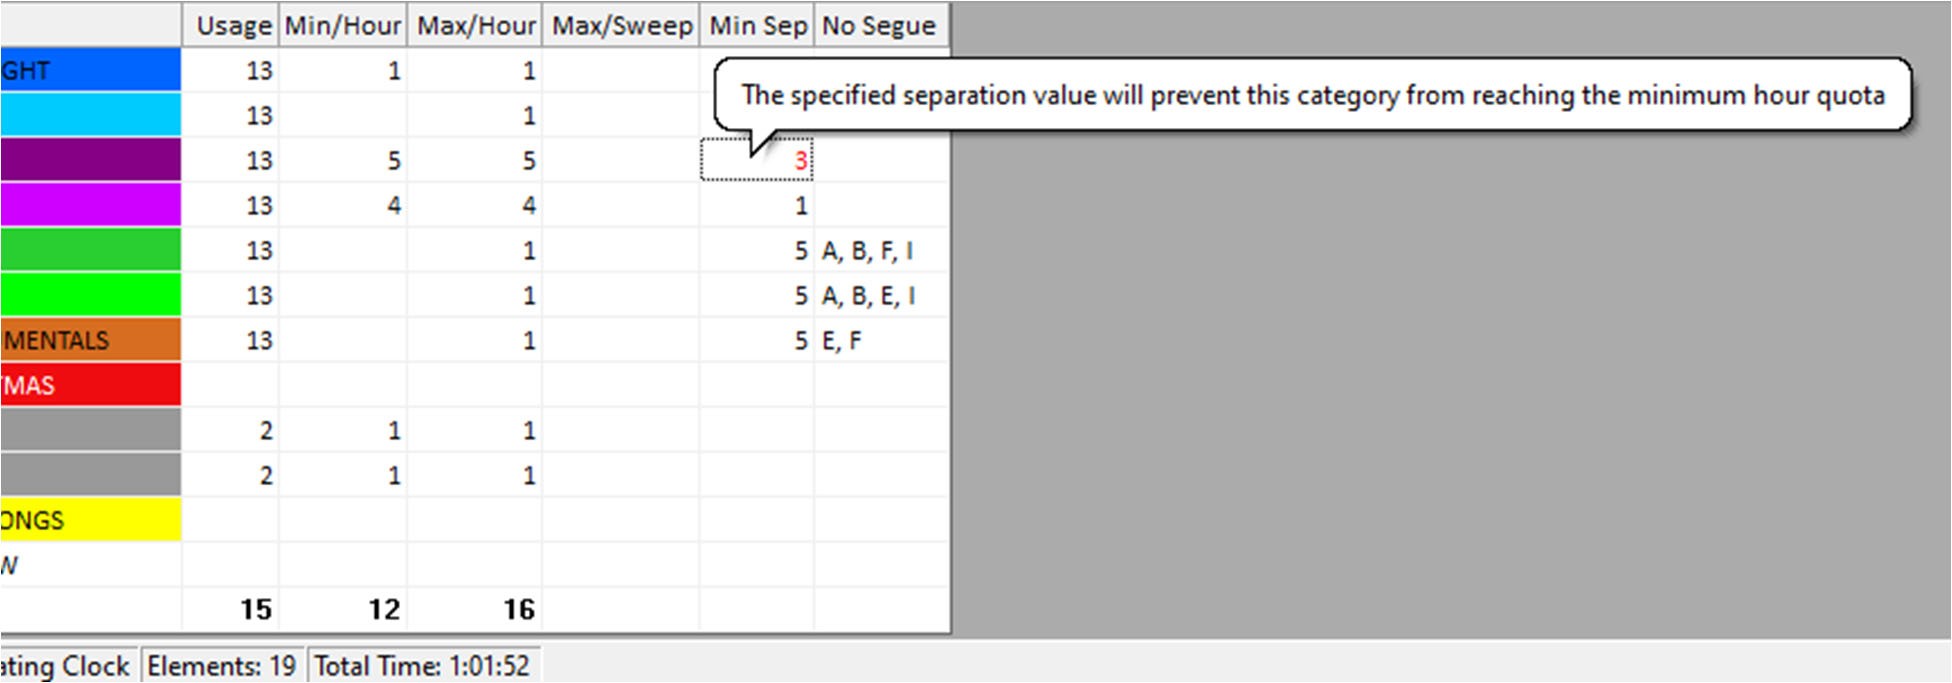
Note that this real‐time Flex Rule analysis will not uncover every single impossible condition that can be created by these settings, because a full real-time analysis of a very complex clock would create unwanted delay.
New Information Panel
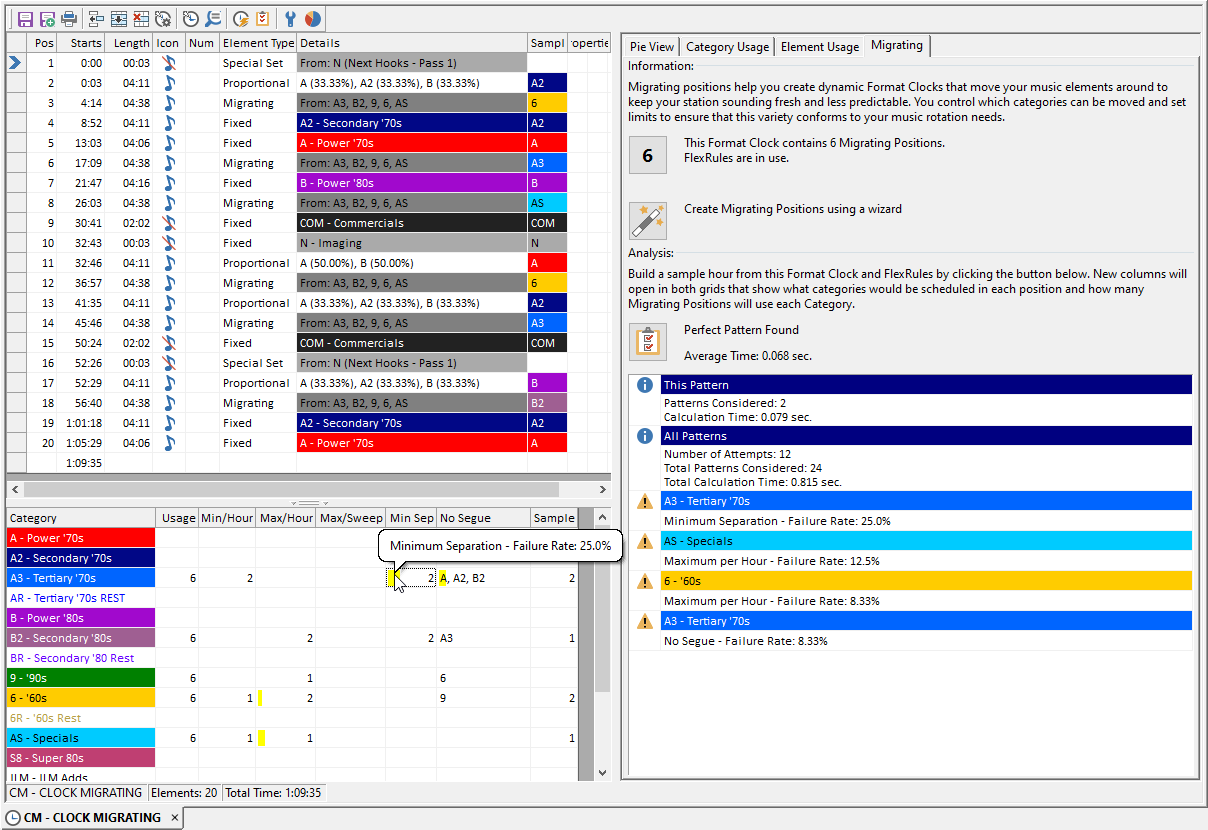
There is also a new Migrating Positions tab on the information panel that can be displayed on the right side of the Format Clock Editor. This new Migrating panel shows:
- Information about the Migrating Positions currently in use, or if no Migrating Positions are in use, a link to Help Documentation about them
- Wizard function to create Migrating clock elements. (More details later)
- Pattern Builder: There is an Analysis button that uses the same functionality as the Automatic Scheduler to create an actual set of category assignments for the elements in your clock, which you can use to see sample outcomes. When used, a “Sample” column will open on the clock grid showing the category assignments. You can click the button again to see another potential pattern. If you make a change to your Migrating Positions, the column will close and you can run the analysis again to test your new settings. (More details below)
- Analysis Results: Flex Rules that cause conflicts and issues will be noted in the results grid at the bottom of the editor and are also highlighted in the Flex Rules grid with explanatory tooltips. When running the Analysis multiple times, you will see statistics on the ongoing success or failure rate, which indicate how easily the Automatic Scheduler will be able to fulfill your chosen settings. (More details later)
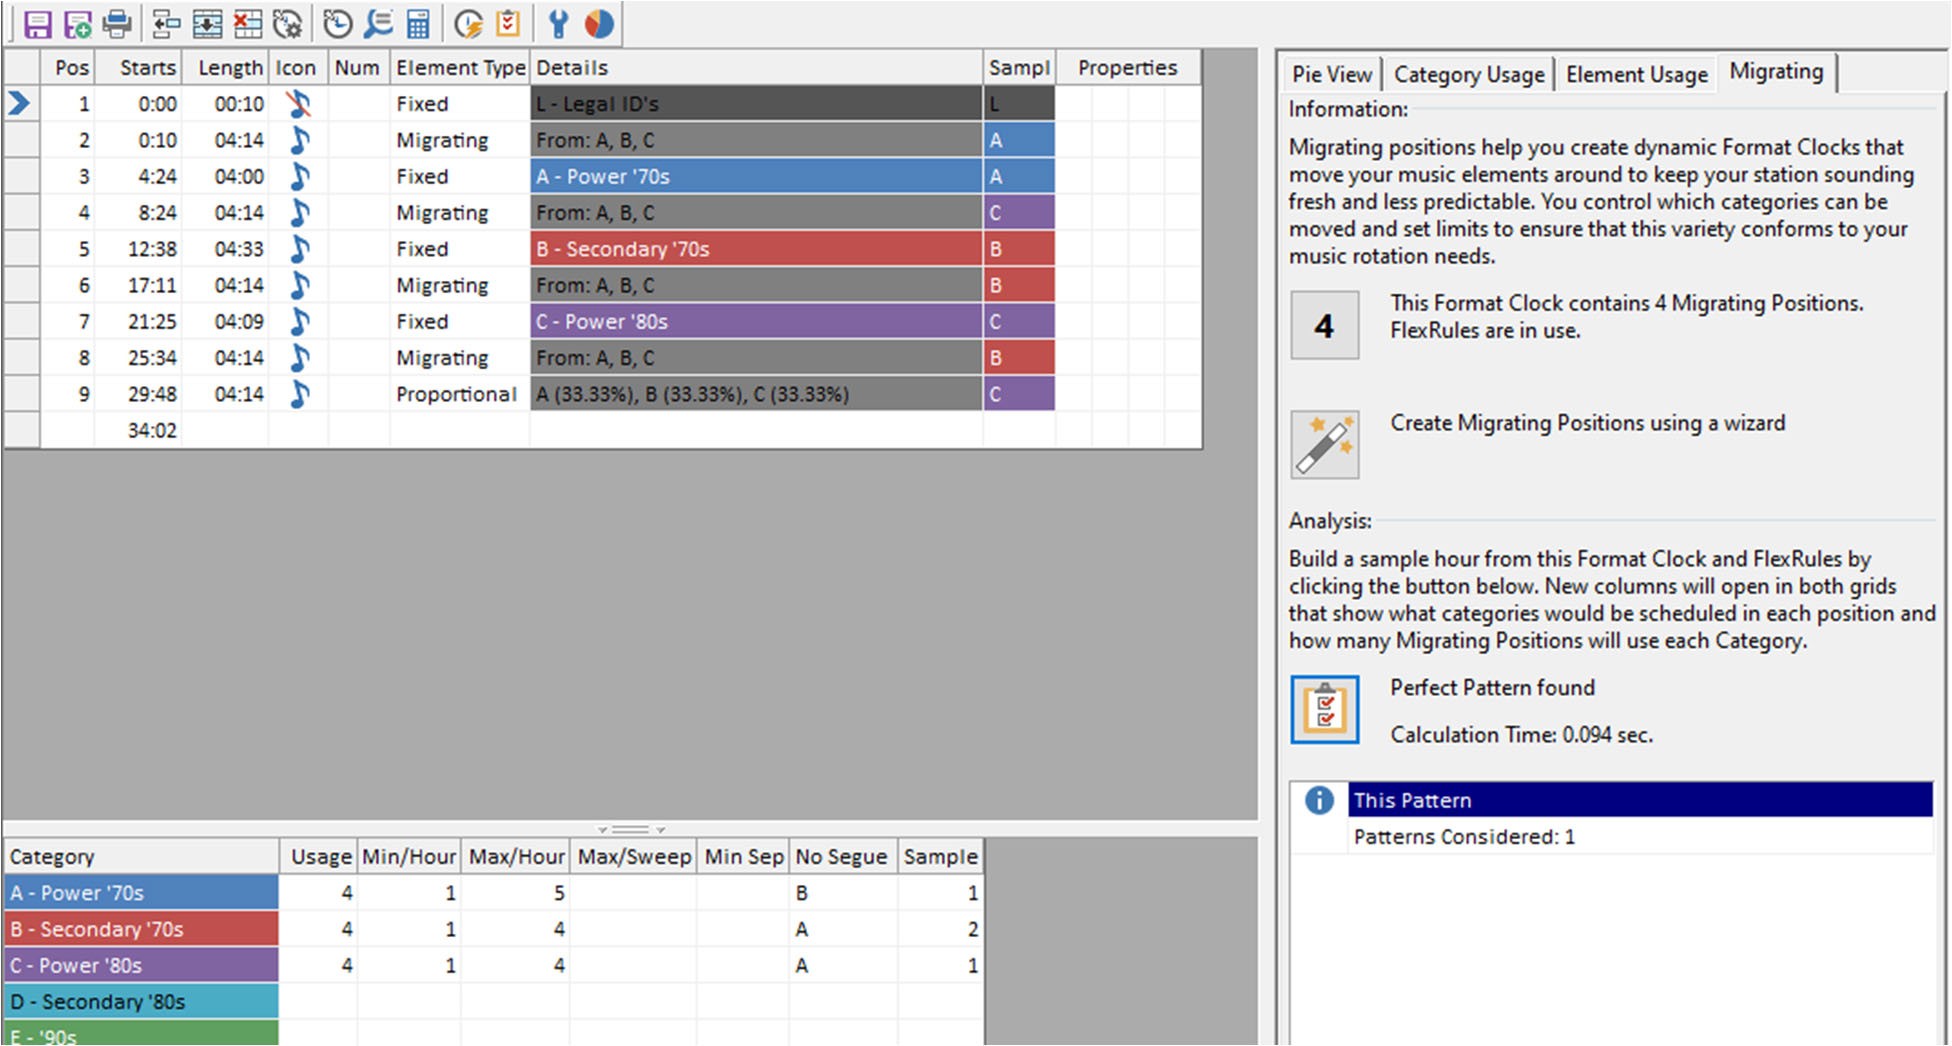
Migrating Positions Wizard
You can run the Wizard to set up a set (or sets) of Migrating Positions in your clock. You can select the categories that you wish to include in these new clock elements by checking the “Include” box. Then, if you wish, you can set a minimum and/or maximum quota for those categories. The Wizard will calculate the number of positions required to make this possible, which you can adjust to a higher value if you like. Then click OK to create the positions. If you entered Min/Max quota settings, those will be transferred to the Flex Rules. Your new positions will appear at the end of your clock and you can move them to the desired slots.
This is a simple tool designed to create one set of clock elements that all have the same category assignments. You can run it more than once to create more. If you try to use it to create multiple sets of elements that include overlapping categories, it will do the best it can to adjust the Flex Rule settings properly, but there are limits to the complexity that this will achieve.
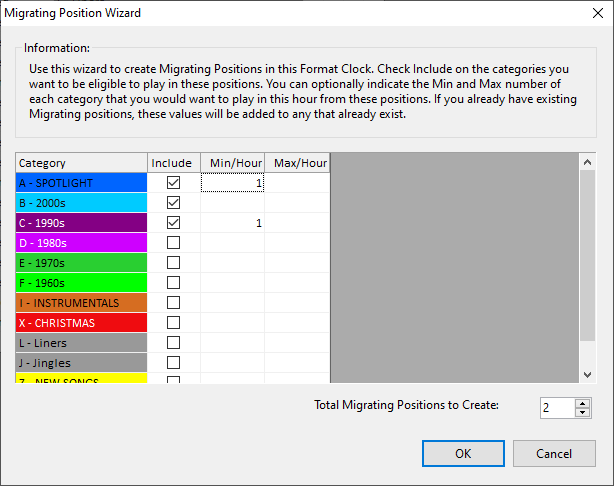
If the Wizard is run with the settings shown above, it will add to the clock and Flex Rules as shown:
Pattern Builder Tool Analysis
The Analysis section contains the Pattern Builder tool which assigns a category to every music element in your clock, attempting to create a complete and valid hour that satisfies all of your settings. When it does this, it will open new “Sample” columns in both the Clock and Flex Rule grids to show you the results. This gives you a nice way to show a “What If” version of how this clock might look like as part of an actual log. Here is an example clock:
As you can see, after the Pattern Builder was run, the Sample column in the clock shows an example of category assignments that may have been made by the Scheduler. Not only will you see Migrating Positions, but also selections from all other element types in the clock.
Any Fixed or Forced elements will reflect the assigned category. For a Combo position, you’ll always see the primary category selected. If you have a Proportional Element, each time you run the Pattern Builder, it will choose a category at random based on the proportions you’ve specified. For Format Lists, the category that is chosen depends on your list settings. For example, you may have specified that the Scheduler should pick the First, Next or a Random element from the list. The Pattern Builder will do the same. Note that “Next” will reflect the item that would have been used in the next scheduling session.
When the Pattern Builder finds issues, it will show highlighting in the Flex Rule Grid along with explanatory tooltip text. Like a status bar, the highlighting will show the relative failure rate of each Flex Rule setting, with the worst offending settings in red. The information panel also displays things like how may attempts resulted in a valid pattern, the overall success rate, and explanatory text of each Flex Rule that contributed to the problem. This is sorted to show the most difficult to pass Flex Rules first.
After running the Pattern Builder a few times on this example clock, you will start to see a problem emerge. Any time Category A is selected for the last Proportional element, no valid pattern can be found. However, when the Proportional element is B or C, there is a pattern that works. This is reflected in the success rate, which is around 63%.
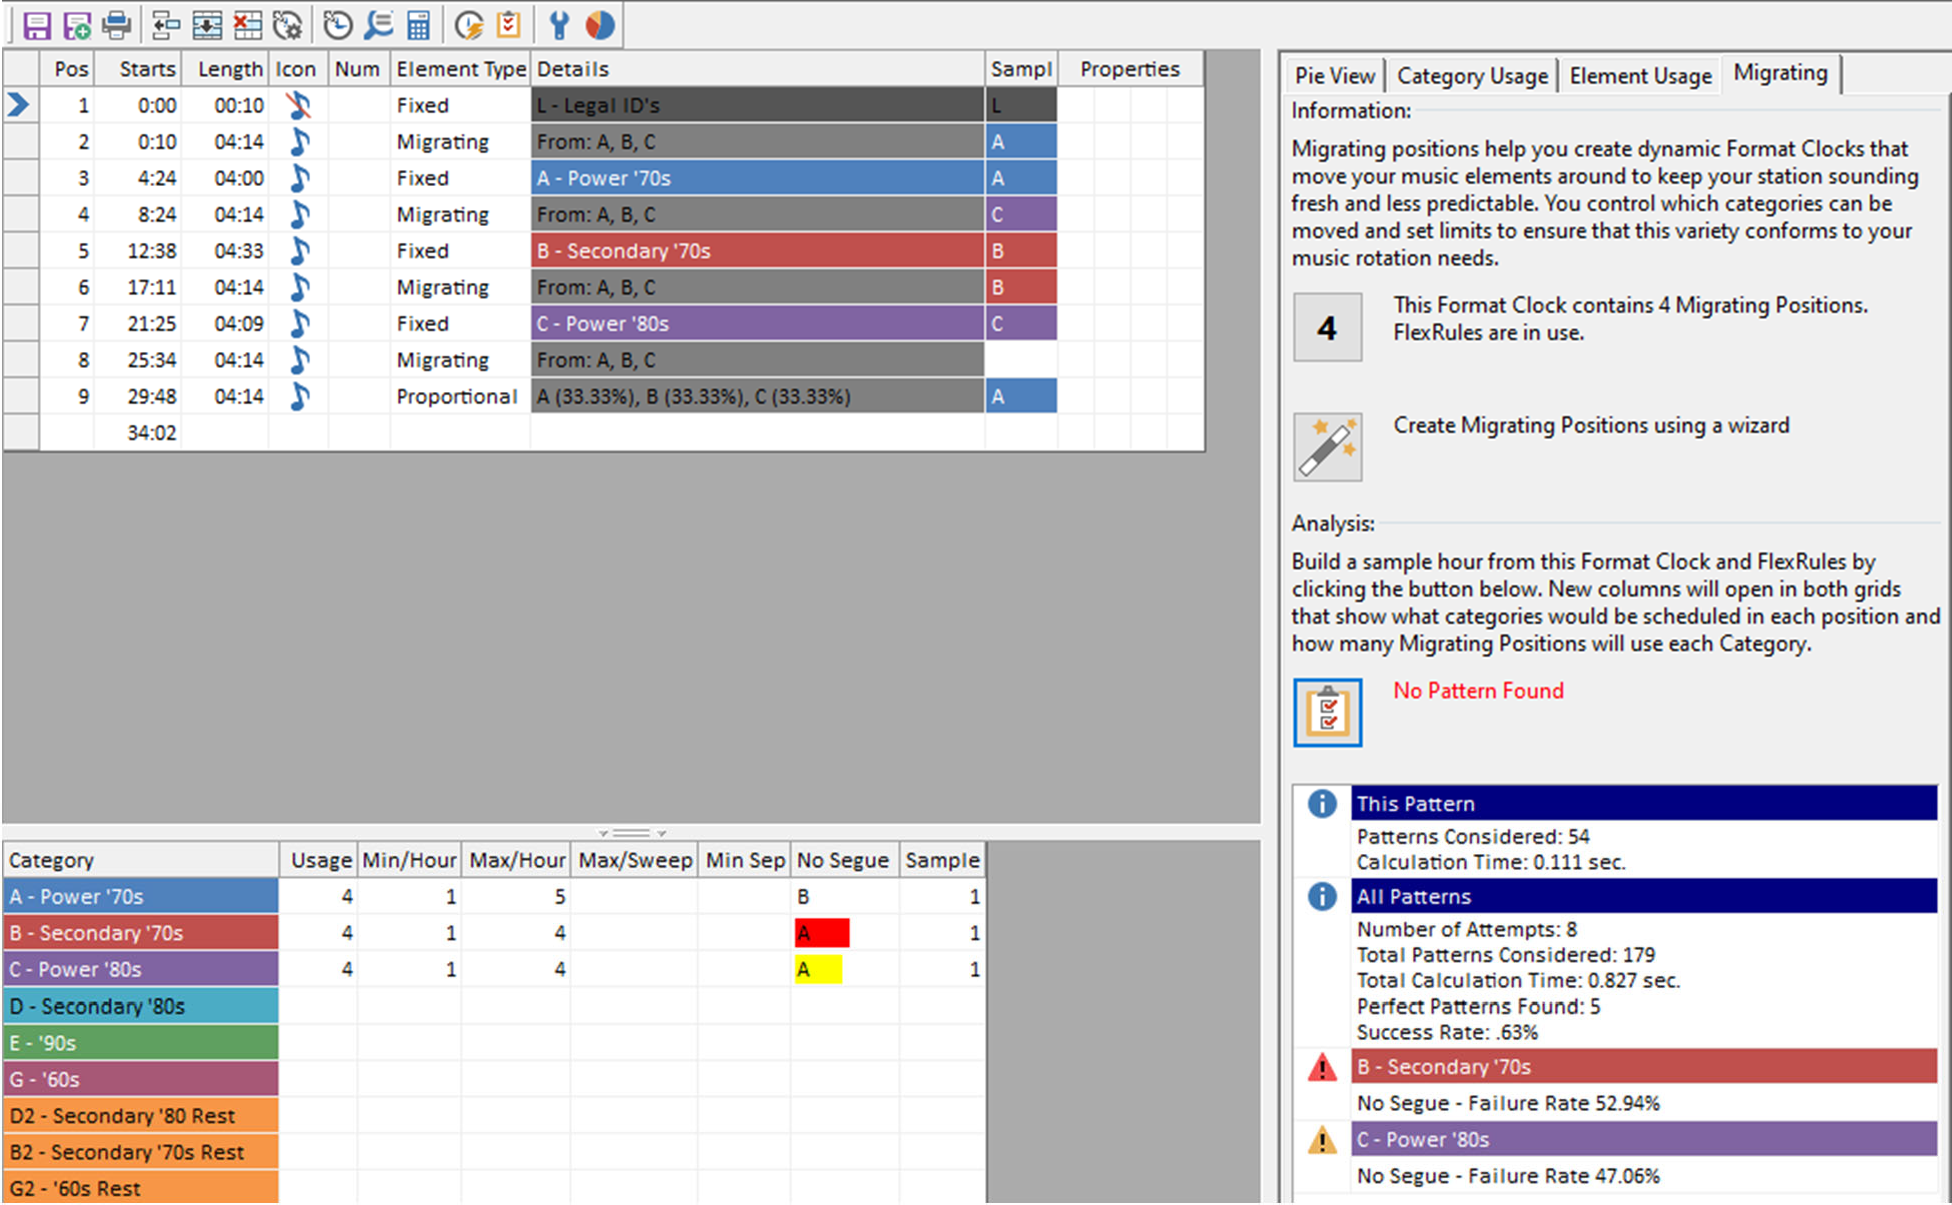
In the above image, you can see high rates of failure for the category B and C No Segue settings. This tells you where the problem lies. Category A cannot play before B, B cannot play before A, and C cannot play before A. When you factor in the other Fixed Elements, only A can be used the first Migrating Position, only C can go in the second and only B can go in the third. Not much for variety!
This also explains why no pattern can be found when the Proportional Element happens to come up as Category A, because it can’t segue with Category C in the Migrating Position above.
It’s important to note here that Proportional and other multiple‐category type elements are assigned according to their own properties and are not influenced by the Flex Rules. Depending on the order in which categories are scheduled, these various elements will need to work around each other in ways that are difficult to predict through this Analysis.
How to Make Adjustments
After seeing the results of multiple attempts, you must decide if and how you want to adjust your Flex Rules.
First, if no valid pattern is ever found after many attempts, your Flex Rule settings may be impossible to fulfill and the Scheduler may end up having to leave a position unscheduled. You’ll probably want to make some kind of adjustment.
If a valid pattern is only found some of the time (lower Success Rate), you know that while not impossible, the Scheduler will have a harder time filling your Migrating Positions and this may slow things down. If you can make some adjustments, it is recommended.
But what to change? In many cases, it will be obvious which Flex Rule setting is the problem. However, some of these issues are due to a combination of settings, and you’ll have to decide which is your priority.
For example, if you require a minimum of three category plays but this will not be possible due to your NoSegue rules, you’ll have to decide what’s more important to you and which you’d rather sacrifice: you could lower the minimum quota of plays or remove the segue restrictions.
In the example used throughout the previous section you may decide to remove your segue restrictions. But if those are really important to you, you could change the Proportional element so it never has a conflict. Or, since you know it works some of the time, you could leave it alone. If you do that, then for those times when the Auto Scheduler can’t find a pattern that works, you can fill in the position manually. Whichever route you takes depends on your own programming style.
Once you’ve made changes to your clock and FlexRules, you can try running the Analysis again and see if these issues improve. Keep trying until you get a result you are happy with.
As always, if you’d like assistance, MusicMaster support is here to help.