
MusicMaster Blog
What is your station’s actual format? posted on July 2nd, 2018
By Jesus Rodriguez
Are you sure your station is the format you think it is? Whether it’s the genre in general that you play or how the different sub-genres play on your station, I’d like to take you through an exercise to so you understand exactly what your format at this moment.
I often get calls from users saying that they hear too much R&B on a Hip Hop station, the CHR station is playing too much Urban music, the bilingual station is playing more English music than average, the rock station sounds too alternative, etc. I usually get these calls the most right after music test results have been implemented or when there’s a wave of music shifting in the format. When I get a call saying “Jesus I just can’t have this playing so much, we aren’t that kind of format!”, rather than giving a verbal response, I show the user the facts. You can do the same.
I hear it all the time, “My station needs to be 50/50, 60/40, 70/30, etc.” If you ever question whether your station’s mood, tempo, amount of songs by an artist, sound codes, or just about anything is off (where you hear more of one over the others), there is a feature that will be helpful to you.
Right-click on any field and click on Library Analysis. You will get a window similar to this one below giving you the numbers for those items currently in your library view.
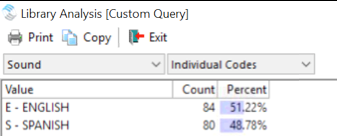
In the above example, I had a client that has a bilingual station that had to be 60/40 with Spanish as the dominant sound, and they felt that they weren’t getting that anymore. Well, I was able to break it to them that their library was closer to 50/50. For CHR stations that no longer hear so much pop, I might show them that actually, they’re more of an urban station because of the sudden influx of Drake, Rihanna, Post Malone, Kendrick Lamar, and others crossing over. The Hip Hop stations are more R&B because their tempo analysis shows that their hip-hop artists went soft with their new music. You can imagine how this could happen to just about any station format over time or after a music test. Either the charts are having you shift towards a different genre, or your listeners at your test just told you they prefer to listen to a different style than what you thought.
Now that you know how to run Library Analysis, you can also confirm what you get in the Schedule Editor as well. Everyone has their ideal percentage of how many types of songs should be in every hour so they can hit that 50/50, 60/40, 70/30, etc. The Schedule Analysis feature allows you to monitor this while you are in the Editor.
Check out this Schedule Analysis Blog by my colleague Paul Ziino called “Analyze Your Schedule”.
I hope this becomes an eye-opening experience that helps get your station back on course to the format you claim to be with your listeners. It does not mean that you have to remove any songs to find that balance, because I am sure you may still want to play those hits. You can tweak your rules to help prevent those specific types of songs from playing to close to each other making you sound like your competition or a different format altogether.
If you need any assistance with this please contact your MusicMaster support representative today.
Arming Your Database with Artist Information posted on June 11th, 2012
By Drew Bennett
Today, I am going to go over some features that have been in MusicMaster for some time now but I am going to show you a new way to use them. The Mass Changer and the Web Browser can work together to bring you serious artist information to the database. (more…)
Overview of Packeting in MusicMaster posted on December 1st, 2010
What can “Packeting” songs do for you?
Packeting can be used to group songs together, which will have the effect of slowing down the rotation of the individual songs. A great example of the use of packeting might be to group the studio, acoustic, or live versions of a particular song together in a packet so they are not rotating independently. I also like to suggest to clients that they may want to consider packeting the “one hit wonders” or very tertiary songs in a category together in packets, so that you can potentially avoid music sets clustered with a seeming stack of these marginal songs. It is also a common desire to packet non music elements together, like jingles, liners, or sweepers.
The packeting utility in MusicMaster will also allow you (if desired) to “weight” a packet, so that particular cuts in the packet will play X number of times before moving onto the next song in the packet order.
You can group any number of songs (as part of the same category) into as many packets as you wish.
To access the Packet editor in MusicMaster, there are several routes. You can either:
- Right-click on a song and go to Packet
- Select Dataset, Library, Packets – which will open the Packet Editor window
- Or, if you add the Packet field to your Library Maintenance grid, you can click that field for the song you wish to create or add to a packet.
Below is a view of the Packet Editor window.

PACKET EDITOR OVERVIEW
On the left hand side you see a list of all the packets in the program, showing their name and which category they are in. The drop-down box in the upper-left lets you choose which category you look at. This information is repeated in the Description and Category boxes in the center of the screen. By clicking on any packet name, the main center box will show you the songs in that packet. Other options/information available here include:
• Description – The name given to the packet. You may change it by clicking into this box.
• Category – Indicates what category the packet is contained in. If desired, you can use the drop-down box to move the packet to a different category.
• Keep Packet Together – With this box checked, if you move a song that is within a packet to another category, all songs in the packet will be moved. If this is not checked off and a song is moved, that song will be removed from the packet and sent to the category specified. The remaining songs will still be in the packet. It is important to remember if you decide to set this for the future, as we’ll get calls from time to time from clients wondering why seemingly “groups” of songs moved, when only one was targeted for a move. You forgot the song was packeted, and the “keep packet together” setting was selected!
• Packet Type – There are three types of packets: standard, diggable and weighted. Here is an explanation of each type:
A standard packet keeps track of the next song that should be considered. When the packet comes up, that song is tested. No other songs in the packet will be tested.
When a diggable packet comes up for consideration, songs in the packet will be tested up to the search depth that has been set to see if the song passes the rules tested on the category.
A weighted packet allows you to determine how many times a song in a packet plays before moving to the next song in the packet. As an example, if you have a two-song packet and you want one of the songs to play twice as much as the other, you would want to place a two in the Weight column that will be displayed when you choose this option.
CREATE A NEW PACKET
Select Create and confirm. Name the packet in the Description field, then select ADD. This will open the standard Database Query box where you will be able to pick categories, filter and sort the list to narrow down the songs you view. When the list comes up, you can choose as many songs as you’d like. To select more than one at a time, hold down the Control key. When you have selected all the songs, click on Add. This will bring the titles into the packet creation window. When you click Close, the packeting process will complete.
Other options at the top of the screen include Delete, AutoPacket and Unpacket. While Delete and Unpacket are fairly self explanatory, the AutoPacket feature deserves a bit of explanation. This utility allows for you to select criteria that will be utilized to create a packet. You will pick the categories you want to include, the minimum number of songs there must be for the creation of a packet, the maximum number of songs in a packet, and the packet name. The standard Song Filter box is used to create the filter.
A FEW OTHER NOTES ABOUT PACKETS AND PACKETING
As mentioned above, you can add the Packet field to your Library Maintenance view. This will allow you to see the name of the packet and any daypart restrictions on it. If you move the cursor over the Packet field with your mouse, it will tell you the number of songs in the packet and the number of restricted hours for dayparts.
To see a combined history graph showing all plays of the songs in a packet, use the drop-down arrow and select Packet. If you have the packet field showing, you can click [SHIFT F6] in the field do to this as well.
 Packeting will slow down the rotation of individual songs in a category. This is reflected in Analysis-Turnover.
When using a standard packet and sorting a song list by rest, the packet history will be used to calculate the rest time for each song. The rest time will be the same for all songs in the packet.
In the Schedule Editor, this means the way the list is displayed in the replacement window may show some individual song rest times that are higher than the songs around it. Make sure to pay special attention to whether packets are in use for the category you are viewing. You should be able to spot the song from the packet that is being used to calculate the rest.
If you have any questions about how to best utilize this functionality in MusicMaster for your particular situation, please don’t hesitate to get in contact with your Music Scheduling Consultant!