
MusicMaster Blog
“LET’S RIP IT!” Importing CD Audio & Data posted on May 29th, 2024
by Vicky James
I recently had a client who needed help with the major task of building a library, but he wanted to take it back to the sorta’ old school and use all CDs to complete the project. He was overwhelmed at the idea of how much time it could take. I asked if he wanted them ripped in no time… His answer, “YES, but how??!!!”
He had no idea that MusicMaster even had a feature to Import Audio with CD under the Tools tab. When I introduced him to the feature, he was thrilled!
I then wondered about those of you who may also have overlooked this feature as he did… Allow me to show you how!
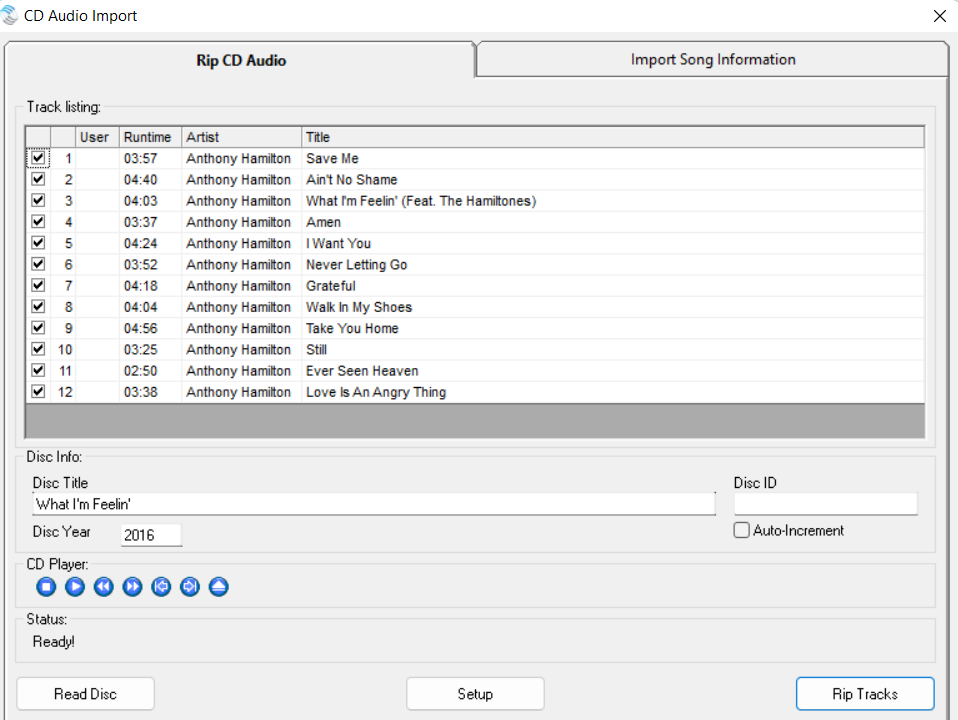
Click the Tools. Import CD Audio. Allow the CD Audio Importer a few seconds to initialize and read your CD.

Once the Importer launches, this box should populate with data if the CD is readable. Next, select the songs you want to rip. Here in the example, all 12 songs are checked. If your CD’s metadata doesn’t automatically populate, click the Read Disk button on the lower left and nearly immediately, the metadata should appear.
You’ll notice in the below image is the option to configure your setup, if necessary. This includes the CD drive where the disc is located. Audio Filename Format is where you specify the audio’s format as an MP3, WAV file, or if you simply want the Metadata Only. If you select the MP3 or WAV, you will be given the option to choose the channels and frequency, which is also set by default for you already. Audio Filename/ Location shows where the audio is stored and how the filename should be ingested into your filename field, if needed. In the example below, a track might be stored as Anthony Hamilton – Still.mp3. The Additional Options allows you to show the CD Player or Disc Info.

We’re getting closer to the fun part. Once you’ve adjusted your settings, selected the tracks, and reviewed the info, you’re ready to start rippin’! Click Rip Tracks and within moments, a box pops up indicating ripping is complete!

Once things are ripped, you can go to the right-hand tab to Import the Song Information directly to your database.
You will need to identify what metadata goes from the Target (the CD) to the Source (your MusicMaster database). Click the drop down option for each line needed under the Target, then next to it, drop down each line selecting the Source for the field in which you want to store that metadata in the database. Depending upon your format, you can set the target for artist to the source of your preference. For example, a Classical format may want the Target of Artist going to the Source as Composer. This is what makes this feature so resourceful for users who need to expand their library, catalog projects, or clean up songs with bad metadata.

After you’ve adjusted your settings and reviewed the sample, you can click Import and you’ll see this prompt to confirm the number of songs selected.

It’s All Done!


… and here are the imported songs in the MusicMaster database.
For more information about the CD Audio Importer, contact your Music Scheduling Consultant!