MusicMaster Blog
Rest Assured with “Check the Log” posted on September 6th, 2021
Rest Assured with “Check the Log”
By Laurie Knapp
Do you ever worry that changes you’ve made to your log might have inadvertently caused important rule violations elsewhere in the schedule? Or do you worry that you might not have noticed rule violations that really matter to you?
Good news, the Check the Log tool has got your back! After editing your log, you can use Check to Log to quickly see if you’ve missed any unbreakable or breakable rule violations, or for that matter, whether any of your song swaps, changes or deletions caused new rule violations. This is a quicker alternative to going back after you’ve finished editing and reviewing new rule violations one-by-one.
For example, if you’ve removed a couple of songs from your hour, this may have affected the time separation between keywords before and after that position. Check the Log will show you where those violations are so you can decide if and how to fix them.
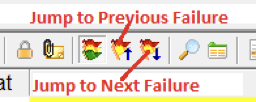
Traditionally, after editing, you may have decided to go back to the top of the log and use the “Jump to Next Failure” button to find any unbreakable rule violations left in the log.
With Check the Log, you will get a handy report that shows you where all these violations are. You can also tailor the report to only include certain categories, rules, or rule folders. For example, you may know that you break certain rules on purpose when editing or have certain rules and categories for which you’re less concerned about violations. By turning these items off, you won’t see them in the Check the Log, and you can instead zero in on unexpected or more critical problems.
How to Use Check the Log
You can access Check the Log from either Dataset > Schedule > Check the Log or through its icon on the Schedule Calendar.

When the set-up box opens, you can choose from several options: including the date/time to check, as well as which categories should be checked, and which rules or rule folders to include.

Rule Folders allows you to determine which folders will be included in the Check. The Rules to Include option shows the list of all rules available in MusicMaster. Click the checkbox for those that you wish to examine.
You only need to check on those rules that you want to be considered, not necessarily all the rules you currently have in your Rule Tree. For instance, you might be primarily concerned with daypart and artist separation violations, so you would only check off those two rules to make sure you don’t have any violations there.
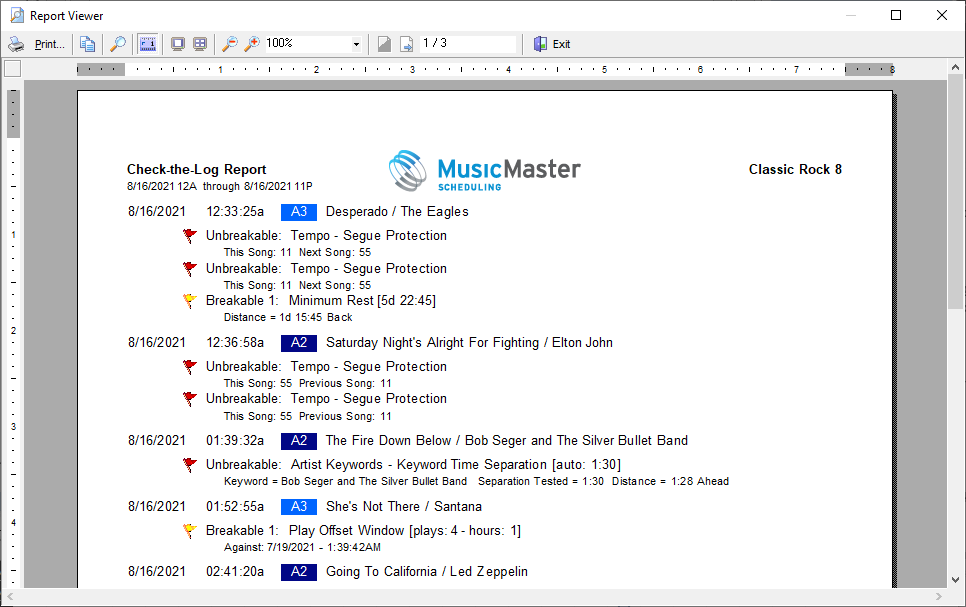
You can watch the progress of the report in the lower right corner. Once completed, you will either get a message indicating there are no violations or a report will display showing you the violations. This report will list the rules you checked that were violated and what the current rule setting is.
As always, if you have any questions about Check the Log, please contact your MusicMaster Consultant for assistance!
Handling Contributing Artists in MusicMaster posted on August 23rd, 2021
Handling Contributing Artists in MusicMaster
by Joe Knapp
Think about a song like “Side By Side” by Ariana Grande featuring Nicki Minaj. Of course, you would want to separate this song from other songs by Ariana Grande but what about Nicki Minaj? She’s not the “primary artist” on this song, but a “contributing artist” instead. Nicki is the primary artist on “Seeing Green” featuring Drake and Lil Wayne. On that song, Drake and Lil Wayne are the contributing artists. On the song “What’s Next,” Drake is the primary artist and there are no contributing artists. What’s the best way to deal with songs like this in MusicMaster?
We suggest you create two Multiple Keyword fields, one called Primary Artist and the other called Contributing or Guest Artist. The Primary Artist would contain only the main artist and would separate songs by that artist by a larger amount of time. The Guest field would contain the primary artist and the contributing artists with a much smaller fixed time separation setting.
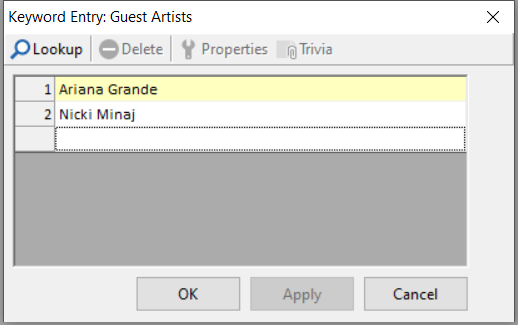
So, on “Side By Side,” your Artist keyword would simply be Ariana Grande. Your Guest keywords would be Ariana Grande and Nicki Minaj.
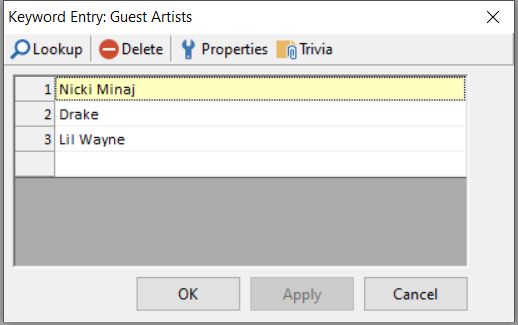
On “Seeing Green,” your Artist keyword would simply be Nicki Minaj. Your Guest keywords would be Nicki Minaj, Drake and Lil Wayne.
On “What’s Next,” your Artist and Guest keywords would both contain just Drake.
Now in the Rule Tree for the Guest keyword field, you’d set up a time separation rule of, say, ten minutes.
Just for this discussion, let’s assume you set up a fixed time separation rule of 1:10 on your Artist Keyword field. Of course, you can set up custom settings for each artist or allow MusicMaster’s Optimum Goal Scheduling to automatically try to give you the greatest possible separation for each Artist Keyword.
When you play “Side By Side” by Ariana Grande, another Ariana Grande song cannot play again for at least an hour and ten minutes. But you’d only have to wait ten minutes before hearing “Seeing Green” by Nicki Minaj.
After playing “Seeing Green” you’d have to wait an hour and ten minutes before hearing another song where Nicki Minaj is the primary artist but you could hear “What’s Next” by Drake just ten minutes later.
Using custom separation settings for your Guest Artist Keywords, you can also adjust the reduced separation time for certain contributing artists, if you like.
It’s important that you include the primary artist’s keyword in the Guest field so that songs where the primary artist is merely a guest will have the smaller separation. Even if you know that the primary artist doesn’t contribute to any other songs, you never know if they’ll end up dropping in on someone else’s song later.
If you have any questions, reach out to your Music Scheduling Consultant.
Got the Slow Morning Blues? posted on August 9th, 2021
Got The Slow Morning Blues?
By Dave Tyler
I have been a Morning Man most of my 36+ year radio career and yes I was that guy going into my PD/MDs office saying “Dude please schedule something with tempo in the mornings…..it’s a dirge-fest in here!”. I think listeners feel the same way for the most part. Please don’t misunderstand me I LOVE ballads! I’m a Country guy and when Garth had “The Dance” out listeners demanded it and we sure played the wheels off it! However, if overall you really just want medium to fast tempos tunes to play there is a very easy way to do it in MusicMaster.
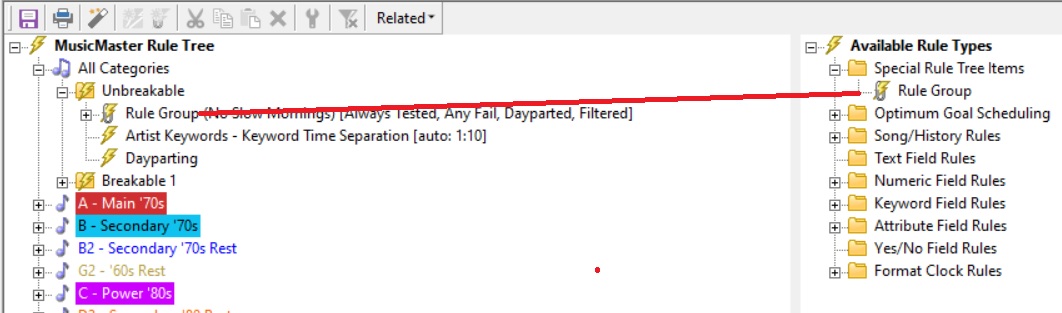
It’s going to require a Rule Group but don’t fret this process can all be done in literally five minutes assuming your songs are already coded for Tempo. Let’s get started. First, we need to make a rule group. Open your Rule Tree and under Special Rule Tree items you will find Rule Group. Drag it into your All Category Unbreakable folder like the pic below.
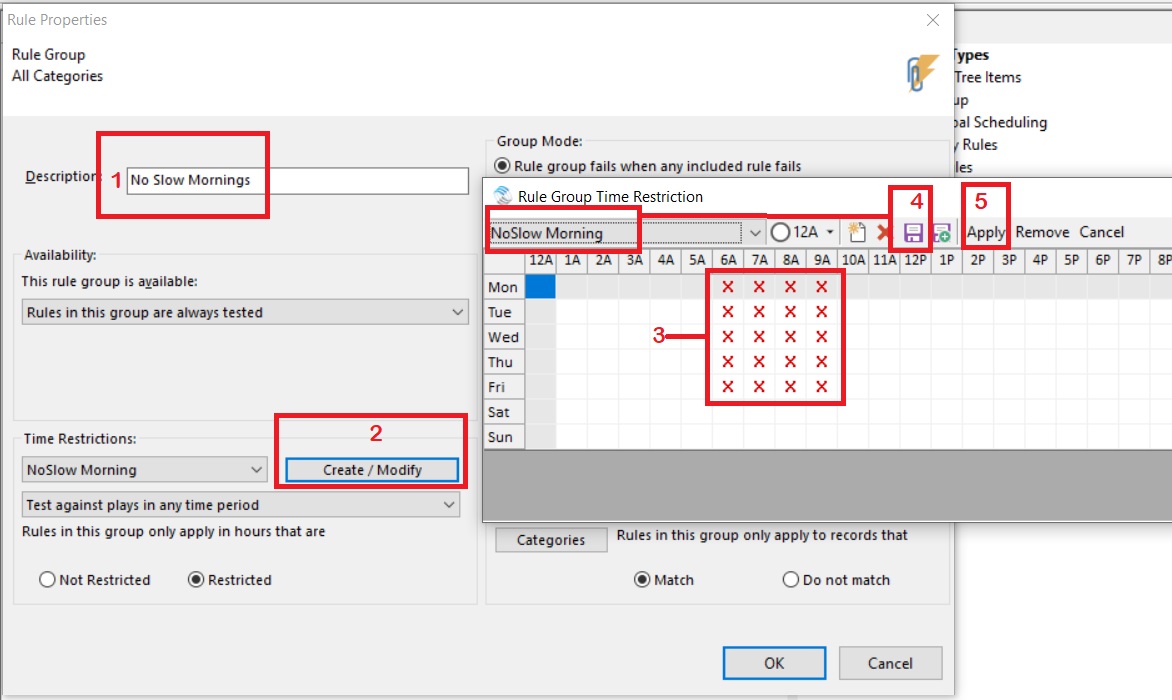
The Rule Group box will pop up and there are several things to do in here. 1) In the Description box enter the name of the Rule Group. 2) Click Create/Modify button. 3) Place “X”s in the hours for your morning show. 4) Click the Save Icon, this will allow you to name this particular restriction. In my example it is “NoSlow Morning”. TIP: Adding the time frame into the name will remind you what it’s for so you don’t inadvertently change it. 5) Click Apply. This will bring you back to the original screen.
Now 1) Click on the “Categories” button and 2) place a check mark in each of the Music categories you want affected by this rule group then 3) Click OK. 4) Now click the button for “Match”. This means the categories you selected will have the NoSlow applied to them during this time period. 5) Finally bubble the “Restricted” and then 6) OK.

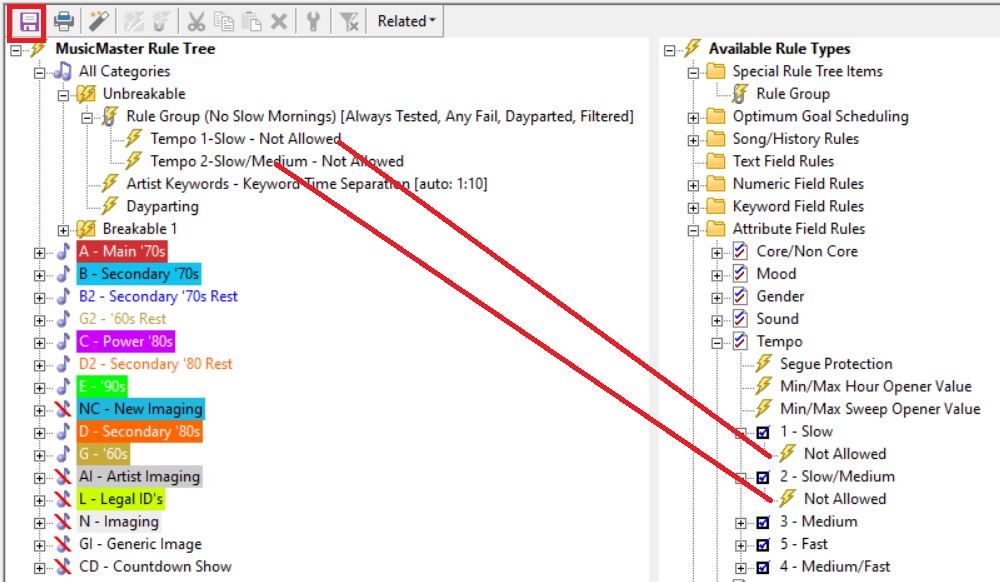
Guess what??? We’re almost done! Open your Attribute Field Rules and drag your 1-Slow & 2-Slow/Medium tempo “Not Allowed” rules into this folder. Save your Rule Tree and you’re done. No more Slow Morning Blues for you!!!!
If you have any questions just contact your dedicated Music Scheduling Consultant.
If You Do THIS Today, Future You Will Thank You! posted on July 26th, 2021
If You Do THIS Today, Future You Will Thank You!
By Brian Wheeler
Some would say it is a wee bit early to get ready for the holiday season. With the temperatures rising and people itching to get out and enjoy some sun, the last thing anyone should be thinking about is Christmas, right? Not so fast! Phil Thompson and Bill MacNeil of Coast 89.7 CKOA have been busily preparing for a season that’s months away. Are they crazy? Like a fox. Here is what they’re doing and what YOU can do, too!
Phil wanted a tiered Christmas calendar. When he introduces Christmas music, his first several days he plans to just dip a toe in the water using one Christmas song per day. What he does next is the difference maker. He clones his one-song-per-hour grid using the grid copy feature in the Format Clock Maintenance screen, creating a three-song-per-hour version of the same grid.

He even renames the clocks to begin with the number 3. That way, he knows immediately which clocks are his ‘3 Christmas song’ clocks. Once cloned, he goes into the grid, modifies each clock to now contain three Christmas songs instead of one. Then, he takes it a step further. He clones the grid containing the three-song-per-hour clocks, creating an even more Christmas-saturated clock (75% Christmas). He’s already got three songs per hour in each clock, so he only has to add a handful more each clock. Now he’s got three grids created with minimal work.
Finally, he creates an all-Christmas grid for the last few days leading up to and including Christmas. He creates clocks containing wall-to-wall Christmas music, which are already heavily populated from the 75% Christmas grid. He now has four Christmas grids total and he is all set for the ramp-up to Christmas.
Here’s the best part: He doesn’t have to wait to put these grids in action. Phil will use the Format Scheduler (see arrow pointing in the picture above) to apply these grids to the calendar in November/December. He can have this all planned out months in advance, as can you! You can click here for a brief and informative video on using the Format Scheduler: https://youtu.be/ylVgnC0U4pc
Sssshhh! Secret bonus tip for those who are still reading! Phil said I can share a cool secret with you. I thought this was great idea! For the days following Christmas (Boxing Day through the end of the year), Phil cloned the one-song-an-hour clock and applied a format clock filter (check this video out to learn more about format clock filters! https://youtu.be/D76hqFv8nzc ) so only seasonal songs (i.e. Let it Snow! Let it Snow! Let it Snow! Or Winter Wonderland) played in that position. What a great way to wind down the holiday season and not just abruptly end the festive feel of your playlist!
As always, if you should have any questions you can reach out to your friendly neighborhood MusicMaster MSC. We’ll be happy to answer any questions and help you take these steps to streamlining your holiday programming.
Why Stay Current? posted on July 12th, 2021
Why Stay Current?
By Dave Tyler
Quite often I get calls from Programmers asking about the different versions and releases of MusicMaster and what those differences mean. After nearly 40 years of development there have been many versions of MusicMaster all the way back to our DOS version. The majority of users are on our latest version, PRO 7.0, which is amazing!
In addition to there being various versions over our timeline like 4.0, 5.0, 6.0 and now 7.0 there are also “service releases” within those versions that include functionality improvements, feature and performance additions, report updates and fixes.
Does Everyone Need To Be On The Same Version?
The answer to this is “Yes” if we are talking about working in a single database (Station). If you, your PD and MD all work for radio station W*** then you all need to be on the same version (5.0, 6.0 7.0 etc) because once a database is open in a newer version of MusicMaster it can no longer be opened by the earlier version. I always recommend if you are moving up a version (example: Updating from 6.0 to 7.0) that you make a backup of your 6.0 data and put it somewhere safe and then move on. It is important if one user wants to update to the latest version that everyone is on the same page and ready to do the same. Remember if I update to 7.0 and open the database and my two colleagues do not update, they will not be able to open and work in the data any longer until they also update to 7.0. Updating your version to our latest greatest is as easy as opening MusicMaster then going to Help/Check for Update or you can download the full version by registering and downloading it from our website Support Center.
Does Everyone Need To Be On The Latest Service Release?
Although it is always recommended that everyone be on the latest version to get the most out of this powerful software, it is not necessary for users working in the same database to be on the same service release. In other words if the PD is on 7.0.02, the MD is on 7.0.5 and the OM is on 7.0.10 there will be no issues and everyone can continue just fine. This is what I mean by “service releases”. The “7” is the major version release number. The “.0.0x” is the service release number. Everyone just needs to be on “7”. The only concern with my example would be that a user on 7.0.10 might have a new feature that the users on 7.0.2 or 7.0.5 don’t have.
One of the more obvious examples of that has to do with our work with various reporting agencies like ASCAP/BMI, Sound Exchange and CRTC. Their requirements can change from time to time. Since we work with these organizations to make sure the reports are accurate, staying on the latest version and service release means your reports are in line with what the organizations have requested. Of course, that also means you will always have the most powerful, productive and high performing version of MusicMaster software at your fingertips.
We understand that updating software is not something you do often, so if you’d like any assistance checking your version and updating to a newer release, do not hesitate to contact your Music Scheduling Consultant.
Music Scheduling Therapy posted on June 28th, 2021
Music Scheduling Therapy
By Chris Malone
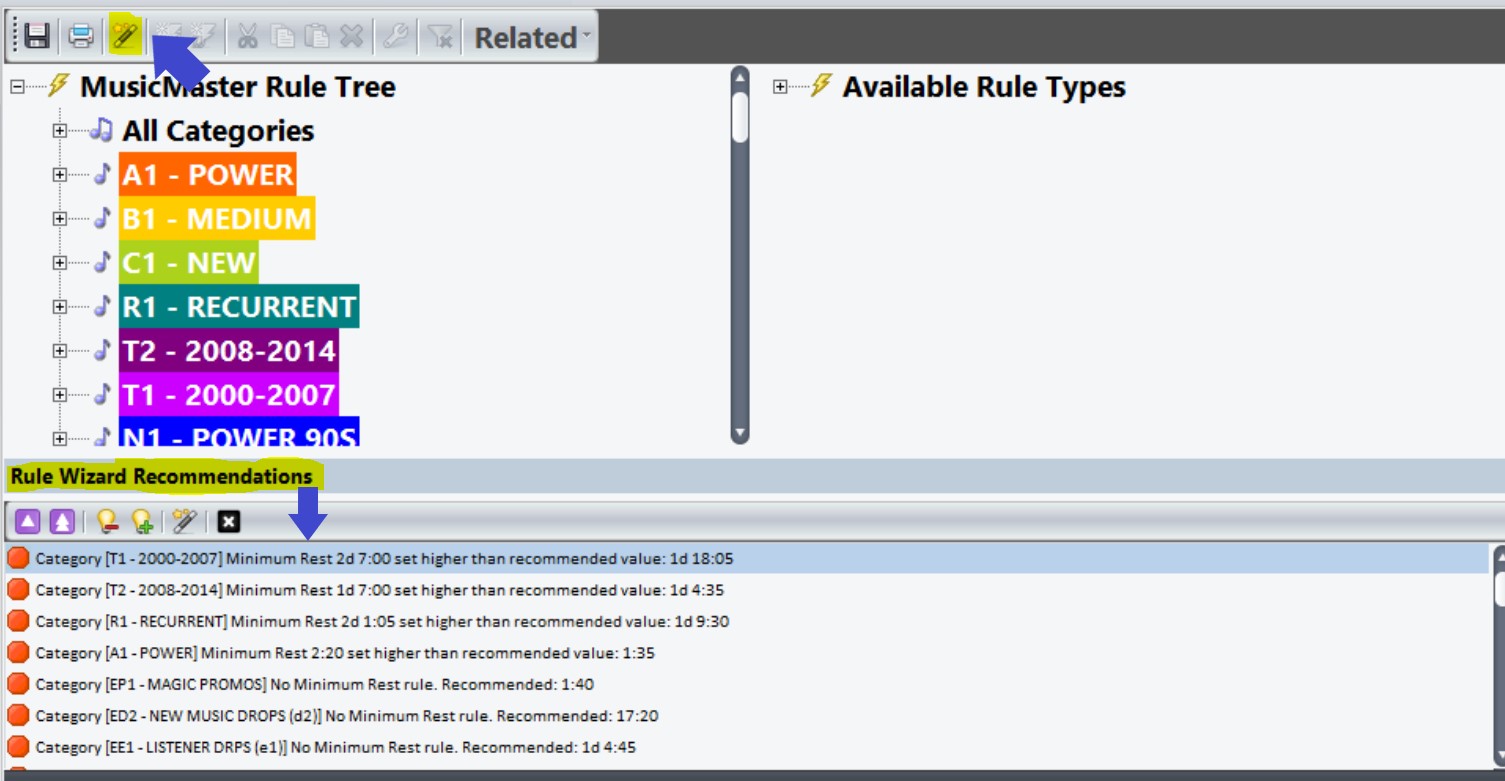
If you have had the privilege of sitting in a therapy session, you are aware of the benefits of having someone look at your life’s configuration and help recommend ways to get back on track. Did you know in MusicMaster, you have a built-in music scheduling therapist at your disposal too? One of the overlooked features in your Rule Tree is the Rule Wizard that gives you a list of recommendations to make to your rule tree based upon your last scheduling session.
This feature helps determine rotations miscalculations and rules that may be off-base due to the lack of available inventory in your actively scheduled music and non-music categories. The Rule Wizard can pinpoint problems with rest settings, hour rotation rules, and indicate how your attribute rules affected the scheduling session. If you notice an abundance of unscheduled positions in your most recent scheduling session, you may want to review this list and see what your MusicMaster therapist recommends.
 Additionally, you can benefit from learning how to read your scheduler recap report (Dataset, Schedule, Recap Report). In this recap report, you can sort the pass percentage column by descending order, which shows me the rules that had lowest percentage of songs that pass any given active rule (both breakable and unbreakable). Watch out for unbreakable rules that have a low pass percentage, it indicates problems with that category’s ability to tolerate the current rule setup. Remember, this is a picture of the last scheduling session. You may wish to make some notes over the course of a week before making any changes to rules or other settings.
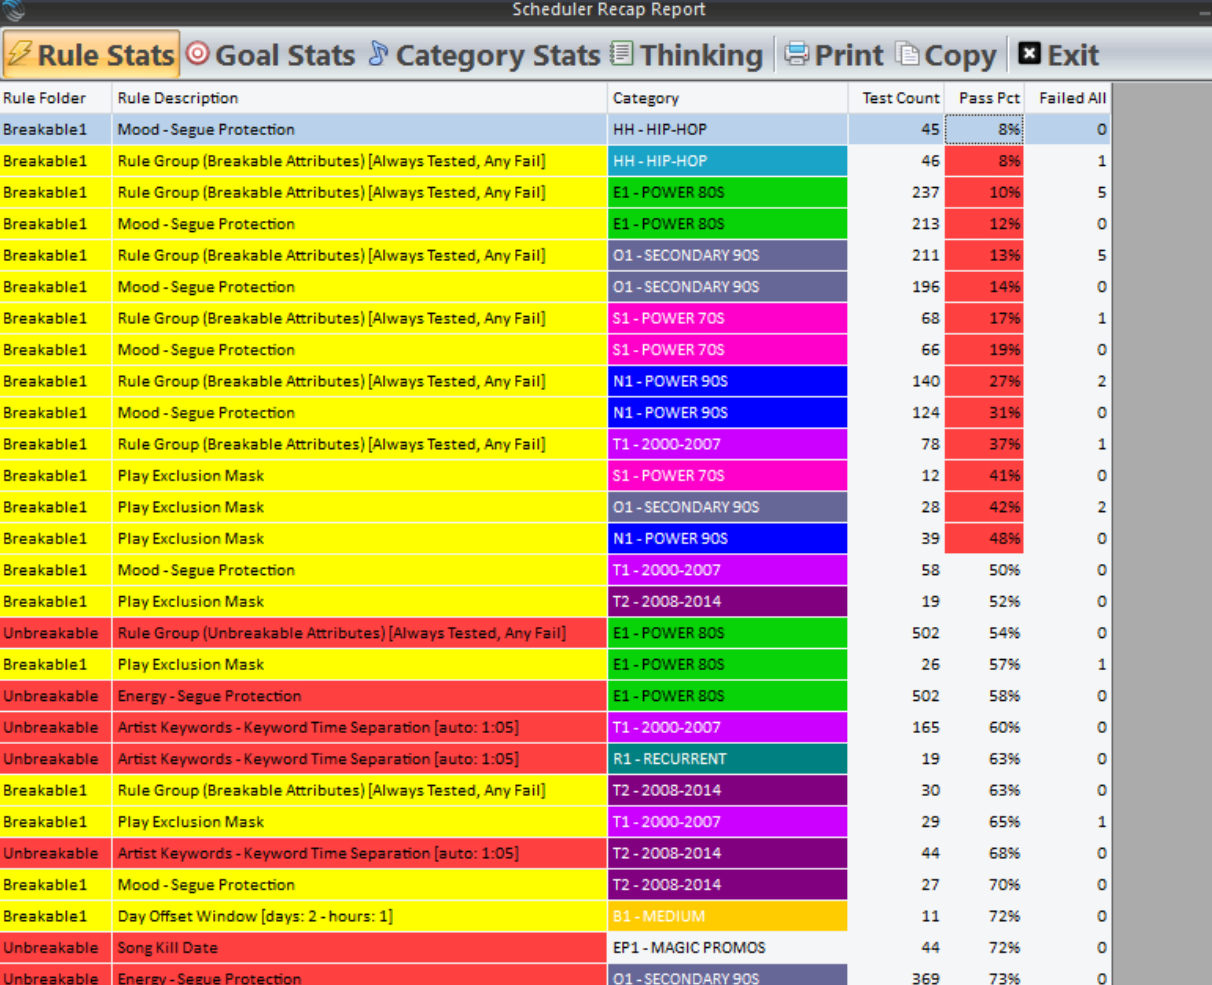
(For even more info on the Scheduler Recap report, check out this other blog article on the topic.)
You can lean on your built-in MusicMaster scheduling therapist or you can call your MusicMaster Scheduling Consultant, have a seat on the couch and tell us your problems.
Level Up! posted on June 14th, 2021
Level Up!
By Dave Tyler
As a Music Scheduling Consultant for MusicMaster and a 35+ year radio veteran, I have used just about all the scheduling software programs available over the years. I see time and time again how intuitive and powerful MusicMaster is. If you want to do it, if you can hear it in your head, MusicMaster can make it happen. There is so much horsepower under the hood and so many tools in the trunk it will blow your mind.
Recently I had a top-notch programmer, who is very detailed oriented and knows everything about his database, contact me with any interesting question. He was running a “Quiet Storm” type program on Saturday nights and in keeping with that style it was all slow songs. His issue was that he knew he had to increase his search depth but when he did that he did not like how it affected his regular week rotations and asked if there was a solution.
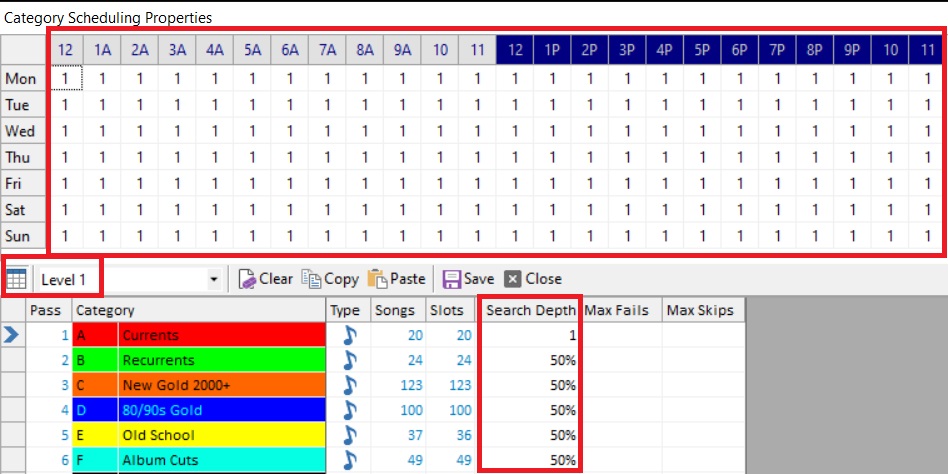
It was my pleasure to say “YES!!!”. During the week he wanted his A category to only dig 1 deep and other categories no more than 50% however on Saturday nights he needed to dig deeper because he had clock filters in place calling for only Tempo 1 and 2 (Slow and Slow Medium) songs. Looking at his Schedule Properties window for his normal week (Dataset/Schedule/Schedule Properties) it looked similar to my example below: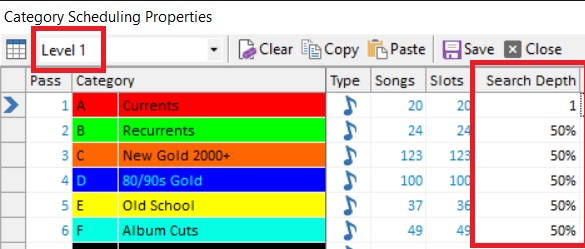 You can see in the top left corner that in “Level 1” his setting are consistent with what I mentioned above. This is the search depth settings for the entire week. Keep in mind though he wants these search depths to increase for one 5-hour period each week. To do this we need to level up! By pressing the little calendar icon to the left of where it says “Level 1” we will launch the “Show/Hide the Level Assignment Grid” and we see that it is all 1s across the week.
 So let’s change the grid so Saturday night from 7p-Midnight now reflects a level setting of 2. Once we do that the drop down box displaying the level will also change to 2. We change our search depth settings to 100% and then click Save and we are done.
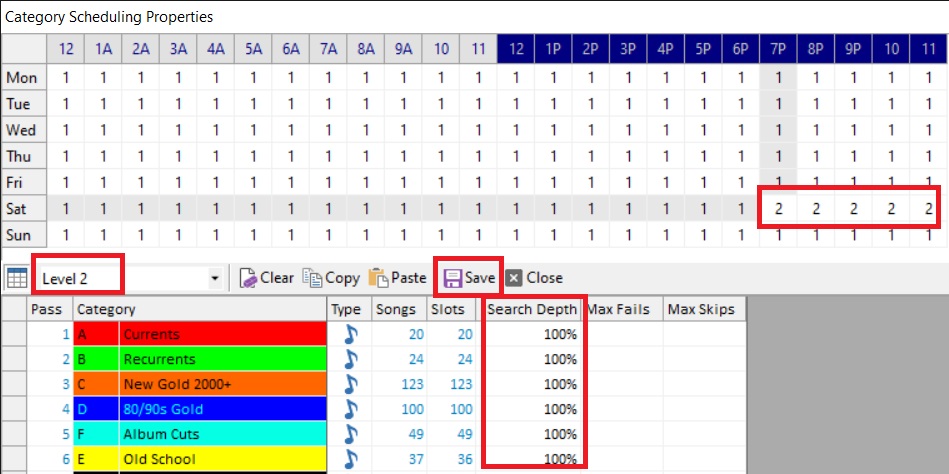 Now the client has accomplished the goal of increasing search depth during a certain time period automatically. This takes very little setup and is such a powerful tool!
For more information on how to do this or any other question you may have please contact your dedicated Music Scheduling Consultant. Our goal is for that great radio station you hear in your head to be coming out of the speakers of every radio in your market. Let’s make it happen!
MusicMaster WideOrbit Voice Tracking posted on May 31st, 2021
MusicMaster WideOrbit Voice Tracking
By Jesus Rodriguez
Recently because of our industry’s current state and lockdowns, more stations have to resort to voice tracking. This blog will show you the standard and preferred method of setting up your MusicMaster database to voice track with WideOrbit, formerly known as SS32 or Scott Studios.
It is first essential to understand the different voice tracking “Join Types.”
Join Types:
JU = Join or link UP in the playlist or link the voice track to the playlist’s previous cut. This prefix would be used when coming out of a song going into a non-song event such as a liner or a stop set.
JB = Join to BOTH the pre and post cuts and would be used when the voice track is between two songs
JD = Join DOWN to the post-cut only and would be used when the voice track follows a non-song event such as a commercial or imaging element
JN = Join NONE or NEITHER the pre nor post cut and would be used when a voice track is designated as a generic announcement such as a weather cut, and the voice talent knows to mention neither the pre nor post cuts.
Now let me explain why this is important. When recording the voice track, the voice talent announces the Title and Artist of either the cut before the voice track, the cut following the voice track, or both, and the JN prefix are used. One of the songs gets deleted or moved after the voice track is recorded, the voice track would play, and the listeners would hear the DJ announce the wrong Title and Artist of the cut that played on air. If the proper linking or “joining” prefixes are used, and the voice track loses its link to the event it was linked to when the voice track was recorded; the voice track will not play
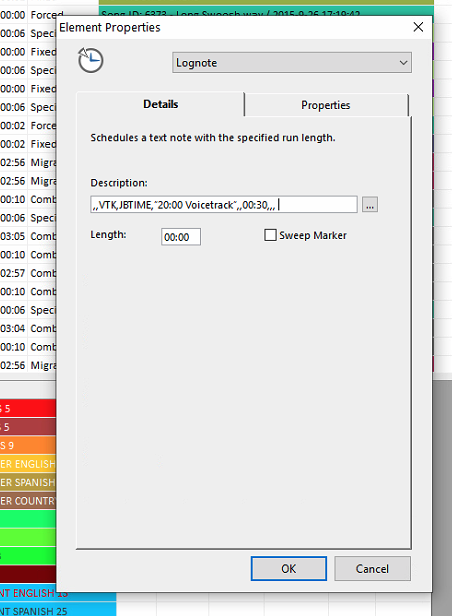
How do we implement this into our MusicMaster data? There are two options: using a log note or creating a category or categories for each of the Join Types. I would advise you to consult with your WideObit representative on which method would be best for you. The log note type has been a heritage way of doing it, but it has some limitations if you plan to voice track for more than a month. You can copy and paste the log notes below that best suit the join type you need into your clock using the log note element type. Then adjust your air minute and seconds as shown below as 20:00 and your length of the voice track as shown below as 00:30.
Log note Method:
,,VTK,JUTIME,”20:00 Voicetrack”,,00:30,,,
,,VTK,JBTIME,”20:00 Voicetrack”,,00:30,,,
,,VTK,JNTIME,”20:00 Voicetrack”,,00:30,,,
,,VTK,JDTIME,”20:00 Voicetrack”,,00:30,,,
 Category Method:
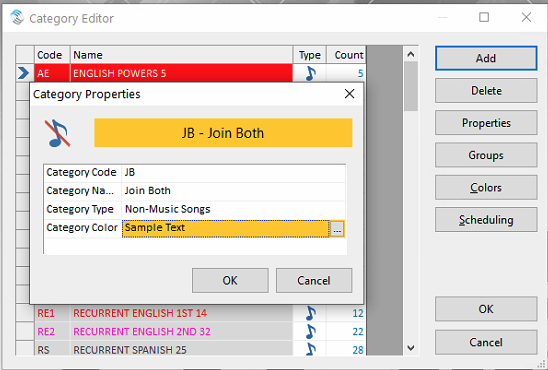
We have been advised that this is the preferred method to use, but there is no wrong answer here as every database’s needs are different. Once you have selected which Join Types you would like to use, create a category for each. You can create a new category by going to the menu bar Dataset, Library, Categories. Next, click on the Add button on the right in that window. Give it your Category Code, Category Name, Category Type, and Category Color. I would advise you to use the two-letter Join Type as your Category Code and the Join Type name as your Category Name for consistency.
 After creating the categories, we will now make at least 1,000 song cards for 1,000 voice tracks that can be used. You can use a higher count if you do a lot of voice tracking. The goal here is to take weeks, if not months, before anyone’s voice track circles back around in rotation, preventing an accidental overwrite of a voice track pending to go live on air in the upcoming days. On the menu bar, go to Dataset, Library, Add New Songs, then type in 1000 or the amount you prefer and click ok.
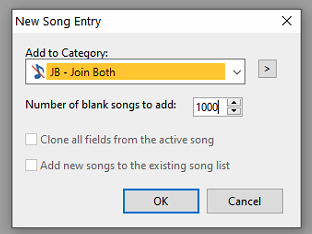 You will now see 1,000 empty song cards. Next, we will use the mass changer to assign the WideOrbit Category you are using for your voice tracks, the WideOrbit Type/Prefix, WideOrbit Asset/Cart number, and your Artist/Title description.
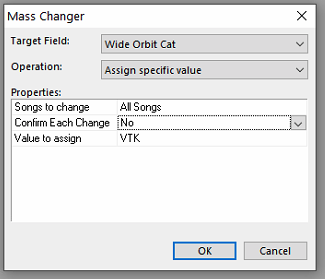
First righ- click within your WideOrbit Category Field of any song card, then select Mass Changer. Make sure your Target Field drop-down is set for the WideOrbit Category Field. The Operation drop-down should be set to Assign Specific Value. Songs to Change set to All Songs, Confirm Each Change I usually go with No, and Value to Assign type you will enter your WideOrbit Category Code for your voice tracks. Click ok, and you should now see your WideOrbit Category code in your field for all the items.
 Next, let’s do the same process but for your WideOrbit Type/Prefix in the Target Field to add the JB join type or whichever you selected for the Value to Assign. Click ok, and you should get the same results of your join type populating in every item in that field.
 It is time for the WideOrbit Asset/Cart numbers. You may have already been designated a series of cart numbers to use for your voice tracks, but if not, I like to use a high series of numbers like 8,000-8,999 if available. We will do the same process with the mass changer, but make sure your Target Field is your WideOrbit Asset/Cart number field, and your Operation is Assign Sequential Values. Set your starting value to the first number in your sequence. In my case, it will be 8000. You will click ok, and that field will populate with 8000 to the last number needed in sequence to fill them all.
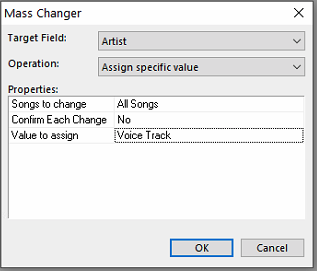
 We will now add your Artist and Title description to those fields. This process is the same as the first one we did but ensure your Target Field is set to Artist with Operation set to assign specific value. I like to keep it simple and use Voice Track as my value. You will click ok and see that description populate in that field in all your items. Repeat for your Title field. I tend to use Voice Track again to describe that field for consistency, but you are welcome to use anything you like, possibly your station name.
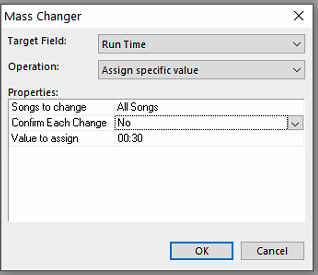
 Last in the mass changer process will be your runtime. The process is the same as the previous ones to get to the mass changer then set your target field to Run Time and Operation to Assign Specific Value. You can have your run time value be what you like, as shown in my example below as 00:30. Click ok, and that length will populate in your field on all the items.
 You can repeat these steps if you plan to use more than one Join Type. Your WideOrbit MusicMaster voice track category is now ready and should look something like this below.
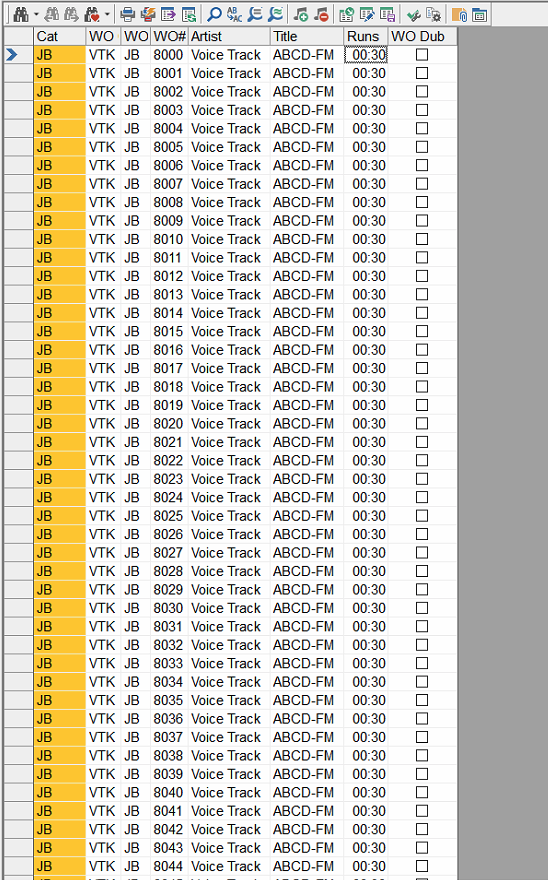 You can now add this category to your clocks as fixed positions so that it rotates through them.
 There are a couple more things I would suggest you do to guarantee an even rotation of your voice tracks and have no issues with rules interfering with your category. First, go to Dataset, Schedule, and Schedule Properties. Locate your category on the list and set the column for Depth to 1.
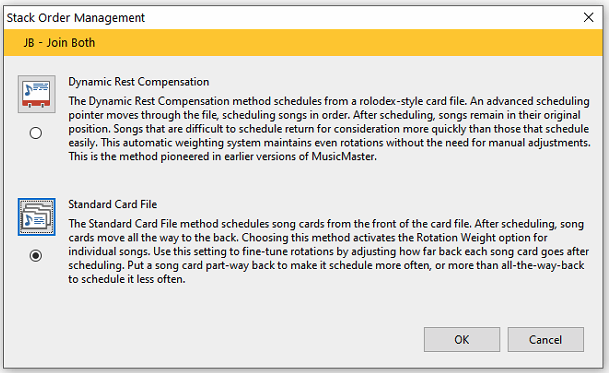
![]() Second, go to Dataset, Schedule, Schedule Order, select your category from the drop-down, and click on the Category Order Management tab, which is the third tab in this window.
Second, go to Dataset, Schedule, Schedule Order, select your category from the drop-down, and click on the Category Order Management tab, which is the third tab in this window.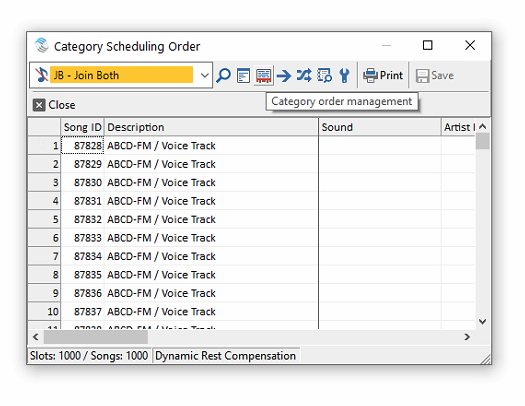 Set the Stack Order Management to Standard Card File.
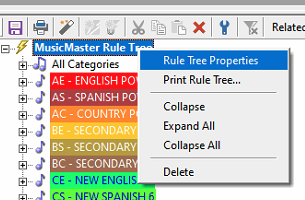
 Finally, let’s make sure you do not have any rules affecting your voice track categories to plot naturally in sequential order. Go to Dataset and then to Rules on the Menu Bar. Once in the Rule Tree right click on the bold MusicMaster Rule Tree at the top, go to Rule Tree Properties.
 Place a checkmark in the box for the voice track categories.
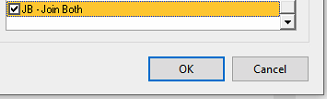 This selection means these categories will bypass the All-Category section of the Rule Tree so the tracks will plot naturally. Ideally, you would not have any rules in the category itself either, but if you need some for any reason, place your rules directly in the category itself.
You are now set and ready to voice track using MusicMaster with WideOrbit!
If you have any questions, please contact your Music Scheduling Consultant.
Search and Find within MusicMaster posted on May 17th, 2021
Search and Find within MusicMaster
By Chris Malone
If you do not have the Search Bar activated in MusicMaster, you may want to give it a try. Using the Search Bar is an efficient way to quickly search the library for existing song data.

To activate this feature and make it a part of your normal view, simply go to View from the file navigation menu and select Search Bar.
Many users rely on the Search Bar to find artist and title information across their entire database, but here is a quick tip to allow other data fields to become ‘searchable’ when you search the library.
Let’s use a scenario where the PD wants to be able to search the library by Wide Orbit Asset ID in order to quickly find the song he/she needs. You’ll need go to your Field Editor, under Dataset, Library, Fields and find the Wide Orbit Asset ID field so you can then set it to searchable. Below, we can see the WO Asset ID field properties box. You want to change the Search Bar option from No to Yes in order for this field to become searchable.

This will now allow you to search the library using Wide Orbit Asset ID in addition to other fields that may already be searchable in this database such as title and artist.
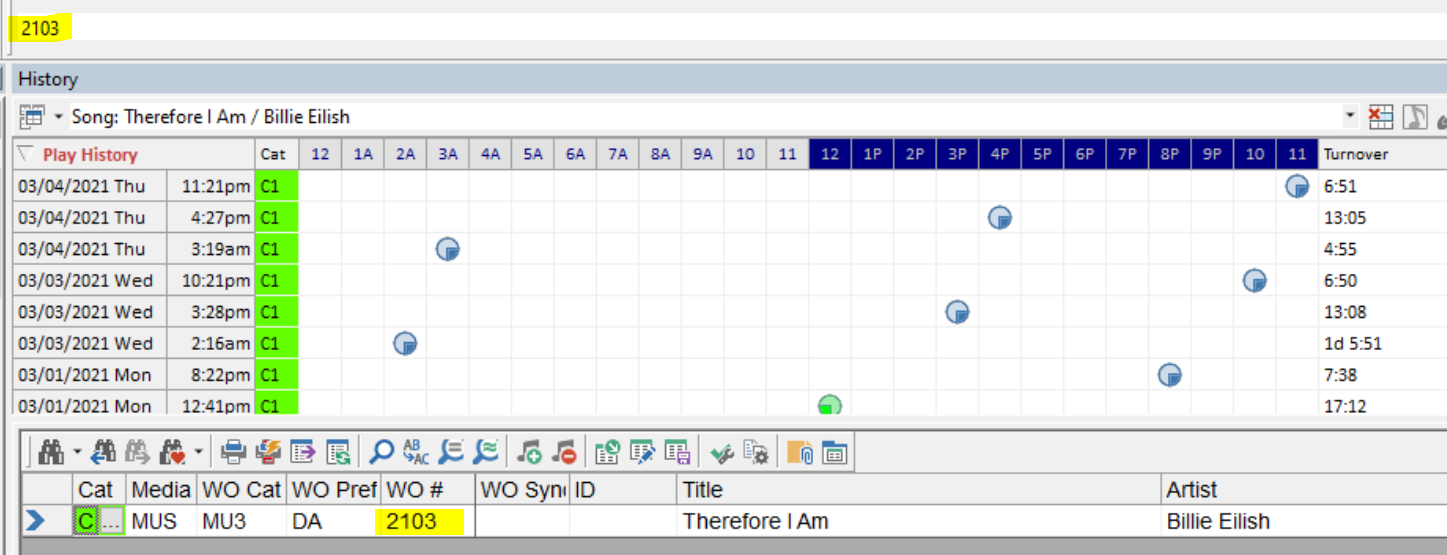
For example, if the PD is looking for cart number 2103, they can type that into the Search Bar and quickly locate the element attached to that cart number in their database.
As a warning, you do not want to go overboard with a ton of Search Bar friendly fields. Only use this for fields that are necessary to quickly call up data. For other items such as tempo, mood, and gender attributes, it’s best to use library queries under Library Maintenance. We have an instructional article to help better understand library queries here: https://musicmaster.com/?p=171
Final note: Use caution when adjusting anything in your Database Field Editor because it is foundational and not a commonly used area of the program. If you have any questions about what you want to change here, do not hesitate to call your MusicMaster Music Scheduling Consultant for assistance.
Diversity in MusicMaster posted on May 3rd, 2021

Diversity in MusicMaster
By: The W.I.Z.A.R.D.
Diversity is a topic you often hear these days. If you’ve wondered how to take diversity into account but have struggled with the “how”, this is for you.
Like anything you wish to track, having fields that contain the information is essential. While you might be inclined to lump many diversity concepts into one field, it’s cleaner to keep individual criteria in their own field. Here are some examples of what the fields could be and the types of codes:
Gender
F=Female
M=Male
N=Non-binary
Nationality
A=American
C=Canadian
G=German
Race
A=Asian
B=African American
I=Indigenous
In MusicMaster PRO 7 you can go to Library, Fields to create these fields if needed. The above fields would be best suited to the Attribute-Multiple field type. You can make the length whatever you feel appropriate, keeping in mind that the length equals the numbers of individual codes you can put in the field. You can have many more codes available (all upper case, lower case, numbers and characters on the keyboard). For instance, if you give Race a length of 15, this means you could put 15 different Race codes on one song card.
With the fields now available, you can go through your library and add these codes to the music. [Tip: Adjust your layout and save it so you can come back to the same design while you are working on this.] Since you know your library so well, while this will take some time, it likely won’t be hard to do.
With the library coded, using Library Analysis on each of these fields for your active library will give you some idea of how your library is built. You can right-click to access Library Analysis. Whether you find issues or concerns with these results will strictly depend upon your programming objectives. If nothing else, it will help you identify areas where you might want to add or subtract songs. Here you can see the three defined Gender codes and their percentage. Only the active library was loaded, so this is an accurate reflection of the distribution of these codes in the music that is being rotated.

Next up is considering whether you would like to add Rules. A simple example would be adding a Gender F rule in a Rock station. I know what you’re thinking: I play mostly guys, why should I code for the female rockers? While it is common not to code or test for this since you are playing mostly guys, consider how often you want to play the ladies. By adding the Min\Max Quota for the Hour Rule, you could, for example, set it to one minimum, two maximum per hour, ensuring you will get your female rocker consistently. Here’s an example for my classical friends. Use that same Min\Max Quota for the Hour Rule to ensure you play one Romantic or Baroque work each hour. Of course, I hope you are now beginning to see that a rule like Min\Max Quota can help you with all of your diversity concerns. If you want a specific number per hour, this rule can help you do it. There is also a version of this rule that can be applied to the Sweep as well, further subdividing the hour.
With the library coded and rules in place, it’s time for accountability. That can be done in a couple of ways: Instant Analysis in the Schedule Editor and the History Browser. Each has its benefits and together you get the best possible picture of what has occurred in your logs.
Instant Analysis is a great way to focus on a specific thing that you want to track in your log. Combined with the ability to tailor the time periods, this feature gives you a quick view into how well you are meeting your goals during a specific time period.
Let’s set up Instant Analysis first. This is done in the Schedule Editor until Schedule Analysis. When it opens, pick the Instant Analysis tab.
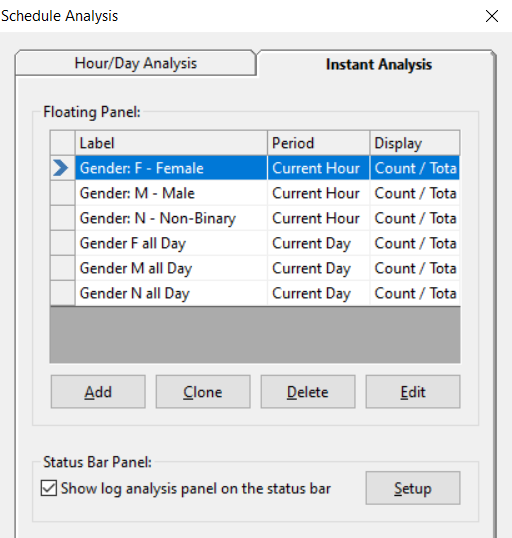
You can add as many of these as you want. Notice I have a set for the current hour as well as the whole day. You’ll have various Display options so you get the data in way that makes sense to you. That might be a simple total or the count and total percentage. If you wanted, you could set up Tools, Options, Custom Time Periods, where you could create new time ranges. This would let you do something like 6am-6pm or any other daypart you want to look at more closely. Once created, those Custom Time Periods would be available to choose when you set up your panel.
With this set up, you can use the Toggle Toolbars icon to display Instant Analysis. Here’s what it looks like:
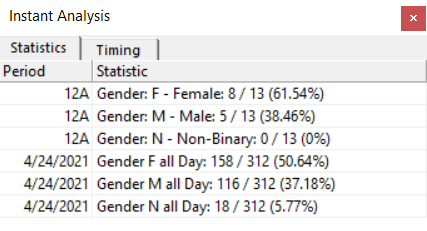
I can now see what my percentage is for each Gender. Since this updates as you look at replacement songs, you will instantly see how the change you are about to make affects your numbers.
The History Browser can be used to track your diversity (or any other) coding over a larger time frame, making sure you are meeting the “big picture” goals you have. Here’s a suggested setup:
Time Period – The last three months
Categories – Actively rotated music
Filters – None
Display – The field you want to review, in this example, Gender
Display Graph (lower portion) – Airtime Density
Here’s what it looks like:
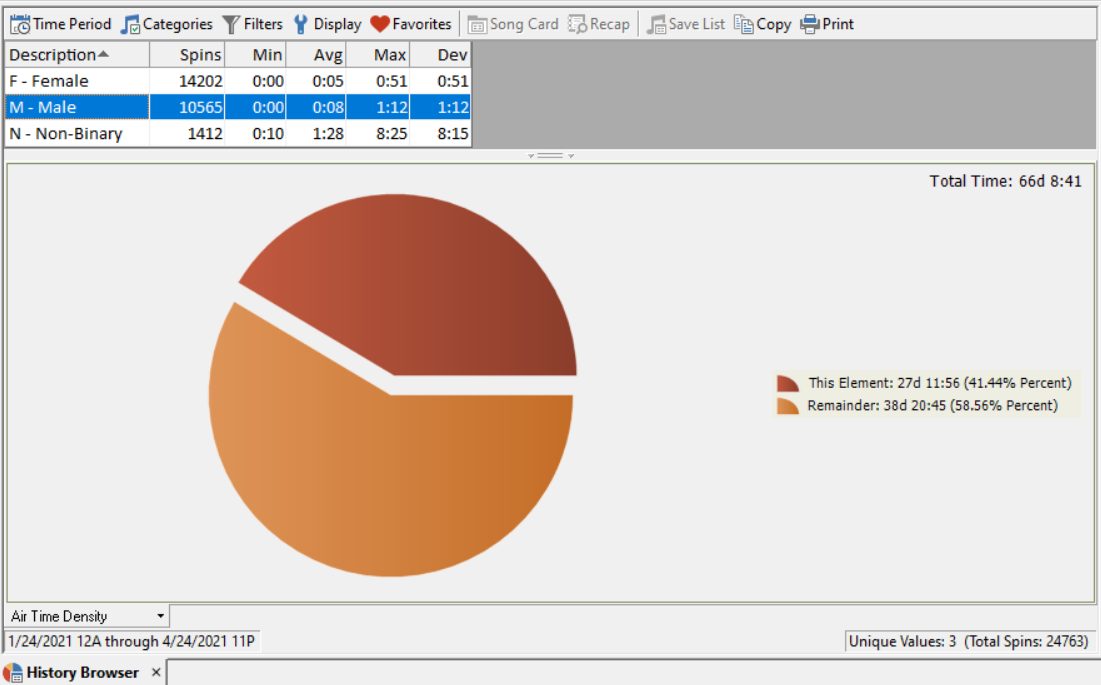
This is a good illustration of how simply looking at a day can be misleading. If you look back up at the Instant Analysis example, the Gender M code played 37.18% during the day. In this three-month History Browser report, the total is 41.44%. Over a larger time frame, there was a subtle but noticeable increase in the Gender M code. Without using both of these tools, you would not know that.
I’ve given you a few examples of how to incorporate diversity into your playlist. You should see that coding for diversity isn’t any different than the other characteristics you likely code for in your library. Code for the diversity that is important for your community and musical genre and let MusicMaster help you do that.
Please do not hesitate to contact your Music Scheduling Consultant for assistance in any part of this process.