
MusicMaster Blog
Rule Tree Basics – The use of “Rule Groups” posté par Joseph Knapp le February 8th, 2021
Rule Tree Basics – The use of “Rule Groups”
By Joe Knapp
What is a Rule Group and why should you use it?
I refer to Rule Groups as boxes you can put some rules into.
Rule Groups give you the ability to use Dayparting or a Format Clock list to control when those rules apply, select which Categories will respect those rules and even let you apply a Filter to select which songs must test those rules.
You can put Rule Group “boxes” anywhere in your Rule Tree. They’re often used in the “All Categories” folder, but you can also use them in specific Category folders too.
Simply put, Rule Groups make it easier to organize and adjust rules.
When you open the Rule Tree, on top right-hand side is a Folder called: Special Rule Tree Items. Open the folder and you will see Rule Group inside. Grab the Rule Group with your mouse and drag that across to the “All Categories” folder, or to a specific Category folder on the left-hand side of the screen. Once you let go, the Rule Group Properties box will open automatically. Once you’ve added a Rule Group, you can right-click on it at any time to review or modify these Properties.
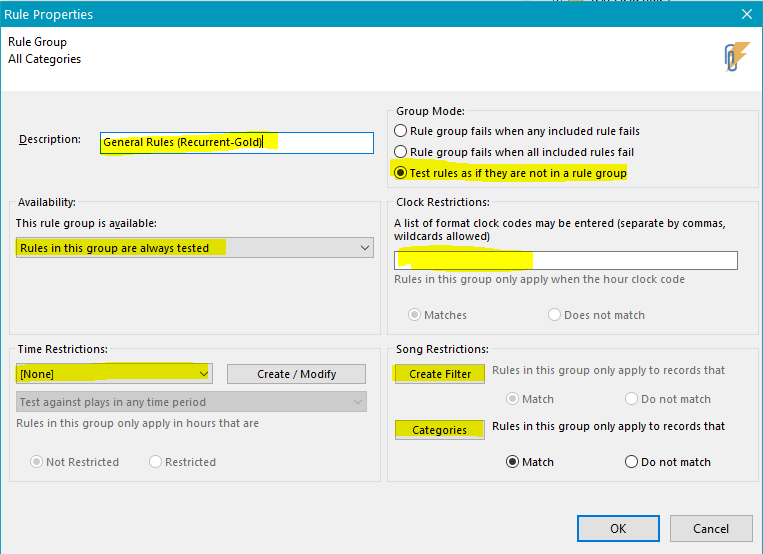
The six areas of the Rule Group you can adjust are highlighted below.
Let’s go over each of these and what it can do for you:
- Description: is just a name you give the Rule Group. Try to use a name that helps you remember the reason you want the rules included in this group, such as “Morning Drive Rules” or “Tempo Segue for Female Vocals.”
- Availability. This allows you to decide when the rules in this Rule Group are tested. Typically, programmers like to keep the rules engaged while using the auto scheduler and while editing. Some just want rules to apply only while auto-scheduling, others only while manually editing the logs. There is even a setting called “Rules in this group are never tested”. You can use this to “shut off” all the rules in this Rule Group without deleting them. This allows you to activate them again later.
- Time Restrictions. This allows you to “daypart” your rules. If you wanted a specialty show to sound a bit different than your normal programming, you can isolate different times of day and apply different rules to any location within the week. Remember that the Daypart codes you apply to Rule Groups may also be applied to songs. If you change a Daypart code, those changes will affect any song or Rule Group that uses that code. Consider naming any daypart for a Rule Group with something that makes it clear it’s used in the Rule Group, so you don’t accidentally change it and affect your rules.
What about the drop-down box in the Time Restrictions settings? That box says “Test against plays in any time period” by default. But what if you want to set up Hour Rotation rules that ignore weekday plays on weekends, and vice-versa? The option to “Ignore plays outside this time period” lets you do that. Put your weekend Hour Rotation rules in a Rule Group, daypart the Rule Group to only test on weekends, then set it to ignore plays outside the dayparted hours. MusicMaster will pretend the weekdays don’t even exist when testing these Hour Rotation rules on the weekend. You should also create a second Rule Group that is set up the same way but dayparted to only apply during the weekdays. The Hour Rotation rules you put in there will ignore plays that occurred on the weekend. There’s another option to “Ignore failures outside this time period.” Use this option when you want MusicMaster to see the plays outside the dayparted hours but ignore any failures against them. This is handy for special shows you might schedule on weekends where you only want MusicMaster to test the rules within the special show itself.
- Group Mode. Most people use “Test rules as if they are not in a rule group” because it allows them to see which individual rule failed in a Recap Report. “Rule Group fails when any included rule fails” causes the entire Rule Group to fail if any rule you’ve put in that group fails. MusicMaster doesn’t bother to test the rest of the rules in that group once it finds one rule that fails. When using this mode, you’ll see that the entire Rule Group failed in the Recap Report.
The most interesting option is “Rule Group fails when all included rules fail.” This one let’s you do some things that would be virtually impossible in any other system. For example, let’s say you don’t want two Slow Tempo songs that are both sung by Female vocalists to play back-to-back. It is alright, though, to play two Female vocalists back-to-back if one of them is not Slow. You’d put just two rules in the Rule Group to handle this special case. One would prevent two Slow songs from playing back-to-back and the other would prevent two Female songs from playing back-to-back. Both rules would have to fail before the Rule Group fails. If only one of them fails, the entire Rule Group passes.
- Clock Restrictions: You can use this if you’d rather just type in the Format Clock letter codes instead of using a Daypart code in the Time Restrictions section. For example, if you have a Sunday Morning Jazz show for four hours and you’re just using one or two clocks, typing in the Clock Codes separated by a comma would achieve the same exact thing as Dayparting the Rule Group. But, if you later move that show’s Clocks to different hours, the Rule Group will automatically follow that show to the new time period.
- Song Restrictions: This setting allows you to select a Filter and/or a list of Categories that would apply to this Rule Group. In my example screen shot, you’ll see the name of this Rule Group is Recurrent-Gold, so I’ve just selected those Categories and a fill category to adhere to the rules in this group. Note: If you have bypassed any Category using the All Category bypass option in the Rule Tree, that designation will supersede any settings here. In other words, if you bypass Category A, even if you include Category A on the category list here, it still will not be tested.
The Filter option is very powerful. It allows you to apply rules only to certain types of songs. For example, you might apply a special separation rule to songs with an Instrumental Sound Code if they also happen to be coded with a Jazz sound code.
How many Rule Groups can you have? As many as you like!
If you have any questions about Rule Groups, or would like to know more about the MusicMaster Rule Tree, contact your Music Scheduling Consultant, refer to the “Help” section of the software, or stop by our website and click on the “Learn” button.
MusicMaster Emergency Kit posté par Jesus Rodriguez le January 25th, 2021
Your Company Consolidated? Here is your MusicMaster Five-Step Emergency Kit
By Jesus Rodriguez
In the unfortunate world we live in today, many companies have to consolidate, furlough, let go, lay off, to stay profitable and avoid things like bankruptcies. Unfortunately, as we have experienced during the Covid-19 pandemic there has been a lot of lost revenue. Fewer places open for business meant they did not need to purchase commercials.
If you were one of the lucky individuals to not be affected by those changes, you may be thinking that those that think you got lucky have no idea of the amount of work you now have to do. You are more than likely now a team of one. Your Operations Manager is gone and you are overseen by another markets management. You lost your Music Director/APD. Maybe the Program Director got to stay but has been moved to a different location. Now here you are with a new promotion and your first time opening MusicMaster. Whether you are the PD that lost their team or the night jock that is now working days in the office to help program the station, I have compiled a list of some of our blogs and videos to help you get going right.
Here is your Five-Step MusicMaster Emergency Kit.
Your Music Director is gone and it is your first time picking a song that will go on the air. How do you add a song to the library?
Adding Songs, Imaging, or other items to the Library
https://www.youtube.com/watch?v=ockIX0Ue3U8&list=PLQClZKdxvI1ze6tU8BPwFbeorYCNAz-8y
You added your new music for the week to keep the station’s momentum going but you still need to create a log for tomorrow’s programming and your PD is also no longer available.
How to Use the Automatic Scheduler
https://www.youtube.com/watch?v=8P-Mp9ZIhOA&list=PLQClZKdxvI1ze6tU8BPwFbeorYCNAz-8y
Now you have your log, but you would like to massage the playlist to change some of the songs around.
Editing Logs
Swapping elements in the Log
https://www.youtube.com/watch?v=tTZQJCe322M&list=PLQClZKdxvI1ze6tU8BPwFbeorYCNAz-8y
Replacing Songs
You can also replace categories easily by pressing F9 or double-clicking on the item to get the replacement window. Once you select the item you wish, press [enter] to replace it in the position. If you do not see the song or category you want in the replacement window press the binocular icon to open the query. That will allow you to pick a different category.
You have completed your log and are now ready to export it to your automation for on-air!
Exporting logs to your automation system
https://www.youtube.com/watch?v=rXfahVJAv1s&list=PLQClZKdxvI1ze6tU8BPwFbeorYCNAz-8y
CALL MUSICMASTER!!!!!
You may not know this, but it is very likely that your subscription also includes 24/7 support for all users at your location. You are not alone. We have been there before too. Please call our direct support hotline at 262-825-4000. You’ll be put in contact with one of our support representatives so you can request a MusicMaster 101 session. These five steps are only scratching the surface of the power of MusicMaster. Let us help you become a MusicMaster Genius in a short time.
If you made it this far into this blog let me be one of the first to tell you congratulations on the new position. Remember you were selected by those above you for a reason and we are here to help you every step of the way beyond these five emergency steps.
What’s Your MusicMaster Tip? posté par Brian Wheeler le January 11th, 2021
What’s your MusicMaster tip?
By Brian Wheeler
For years, we at MusicMaster have provided you, our beloved MusicMaster users with tips and tricks, thoughts and concepts, schemes and strategies to get the most out of your MusicMaster experience.
Now it’s your turn. If you had one thought, one idea, one tip or trick that you could share with MusicMaster users around the world, what would it be? Here’s your chance to shine! We’re now taking your submissions contest@musicmaster.com
You have until February 11th to get your ideas submitted to us. We’ll then select the three best submissions (as selected by a panel of judges) and share them with our MusicMaster family around the globe. The top selection will also win a fabulous prize from my prize closet! Here’s just a sample of some of the available prizes (we’ll try to tailor a prize to your tastes):


Our grand prize winner will be announced on February 22nd, at which time we’ll also share the top three tips in our February article. Get those ideas submitted! We’re looking forward to seeing creative MusicMaster minds at work!
Legal note: by submitting a blog tip, you agree to let us use your name, call letters/company in our winner’s blog post. Please clearly notate in your submission if you wish to remain anonymous and we’ll be happy to honor that request. For transparency reasons, we request that those who wish to be eligible to win a prize allow us to share who you are.
Filter the Flow posté par Chris Malone le December 28th, 2020
Filter The Flow
By Chris Malone
At times, programmers will call MusicMaster Support and ask how to enforce a specific sound attribute at a specific position within the clock. For example, an Urban AC programmer may want to start the hour with a R&B sound attribute to establish a smooth R&B flow, right out of the gate. You can create a clock filter at any given position within your clock. Your filter ideas can go far deeper than sound code attributes. Commonly, you can create filters for energy, tempo, artist keywords and beyond.
In this example, we’re creating a clock filter on the 90’s position that follows our Legal ID to only include R&B songs within that category. First step, you want to double click on the 90’s fixed position on the clock and the Element Properties box appears. Click the Filters tab and begin defining the filter.
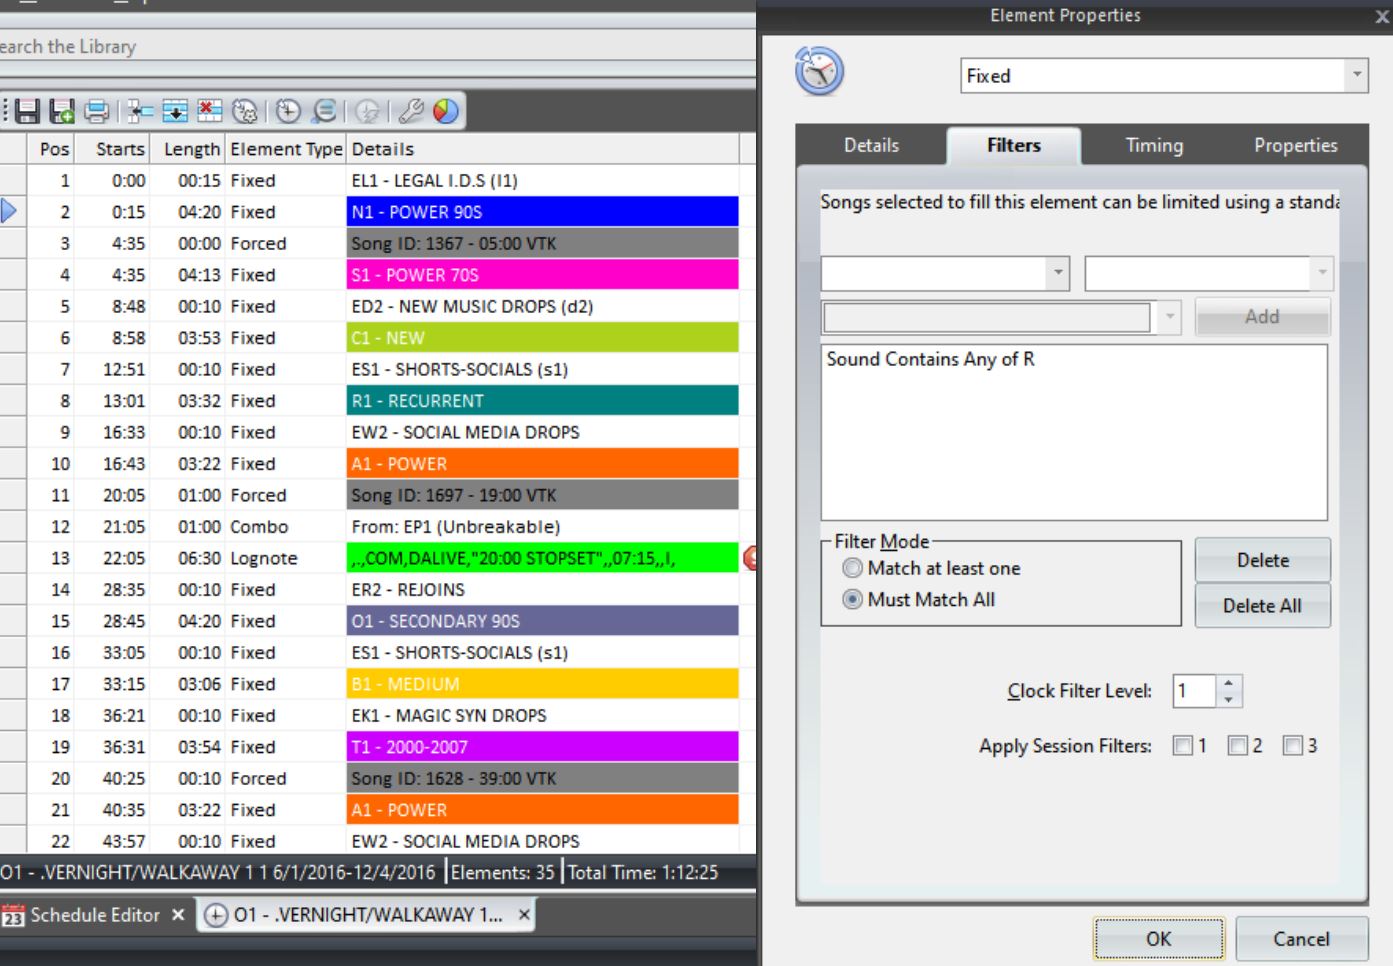
The setup translates as: only allow Sound that Contains Any Of – R, which is the sound attribute code for R&B in this database, to schedule in this position. Please pay close attention to the Clock Filter Level in your Element Properties because you’ll need to know that when you activate the Clock Filter in your Rule Tree. Once you’ve defined the filter you want, press OK.

The filter icon next to the 90’s position, indicates that the filter has been properly applied to the clock and to take it a step further, you can right click on the filter and Show Matching Songs to get an idea of which filtered songs qualify for this clock position.
Next, you simply want to activate the proper Clock Filter rule in your Rule Tree. In your Element Properties setup, you recall we are using Clock Filter 1. In the Available Rule Types under Format Clock Rules, we need Format Clock Filter 1. That available rule needs to be active. I put it under All Categories so I can adjust any clock adding a Clock Filter 1 and have it be Unbreakable. You can put the rule in a specific category if you’d like. Once you’ve turned on the rule, save your rule tree and you’re done!
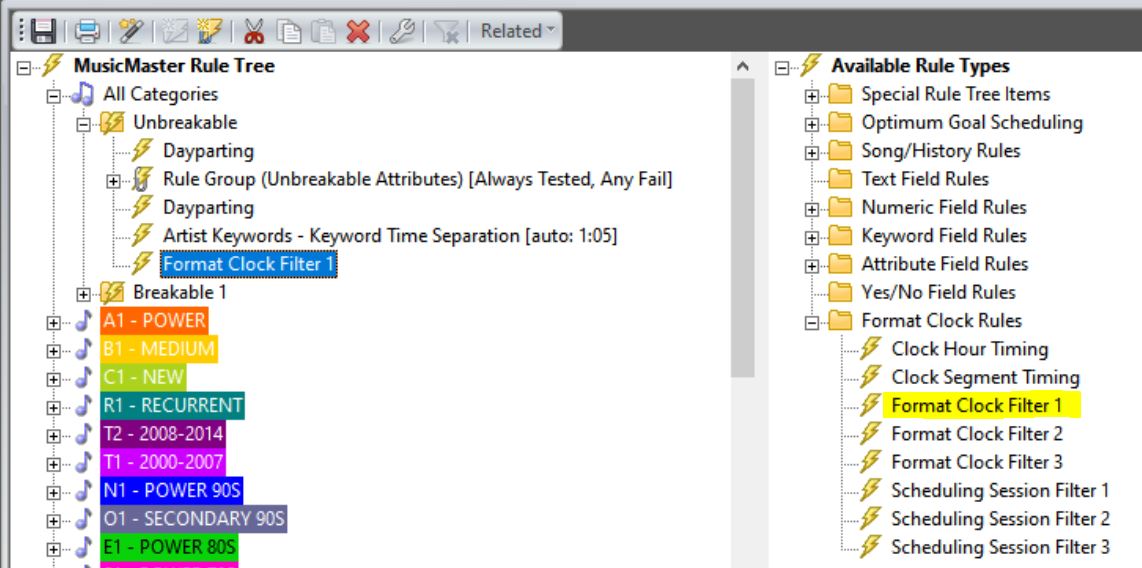
With three Format Clock Filter options available, you have flexibility to mix and match Unbreakable and Breakable rules along with setting up different filters on different positions. Maybe you’d like a certain sound code coming out of a stopset. Set up the filter and make the rule breakable.
If you want to learn about Clock Filters or explore other ways to use Clock Filters, please reach out to your Music Scheduling Consultant for more assistance.
Planning for the Holidays posté par Dave Tyler le December 14th, 2020
Planning For the Holidays
By Dave Tyler
We all love the holidays right? I know I do but we also know that if anything is going to go wrong it is going to happen on a Friday, when you are on vacation or over the holiday. So what can you do to minimize that?
When do you start playing Christmas tunes? Maybe you add some new clocks to your grid or perhaps you have a “Holiday” grid(s) that you use each year. No matter your format, it’s likely your regular playlist freezes around this time too. This gives you a unique opportunity to take the stress out of your scheduling.
Since you are doing your holiday music and your regular playlist is frozen, you can safely schedule out a week or more because you won’t be adding any new music or making changes. Think about it. If you’re using the Format Scheduler to activate those holiday grids, your regular grid will come back up all by itself. That means you might schedule the entire month of December and into January!
When you reach the point where you know nothing is going to change between when your holiday music starts and your playlist is frozen, get going. This accomplishes a few of things. It allows you to get the scheduling completed well ahead of time. It also gives you the opportunity to make just minor changes as each day comes along if needed. Finally, you won’t be in any big rush on that Friday before you take off to get tons of logs done.
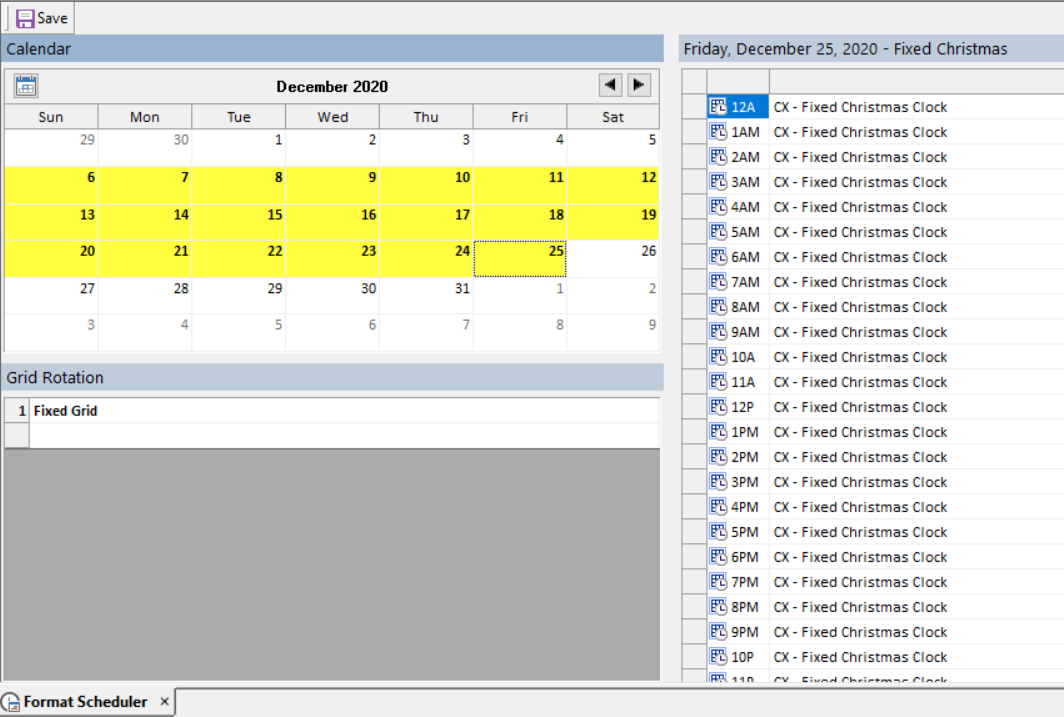
We do get calls every year where someone says they have Christmas music scheduled on December 26th and they don’t know why. It’s because they are manually activating grids and forgot to re-activate their regular grid. This is why we highly recommend the Format Scheduler. If you’ve never used the Format Scheduler before, this is the perfect time to give it a try. It’s just too easy to forget which grid you have active when you are manually changing it. By using the Format Scheduler, you pick the grid and date(s) where it applies. If you don’t change anything, your regular, active grid is used. You can even do this down to the clock level, which means if you decide to start playing holiday music at noon, you can change the individual clocks from noon to 11pm. You’ll assign the holiday grid to the entire day moving forward.
As you can see in this screen capture, the Fixed Christmas Clocks are scheduled across the day. I assigned the grid that contained this clock across multiple weeks. Any dates in yellow mean something different is going on. Any dates in white mean the regular grid is active. Dates in red (if you see them) mean the log has already been scheduled.
When you put this all together, with a couple of simple adjustments in MusicMaster, you can schedule your holiday music and get back to your regular programming automatically. When you factor in the ability to schedule ahead, it adds up to the MusicMaster way to take just a little bit of the stress out of the holidays. You’re welcome!
If you have any questions about implementing your holiday music, do not hesitate to reach out to your Music Scheduling Consultant.
Artist Keyword Separation posté par Brian Wheeler le November 30th, 2020
Artist Keyword Separation
By Brian Wheeler
One of the more frequently asked questions I get when I’m helping a MusicMaster user dial in the rules is, “What does the auto setting mean in the artist keyword separation rule?”
This is a great question because the flexibility of the keyword separation settings in MusicMaster is often not fully understood.
Let’s start with “What DOES it mean when you set an ‘auto’ separation on artist keywords?” This is the default setting. If you set your ‘auto’ setting to 1:45, any keyword that has been assigned the ‘auto’ separation time will abide by a separation of an hour and forty-five minutes.

Your level of control doesn’t have to end there.
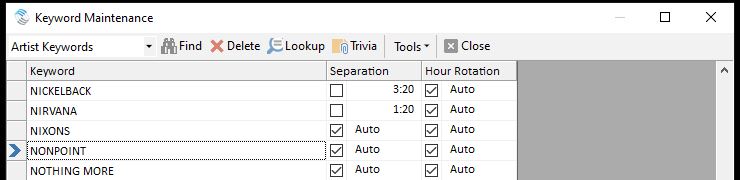
If you go to Dataset/Library/Keywords, you can put different settings on keywords that need more specific attention. Here’s an example where I’ve set specific artist keyword separations for two different artists.
For the sake of this demonstration, let’s say I’ve got an ‘auto’ keyword setting of 1:45. Any artist with the ‘auto’ setting in this screen will adhere to a separation time of one hour and forty-five minutes. I’ve checked two settings. In this case, I’ve asked MusicMaster to prevent Nickelback from coming up more frequently than every three hours, twenty minutes. Conversely, I’ve asked that Nirvana have a more relaxed setting than the ‘auto’ setting. They can appear every hour and twenty minutes. That doesn’t mean they WILL, but they could because of the setting I’ve given them. To apply these settings, I clicked the box next to Auto and entered the new restriction time.
You’ll find that the auto setting gets the job done in most cases. In some cases, you need to grant certain artists more freedom, such as when Drake decides to drop a record and also has several collaborations that find their way on the charts. Conversely, there are some artists in your library that you believe “a little goes a LONG way”, and you’d like to control the frequency of their appearance in your music log. Keyword time separation is your remedy.
If you have any questions regarding use of this feature, don’t hesitate to contact your MusicMaster Scheduling Consultant for more information. Be well!
Rules–Sometimes Less IS More! posté par Dave Tyler le November 16th, 2020
Rules–Sometimes Less IS More!
By Dave Tyler
We’ve all been there. You are the new PD or MD at the radio station or recently got promoted and you are excited! You open up the database and your eyes spin because you have no idea what the previous person’s programming goals were and how everything was set up to accomplish it. Sound familiar? You look at the codes and rules and it looks like a composition by Conlon Nancarrow! (Google him…it’s worth it! ).
Initially you will live with it because you need to get logs out. At some point you realize that you do not feel in control because you don’t understand the previous philosophy. Now is the time to take control back and do things your way! I have been in your shoes. I took over and found all kinds of things happening I didn’t like. My first idea was to start adding rules to counter what was happening. This was a disaster. When I travel the country meeting MusicMaster users or take a support call I often recommend looking at the rules and finding the ones that have to do with your pains and just removing them! That’s right. Instead of adding rules, get rid of some rules. If you’re feeling really bold, just nuke the whole Rule Tree and start over.
You have your programming philosophy, the sound in your head of what the radio station should sound like. How are you going to get that with rules that someone else set up that make no sense to you? This is something you can do on your own or with the assist of your Music Scheduling Consultant. Here are some things to consider when you do this:
Make a backup of your data or even better, clone your data so you can play around in the clone and test your philosophy. If you want to do this work in the clone, schedule out several days. That way if you like the rule changes, you can simply continue working in that copy as the new “live” version of your data.
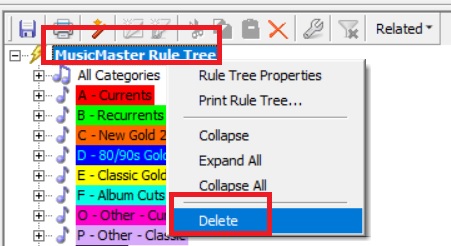
In the Rule Tree, right click on MusicMaster Rule Tree and click Delete.
Run the Rule Wizard to get an idea of some of the basic rules to set up like minimum rest, hour rotation and keyword separation rules.
Think about your Attribute rules and come from the position of the things you don’t want to happen. It might sound counter-intuitive but give it a try. Here’s an example: Let’s say you have a 60-40 mix of male to female artists in your active library. If put no rules on your Gender, you might end up with more males in a row than you’d like. The question to ask yourself is, “How many is too many?” The answer to that question then becomes your rule—Max in Sequence four for Gender=M.
If you pick just a few core items when you start, this has the added benefit of making it very clear which rules might be causing a problem as you run test schedules.
Whether you want to give this a go yourself or would like a helping hand, feel free to reach out to your Music Scheduling Consultant. We can help you through the entire process.
Speed Up or Slow Down A Song with Rotation Weight posté par Jesus Rodriguez le November 2nd, 2020
Speed Up or Slow Down A Song with Rotation Weight
By Jesus Rodriguez
Clients often ask if there is a way to speed up a song in a category so that the song does not have to wait for the entire cycle to come back on the air. This is something that many would want to do on deeper categories where they may have some core artist or major hits. When you are dealing with a big category that can take days, weeks, maybe months to rotate there are might be a handful of songs that your station simply can not go without for your P1’s. While there are different ways to make songs spin quicker like creating an additional smaller category with only those key tracks or using packets among other things, we will talk about Rotation Weight. Rotation Weight allows you to control how quickly a song will come back to the front of the stack or even slow it down, so it must wait longer. For example, maybe you want a song to only move back to the half of the stack rather than moving to the back after it airs allowing it to come up on for consideration much quicker. First go to Dataset, Schedule, and then Schedule Order to click on the Category Order Management tab.
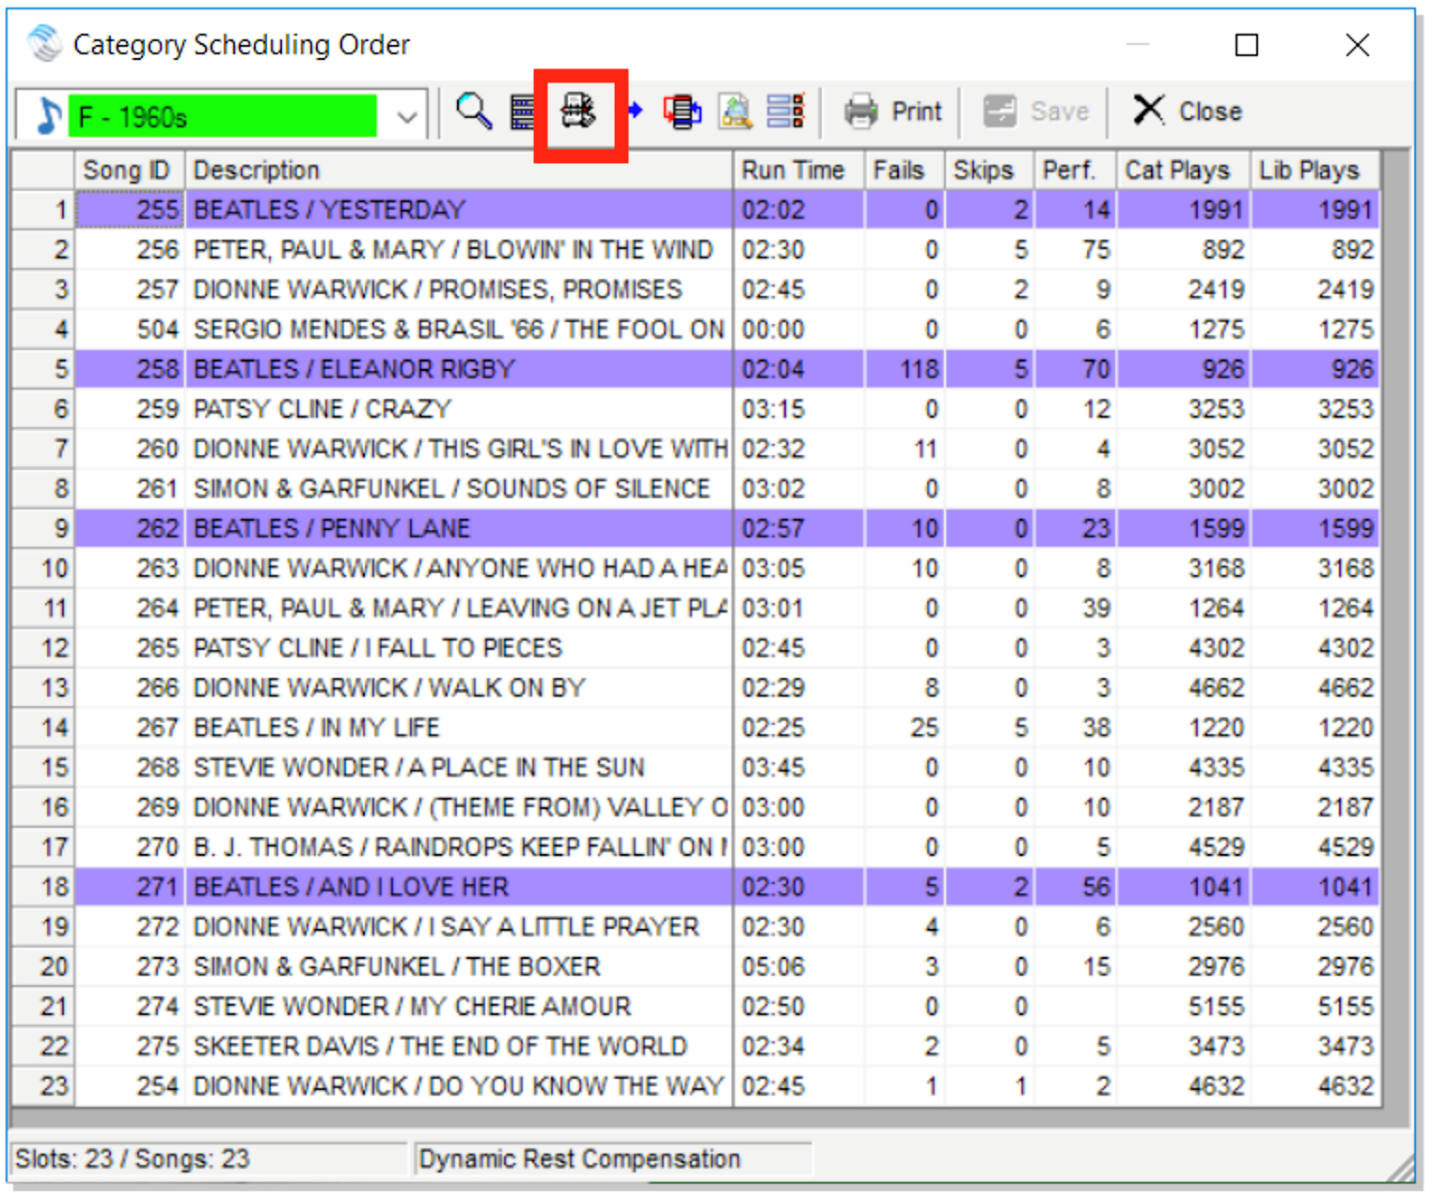
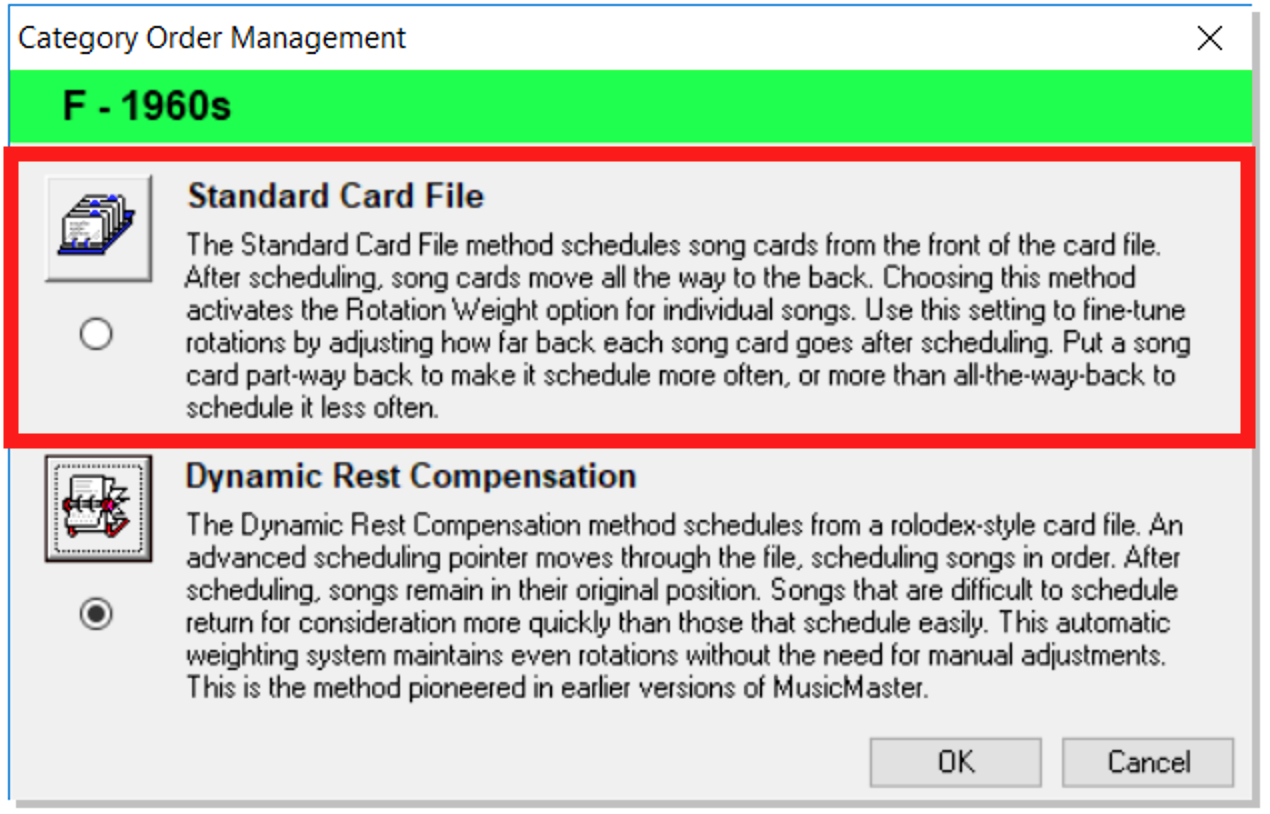
As shown below you most likely have it set to Dynamic Rest Compensation and will want to change that to Standard Card File.
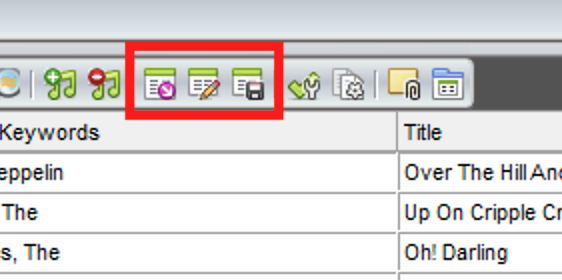
You can now press OK and begin to work your way back out of those windows. Next, open your library, any category would be fine. We want to adjust your library layout to include the Rotation Weight field using the center tab in the red box shown below. Do not forget to save your layout using the third tab in that same red box after we add the additional field.
Add Rotation Weight from the list on the left box to the center box to include it in your layout then press OK.
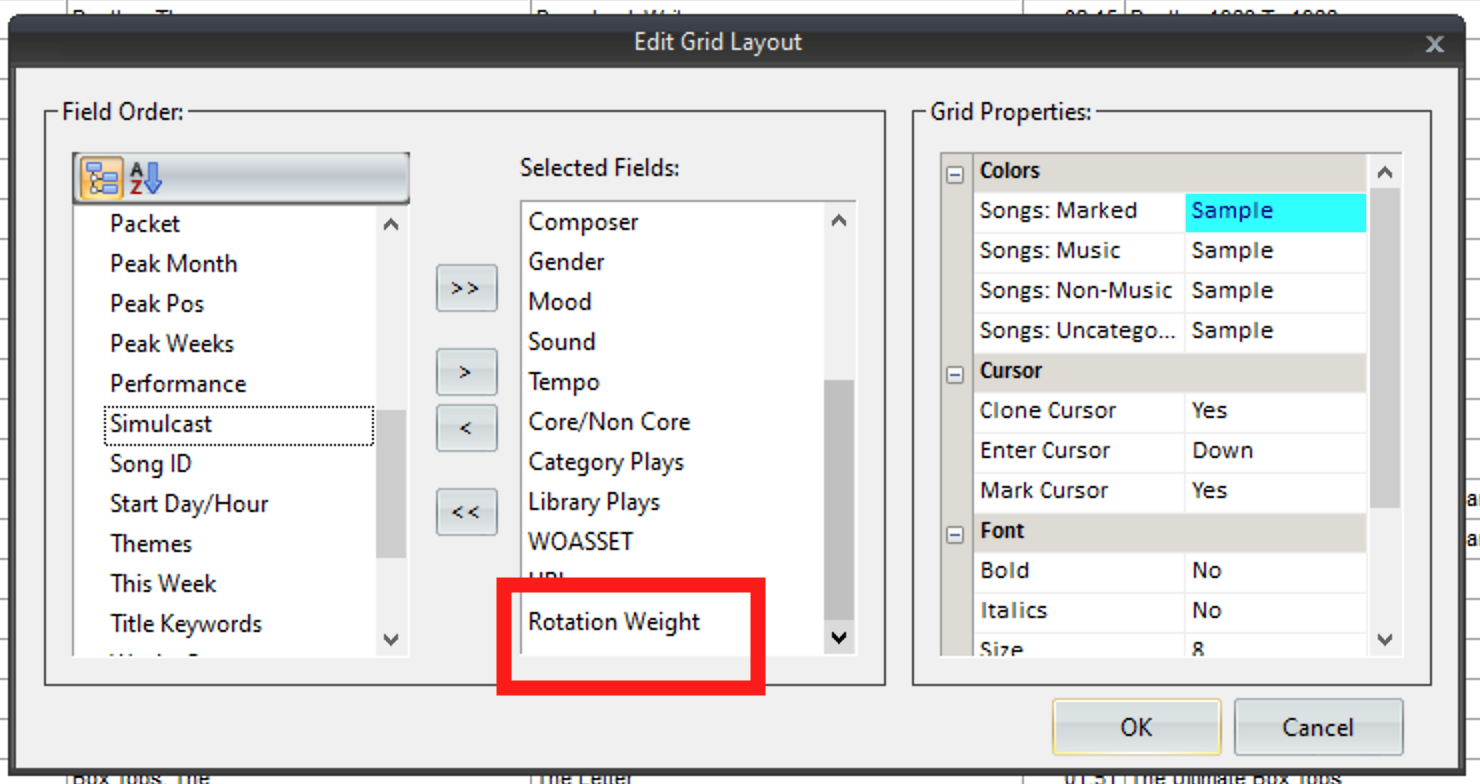
Rotation Weight will now be part of your layout. Remember do not forget to save your new layout!

You can now put any number you wish to speed up or slow down a song. The number you select represents a percentage but the percentage sign % is not needed in the field it will know that automatically. Let’s look at the above examples in the Rotation weight column. You will see that some songs have a 50, 25, and a 10. I am telling MusicMaster that I want these songs to only go back that far in the stack after they air rather than to the back. Led Zeppelin, for example, will air and only have to go back 50% of the stack or halfway back allowing it to come up for consideration much quicker; half the time than it would if it was to go to the back of the stack like most rotations.
What about the songs with higher numbers like 200, 300, and 400? These songs must wait longer before coming up for consideration. The Beetles “A Hard Day’s Night” is set to 300. Remember that means 300% so this song must wait for three full category rotations before being considered causing it to slow down.
Those songs where the field is left blank will continue to rotate as they always have at 100% meaning they will play and go to the back of the stack so there is no need to put a number on those if you plan to let them continue like normal.
Whether it is to increase the spins of your favorite versions of your Christmas songs, slowing down those not so favorites or lower research testing songs this is a great tool!
As always, contact your Music Scheduling Consultant if you have any questions.
Daylight Saving Time posté par W.I.Z.A.R.D. le October 29th, 2020
MusicMaster for Windows was designed to inherit Daylight Saving Time settings directly from Microsoft Windows. You can check your system in a couple of places:
The Schedule Calendar in PRO 7 has an icon for a clock with a back arrow on November 1 this year. You can also go to Help, System Information in any version and it will also tell you the Sunday when this will be done.
MusicMaster will automatically double the scheduled clock. A lognote will be put between the two hours to indicate the extra hour. You can set up a Format List specifically for this time if you’d like. That is done under Tools, Options, Additional Properties in the Schedule section. Look for the DSTFormatList option where you’ll specify the list you want used.
Keep in mind that MusicMaster can generate this 25-hour log and has always handled Daylight Saving Time this way, so rest assured that most automation systems can handle this. Please feel free to check with your automation vendor to be sure.
Feel free to contact your Music Scheduling Consultant if you have any questions.
An Idea for Scheduling Imaging posté par Paul Ziino le October 19th, 2020
An Idea for Scheduling Imaging
By Paul Ziino
I just spoke with a customer who wanted to run promos/imagers on his rock station that list band names and snippets of their songs, but he wants to keep those items from playing too close to any song by the mentioned bands.
He’d been puzzling over how to do this with a special set, but those clock elements are based on matches. He wants to only schedule songs that do NOT match the imager’s mentioned bands.
He thought about using coding, but he couldn’t quite come up with a way to say “make sure this band’s song doesn’t play next to that band’s imaging.”
What was the solution? Artist Keyword Time Separation!
That’s right. I told Mr. Customer all he needs to do is add the Artist Keyword Time Separation rule directly into that imaging category. Set it at eight minutes and check the box to ignore individual keyword settings. This way, no matter the artist keyword, the imager must stay away from any song scheduled by that artist by at least eight minutes.
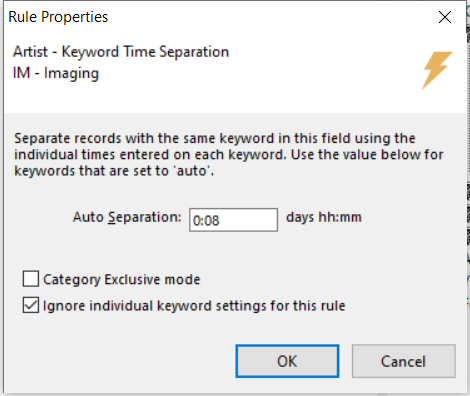
He was quite pleased with how simple this was and how quickly he could set this up. All he needs to do is add the appropriate artist keywords to the imagers that list those artists and he’s done!
When you have a MusicMaster question and can’t come up with a solution, call your MusicMaster Scheduling Consultant. We are here to help!