
MusicMaster Blog
Speed Up or Slow Down A Song with Rotation Weight posted on November 2nd, 2020
Speed Up or Slow Down A Song with Rotation Weight
By Jesus Rodriguez
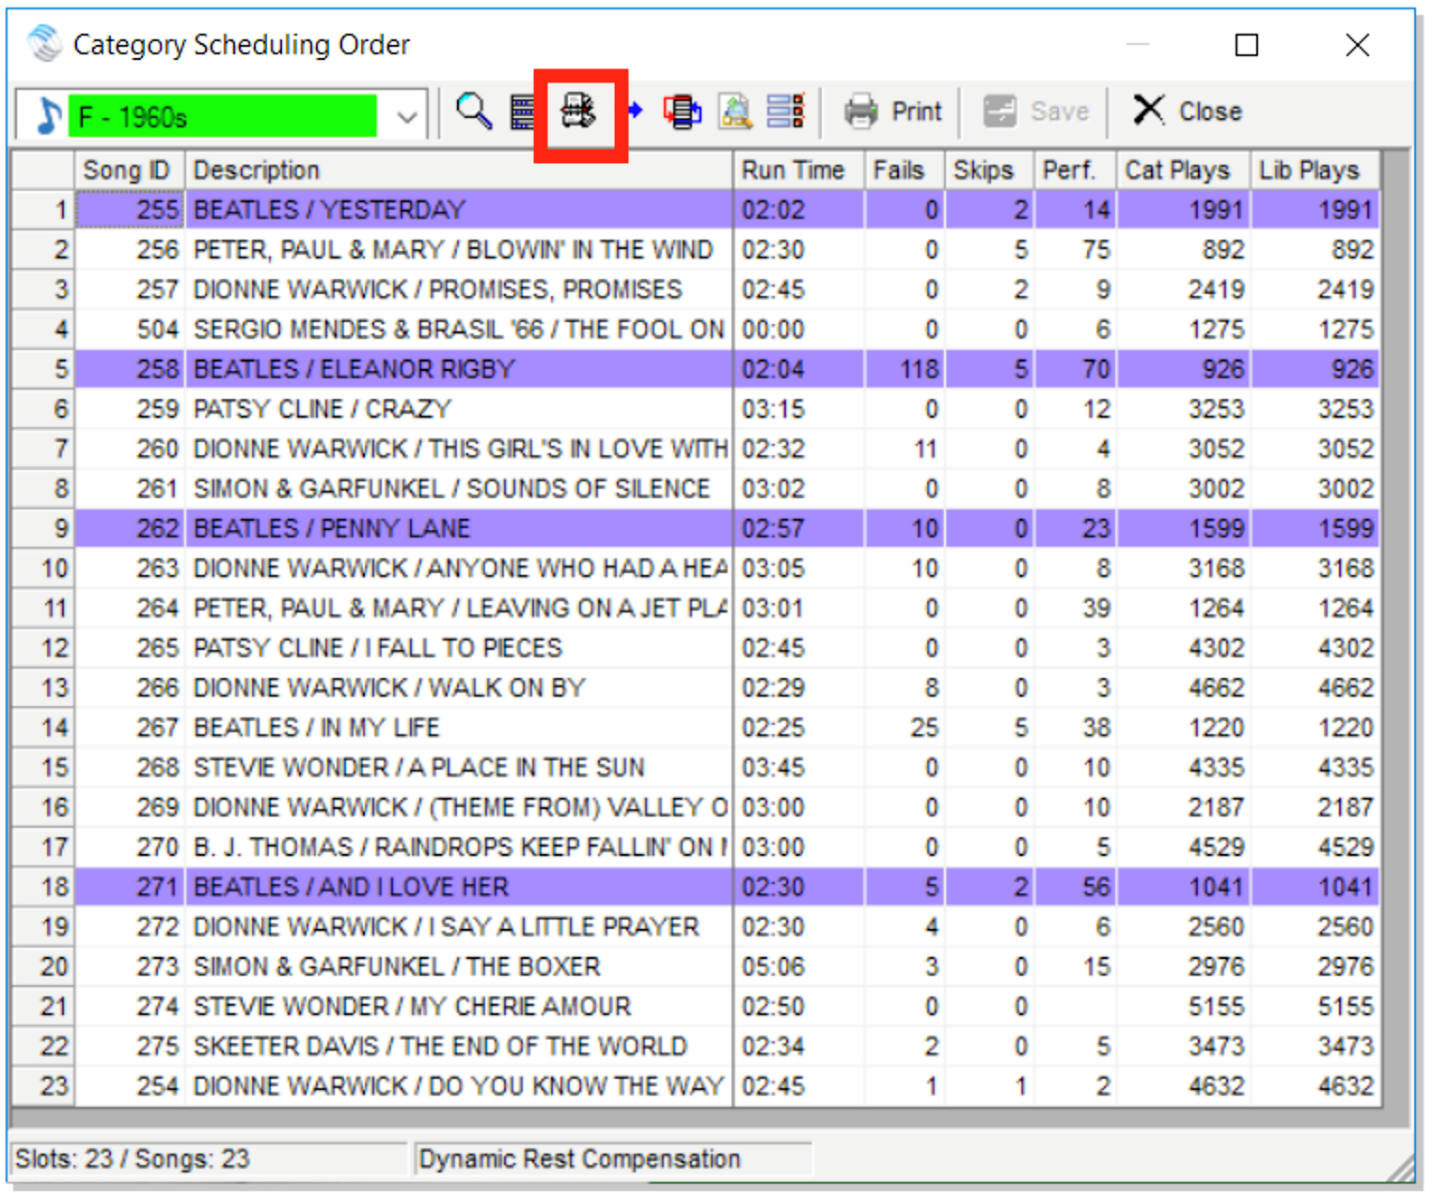
Clients often ask if there is a way to speed up a song in a category so that the song does not have to wait for the entire cycle to come back on the air. This is something that many would want to do on deeper categories where they may have some core artist or major hits. When you are dealing with a big category that can take days, weeks, maybe months to rotate there are might be a handful of songs that your station simply can not go without for your P1’s. While there are different ways to make songs spin quicker like creating an additional smaller category with only those key tracks or using packets among other things, we will talk about Rotation Weight. Rotation Weight allows you to control how quickly a song will come back to the front of the stack or even slow it down, so it must wait longer. For example, maybe you want a song to only move back to the half of the stack rather than moving to the back after it airs allowing it to come up on for consideration much quicker. First go to Dataset, Schedule, and then Schedule Order to click on the Category Order Management tab.
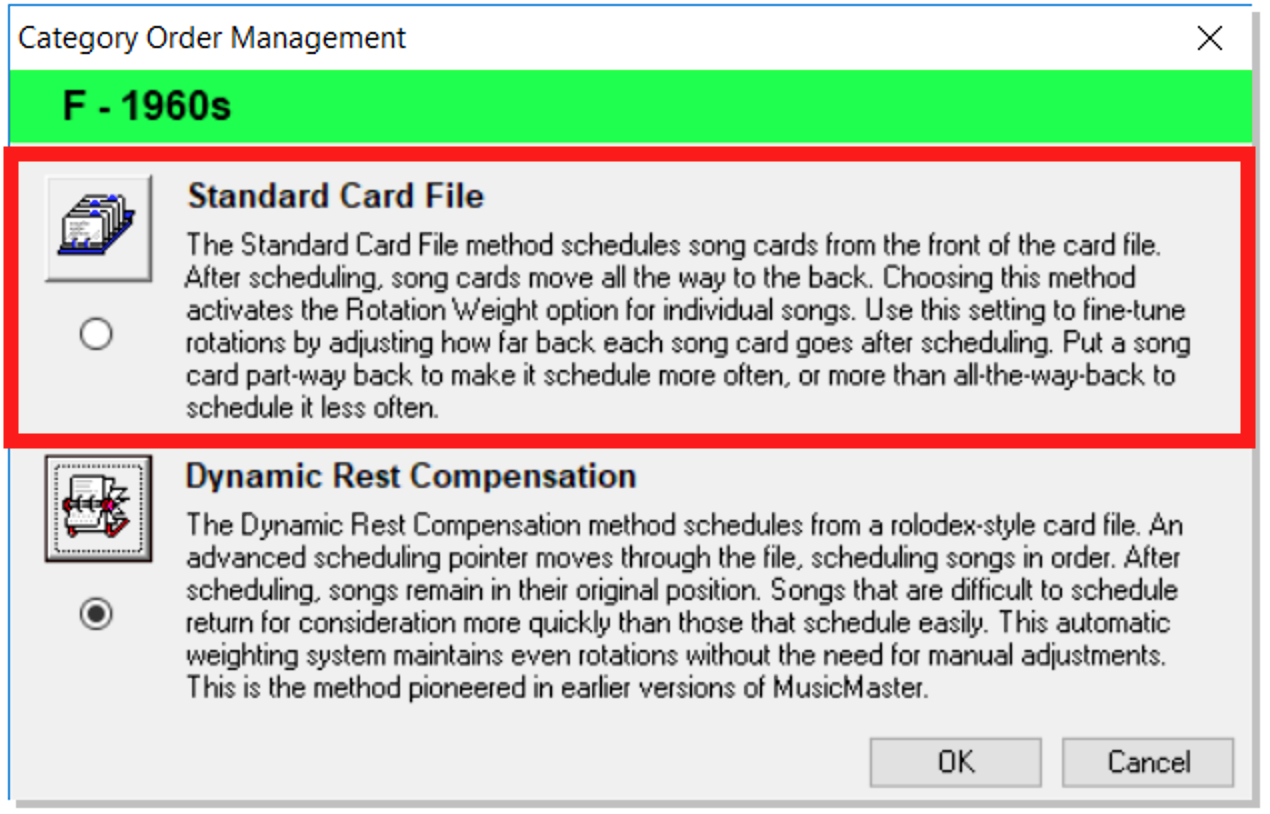
As shown below you most likely have it set to Dynamic Rest Compensation and will want to change that to Standard Card File.
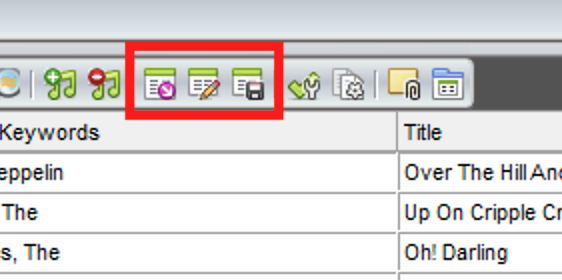
You can now press OK and begin to work your way back out of those windows. Next, open your library, any category would be fine. We want to adjust your library layout to include the Rotation Weight field using the center tab in the red box shown below. Do not forget to save your layout using the third tab in that same red box after we add the additional field.
Add Rotation Weight from the list on the left box to the center box to include it in your layout then press OK.
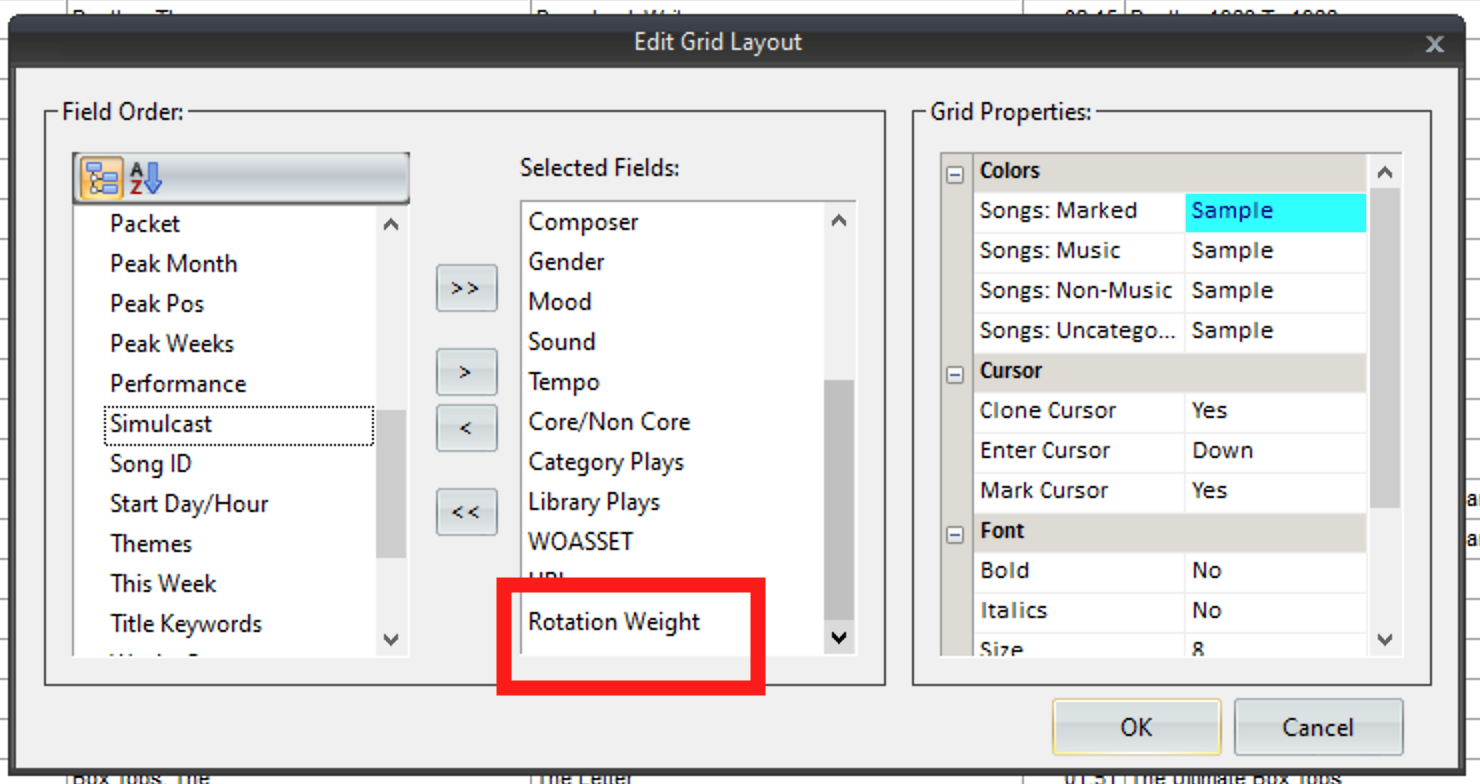
Rotation Weight will now be part of your layout. Remember do not forget to save your new layout!

You can now put any number you wish to speed up or slow down a song. The number you select represents a percentage but the percentage sign % is not needed in the field it will know that automatically. Let’s look at the above examples in the Rotation weight column. You will see that some songs have a 50, 25, and a 10. I am telling MusicMaster that I want these songs to only go back that far in the stack after they air rather than to the back. Led Zeppelin, for example, will air and only have to go back 50% of the stack or halfway back allowing it to come up for consideration much quicker; half the time than it would if it was to go to the back of the stack like most rotations.
What about the songs with higher numbers like 200, 300, and 400? These songs must wait longer before coming up for consideration. The Beetles “A Hard Day’s Night” is set to 300. Remember that means 300% so this song must wait for three full category rotations before being considered causing it to slow down.
Those songs where the field is left blank will continue to rotate as they always have at 100% meaning they will play and go to the back of the stack so there is no need to put a number on those if you plan to let them continue like normal.
Whether it is to increase the spins of your favorite versions of your Christmas songs, slowing down those not so favorites or lower research testing songs this is a great tool!
As always, contact your Music Scheduling Consultant if you have any questions.
Daylight Saving Time posted on October 29th, 2020
MusicMaster for Windows was designed to inherit Daylight Saving Time settings directly from Microsoft Windows. You can check your system in a couple of places:
The Schedule Calendar in PRO 7 has an icon for a clock with a back arrow on November 1 this year. You can also go to Help, System Information in any version and it will also tell you the Sunday when this will be done.
MusicMaster will automatically double the scheduled clock. A lognote will be put between the two hours to indicate the extra hour. You can set up a Format List specifically for this time if you’d like. That is done under Tools, Options, Additional Properties in the Schedule section. Look for the DSTFormatList option where you’ll specify the list you want used.
Keep in mind that MusicMaster can generate this 25-hour log and has always handled Daylight Saving Time this way, so rest assured that most automation systems can handle this. Please feel free to check with your automation vendor to be sure.
Feel free to contact your Music Scheduling Consultant if you have any questions.
An Idea for Scheduling Imaging posted on October 19th, 2020
An Idea for Scheduling Imaging
By Paul Ziino
I just spoke with a customer who wanted to run promos/imagers on his rock station that list band names and snippets of their songs, but he wants to keep those items from playing too close to any song by the mentioned bands.
He’d been puzzling over how to do this with a special set, but those clock elements are based on matches. He wants to only schedule songs that do NOT match the imager’s mentioned bands.
He thought about using coding, but he couldn’t quite come up with a way to say “make sure this band’s song doesn’t play next to that band’s imaging.”
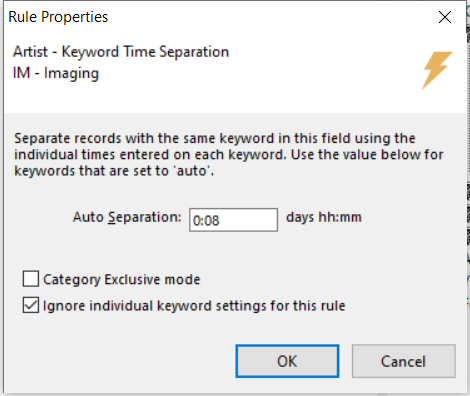
What was the solution? Artist Keyword Time Separation!
That’s right. I told Mr. Customer all he needs to do is add the Artist Keyword Time Separation rule directly into that imaging category. Set it at eight minutes and check the box to ignore individual keyword settings. This way, no matter the artist keyword, the imager must stay away from any song scheduled by that artist by at least eight minutes.
He was quite pleased with how simple this was and how quickly he could set this up. All he needs to do is add the appropriate artist keywords to the imagers that list those artists and he’s done!
When you have a MusicMaster question and can’t come up with a solution, call your MusicMaster Scheduling Consultant. We are here to help!
MusicMaster Makeover posted on October 5th, 2020
MusicMaster Makeover
By Chris Malone
Commonly, you find answers to your deepest, most scientific questions through our MusicMaster blogs and videos, but in a business full of creative souls sometimes we need to express our artistic side or at the very least put a fresh coat of paint on our database. There are a few ways you can makeover the look and feel of your MusicMaster. If you aren’t aware here are four quick and easy styling options:
Category Color Wizard:
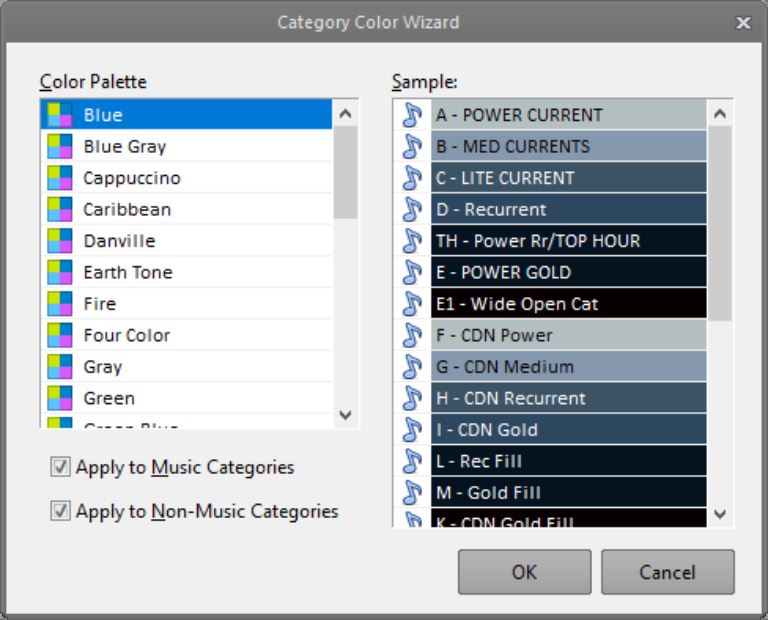
It’s not uncommon to see a library with a multitude of categories. Colorizing those categories helps in the identification of the category across several areas over MusicMaster (including, but not limited to Clocks and Schedule Editor). You can choose from a pre-made palette of category color scheme by going to Dataset, Library, Categories. You can adjust colors by clicking on the ‘Colors’ tab and this box will appear. You can choose from any color template and apply it to music categories only, non-music categories, or both. In this example, I have the Color Palette set to blue and I can see a sample list of how my music and non-music categories will look.
2. Dataset Identification:

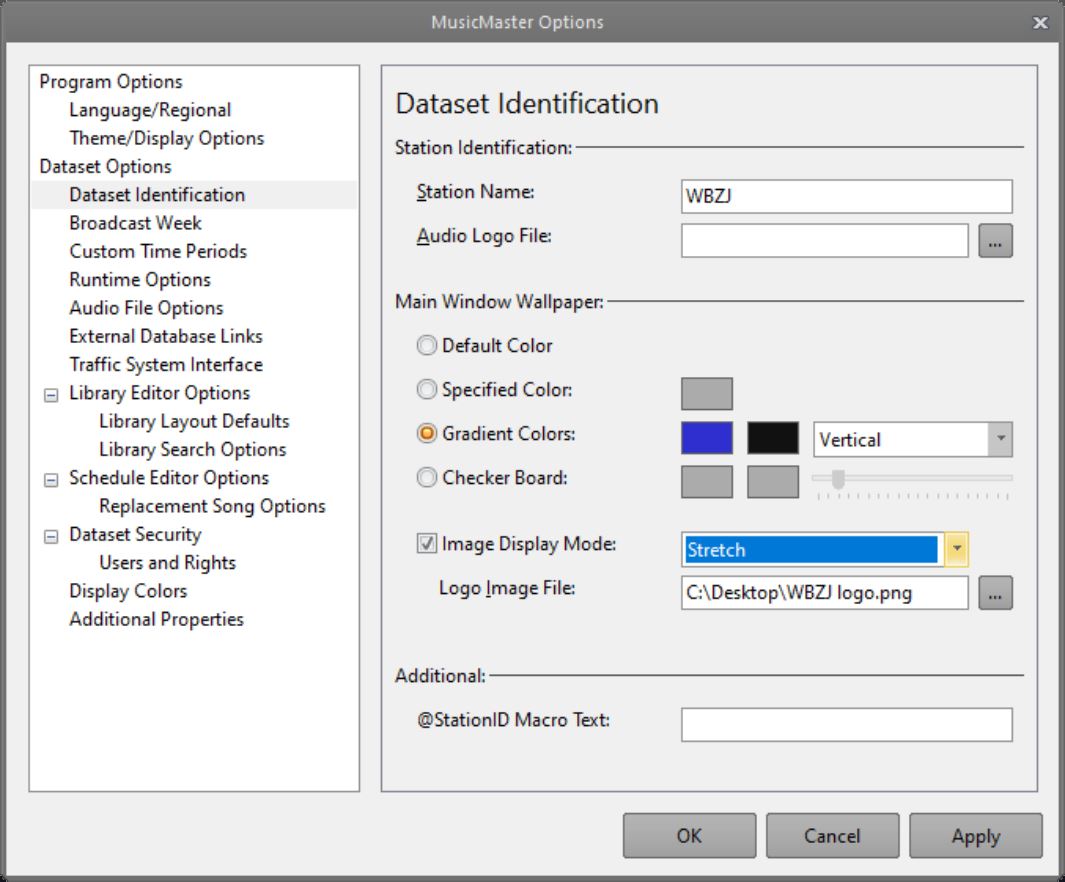
You may wonder how some stations get their logo in the background when you first open MusicMaster. It’s easy to setup this under Tools, Options, Dataset Identification. You can assign gradient colors as your wallpaper, your station’s logo, or a combination of both. To display your station logo as wallpaper, you’ll need to indicate the path of the logo file and press Apply. Here’s how it’s setup:
3. Theme/Display Options:
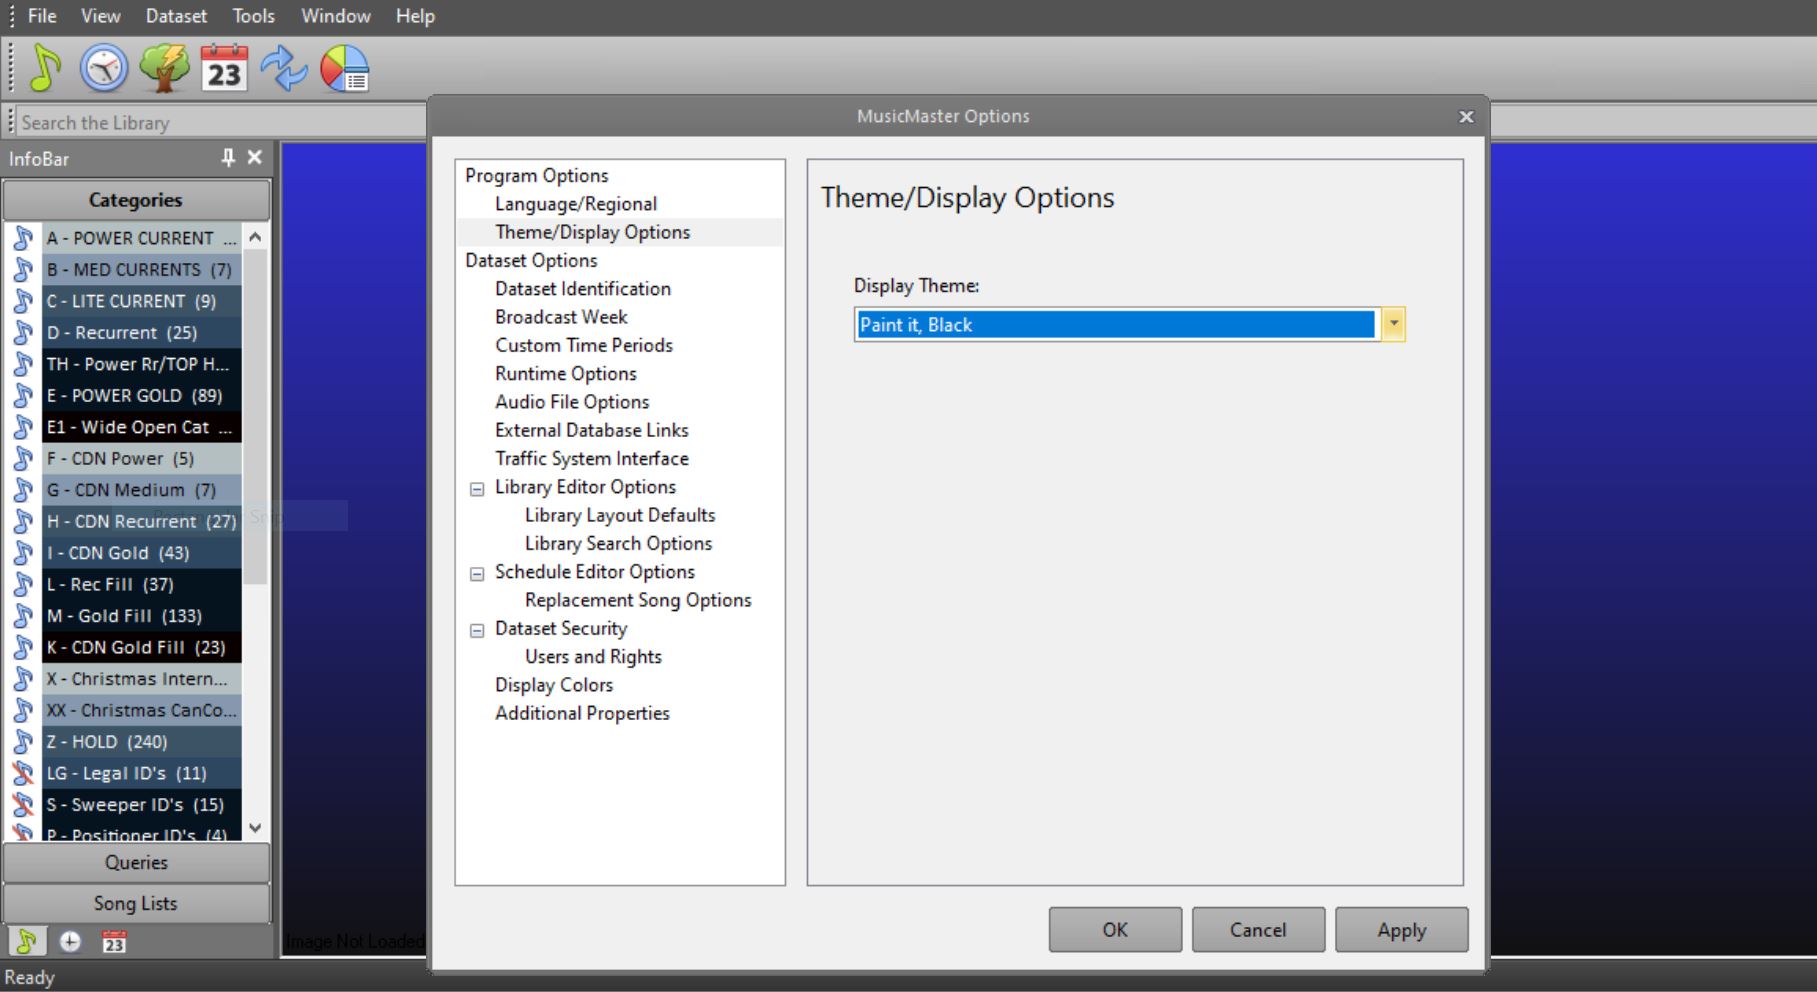
You can apply an overall color theme to MusicMaster, which will instantly give you a fresh new feeling every time you open your database compared to the standard Windows OS colors. To select and view our theme templates, simply go to Tools, Options, and Theme/Display Options. The theme applied to this example, is called “Back In Black”, which looks so cool and sleek.
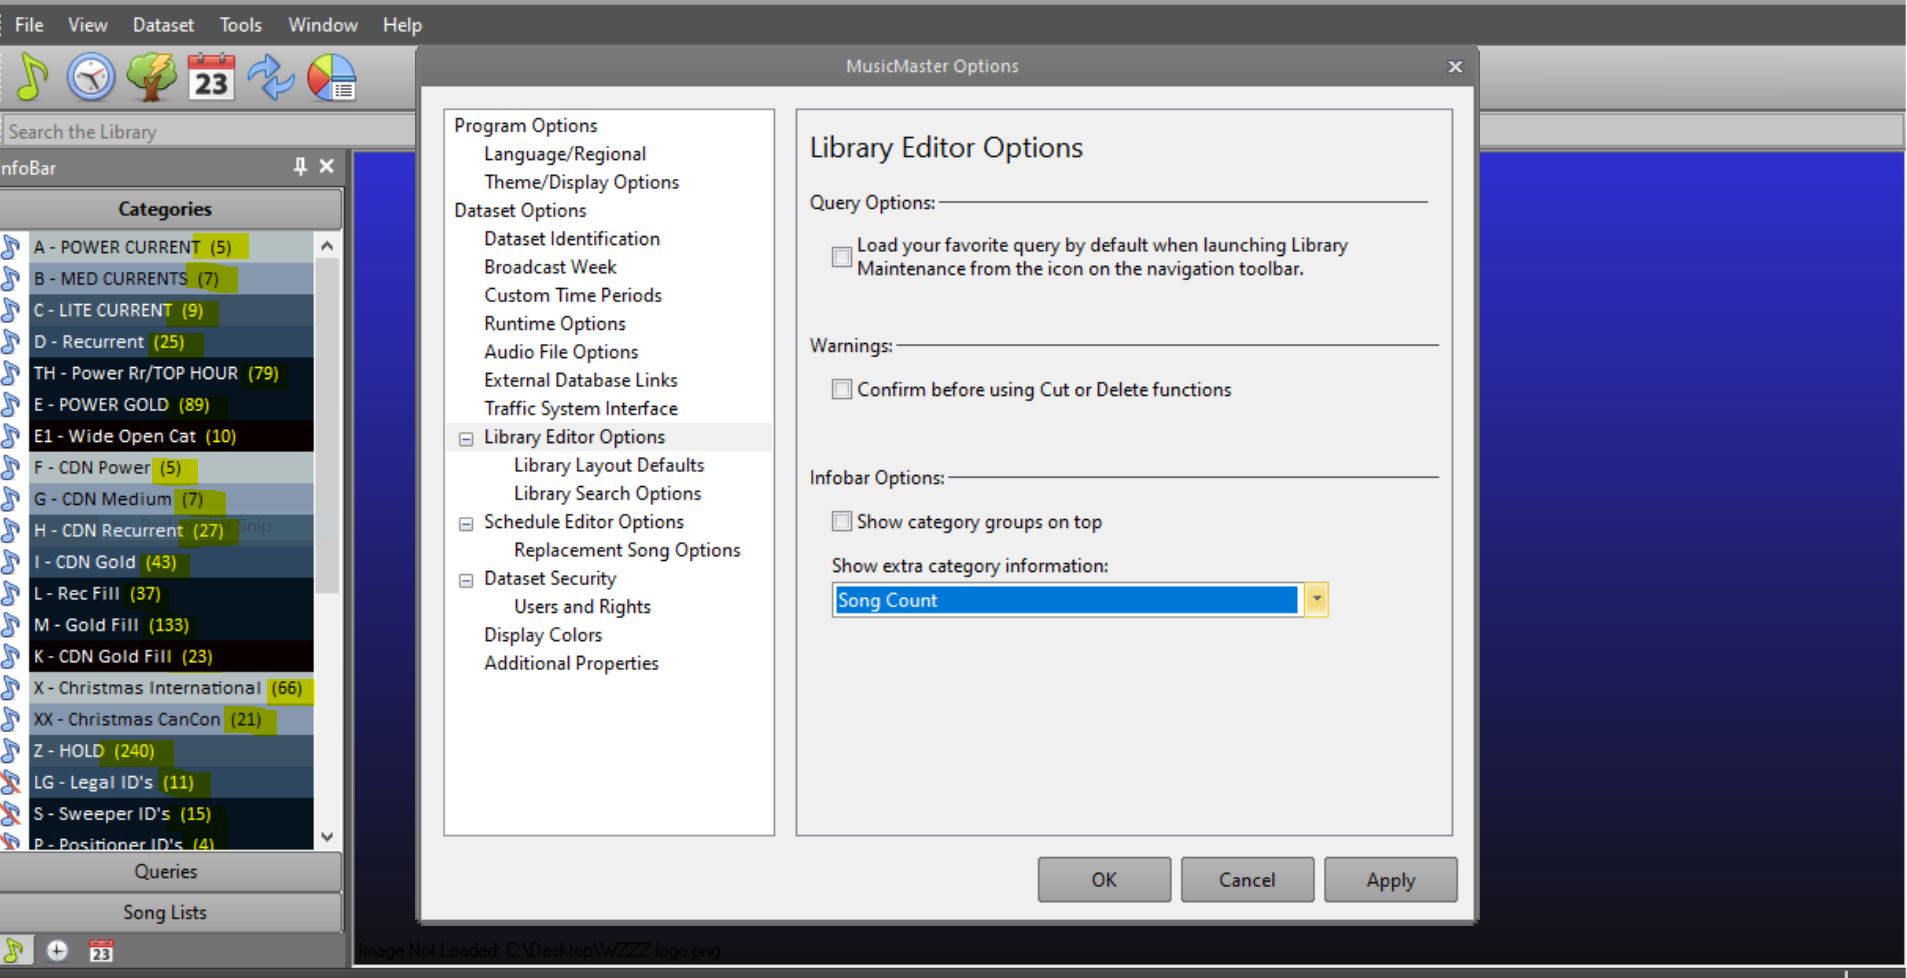
4. Category slot/song count
Often we’ll get a station client with song count problems inside a category. Some Program Directors know for a fact they should be at five songs in Power Current, seven songs in Medium Currents, etc. in order to achieve the perfect rotations they desire. There’s an easy way to include category song count or slot count in your InfoBar to eliminate the need to guess or physically open the category. To turn on this function go to Tool, Options, Library Editor Options. From there you will see InfoBar Options where you can select Song or Slot Count from the drop down menu.
Have some fun giving yourself a MusicMaster makeover, you’ll be instantly impressed! If you need any help, feel free to reach out to your MusicMaster Music Scheduling Consultant.
Hour Position Kick posted on September 21st, 2020
Hour Position Kick
By Marianne Burkett
If you are a longtime user of MusicMaster Pro, you know we constantly make changes, adjustments and additions to the software. With version 7.0.10, there are two new rules available, by request!
- Hour Rotation Position Kick
- Keyword Rotation Position Kick
Let’s look at Hour Rotation Position Kick.
Open the Rule Tree and find this new rule inside the Song/History Rules/Hour Rotation Rules folder.
In the clocks, you might have a category in multiple locations within each hour. This type of category is a perfect candidate for the rule. I would not recommend placing the rule in the “All Categories” area as all your categories likely rotate differently.
When you pull the Hour Rotation Position Kick rule into a category, the Rule Properties box will open where you can set up your custom options:
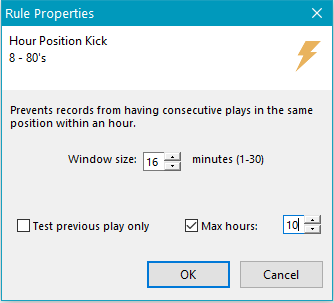
The first option is “Window size”. I put 16 minutes in the box, which would stop the title from playing eight minutes either side of that the next time it plays within the “Max Hours” of 10.
In a nutshell the rule essentially will stop a song from playing in the same spot within any hour for the number of hours specified in the “Max Hours” window.
Also, if you don’t want to test plays ahead in time from the current play, do not check the “Test Previous Plays only” Button.
The second new rule, Keyword Hour Rotation Position Kick, can be found in Available Rule Types in the Keyword Field Rules folder.
Be careful with this rule, especially if you have a great number of the same artists in a category. I have set this up in a Power category that plays multiple times an hour.
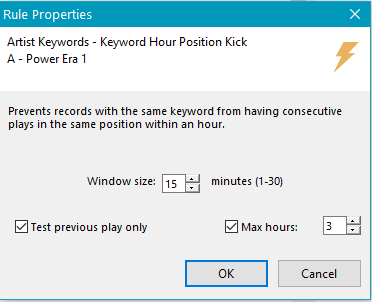
This rule will keep the same Keyword from playing in the same window of time within the Max Hours limit. Remember, the Window size in this example would be 7.5 minutes either side and would span a three-hour window.
Other rules you might consider along with Hour Position Kick or Keyword Hour Position Kick would be Optimum Quarter hour Exposure and Optimum Keyword Quarter Hour Exposure.
If you have questions about these, or any other rules, please contact MusicMaster Support.
Demystifying Special History Reports posted on September 7th, 2020
Demystifying Special History Reports
by Brian Wheeler
If you’ve been in the broadcast business for any appreciable amount of time, you’ve heard horror stories of having to log entire weeks of aired songs by hand for ASCAP or BMI, or perhaps CRTC in Canada. You may have even had to do this yourself back in the day.
Fortunately, things have gotten a lot easier since those days of writing out ‘as-played’ logs. Still, whenever we get that notification that your reporting week is coming up, a moment of panic can set in. You simply don’t run this report frequently enough to realize just how easy it can be. It’s time to demystify the Special History Report.
Did you know we provide over 70 different reports that are used to provide as-played logs to governing bodies all over the world? MusicMaster takes great pride in providing the latest and best reports in order to give the governing bodies exactly what they’re looking for when you submit your report.
To access the many history reports we have available, select Library, Analysis, Special History Reports. You can select the report type you wish to create from the drop menu at the top of the page. For demonstration, I’m going to select the BMI/ASCAP report.
There’s a good chance your station already has the report options set up for you, but it’s wise to check to be sure. Click on the Options tab, then confirm that your specific station’s information is correctly filled out. Enter in your station name, the type of station, your company name and any other pertinent information you’re able to provide. Account number information is helpful but not critical, as your call letters and company name will often suffice.
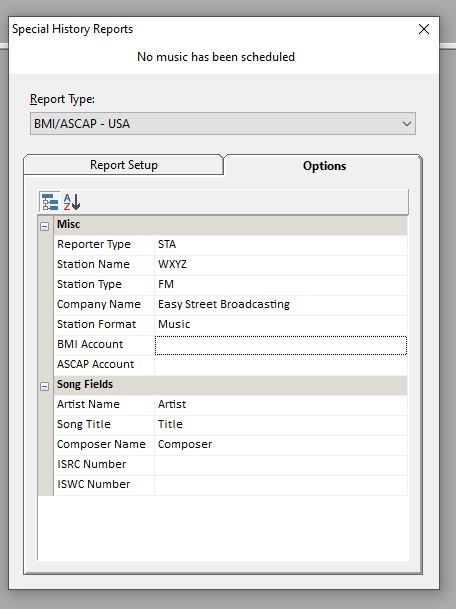
Also, make sure that you’ve indicated where you store the essential information in the song fields portion of this Options tab. It may seem fairly obvious that you keep your artist name in the artist field, but nothing is assumed here. Simply click on the drop menu options next to each field and indicate the field in which MusicMaster can find the information. Then you can return to the Report Setup tab.

From here, you can select the date range you wish to use to generate your report. Select the dates and make sure that you’re including all available hours as well as all categories. Don’t worry that you may be including categories you didn’t use (Christmas in May, anyone?) as the reports will only include the music you scheduled for that time period.
At this point you may say, “what about the fact that I over schedule my music? Shouldn’t this report be about what I ACTUALLY played, not just what I scheduled?” I’d say you are right. That’s where our log reconciliation feature can help. We have a blog that discusses this feature if you don’t have reconciliation set up already http://musicmaster.com/?p=39, but you can also reach out to your MusicMaster MSC for assistance in setting it up for you.
Okay, so now your logs are reconciled. Your report is set up and ready to go. You click PRINT to print your report and this screen pops up.
Then you wonder: “is this right? Did I create the right file? What is this?” This is exactly what BMI/ASCAP is looking for. This file is in the requested naming and structure for BMI. There’s no need to edit the name or the file itself. Simply save it, then send it to the governing body who has requested it. You are all done!
Now, this example is just one of the dozens of reports we have available, but most if not all of the reports have a similar setup. As long as your histories are correct and your report designs have been set up properly, providing history reports are no longer the headaches they once were.
As always, if you have specific questions feel free to reach out to your MusicMaster MSC and we’d be happy to help further.
Alternate Categories posted on August 24th, 2020
Alternate Categories
by Paul Ziino
We’ve talked about using History Links in MusicMaster Pro to accomplish what is commonly referred to as “Alternate Categories” in music scheduling software (http://www.musicmaster.com/?p=557). As more and more companies look toward the future and make the switch to MusicMaster Client-Server (MMCS), I thought this would be a good time to demonstrate how easily this is done in MMCS.
To begin, MMCS is intended to be used by larger groups where the desire is to maintain one central library (Enterprise) that is shared with multiple scheduling databases (Stations). All the library is in Enterprise, and a box is checked to share the songs with the various stations.

In this image we have a list of songs and you can see that each can be assigned to any available station in the database. Here we see that two songs which are circled are actually shared to two different stations.
Now we go into a single station and open a category. Click on the Edit Helper Box in the Category field.
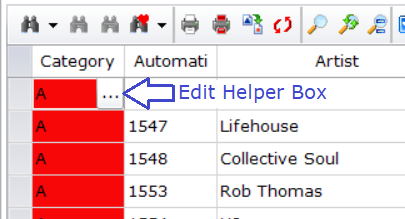
The list of available categories in the station appears. Here you can check any/all categories in which you want this song to reside. Note that when you do check additional categories, the Category field will display whichever category is listed first in the Info Bar.
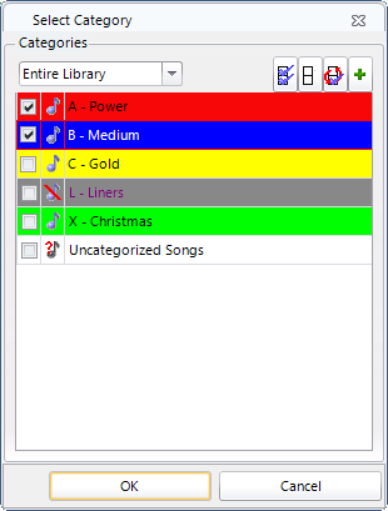
Now this song will rotate in both the A and B categories. Why do this? Maybe you want it to rotate in a faster turning category at night and in a slower turning category during the day (make sure to daypart them accordingly). Maybe it rotates in regular rotation during the week, but on weekends you feature a different category set and want that song to rotate in the weekend categories as well as the weekday categories.
There are lots of differences between MusicMaster Pro and MusicMaster Client-Server. If your organization would like to learn more about MMCS please contact your MusicMaster Scheduling Consultant. They’ll be happy to answer your questions!
MusicMaster with an Apple Product posted on August 10th, 2020
MusicMaster with an Apple Mac Product
By Jesus Rodriguez
I wrote this blog because of an increase in calls from users working remotely due to the Covid-19 pandemic. The users are either remoting into their machine at the station office or have MusicMaster installed on their device. Then there are the users whose personal preference at home or for their personal computer is an Apple Mac product.
While MusicMaster Scheduling is Windows-based software, you can use your Apple Mac machine with MusicMaster. Some have already begun using their personal Apple machine to remote in at the office. The most popular question has always been, “How can I get my F1-F12 keys to work for the shortcuts in MusicMaster if I am using my Mac to remote in?” If you’re a Mac user, you already know the F Function keys always are used to turn up and down your settings on the computer like your volume or the brightness of your screen. Let us get those F function keys to act “normal” so that you can move faster with the MusicMaster shortcuts.
First, go to your Mac machine settings by clicking its icon.

Next, go to the keyboard settings icon.
Now let’s make a change to how your F1-F12 function keys will work.
- If you have a newer model, you may want to change your Touch Bar settings to show the F1-F12 Keys.
- This screen is where the magic happens; select to use F1-F12 keys as standard keys, aka “normal” keys.
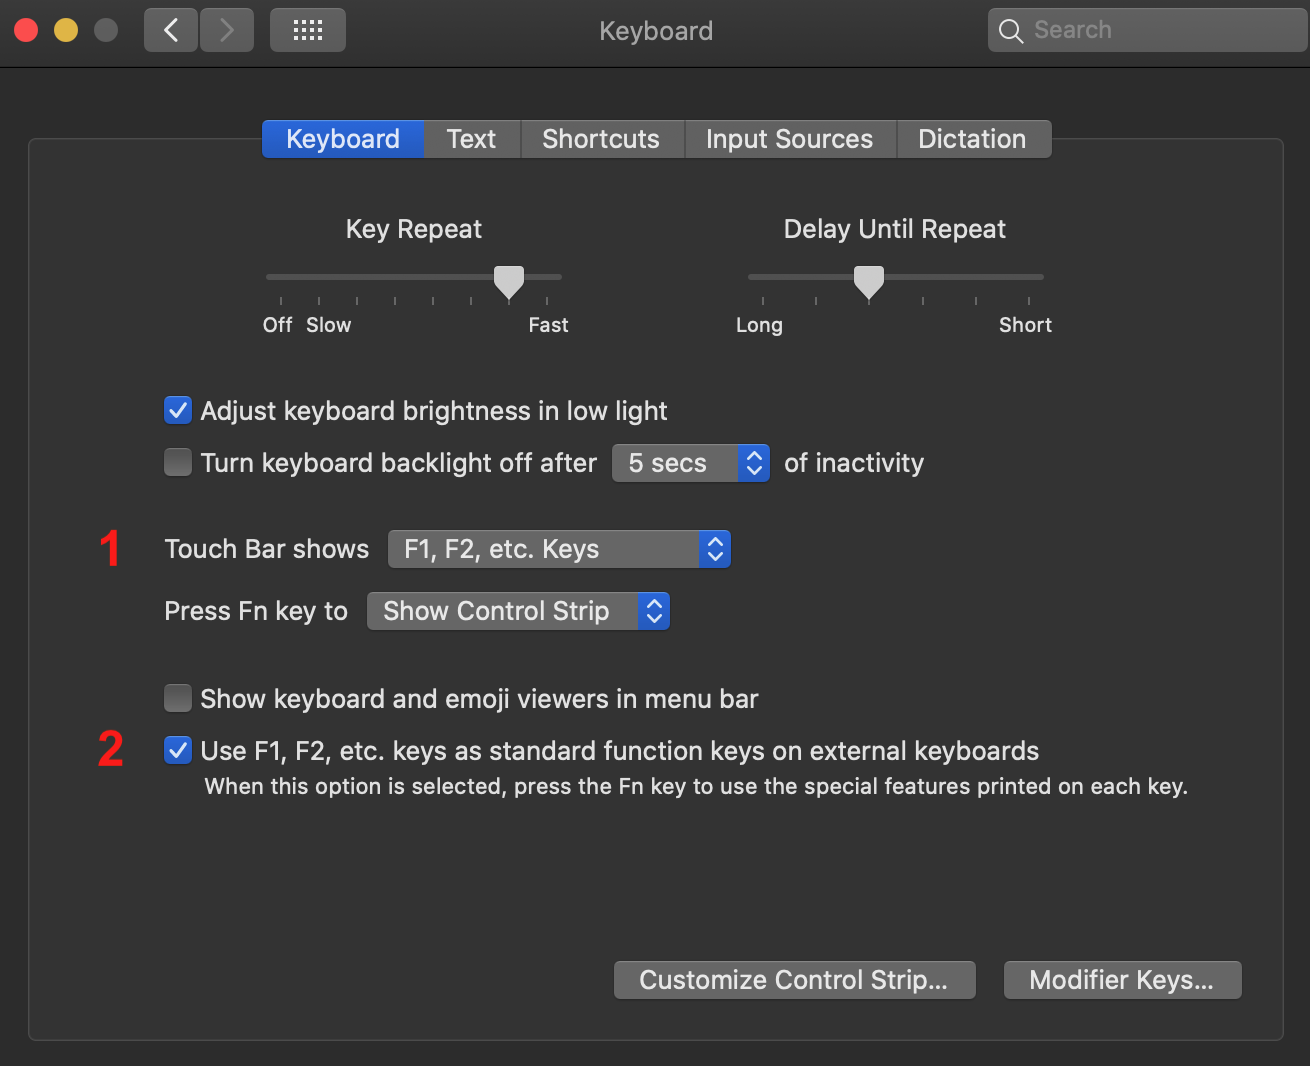
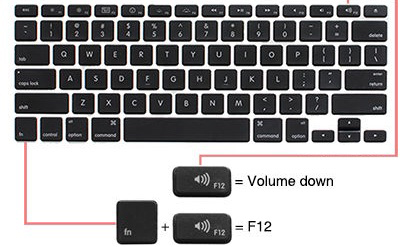
You can still use your Mac functions that were preassigned to your keyboard from Apple by pressing FN (Function Key) and any F1-F12 key at the same time to adjust things like your volume and brightness.
What if you prefer to work on your Mac and not remote into the office machine? The previous tips will also come in handy too. Now for the big question, how do we get MusicMaster on your Mac computer? First, you will need to install a virtual machine software on your Mac that will allow you to install Windows. Some of my personal favorites are listed below, but there are many options feel free to pick the one that best suits you.
Parallels
Fusion by VMWare
https://www.vmware.com/products/fusion.html
Once you have selected your Virtual Machine software, you will need a copy of Windows to install in it so that now you can have the best of both worlds: Windows, and Mac on one machine! Don’t tell Bill Gates I said this, but I think my Windows performs much better on a Mac than a PC.
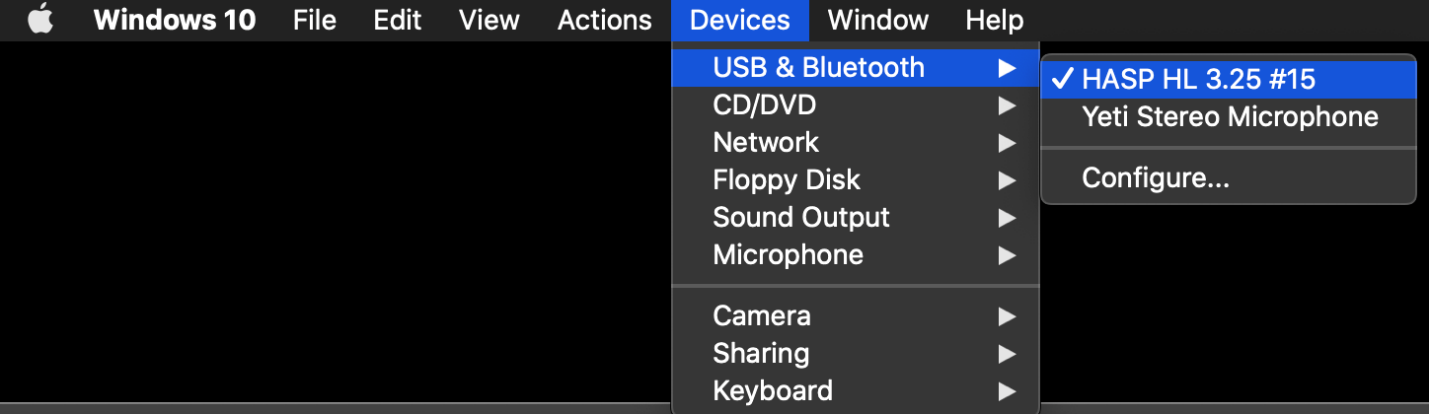
Now that you have Windows on your Mac, you can install your MusicMaster software and work from your Mac the same way you would form your office computer. Here’s a little disclaimer, you will need your USB Dongle if you plan to work from your Mac machine and not remote into the office computer. When you have a Virtual Setting for Windows on your Mac, you will select which device you want to use your USB dongle with either your Windows or your Mac. If it does not ask you, there is usually an option on the menu bar like mine shown below to assign it.
I hope that this blog brings you some flexibility to your life and makes MusicMaster even more enjoyable, no matter if you are a PC or Mac enthusiast!
Moving Songs posted on July 27th, 2020
Moving Songs
By Dave Tyler
As programmers we all have our own ways of doing things and having multiple ways to accomplish these things is a good ability to have in your toolbox. Today I want to briefly go over one of the most basic tasks you do day-to-day and week-to-week: moving songs. We move songs for many reasons. If you are a current based format, then you are moving songs through your Lights to Powers to Recurrents and Gold and even Hold categories over time. Other formats may be moving songs because they are adding to or cutting their lists, rearranging or consolidating.
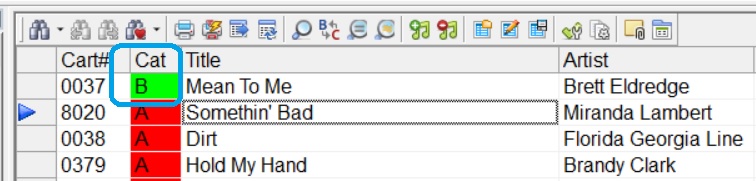
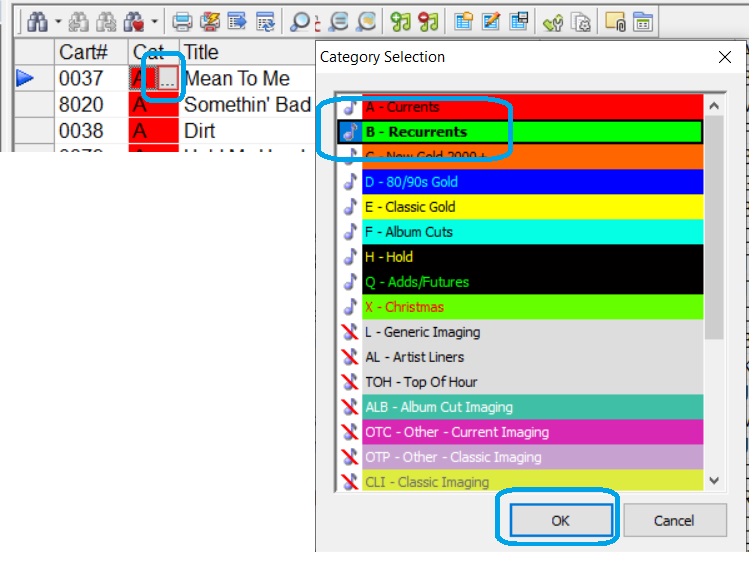
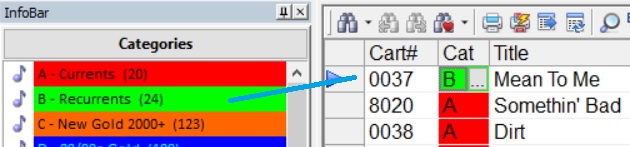
Let’s start by opening a category in Library Maintenance. In my example it is my Powers category. If I want to move Brett Eldredge to my Recurrent category I have three simple ways of doing from this window. In the picture below I am simply using Direct Entry and typing in a “B” into the category field and you can see below it has changed him to a “B” (green).
Another way to accomplish this would be to click on the category field and then click on the edit helper button (the three dot box) and choose the “B” Category then clicking OK.
Another way is to simply drag the song from the A category in Library Maintenance to the B category over in the Info Bar. You can also select multiple songs via SHIFT-CLICK or CTRL-CLICK and drag many songs at the same time if needed.
In addition to these three ways of moving a song into a new category MusicMaster has even more ways to accomplish moving songs and making larger scale changes. This would include the use of Auto-Platoon for rotating songs automatically in and out of categories on a regular basis. Category Quick Move can be used for making all of your category changes in one window. Search our blog for some great articles on both of those features and as always you are welcome to contact your MusicMaster Music Scheduling Consultant at any time for help.
Key Mapping Means Less Tapping posted on July 13th, 2020
Key Mapping Means Less Tapping
By Chris Malone
If you’re looking for keyboard shortcuts while using MusicMaster, then this is the article for you! Let me introduce you to Key Mapping. It’s a time saving feature available inside Library Maintenance and the Schedule Editor. You can establish up to 10 of your very own shortcut keys, that can be accessed by pressing the ALT key plus a corresponding number (available for numbers 0-9). In order to use these keys, you’ll need to setup Key Mapping.
In Library Maintenance, look for the Library drop down file menu. Then, select Key Mapping to begin assigning quick navigation keystrokes in Library Maintenance. Similarly, in the Schedule Editor, look for the Schedule drop down file menu and select Key Mapping. Here you see some of the options available when you use the Select option.
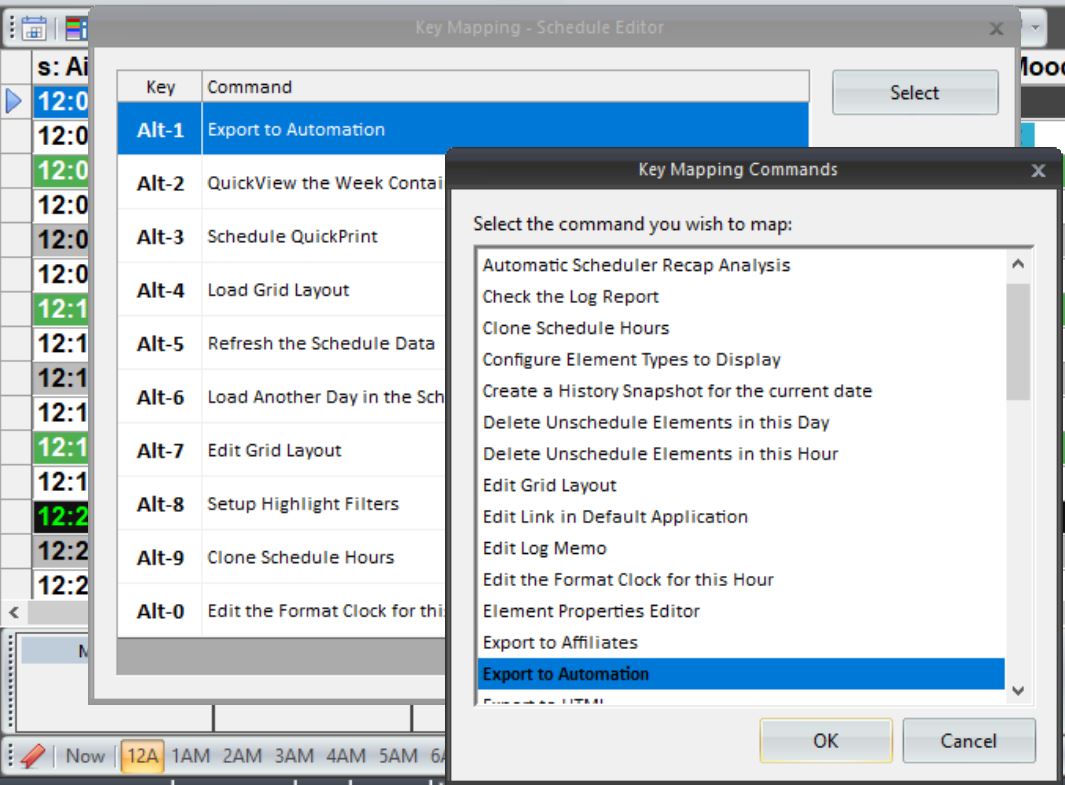
Here’s how I set my Schedule Editor Key Mapping:
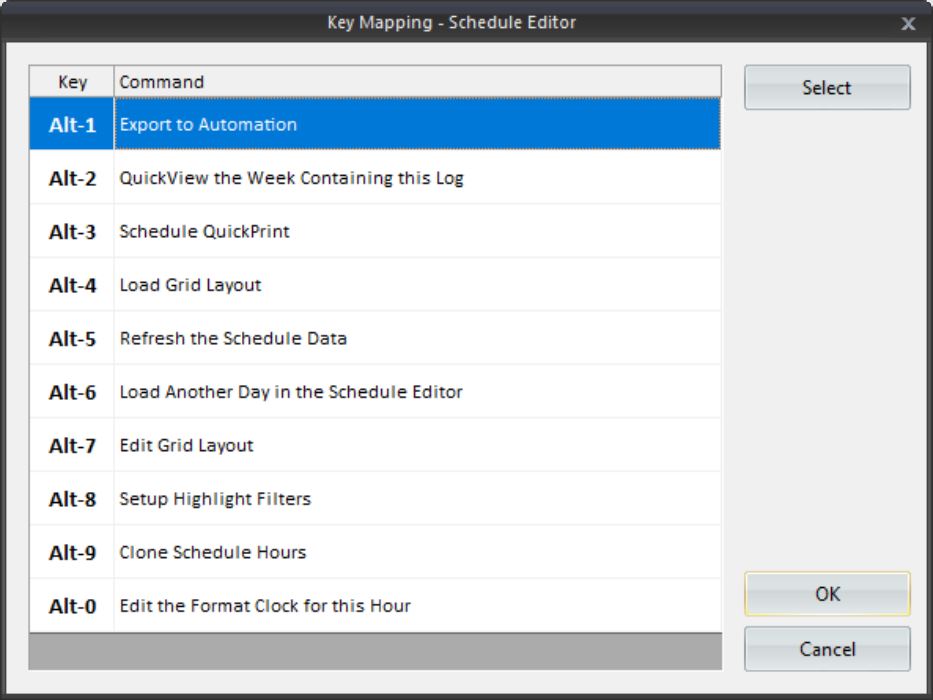
You can customize the shortcut actions any way you want based on the options available in the setup screen. When you are finished, press OK. Based on the example above, it will be a lot easier to send my log to automation. All I have to do is press ATL+1 without a single mouse click to get there. Each assignment has a different meaning to me. You should set up your own Key Mapping functions so they have meaning to you.
Feel free to contact your MusicMaster support representative for any assistance you may need.