MusicMaster Scheduling
Your viewing experience of the MusicMaster website, as well as the web as a whole, would be much improved if you upgraded your browser.

MusicMaster Blog

Schedule The Unscheduled Quickly posted on December 28th, 2015

By Jesus Rodriguez

I bet that at least once you have tuned in to your station and realized you missed an unscheduled position. For example you hear a sweeper into a sweeper or a song segue into a song where there should have been a sweeper.

There’s a way you can check you log to prevent that from happening. This past month I have been amazed at how many “wow” responses I have gotten when I pull up the feature that I am going to introduce to you today.

Typically when I get a call from a client asking about any unscheduled positions that concern them, they always begin to scroll down their log searching for an example. I always ask if I can take control of their machine and I go straight to the Schedule Quick View to see at one glance where the unscheduled positions occurred. This is where the “wow” factor kicks in when I click on the Schedule QuickView tab if they are already in the Schedule Editor.

Schedule The Unscheduled Quickly1

Another way to access the Schedule QuickView is by going to Dataset, Schedule, and select QuickView. Once you have opened the QuickView you will get the Schedule QuickView box.

Schedule The Unscheduled Quickly2

In the Schedule QuickView box above you will see the hours of the day on the top row and the calendar days on the left column. The fun stuff is in the actual grid. The squares on the grid represent the specific day on the left and hour on top. The colors represent the following:

White = Unscheduled Hour
Yellow = Includes a number for the amount of Unscheduled Elements for that hour.
Green = Fully scheduled with no unscheduled elements.

Just when I thought I wowed the user they get even more impressed with the fact that you can simply double click on any square in the grid to go to that specific hour of that day. Even if you were in a different log when you first started using this feature, clicking on the day will take you to that hour. This is great for a quick glance of unscheduled positions and going straight to them to schedule a song. I think the users that enjoy this feature the most are those that schedule days, weeks, and months at a time. Rather than scrolling through logs looking for unscheduled positions day by day, QuickView gives them that information far more efficiently. It’s just another time-saver from your friends at MusicMaster. What you do with all that saved time is up to you!

Multiple Layouts for Music/Non-Music Categories posted on December 14th, 2015

By Dave Tyler

Customization has always been the name of the game with MusicMaster and now Version 6 has a feature that sets the bar even higher. When it comes to our library we each have our opinions on what is important for us to view. When it comes to my Music Categories there are a lot of fields that are important to me and that I need to see and be able to readily enter information into. However, when viewing some of my Non-Music categories, for instance PSAs, there are fewer fields I need to view. With Version 6, we can now have default layouts for Music and Non-Music categories without having to switch the view manually every time you go into that category. This feature is a great example of MusicMaster listening to your needs and implementing them into a wonderful feature.

I already have my default view for my library set with the fields I need to see when working with my music but I don’t need to see things like “Artist Keyword” or “Gender” when working in my PSAs. In my example below I am creating a new layout for my PSAs which will also be my layout for my imaging and all Non-Music categories. Using the Show/Hide Fields icon I have selected (by adding/removing) the fields I want to view when in my Non-Music categories.

multiplelayouts1

Once this step is complete you would select OK then click the Save Library Grid Layout icon. You will now have the choice to name this layout. Check the box for Save as a New Design then name the layout here. In my example I am calling it simply PSA. Click Save and you are done here.

multiplelayouts2

In the example below you can see the differences between my Music and My Non-Music layouts.

multiplelayouts3

Now we need to set these as the defaults by going to Tools/Options/Library Layout Defaults. Here is where you set not only your Music and Non-Music layout defaults but at the top you can choose which view (Layout) you will use when looking at your Entire Library (Music and Non-Music at the same time).

multiplelayouts4

Once you have the defaults set to the layouts of your choice click Apply then OK and you are done. These will be the layouts you will see automatically when you open those categories. If ever you want to change the defaults, it is easy to do and now you know exactly how to do it.

3 Things All Stations Should Do posted on November 30th, 2015

By Jerry Butler

You wouldn’t drive your car without regular oil changes and maintenance. Are you taking that same care for your database? If you lost your data, how long would it take for you to rebuild your database… hours, days, weeks, months? All databases are different, but one thing is true about them all. Regular maintenance insures the health and wellbeing of your data. With these three steps, you can help keep your database running smoothly and be prepared for a catastrophic disaster.

(more…)

Library Query Clock Elements posted on November 16th, 2015

By Paul Ziino

MusicMaster version 6.0 is full of brand new features. One of those new items is Library Query clock elements.

I want to schedule a special dance party on Saturday night from 7 to midnight. With a Library Query clock element, this is a breeze.

  • Create a new clock.
  • Use the drop down under Element Type to select Library Query.
    The top half of the window is set up like any other library query in the database. Select the field to be queried in the first box, the operator in the second, and what you’re looking for beneath that. Then click OK to add the query.

libraryqueryclockelements1

  • The lower half of the window is where you select which categories you want to query, and the order in which you want them queried. Click Select and check the categories you want. Click OK, then using the pointer drag the categories into the desired order.
  • If you want the categories to use rules from a specific category, select that option, otherwise allow MusicMaster to use the rules from the category of each song tested.
    iimg2
  • Click OK, complete the clock, save it and assign it accordingly.
  • The next step is to determine where in your pass order you want Library Query Elements to schedule. You can adjust this in Dataset/Schedule/Schedule Properties.
  • When you start the Automatic Scheduler, make sure to check the Library Query Elements item under Schedule Special Elements to cause those Library Query positions to be automatically scheduled.

There are a number of cool things about this.

  • You can use different Library Query elements throughout the clock to query for different things.
  • You can organize the categories in the different positions to vary the preference.
  • You needn’t turn on any rules in the rule tree to make this work, just using the element makes it happen in the clock!
  • If you wish to edit a position scheduled via Library Query, the replacement options will also abide by the query from the clock.

Don’t have version 6.0? Contact your MusicMaster Scheduling Consultant to find out how to get it, or call our home office at (469) 717-0100 to speak with an available sales representative.

Making Your Database Lean and Mean! posted on November 2nd, 2015

By Marianne Burkett

As your database ages, you acquire archived histories. The older the database is in years, the more histories you add, and the larger your database becomes. Like “trimming the fat” from your steak or your belly, MusicMaster has a feature called Purge History/Trim.

You should check these settings today and make sure your database is running at optimum speed.

Go to Dataset/Schedule/Purge History. Allow it to calculate your active history and your archived history. Active history is what you can access via the Schedule editor.

In addition, make sure you are “Automatically” purging histories on the first screen you come to. If you don’t see a check mark in that Automatically Purge box, check that off. This is needed so your database doesn’t become bloated and sluggish.

Now for the “trim”: If your database is five, six or more years old, you may want to consider flushing out some of the archived histories. After all, you probably don’t go back years and years to see what you did in 2007.

Click on the Trim button. You can use the Automatic settings or do this manually. Keep as many years as you’d like, but I recommend two years in the archived histories. Run the Trim. When it is done, close the Purge History utility and head over to Tools on your Toolbar. From there check to be sure you’re the only person in the database. (Tools/User List). If others have the database open, ask them to please exit the software. Once you are alone in the data, run Tools/Purge.

This essentially “flushes” your database, reduces its size and makes it a lean mean fighting machine again.

Be sure to make a new backup under Tools/Backup when you are done.

Happy Scheduling!

If you have any questions or concerns contact your Music Scheduling Consultant.

Dockable Toolbars posted on October 19th, 2015

By Paul Ziino

Have you ever seen your Info Bar spread across your MusicMaster screen like this…

dockable1

…and can’t figure out how to get it back where you like it? Here’s a quick and easy way to do so.

Right click anywhere in the info bar and check Dockable. Right click in the info bar again and click on Location and set it where you want (most common is Left).

dockable2

Once you have the info bar where you like, right click within and select Locked, and now you won’t accidentally drag it away from its desired location. You can do the same thing for the F6 History Graph, too. Just right click in a gray portion of the graphic, select Dockable, then set your location and lock it.

Matching Elements The Easy Way posted on October 6th, 2015

By Jesus Rodriguez

This past summer I think I received more calls about how to match elements to each other than I had ever received since joining the MusicMaster consulting team.

There’s no secret to matching elements like jingles, sweepers or imaging to songs based on tempo, artist, title, etc. There are a few ways to do it and one of them happens to be my favorite because it is very easy and requires very few steps unlike some of the other options.

My favorite way is by using the Match Flow Rule that is found in an Attribute-Multiple field type. Some may say that using Specials Sets is the way to go for matching element types to songs before or after it. Special Sets can be used to do this but in my experience the additional steps it takes to set it up aren’t always the easiest to understand for my clients doing this type of feature for the first time. Don’t get me wrong you are more than welcome to use “Special Sets” and I promise that we can still be friends. Speaking of friends, if you would like to know how to match elements using special sets we have plenty of blogs that have been written on the subject by my friends here at MusicMaster.

I remember hosting a private Genius Day for one of our Colorado clients with MusicMaster’s very own President Joe Knapp. This question came up and I began to go through the steps of how to use special sets to match imagining to songs when Joe asked if he could jump in and offer a way easier solution. Well as Joe always does, he managed to blow our minds at how easy matching elements to items around it could be done in just a few simple steps.

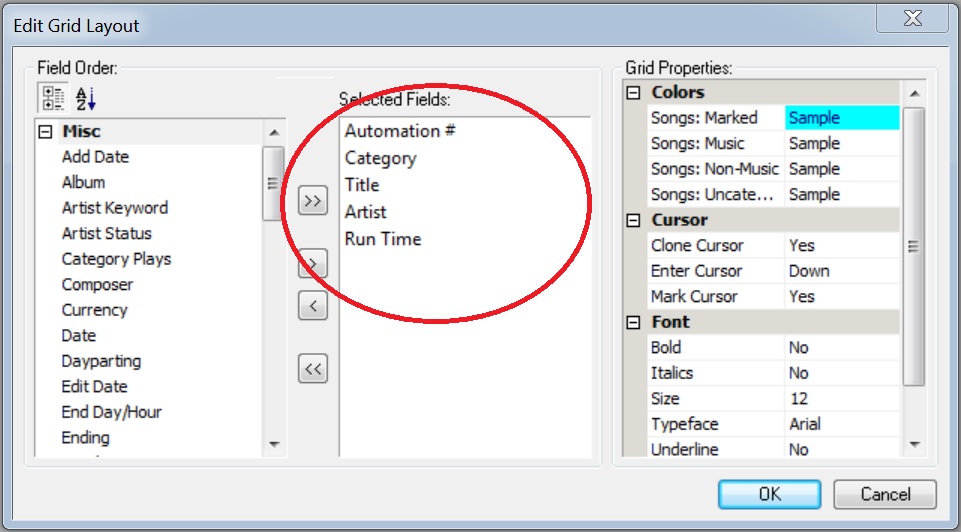
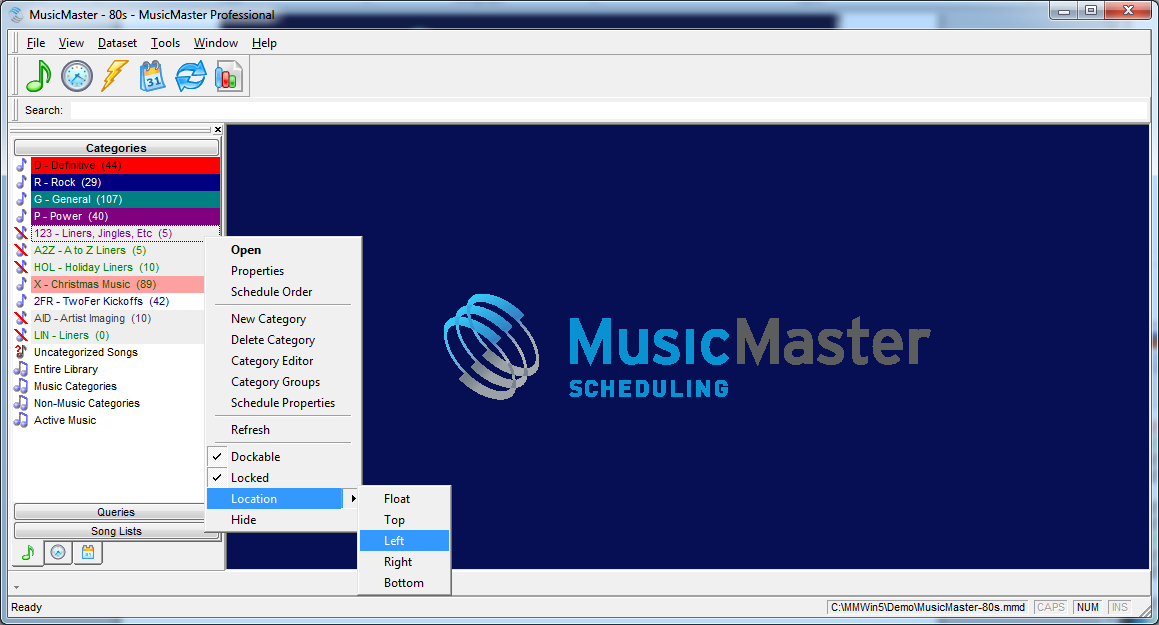
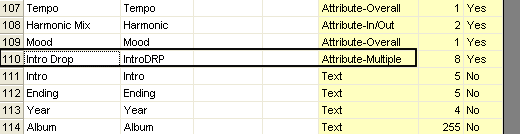
First, you want to make sure that you have an Attribute-Multiple Field available to use because this field contains the rule called “Match Flow” that we will need later. You can find out if you have one available by going to Dataset > Library > Fields. Below is an example of one that I had available and I decided to rename it “Intro Drop” since I will be using it to match my imaging to specific songs.

matchingelements1

You might pick a field you no longer need. You might also have “User” fields that you could use to do this. If not, talk to us about adding a field to your data to do this.

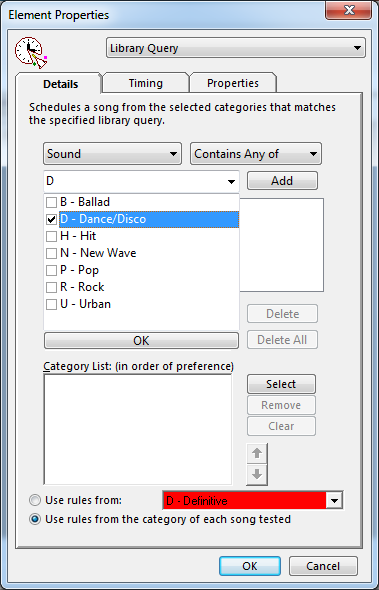
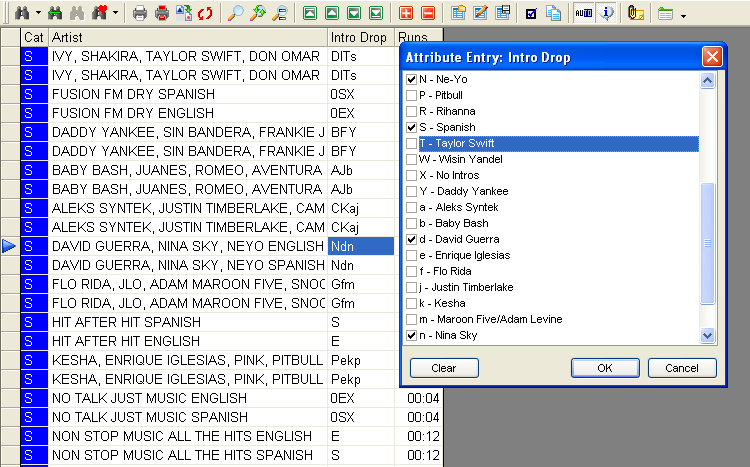
Now go into the attribute itself and begin to create codes to use in this field for your imaging and songs. You do this by going to Dataset > Library > Attributes and find your attribute in the drop down box. Here you will be able to assign attribute codes to be used to match items like imaging to the songs around it.

matchingelements2

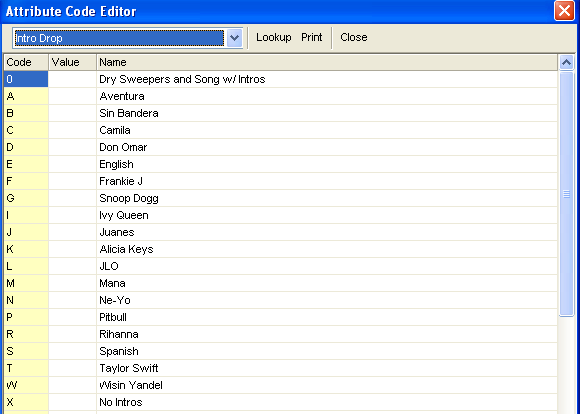
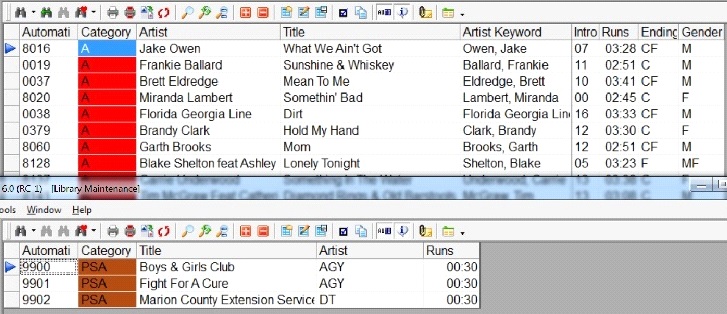
In the example above I created codes for sweepers that I want to match to a song by a specific artist because the artist is saying how much they love my station. I also have imaging to overlay into songs with intros where I already set the EOM in my automation to launch simultaneously with the song. I have generic produced imaging for songs with no intros, too. I also have English sweepers to go into English songs and the same for my Spanish elements. I have codes for tempo to control my high-energy sweepers from going into slow ballads. You know the ones with all the explosions that make you drive off the road when they play before a slow song!

The third step is to assign one or as many of the codes to each one of your sweepers and your songs being used in rotation. This is the cool part because a song and sweeper can be artist specific, tempo specific, intro, no intro, and as many possibilities that you want it to match one of in the process. The sky is the limit!

In the image below I am assigning my attributes to my sweepers. This determines which songs can schedule beside sweepers, looking for a match of at least one of the same attribute. In this example the sweeper is only allowed to play next to a Ne-Yo, a Spanish, David Guerra, or Nina Sky attribute assigned song.

matchingelements3

In the example below we are assigning the attributes that a sweeper can match if it also has at least one of these attributes assigned to it. In this example by assigning English, Pitbull, Spanish, Wisin Y Yandel, and No Intros we are allowing the sweepers to know exactly which one of them can play next to this song. The only ones that will be allowed to do so are the ones that also have been assigned at least one of the attributes assigned to this song.
Img4

There are a few more things to address: Make sure that your sweeper category is included in your clock. You also need to adjust the Schedule Properties so the sweeper category schedules after the music categories.

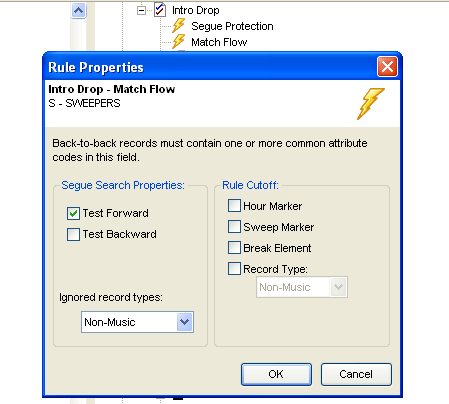
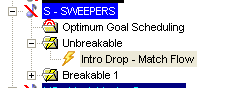
Finally, turn on the “Match Flow” rule in the Rule Tree. Simply drag and drop the Match Flow rule from the attribute you are using into your sweeper category’s unbreakable folder. This tells the sweep category that it must match at least one of those attributes assigned to it; either the song before, after or both.

matchingelements5matchingelements6

That’s it in just a few easy steps you can now match items to others around them. Whether it’s imaging, sweepers, jingles, artist testimonials, a bank of generic voice tracks or anything else you can think of matching. It’s that easy to do!

MusicMaster Maintenance Notification posted on September 22nd, 2015

Please be aware that the IP address for the MusicMaster license servers will be changing on October 1, 2015. This will not affect normal operations of MusicMaster, but a few customers may have created firewall exceptions based on the IP address that will need to be updated.

Old IP Address: 70.60.92.34 or 216.170.134.226
New IP Address: 162.209.76.106
Change Date: October 1, 2015

We strongly recommend that you address this server via the DNS name services.a-ware.com to make future changes more automatic.

If you need further assistance regarding this change, please contact MusicMaster support.