
MusicMaster Blog
Category Fallback Options posted on April 4th, 2022
Category Fallback Options
by Paul Ziino
You are editing your log. You double-click on an unscheduled position to look for replacement options but there are none available—all songs in that category violate your unbreakable rules. Now what do you do? You probably click the query icon and change the category to look through. Well, what if that category’s songs all violate unbreakable rules? You have to go through that process all over again.
In Version 8 we have introduced a new feature called Category Fallback Options. This allows you to preset the categories you’ll allow the replacement song window to look in when the original category’s songs don’t pass the unbreakable rules.
Go to Tools/Options, then under Schedule Editor Options select Category Fallback Options. Here you’ll see the list of your categories. Each category allows you to enter a sequence of other categories to look in.
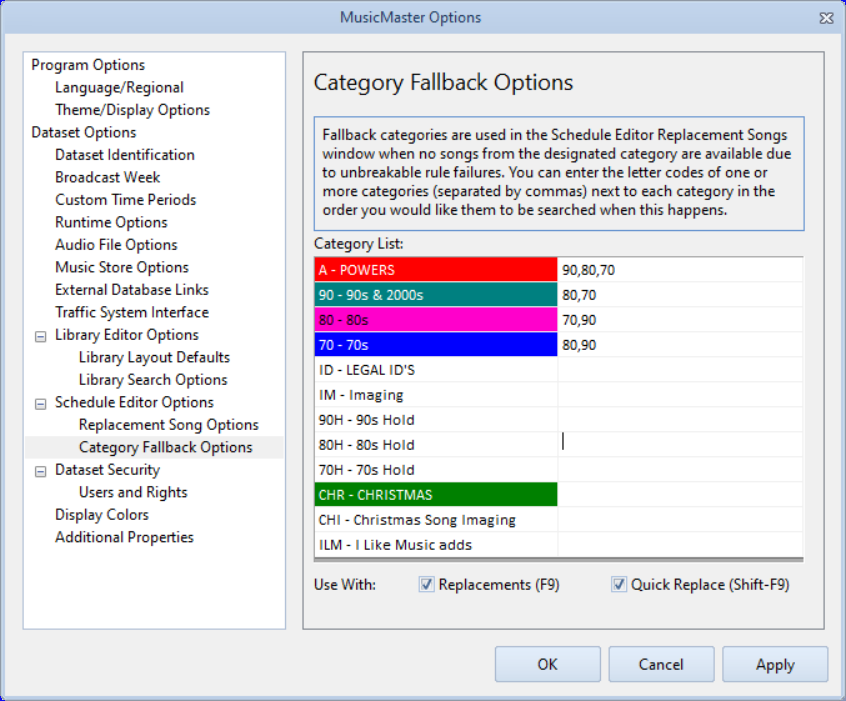
In my example above, if the replacement can’t find an A that passes the unbreakable rules, it’ll go next to category 90. If no 90 passes the unbreakable it’ll fallback to category 80, and if still no song works it’ll fallback to category 70. No longer will we need to re-query in the replacement window, MusicMaster will do it for you!
Notice you can check the box to do this for Replacements (F9) as well as Quick Replacements (Shift-F9).
To get version 8.0 go to Help/Check for Updates and follow the prompts. If your MusicMaster subscription allows for updates, you’ll be able to retrieve the installer right there. Keep in mind, upgrading to version 8.0 does require an automatic database upgrade, so you’ll want to make sure to backup your data first, and verify that all MusicMaster installations are eligible for upgrade before proceeding. We suggest you work with your IT folks to do any upgrades to your software.
PRO 8.0.2 Released posted on April 1st, 2022
No Fooling around today: MusicMaster PRO 8.0.2 is available to you under Help, Check for Update. Changes include:
Adding better visibility to fields you’ve set to use in the Search Bar. When you open Fields, the default search bar fields will show checks when you have made no other changes to the search fields.
Changes have been made to improve the reliability of copy and paste functionality in Library Maintenance
The ability to sort by Song Rest in the Schedule Editor replacement window wasn’t working when you clicked on the column header. Thanks to the eagle-eyed users who spotted that.
Adjustments have been made to the SACEM DIP43 report to address new standards. The BMI/ASCAP Report has also been adjusted to use the Community Upload format.
You can find the full list of changes under Help, Release notes. Contact your MusicMaster Scheduling Consultant with any questions.
Copying Categories from One Database to Another posted on March 21st, 2022
By Dave Tyler
Lately I have been getting a lot of calls and emails about the ability to copy songs from one database to another and if it is possible in MusicMaster. It is! MusicMaster is a Windows-based program so those same Copy/Paste features you use in Excel work in MusicMaster.
Let’s use this example. I have an Oldies/Classic Hits database and one of the PDs from our sister station wants to use the same category and songs in their database. It is possible but there is a caveat, and it is an Important one. If both stations actually share the audio and therefore the automation numbers or filenames are identical then you are good to go. If they are not you can still copy the basic metadata (Title, Artist etc.) but you will need to add the automation information manually on the receiving side.
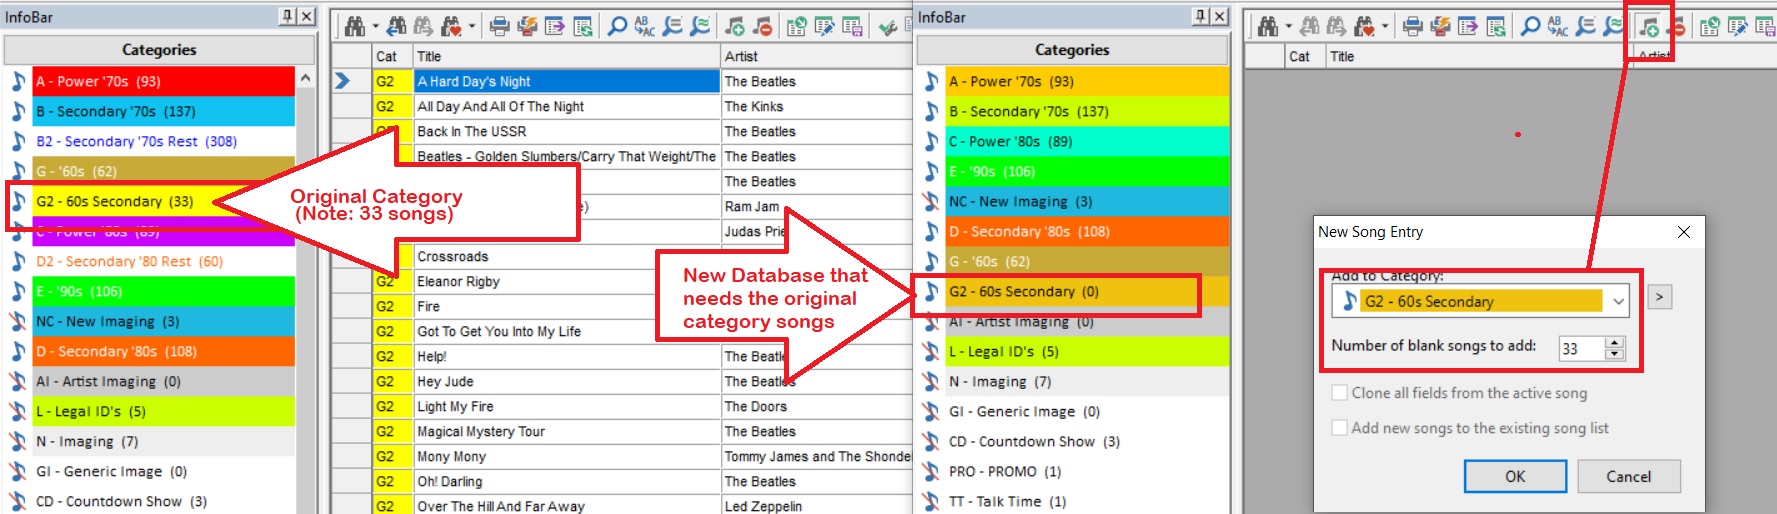
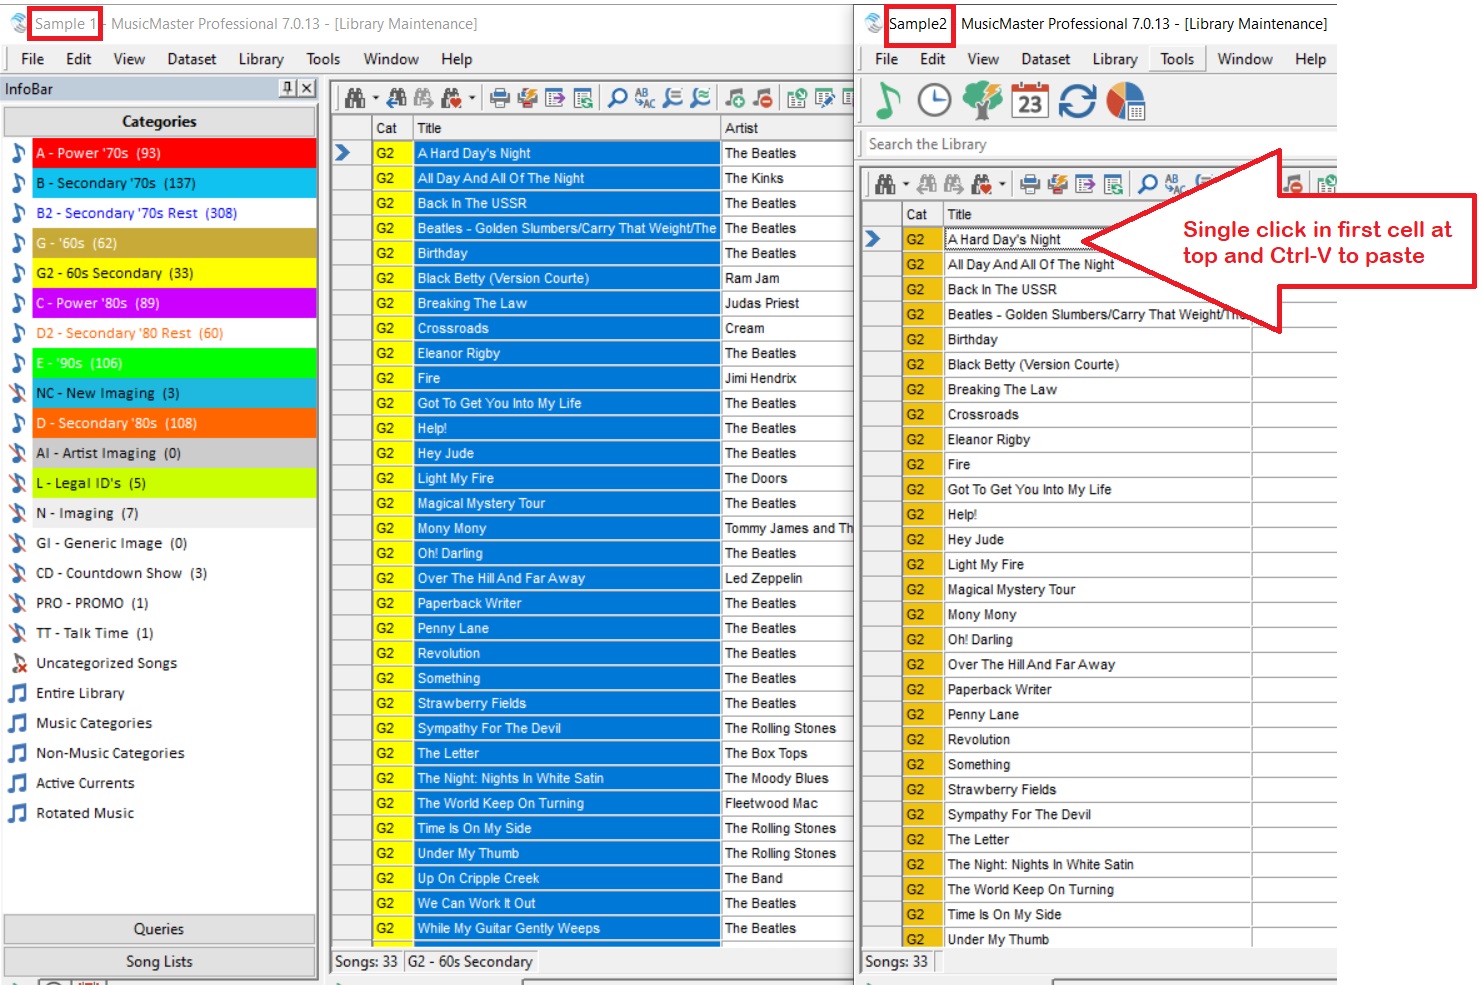
In my example Station A has a Secondary 60’s category that I want in another database. I open MusicMaster twice. One incident has Station A (The original) and the other Station B (The receiving station). This is a really simple and straightforward process but I always recommend making a backup of both station before doing any mass actions like this. In the Station B click n the “Add Songs” icon and, per our example, add 33 song cards.
Now that you have the empty song cards waiting to be populated there are really three options you have in the copy/paste process.
You can A) Copy the entire category at once and then paste it all into the receiving station. You would do this by clicking on the little grey box in the top left corner of the category. You will see all songs are now selected. Simply Ctrl-C to copy (pic Below). Go to the top left cell in Station B and single click in it then Ctrl-V to paste. Please note when using this process you MUST be sure that ALL of the fields are in the exact same order in both databases or you risk pasting incorrect information in. For example if Station A had the fields in the order of Title, Artist, Artist Keyword and Station B had them in the order of Artist, Title, Artist Keyword then Station B would have the Artist in their Title field and the Title in the Artist field. Yikes! This is also why we made that backup prior to starting.
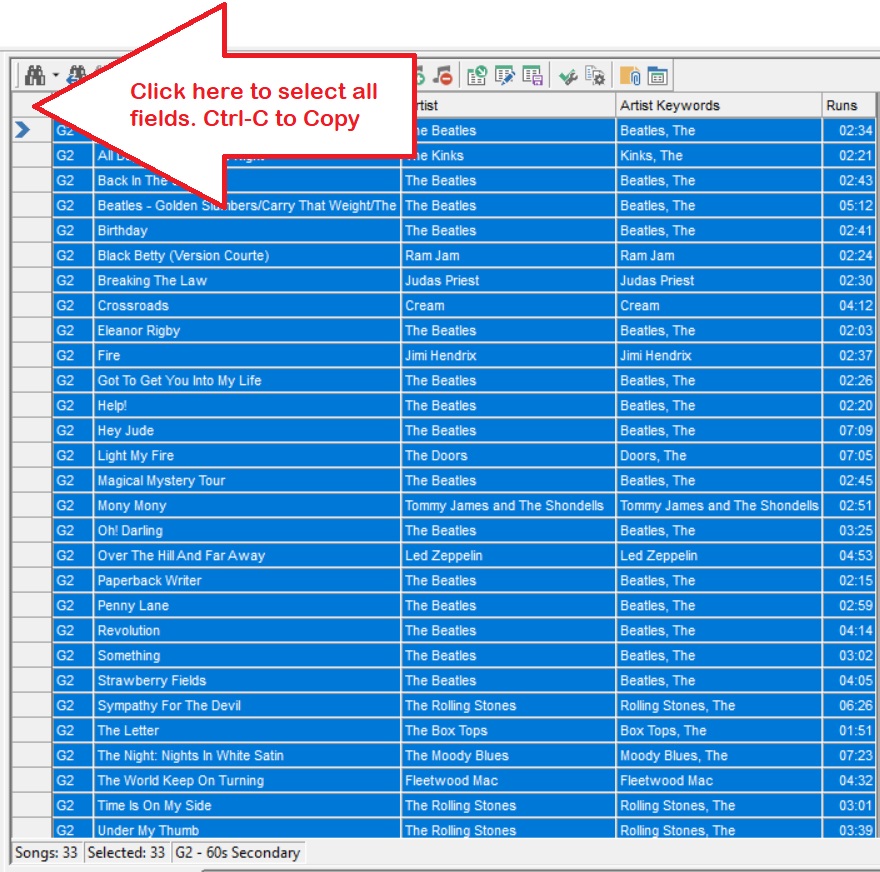
Our second option is to just copy the fields we want. In this example let’s say I do not want the Category field because the receiving station will call this category something different, however I do want all of the other fields and they are ordered the same in both stations. I could then simply click in the top left cell (In this case it would be the first Title cell), then scroll to the bottom of my 33 songs and single click into the bottom right cell for Runtime and you will see it selects all of the songs. Again Ctrl-C to copy (Note in pic below the “Category” field is not selected), then single click into the top left cell for Title in Station B and Ctrl-V to paste.
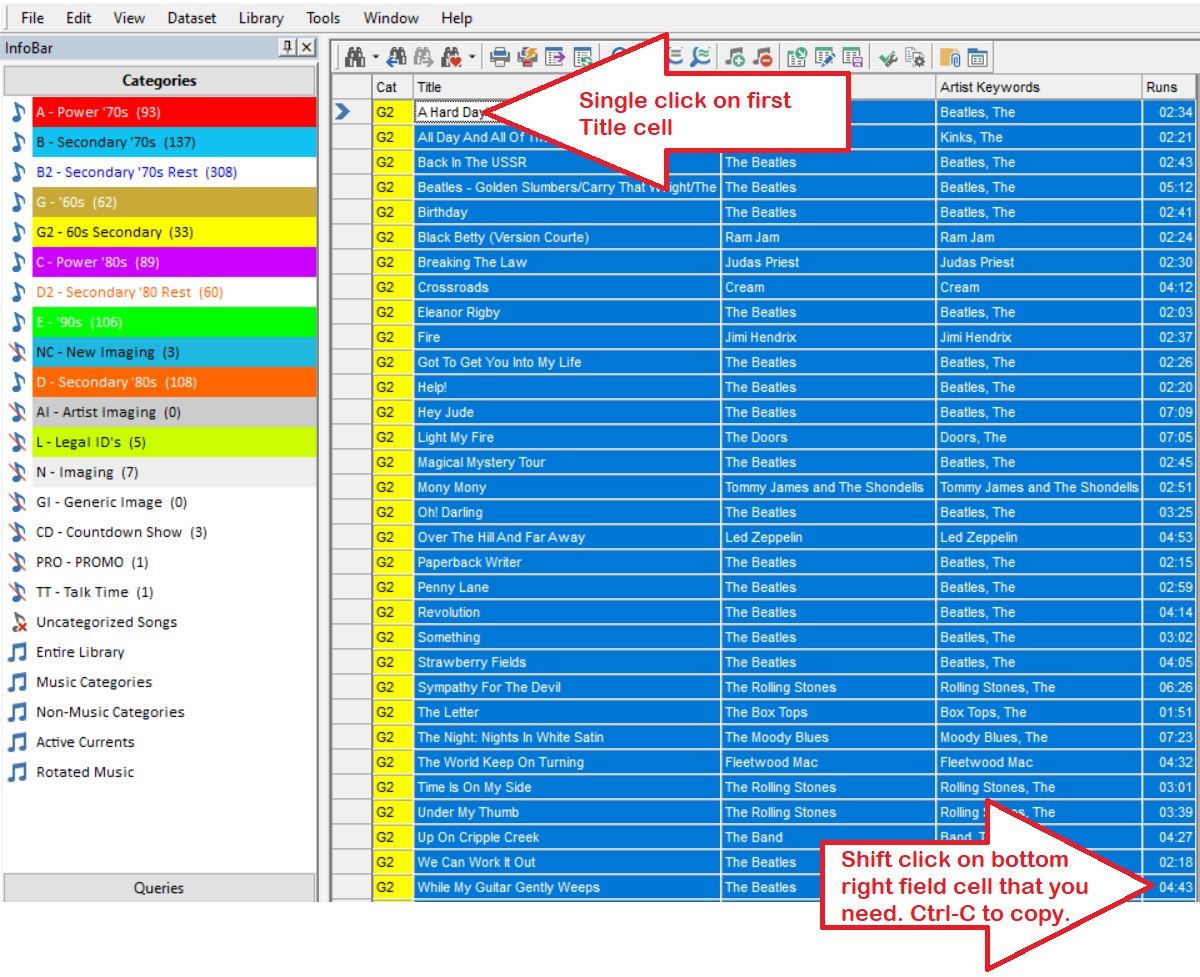
The third and final way is to go Column by column. Although this sounds like it would take a lot of time it really doesn’t and is my preferred way of doing this because I don’t need to go through the setup of making sure all of the fields are in the same order. In this example I just single click in the top cell for Title (in my example “A Hard Days Night”) then scroll to the bottom and Shift-Click on the last Title (While My Guitar Gently Weeps) and the entire column is selected.
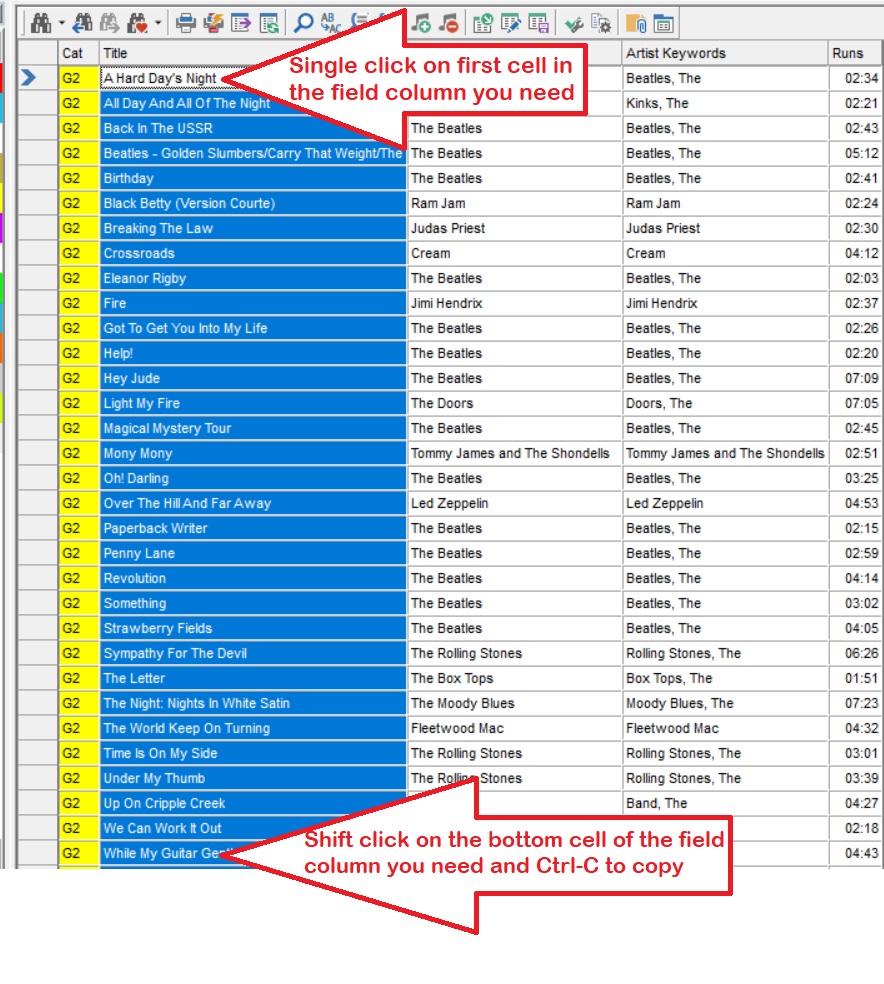
Ctrl-C to copy and go to Station B, click in the top cell for Title and Ctrl-V to paste it in. Repeat the process for any other fields you require.
Copying from one database to another is very easy and quick to do. As mentioned earlier, be sure to make a backup in case something goes awry. We can’t say it often enough! It’s way easier to restore a backup after a mistake and takes the pressure off the process, no matter what you are doing.
If you have any questions just let us know. All of the Music Scheduling Consultants at MusicMaster would be happy to help you.
Migrating Position Wizard and Flex Rules Analysis posted on March 7th, 2022
By Laurie Knapp
In Version 8, it’s easier than ever to use Migrating Positions with Flex Rules. There’s a new wizard for adding Migrating Positions, a Pattern Builder which shows you sample clock assignments, and more display information to indicate potentially problematic Flex Rules settings.
About Migrating Positions
Migrating Positions are not new to MusicMaster Pro Version 8, but in case you have never used them before, here is an overview of how they work.
Almost Perfect – Setting the Order for Your Rules posted on February 21st, 2022
Almost Perfect – Setting the Order For Your Rules
By Brian Wheeler
We’re dipping into the mailbag this time around. I had a client ask me, ‘should the rules in my rule tree be in any specific order?’ My answer is they don’t HAVE to be, but there are benefits to arranging your rules strategically.
For example, let’s say you’ve got a series of unbreakable rules enforced, and the first rule in the list is a stringent one…let’s say it’s Artist Separation. If MusicMaster tests a song for Artist Separation and the song in question breaks this unbreakable rule first, will MusicMaster keep testing or just move on? The answer is, MusicMaster will stop testing the remaining unbreakable rules and will move on to the next song in the search depth because this song can no longer be considered for the position. You’ve just saved your automatic scheduler the time and effort of testing the other rules. Of course, I have no way of quantifying how much time that saved, but efficiency is a good thing, right? My recommendation is to get those rules in an order that eliminates the most obvious songs right away.
Stack’em and Count’em: Numbering Song Rotation Order posted on February 7th, 2022
Stack ‘em and Count ‘em
By Chris Malone
Several brilliant mainstream format programmers have reached out wanting to zero in on the rotation of their cream of the crop Power songs and fully understand the scheduling pattern of the standard card file method in MusicMaster. Little known fact, you can establish the desired slot position, trace the slot, and even visually see AutoBurn in real time by creating a text field that serves as a numbering system for your Power Currents.
We can all agree this history graph reflects a mainstream, hyper turnover power category that looks spectacular inside the Turnover Analysis. To achieve such great rotation requires that a Power category bypass all category rules and have no specific category rules, so songs can plot in a natural order. Under Dataset, Schedule, Schedule Properties – you’ll also want a category like this to have a search depth of 1. The category order management (Dataset, Schedule, Schedule Order) should be switched to standard card file.
Now here’s where you zero in, you can create a numbering system that allows you to establish rotation position number for each song. It serves as a verification that the right things are happening as expected under the hood; furthermore, when a song is moved from Power Currents, a new song can replace that specific rotation position without disrupting the category’s natural turnover.
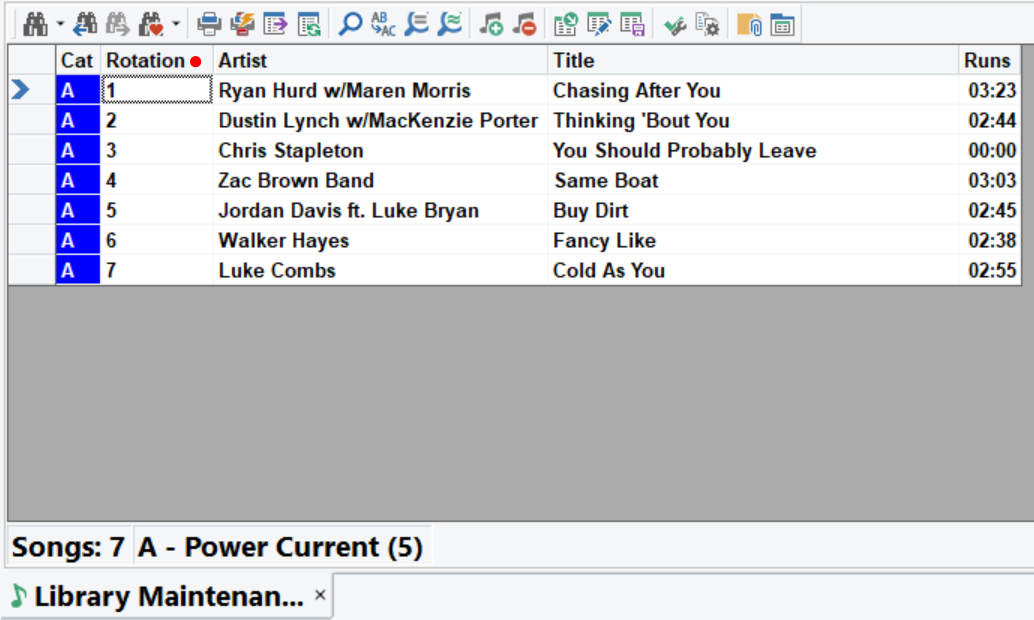
In this example, I’ve created a simple text field called “Rotation”, the songs in the category are numbered 1-7. Keep in mind this is a simple text field. There’s nothing dynamic or rule related to this field other than it allows the user to create a numbering system for these songs and create a desired stack order in the standard card file of this category. Remember, any number entered in this field will ‘travel’ with the song to any other category until the number data from that field is physically deleted or modified by the user.
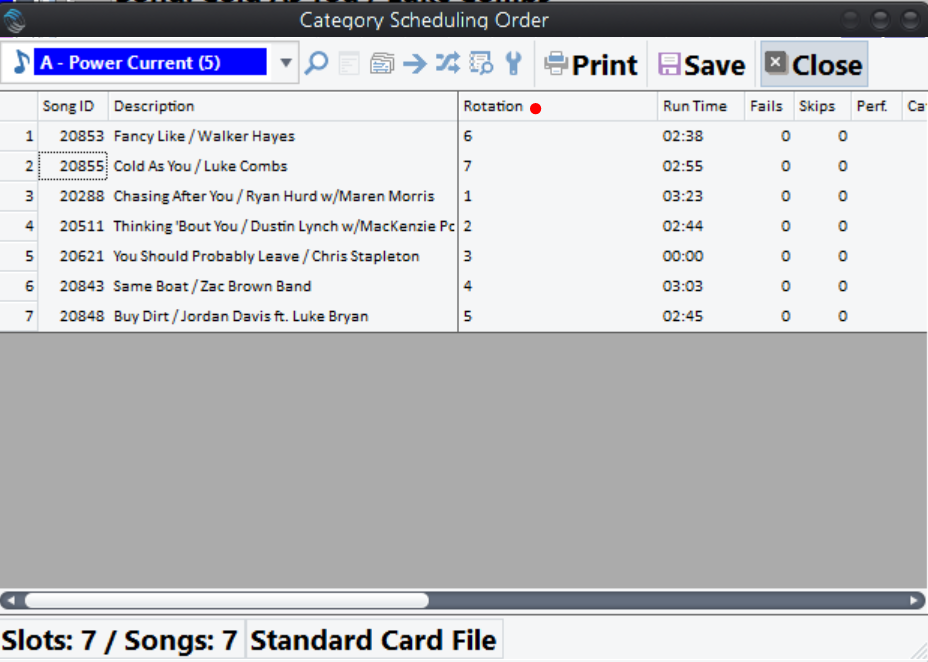
When you go to Dataset, Schedule, Schedule Order for the Power Current category, I can add a field to include the ‘Rotation’ field and I can put these songs in the desired schedule order and let it rip. A common misconception is that the schedule order is your desired rotation order and that’s not the case. The schedule order simply shows what song is next in the standard card file to schedule.
In the example above, the song at rotation position #6 is next up to schedule, in my desired rotation stack order. When a song is moved out of the category at any given rotation position, the incoming song can replace that rotation position in your desired stack order to prevent in wobbles in rotation.
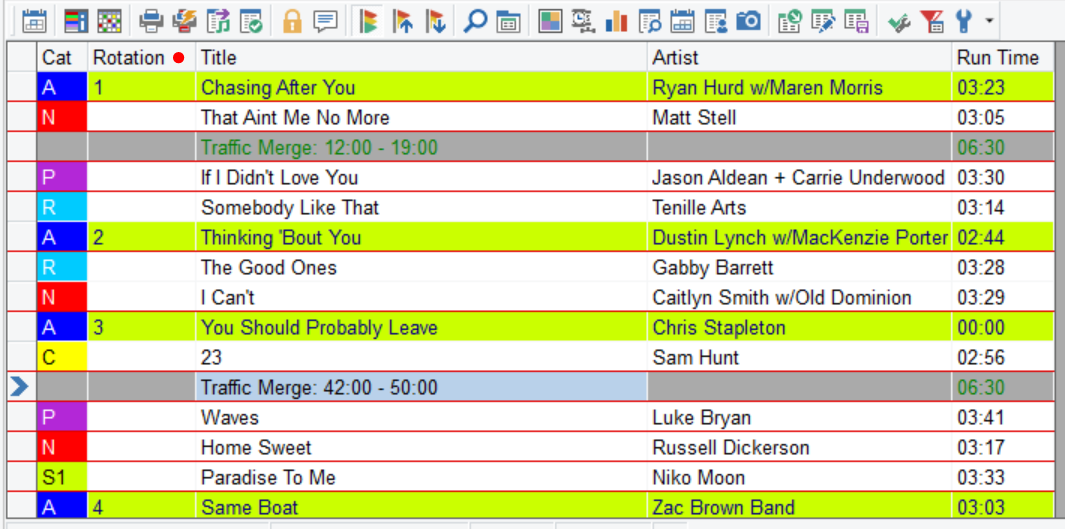
You can even add this “Rotation” field to your schedule editor to follow along to ensure your Powers are rotating in the standard card file order you designed through out the scheduled day.
For more on category order management or how to create a text field in your database, please reach out to your MusicMaster Music Scheduling Consultant.
Support Notification: File Sharing Issues posted on January 24th, 2022
We have had reports in the past few weeks from users who have their MusicMaster Access database on a network share that have started getting error messages when more than one user attempts to access that station at the same time. These errors will report that the database file is already in use or cannot be locked.
There is nothing wrong with MusicMaster. This error is due to a problem with a Microsoft Office update that was released in December. Microsoft became aware of the issue almost immediately and has been rolling out fixes for the various Office versions to correct it. They have also provided a status page where you can see when the fix was available for the version of Office that you have:
If you are currently experiencing this problem, we would recommend that you try to download and install the latest available Office updates or you could also try to remove the patch that caused this problem on your system. In most cases, the update that corrects this issue should have already been installed, or will be very soon.
Classical Data Management posted on January 24th, 2022
CLASSICAL DATA MANAGEMENT
By The W.I.Z.A.R.D.
Like many classical stations, you may be overwhelmed with the sheer volume of pieces you have available. We will never speak of the 50,000, 100,000 or one million pieces you have again!
This plan is a way for you to rethink how you manage your classical library. It’s designed for those who are not already automatically scheduling logs in MusicMaster. If you are already automatically scheduling logs and would like to do this, we would recommend you Clone your database to do so.
The plan assumes a general knowledge of the software. If any concept is unfamiliar to you or you are unsure how to do it, please contact your MusicMaster Scheduling Consultant for assistance.
PHASE ONE: Library Review and Categorization
In this phase, you should be looking for the number of pieces you need to play in one month. To do this, you might have to make an educated assessment of how you schedule. For instance, it’s typical for classical stations to play four pieces per hour. Multiple four by the number of hours a day you play classical music. Keep in mind, you may have to calculate this for each day if there are differences. Once you know the number of pieces needed for a week, multiple it by four to get your monthly number. Here’s an example:
Let’s say you play four pieces an hour for 18 hours a day, seven days a week. We use those numbers plus a final “times four” to get the monthly total.
4 x 18 = 72 x 7 = 504 x 4 = 2,016
If you find 2,016 pieces to play, you will not repeat a piece during the month. While those are playing, you can find more pieces. Breaking down the task this way should make it much more manageable to categorize your library.
The best part of this is that you probably don’t need 2,016 pieces because you will be repeating these pieces.
This is where category management comes into play. We’d suggest you go to Library, Category and create at least three new categories for fast, medium and slow rotation. You can name them whatever you’d like. Just keep in mind that each category signifies how often you will hear the pieces in it. You’ll see what speed these categories will have when we get to Phase Three. What you are doing now is simply indicating that some pieces will be playing faster than others. For instance, “war horses” might be in the fast category while a more obscure work that fits your programming goals, ends up in the slow rotation category.
To get started, go to Tools, Backup. Make a new Backup. What you are about to do is change your data. At any point during this process if you have made significant changes to the data, make a new backup. You always want to be able to revert if you wish to do so.
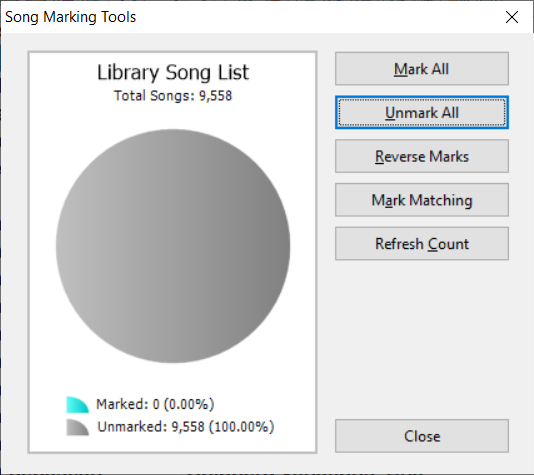
With your backup done, call up the entire library and then use the marking option to confirm you have no marked songs in your library.
Open any of your previous categories. It might be helpful to sort the list by Composer and Title. We also recommend having fields like Conductor and Orchestra/Performer displayed. Scroll down and use F7 to mark pieces. This will give the pieces a background color. You might look for those pieces you want in the fast category, quickly running down the list.
This process is not designed to be tedious. Go through the list quickly and determine if the piece qualifies for the category you are looking for. If you need to think about where you’d put the piece, skip it. The point of this is to move as many pieces as quickly as you can into the new categories. You can always go down the list multiple times if needed.
You likely have more than one performance of a piece. Be critical. Do you really play all of them or are there just one or two that get your air time? Only move the performances you really want to play. Whatever is left can remain in this old category.
Once you’ve gone through the list, right-click to open the Context menu where you will have a Move, Move Marked Song(s) option.
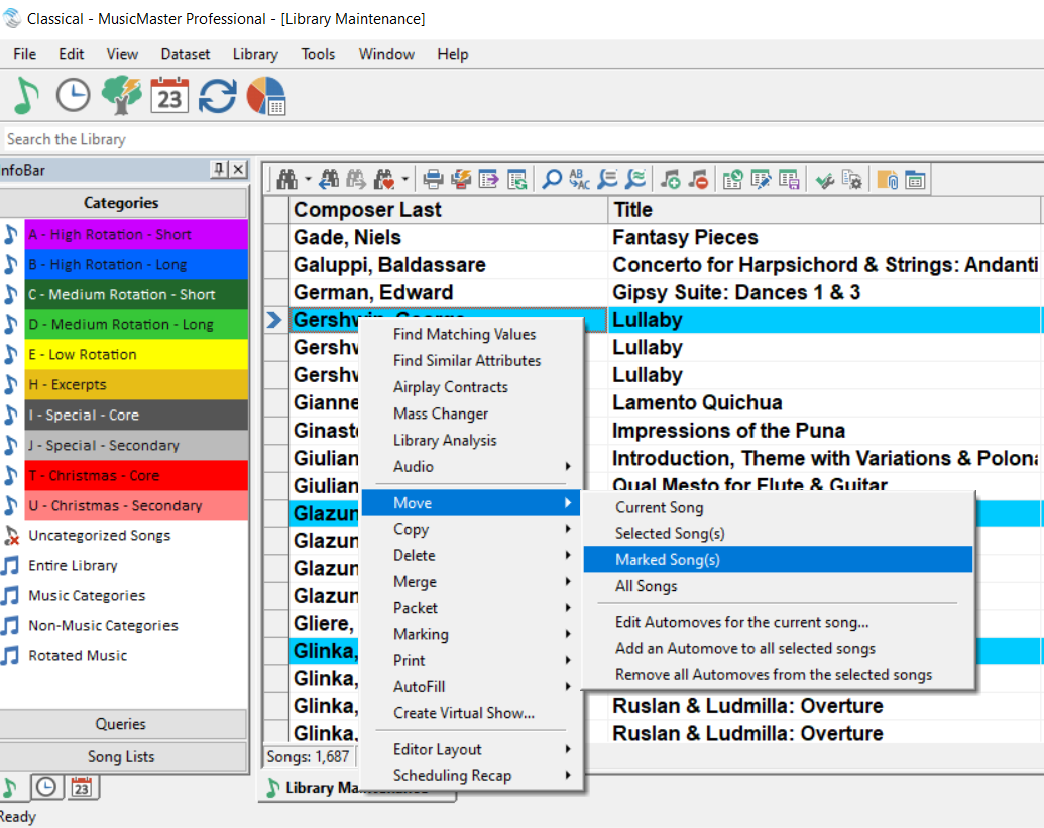
Once you select that, a Category Selection box will appear. Simply click the appropriate category and your selections will move.
You can now go down this list again and pick pieces for a different category or see if you can find more to put into the first category you chose. Continue to do this until you are done with the category. Whatever is left should go to a new Library\Hold category that you can make. Continue reviewing your existing categories moving pieces to your new categories.
NOTE: The pieces you moved are still marked. It’s always a good idea to clear the marks after you are done.
Here are a couple of more things to think about while reviewing your library:
When you are satisfied that you have enough pieces in your new categories, you can review the coding on these pieces. This is an important process because it can determine your overall sound. Too often we see the coding of music is incorrect which causes problems when rules are set up. Does the Composer have the same musical period on his/her works? Does every violin work have the appropriate instrumentation code? Have you distinguished between chamber works and orchestral works? You can easily see how having any of these codes incorrect on a work could cause problems when scheduling. Determine what Attributes are important to you, make sure the specific codes are correct and then review your new categories to make sure the codes on these pieces are accurate.
If you’ve moved more than one performance of the same work to a new category, we would recommend you packet these performances to group these pieces together. If you don’t do this, you might hear the work too often. Packeting keeps the like works together. You don’t want to guess whose Symphony 1 is in the packet, so name your packet with the Composer and Title in the name. You can do this through the Packet Editor (Library, Packets) or through the context menu in Library Maintenance.
PHASE TWO: Clock building
Once you have pieces in your new categories, you can begin to make clocks using your three new categories. As you do this, think about how often you want to play the category. For instance, if you are playing four pieces in an hour, it’s easy to consider playing one piece from each category. Do you even want to do that? If you do, what category will the fourth piece come from? Do you want that changed over time?
We recommend you keep this simple and create just one or two clocks to start. This will allow you to do the fine-tuning on a few clocks. When you are satisfied, you can start to clone and make more clocks as needed.
With clocks created, go to Clocks, Format Assignment Grids and create a New Grid, assigning these new clocks.
PHASE THREE: Analysis
With your library categories set up and clocks built, you can now go to Analysis to see how often the categories will play. Turnover Analysis has a wealth of information. Focus on the Mean Turnover, which is what you think of as the typical average. How fast is your fast category? Is that how often you want to hear the pieces? If the answer is Yes, congratulations. If the answer is No, you have three choices: change the number of pieces in the category, change the number of times you are calling for the category in your clocks or some combination of those two. Remember that Turnover Analysis is showing averages. This doesn’t mean every piece will turn over at the exact speed listed. You’ll also see Short and Long Turnover information as well.
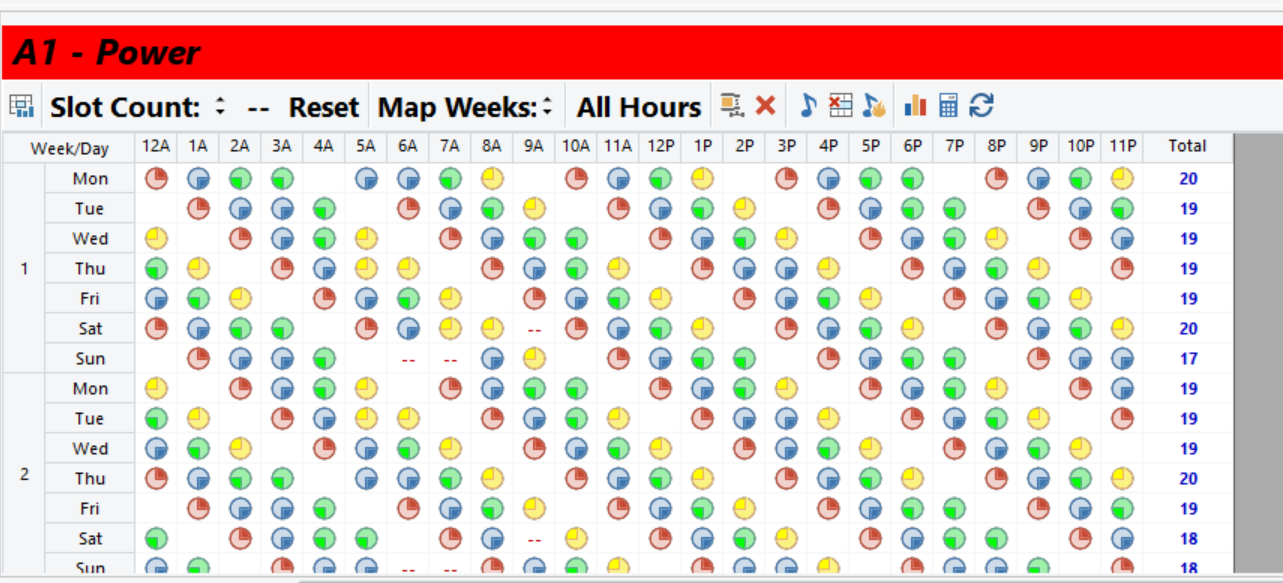
You can also use the bottom graph of Turnover Analysis to see how an individual piece will rotate through your day(s). Use the Hide Blank Rows option to get a better overall view. Notice in the picture below that 10 weeks are show, but not 10 lines. This is because the category isn’t playing in the third and sixth weeks given the number of pieces in the category and the way it’s called for on the clocks. By hiding the blank rows, you have a good idea of how the piece will be played over time. Just remember that any rules you apply to a category can impact how it rotates and that isn’t taken into consideration when you look at this screen.

PHRASE FOUR: Rule building
We highly recommend getting the basics correct first: composer separation, hour rotation and minimum rest. The Rule Wizard can help by making suggestions for the settings of these rules. With these in place, you will keep some distance between your composers, make sure pieces don’t play in the same hours and rest the pieces before they play again.
To make your station sound even better, consider rules for your key Attribute information. For instance, once you play a Baroque work, how many titles should go by before you hear another one? Is it okay to play two violin works back-to-back? How many orchestral works can you play in row? These are the kinds of things you should consider when setting up Attribute rules.
Remember, if you are not confident the coding is correct, setting up rules will not be helpful. Go back to Phase One and fix the coding in the library. Then rules you create will be meaningful.
PHASE FIVE: Scheduling
With the first four phases done, you are ready to have MusicMaster automatically schedule your first test log. When you do this, you’ll be looking for those places where the program scheduled music in a way you wouldn’t want. You can then tweak the data to minimize those things. Try not to get carried away here. You will probably always find some piece to swap or replace. It’s natural. What you want is a log that follows your programming goals with a minimal amount of effort on your part. Perfect isn’t possible. Very Good is attainable.
PHASE SIX and BEYOND: Maintenance and Review
Phase Six starts with going back to Phase One and starting over. Yes, it’s a Deming Circle. Just because the pieces were appropriate today does not mean they will still be relevant to the category in six months or a year. The same is true for your Clocks and Rules. Music is a living thing and so is your use of MusicMaster. Reviewing this plan every three or six months will ensure your music never gets too far away from your programming goals.
A few other things to consider:
As new music is released, be ruthless. If you are adding a performance of a work you already have in your new categories, ask yourself if it is better than the ones you have. Should it replace one of your existing pieces in rotation or be added to the ones you already have?
Gold Recycling is designed to replay music for an audience that is unlikely to have heard it the first time. Do your early morning listeners also listen late at night? If not, you can “recycle” the music.
Auto Platoon lets you move pieces in and out of rotation to keep the category fresh while maintaining your category size. You might draw on music in that Library\Hold category or get even more discreet by moving only a certain composer’s work in and out. Do you really need to have all the Violin Concertos by Vivaldi in active rotation? If not, you can play a subset at any given time and swap them out. Your core will love that they are hearing the different Concertos while your likers remain content.
CONCLUSION:
We hope this general overview of how to manage a classical library has been helpful to you. We are here to assist you with ideas and suggestions. Please contact your Music Scheduling Consultant for any assistance you may need.
Music Maintenance in 3D posted on January 10th, 2022
Music Maintenance in 3D
By Chris Malone
When scheduling a music log, it’s easy for many music schedulers to think in a linear fashion. The familiar thought process is as follows: run the automatic schedule, edit music log, check for consistency and flow, then export the log before the Traffic Department starts screaming there’s no log to merge. It’s a very traditional mindset, but there’s another dimension to consider – how well are your artists rotating from day to day? How well balanced is your music library? What’s lurking in a hold category? Let’s look at these three areas.
DMCA Rules Made Easy in MusicMaster! posted on December 27th, 2021
By Laurie Knapp
If you have a streaming station, you’re likely very familiar with DMCA, or the Digital Millennium Copyright Act. The boring backstory is that these are a set of US copyright laws that were enacted in 1998 to implement treaties of the World Intellectual Property Organization to prevent the illegal copying of music. In a nutshell, the DMCA sets rules for what can be legally broadcast on internet radio. You can find a handy breakdown of all the regulations here (https://help.live365.com/support/solutions/articles/43000533112-what-is-dmca-)
In addition to rules limiting things like rebroadcasts and program announcements, the DMCA also has guidelines for how often albums and artists can play. That’s where MusicMaster comes in!
Specifically, the rules state that within a three-hour time period:
- You must not play more than three different songs from the same album, with no more than two of such songs played consecutively.
- You must not play more than four different songs from the same compilation/set, with no more than three of such songs played consecutively.
- You must not play more than four different songs by the same featured artist, with no more than three of such songs played consecutively.
If you have a lot of the same artist or album in rotation, or a lot of music sourced from compilations, this might actually present a challenge for you. Sure, you could set time separation rules on your artists and albums, but can you be sure you’re doing enough?
Fortunately, there’s a special MusicMaster rule that makes it easy to keep track of whether you’re meeting these regulations. It’s called DMCA Performance. You can find it in your rule tree if you look under your Keyword Field or Text Field rules, where you have your artist, title or album fields.
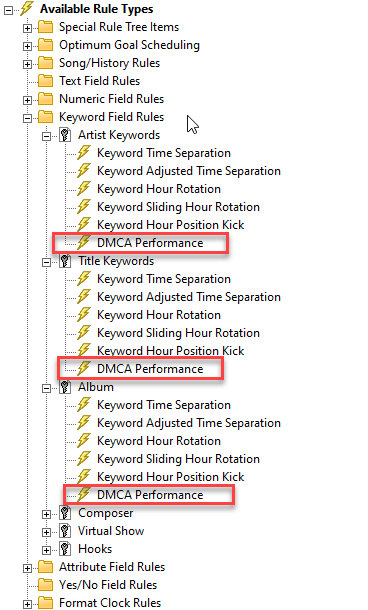
For the sake of meeting DMCA compliance, you’d want to add one DMCA Performance rule for your album field and one for your artist field. You might want to apply it to your All Categories folder, or to a Rule Group that contains just your music categories.
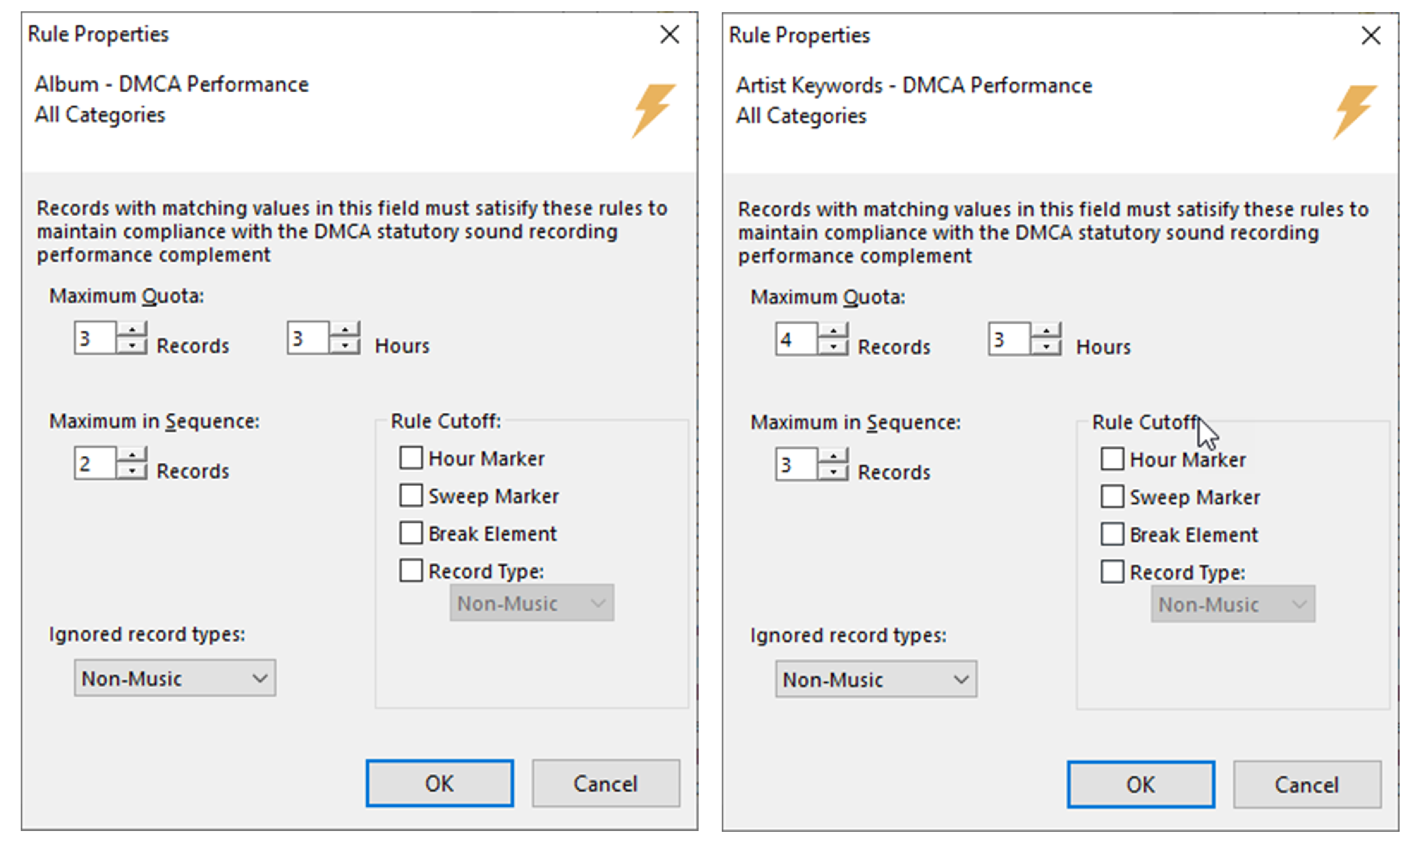
You can see from the rule settings that it addresses both DMCA requirements at once: the maximum quota and the maximum in sequence that can be played within three hours.
For Album, you’d want to set the max quota to 3 and the max in sequence to 2.
For Artist, you’d want to set the max quota to 4 and the max in sequence to 3.
What about compilations?
Chances are, your compilation album titles are stored in the same field as your single-artist albums, so the more restrictive DMCA rule you set for your Album field will apply to them as well, even though technically you could have gotten away with one more play.
If you really want to squeeze that extra play out of your compilation albums, you might consider adding a separate “Compilation Album” keyword field where you store your compilation album titles, instead of in your main album field. You could then apply a separate DMCA rule to that field with a max quota of 4 and a max in sequence of 3.
Keep in mind, if you decide to do this, you may need to create a third album field that contains ALL your album titles together. This would be the single field you reference when sending metadata to your streaming service for display, or for running required reports like Sound Exchange.
While setting up your DMCA rules, there are also some other options you can configure. For example, you can choose to ignore non-music elements so they aren’t included in the count. That way if you applied these rules to your All Categories folder, you wouldn’t end up with an unnecessary rule violation for playing more than four pieces of imaging from the same source.
You also can choose a “rule cutoff” – or the point at which you want to stop or reset the counter. These Rule Cutoffs are more commonly used with other rules, such as Segue Protection or Max in Sequence. However, they are included on the DMCA rule settings in case you need to use them.
The options include:
- Hour Marker: Cuts off or resets the rule whenever the Scheduler encounters an Hour marker.
- Sweep Marker: A sweep marker is designated using a LogNote position in your clock. A single sweep can’t be more than three hours long. If you choose this Rule Cutoff option, the rule will only count songs that play between two Sweep markers and will reset once it passes into the next sweep. So, for example, if you happened to schedule two songs from the same album on either side of a sweep marker, your rule wouldn’t count this as two in a row.
- Break Element: A break element is anything that has more than a zero runtime but is not scheduled from a category, like Stopsets, Lognotes and Traffic positions. So, for example, you might only want a certain rule to count songs that fall between two traffic breaks in the hour.
- Record Type: You can specify Music or Non-Music here. For example, you may want a rule to apply across a sequence of songs, but reset once a piece of imaging plays.
For the purposes of meeting DMCA guidelines, you’ll want to make sure you capture any potential violations within a three-hour period, so be cautious when using any of these Rule Cutoffs that you aren’t inadvertently resetting the count too soon.
One more tip: Another DMCA rule requires that you display the title of the song, title of the album and the featured recording artist. So, make sure you have that information filled into your MusicMaster library! Blank values may be read by the tracking service as “Unknown….” and you certainly don’t want to get flagged for playing three back-to-back songs from an album titled “Unknown Album”!
If you have any questions about the setup in MusicMaster, do not hesitate to contact your MusicMaster Scheduling Consultant.