MusicMaster Blog
What is the Average Year for the Music You are Playing? posted on March 11th, 2019
By Jerry Butler
Does your active library skew older or newer? What is your target year? I occasionally get calls from programmers wanting to find out the average year for the music in their library. Here is a quick way for you to analyze the yearly breakdown of your library.
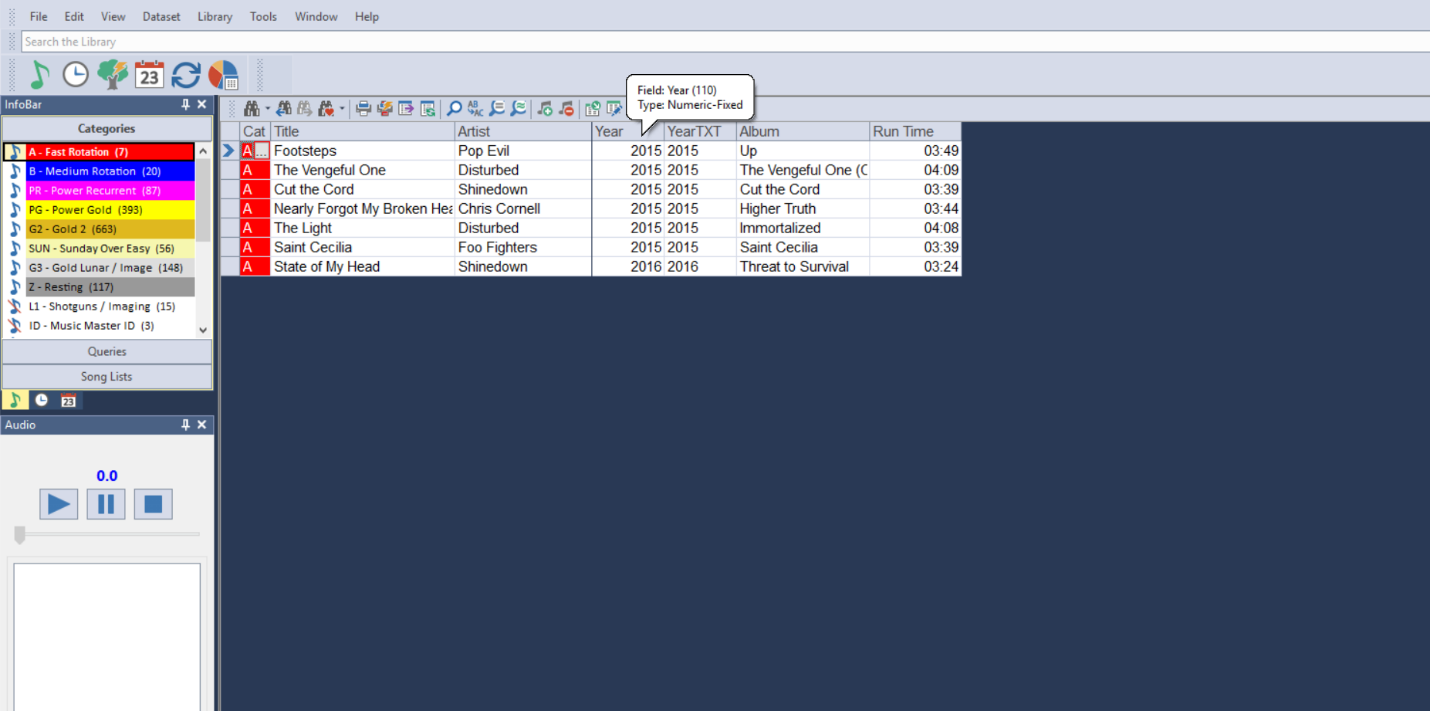
First thing you will want to do is confirm the field you are using for your year data is a numeric-fixed field. Many stations use a text field for this, but there is an advantage of using the numeric-fix field. To check what your field is, you can hover your mouse over the header for the field in your library maintenance window. You’ll notice I have both a year (numeric-fixed) field as well as a text field side-by-side for this demonstration.
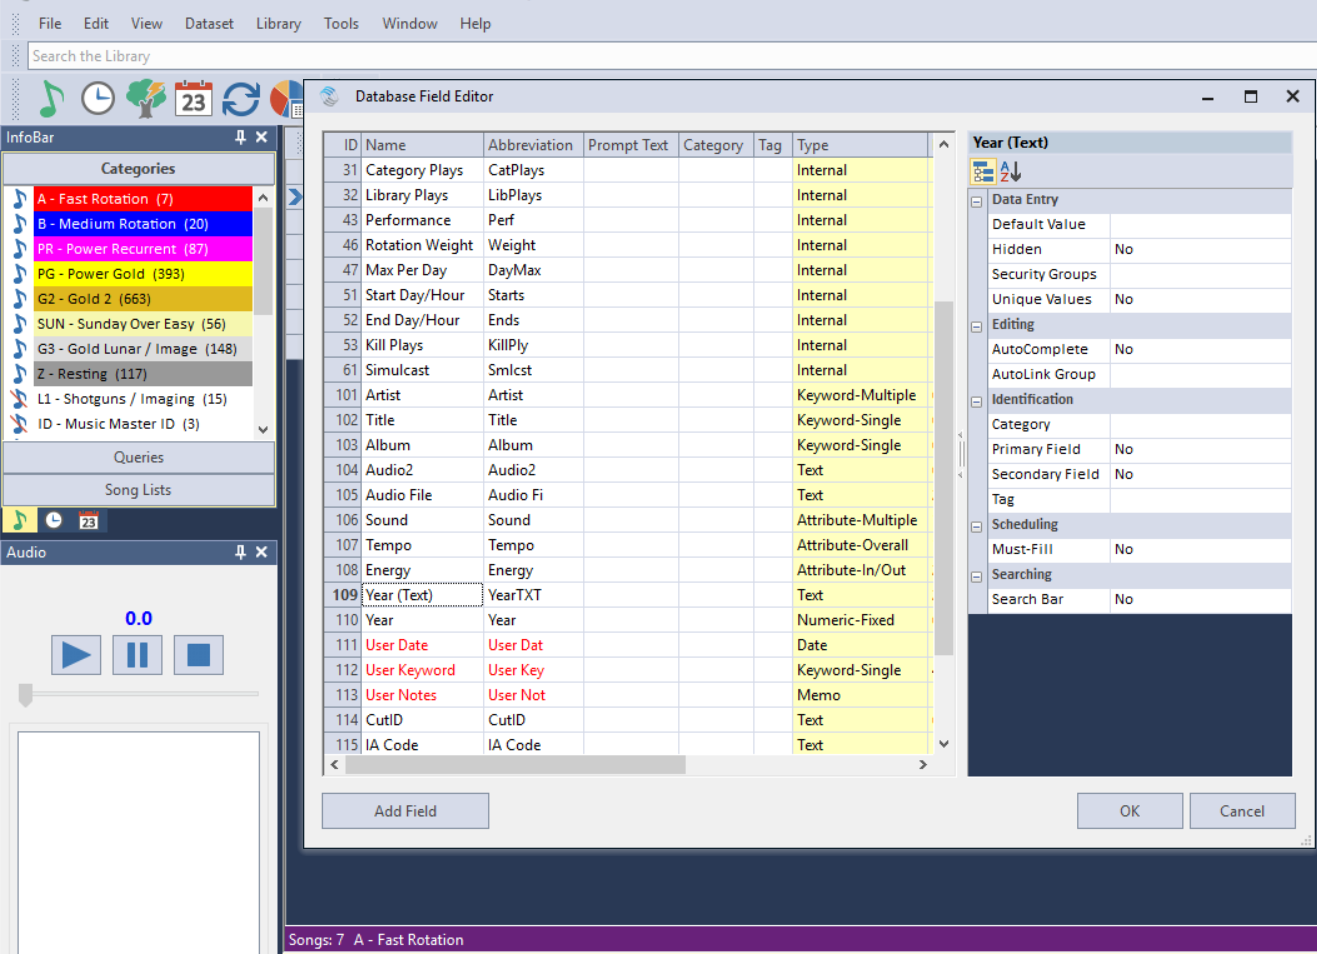
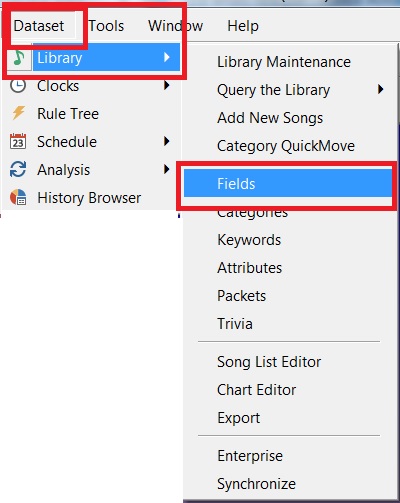
You can also click dataset, library and fields and locate your “Year” field. The description will be on the right telling you if it is a text or numeric-fixed field. If it is a text, you may consider copying your year data over to a numeric-fixed field.
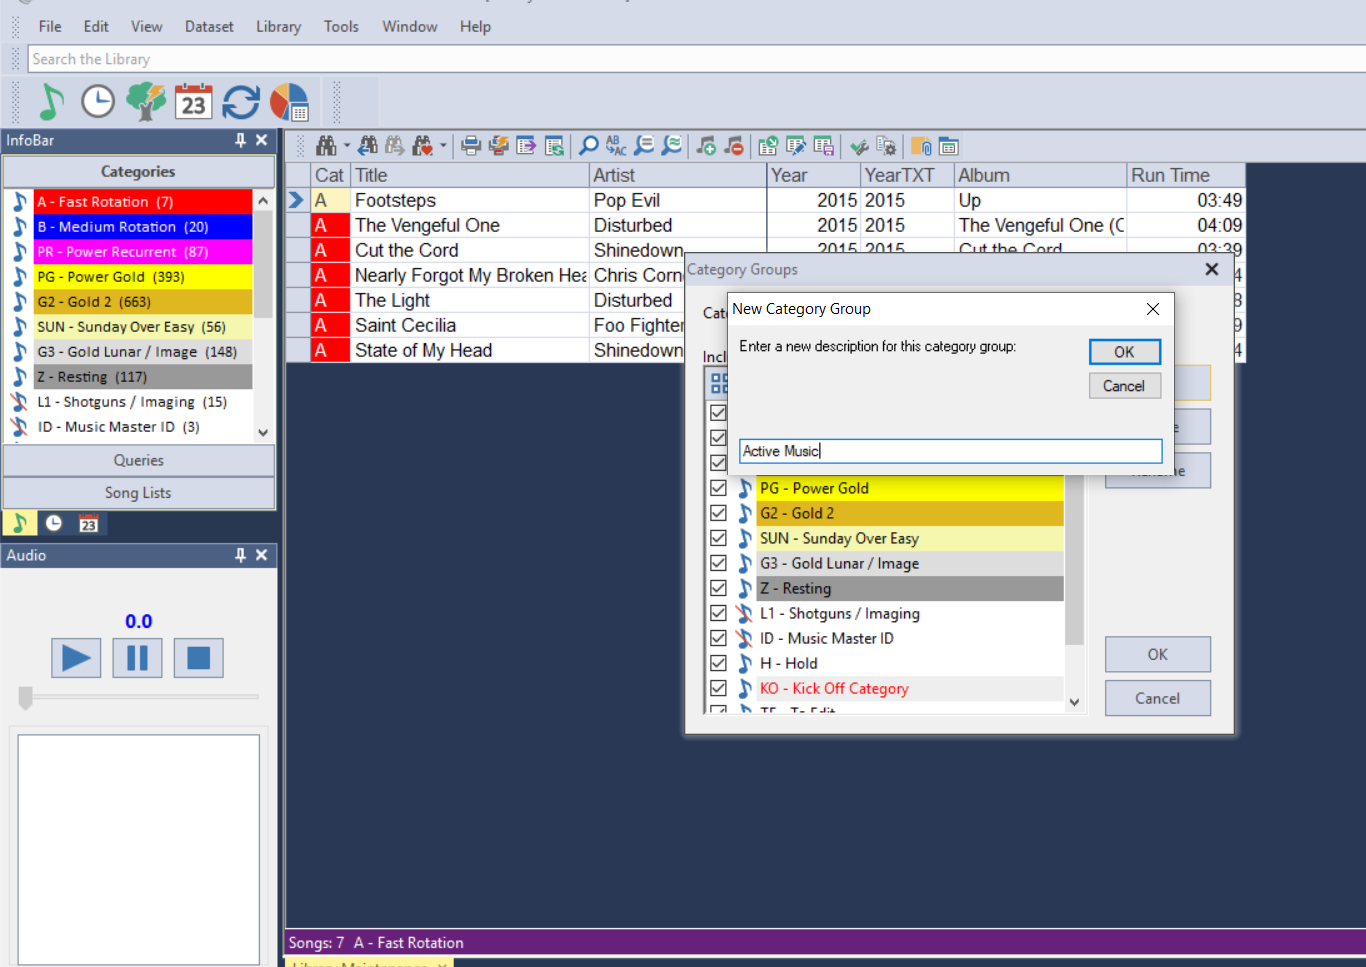
If you have a numeric-fixed field already, I recommend creating a category group for your active categories. This give you a more accurate view of what is airing on your station. You can do that by right clicking in your info bar (list of categories) and selecting category groups. You may also go to Dataset, Library and Categories and click Groups on the popup. Click new, type in the name Active Music and click “OK”. Select categories that are scheduling to be included in the group and click OK.
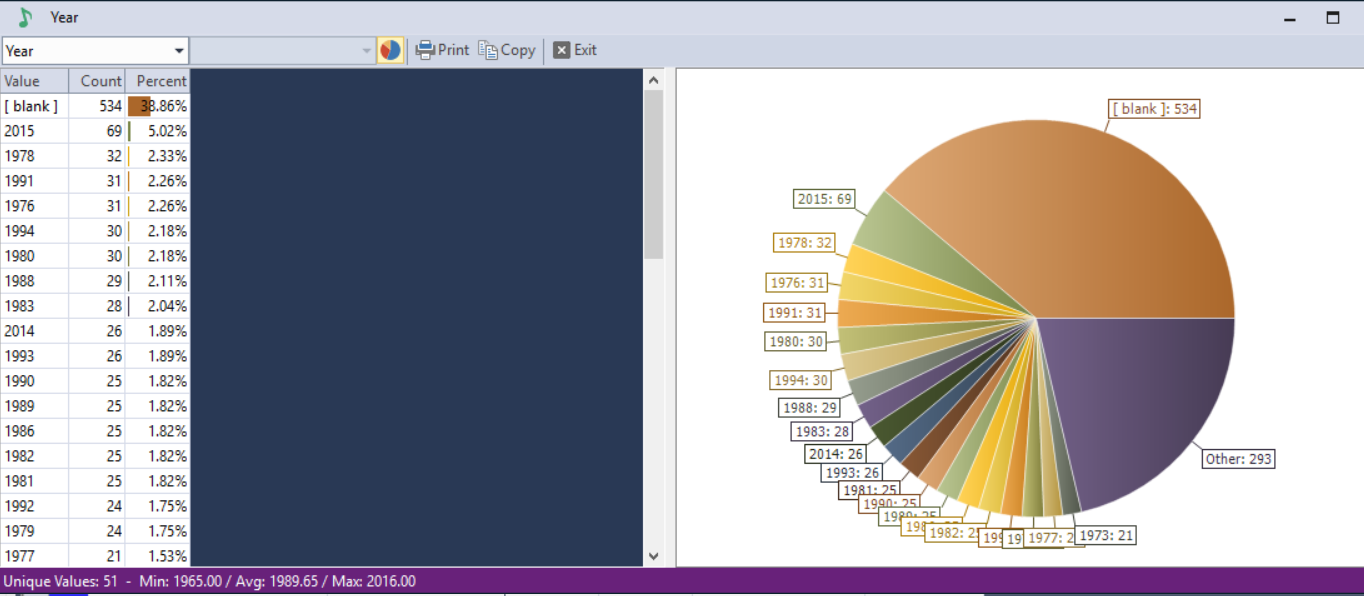
You can now pull up all active music by clicking on your new category group Active Music. Once the group is showing in the library maintenance window, you can right click on the “year” header and select library analysis.
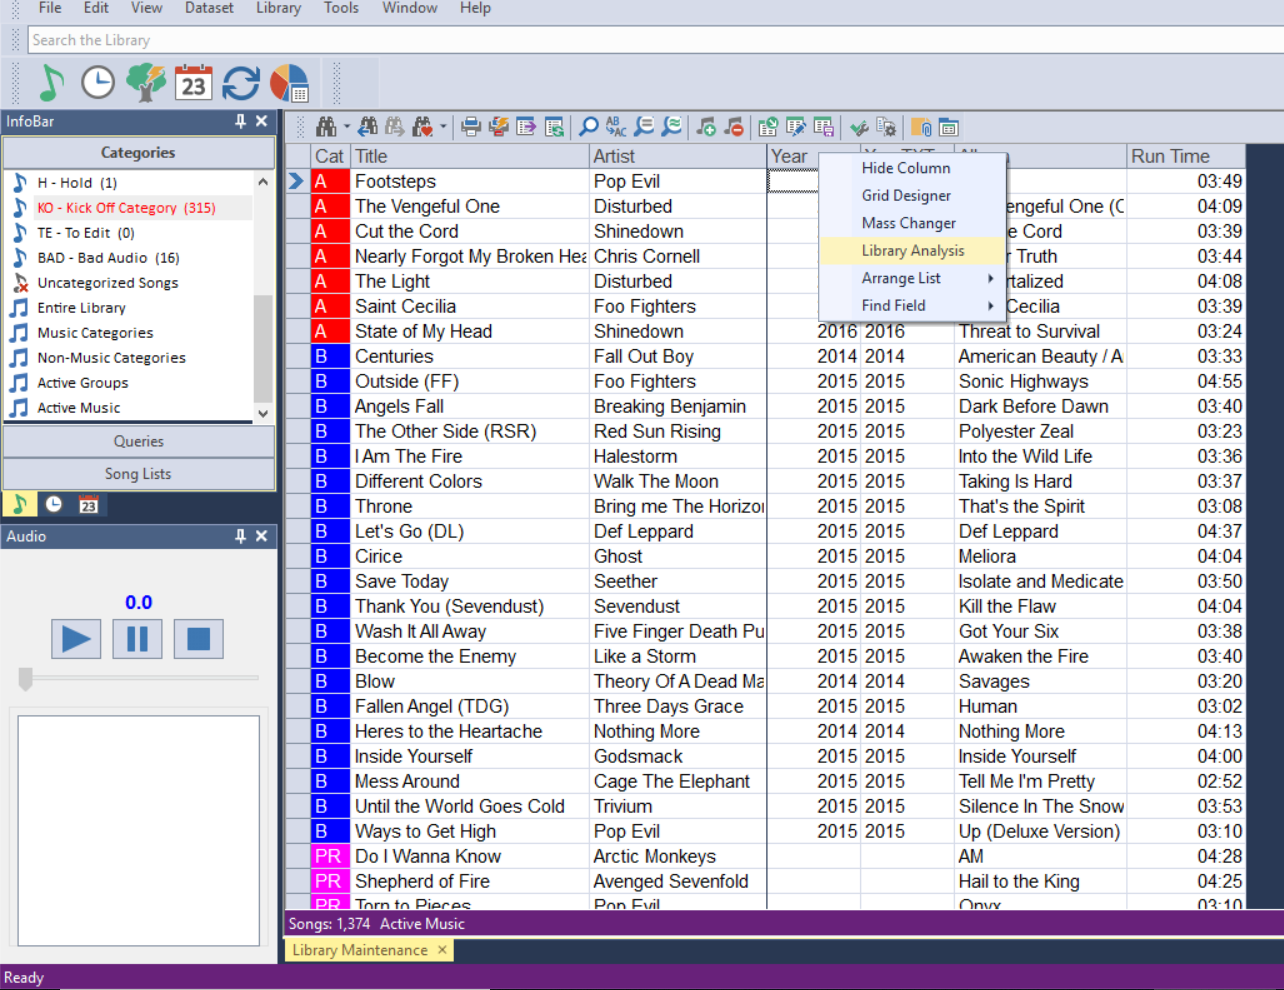
You will get a year breakdown in both the text and numeric-fixed fields as well as unique values. However, if you are using numeric-fixed, you will also be able to see Min (earliest year), Average year and Max (latest year) at the bottom of the display. This will give you a better idea of the music that makes up your active library and how many songs still need coding.
If you have any questions, reach out to your Music Scheduling Consultant.
Drag Text from MusicMaster to a Text Application posted on February 25th, 2019
By Brian Wheeler
Your consultant or regional PD calls and says “I want to take a look at your gold category. Can you send me a list?” Oh, man…how do I print that out again? I think I can do a quick print somewhere…I wish I could just drag this category to Excel and be done with it.”
Now you can.
Stop Listeners from Hearing Your Station! posted on February 11th, 2019
By Jesus Rodriguez
Have I confused you with the title of this blog? You are probably thinking why anyone would ever want to stop their listeners from hearing their stations. I tell this a lot to my clients “You need to prevent your listeners from hearing your station to keep your flow going. The second a listener hears something you may have taken them out of their subconscious that could have them change the channel.”
For me to explain myself let’s review the definition of hearing.
Definition of hearing. 1a: the process, function, or power of perceiving sound specifically: the special sense by which noises and tones are received as stimuli.
If you want to increase your TSL, you have to think beyond your song’s tempos and moods. We also have to consider the same for the items in between the records. We need to code tempo and mood for jingles, sweepers, and any other form of imaging. The majority of our radio listeners will listen to your station’s music in the background whether at work or on the road. If you schedule both your music and non-music items in MusicMaster, you have the ability to control the entire experience. Your audience might stop listening when something grabs their attention like a loud sweeper. Also, an imaging piece that has too many explosions, production effects and segues into a slow intro or ballad, or jingles that are just harmonically out of tune with the song that comes after it, can cause the person to wake up from a listening state of mind. It is important to devote as much time to your non-music items as it is to your music.
If you are not currently scheduling your imaging within MusicMaster, I would like for you to reconsider and I promise that you will notice a significant difference. This adjustment is so much better than having a random cart playing in front of each song. If you are scheduling your imaging within MusicMaster, I would like you to consider some of the following blogs to help you have a much better flow in between the songs than rotating an imaging category. If you need any assistance with any of the following suggestions, please contact your MusicMaster support representative.
https://www.musicmaster.com/?p=4905
A New Look Resolution You Can Keep posted on January 28th, 2019
By Jerry Butler
Roughly 80 percent of people have already given up on their New Year’s Resolutions. Here’s one you can easily keep: updating the look of your MusicMaster. MusicMaster has always been known for allowing users to customize the database, views and more. In MusicMaster Version 7, we have added additional themes/display options and added category coloring options to freshen up your look.
Click on Tools, Options and Themes / Display Options. You can select various themes including Back in Black, Paint it Black, Purple Rain, Silver Bells, Song Sung Blue or Cherry Pink and Apple Blossom White.

To update your category color scheme, go to Library, Categories and selecting Color Schemes.

Not only are there numerous different pre-set color schemes, note you can apply one color set to your music and a different one to your non-music.
These options ensure you’ll keep at least one New Year’s Resolution in 2019!
If you have any questions, please contact your Music Scheduling Consultant.
Custom Rule Settings for Special Sets posted on January 14th, 2019
By Dave Tyler
I had an interesting call the other day. The client is a talented super-user at one of the great radio stations using MusicMaster and he had an interesting dilemma. He uses “Special Sets” to schedule customized Artist Intros into songs. He has 3 of these Special Sets in each hour but only wants them to play a maximum of once an hour and on top of that not always in the same spot. The first thought would be to use a Max Quota per hour rule or Min/Max rule of some sort but the problem would be that if we set it at 60 minutes then it would always become available at the same time. Here is our solution to this unique request.
We decided to re-purpose a Yes/No Field and then add a Time Separation rule to it. To begin with go to Dataset/Library/Fields. I clicked on the header for Type twice to list the fields in descending Alphanumeric order as you can see below.
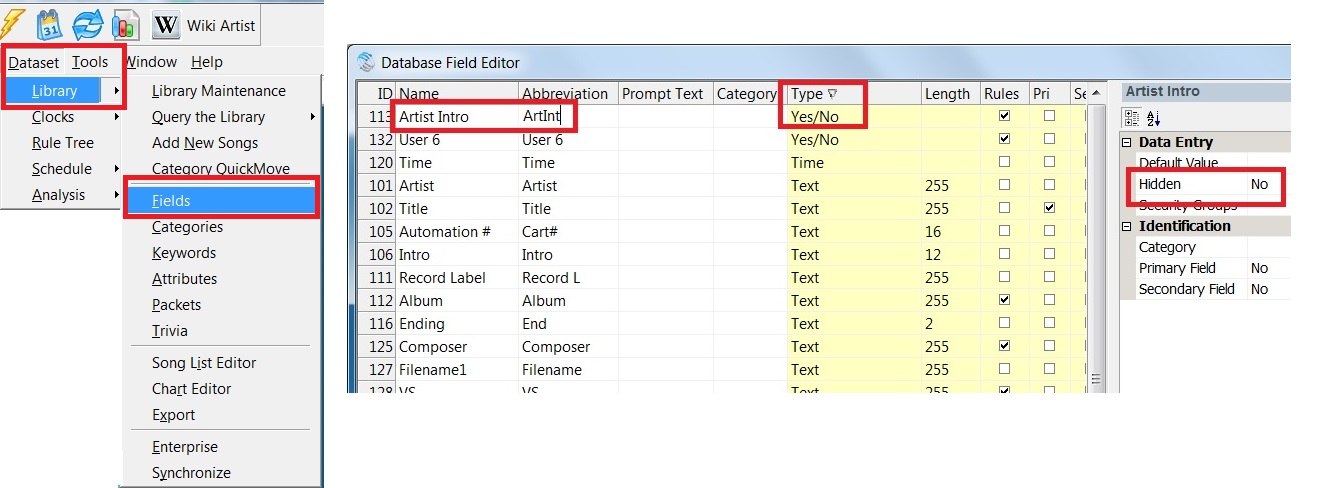
It turns out there was an available “User” field that I could use. You may have a Yes/No field you are not using and you can simply directly enter the name(type) into Name and abbreviation. If for any reason you do not have a field available any of our Music Scheduling Consultants would be happy go “Under the hood” and add one for you. It is as easy as sending us your data. I renamed the field “Artist Intros”. Now I open my Artist Liners category and add the new Yes/No field to my layout by clicking on the Show/Hide Fields icon, locating the field and dragging into my layout.

Now when I return to my Artist Intros category I have the new field with empty boxes. Place a check mark in each box to indicate “Yes”.

Now we open our Rule Tree and open the “Unbreakable” folder for the Artist Intros category on the left and the Yes/No Rules on the right. We then dragged the rule into the Unbreakable folder and set it for 1:07 (1 hour and seven minutes) and saved the rule tree.

Remember our Programmer wanted to play only one an hour but have it rotate around the clock each hour. By setting it for 67 minutes it will schedule an Artist Intro (If available for that song) in say “Position 1” and then an Artist Intro would not be available for Positions 2 or 3 that hour therefore successfully keeping it one an hour but then it goes further because the setting is at 67 minutes it will also disqualify Position 1 in the next hour and be available for Position 2. In this way we are not only limiting how many can play in an hour to one but we are also forcing it to rotate into different positions within the hour and keeping it unpredictable.
At MusicMaster we love when you call us and want to accomplish something we haven’t heard of before! We are all lifelong radio programmers and jocks so we speak your language and get excited when you come to us with a new way of looking things and challenging us to make it happen. As always if you have any questions never hesitate to contact your Music Scheduling Consultant.
Find “Similar Attributes” tool …what’s that? posted on December 31st, 2018
By Marianne Burkett
MusicMaster has always had a find “matching” values feature in Library Maintenance where you put your cursor on any field and click the magnifying glass with the “=” icon and songs with the same value would pop up. In Version 7, we’ve gone a step further. Right next to this icon is a magnifying glass with a “squiggly” equal sign – Find Similar Values.

You can pick and choose which fields to use for this feature. Any one, or multiple attribute fields.
Open your Field Editor… (Dataset/Library/Fields).
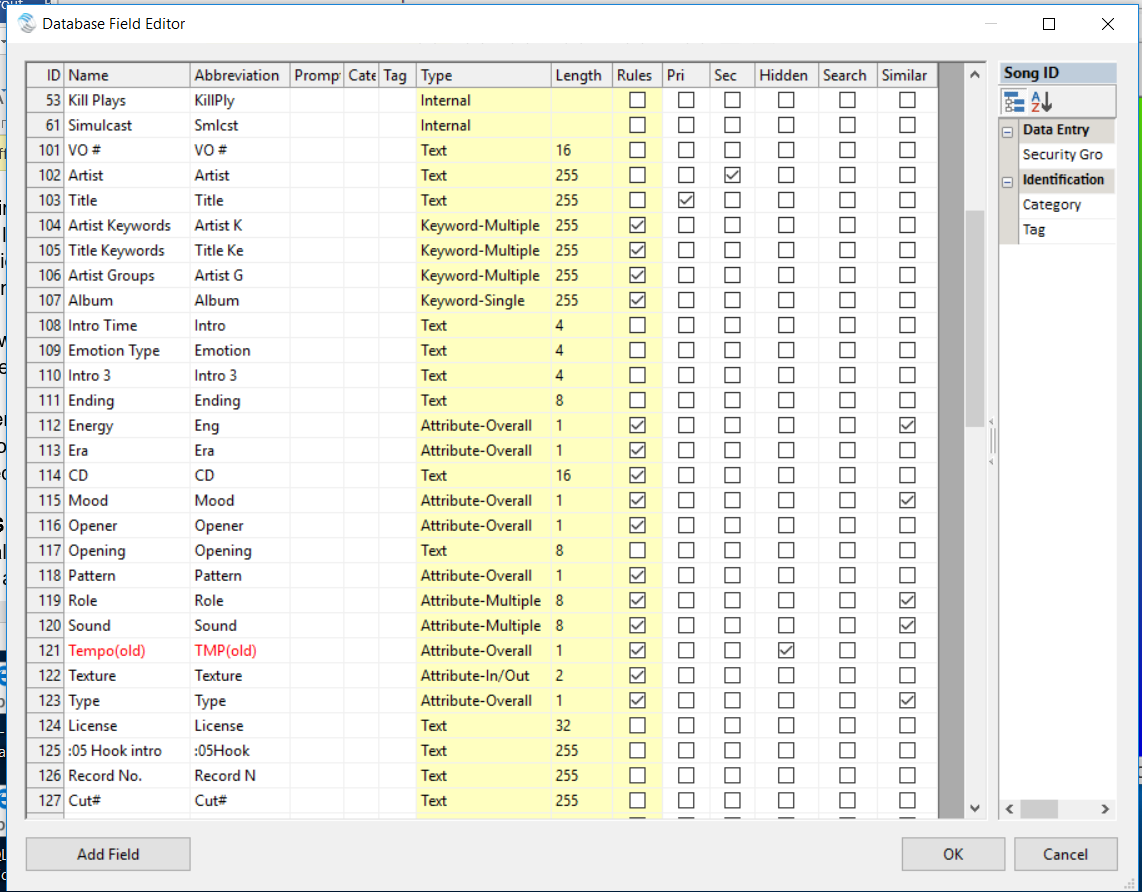
You’ll see the “Attribute Fields” under the column “Type”. Note the header “Similar”. In the sample above, I have Energy, Mood, Role, Sound and Type checked. Anytime you make changes in the Field Editor, be sure to click “OK” to save your changes.
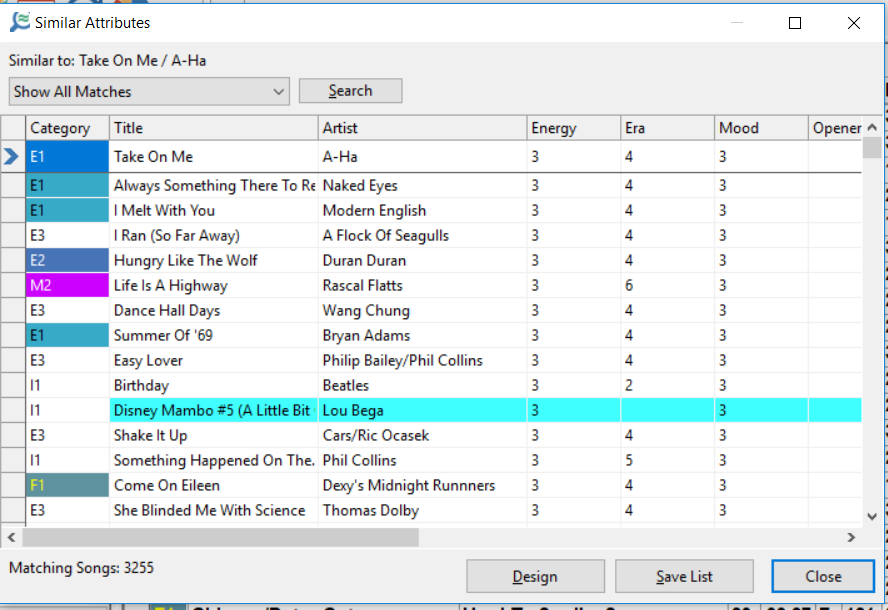
Now go back to Library maintenance and click on the magnifying glass with the squiggly equal sign icon. You will initially see “All Matches”. Now, look at the bottom of the screen. You have DESIGN, SAVE LIST and CLOSE. Design allows you to choose the attribute fields you’d like to see in the display. Save List is just that. Click that and you’ll have a new Song List to utilize.
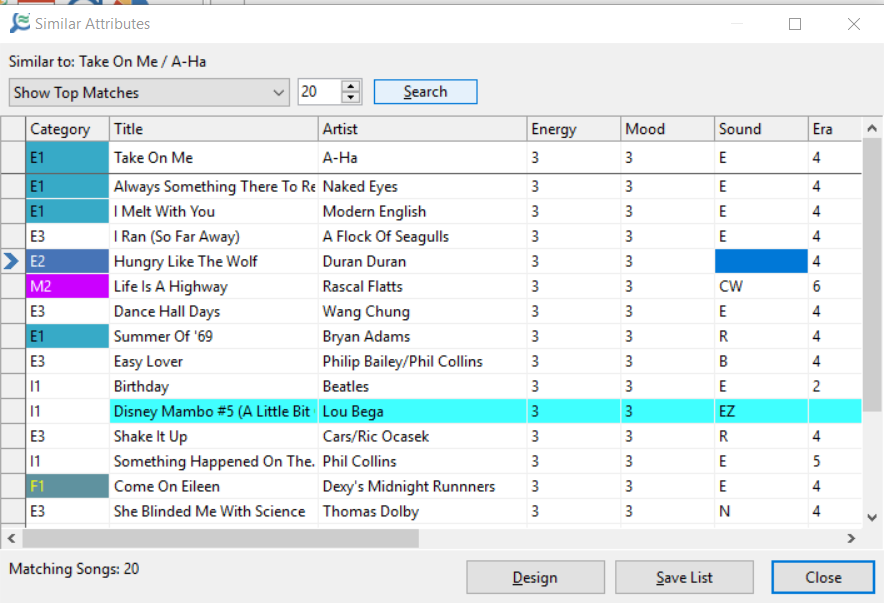
Use the Drag down options at the top and you’ll see a few more selections:
In the sample below, I’m showing the Top 20 Matches. You’ll notice too from here you can Save List – which may come in handy when trying to come up with a Theme type weekend or music you may want to include in some kind of specialty show.
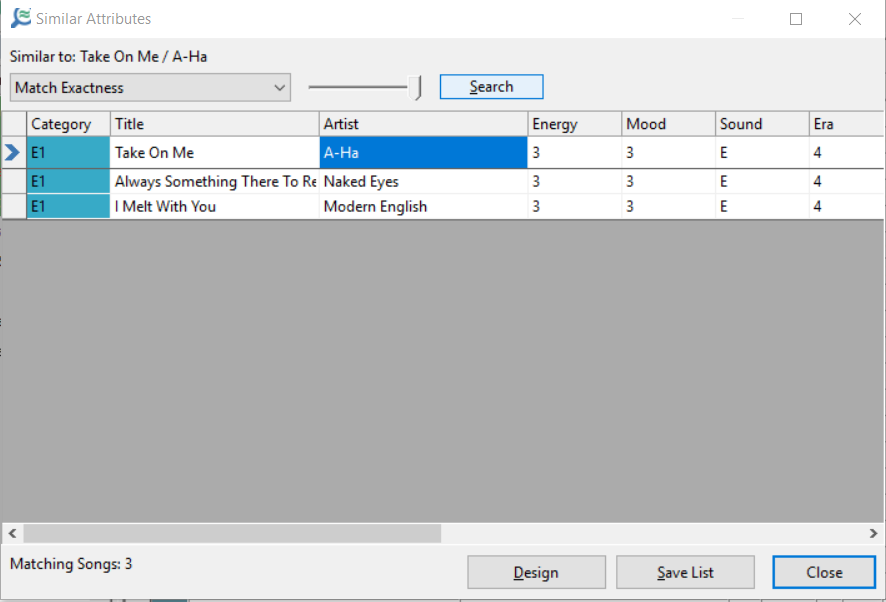
There is also a “Match Exactness” option that will come up with a list of EXACT matches in a sliding scale from 0 to 10 or, least to most exact. In the sample below the songs shown are the only songs in this library that match the attribute fields with complete accuracy when I have the slider to the far right.
I hope this feature will help you build the kind of Song Lists that make it easy for you to schedule your specialty shows! If you have any questions about this Version 7 feature, please contact your support person.
Happy Scheduling!
Replacement Song Options posted on December 17th, 2018
By Paul Ziino
You are in the Schedule Editor, you double-click (or press F9 or K) on a position to replace that song but often don’t like the options presented. Now you click the binoculars icon to open a new query within that replacement list, check some additional categories, and OK.
Wouldn’t it be nice if MusicMaster could just load that full list of categories each time you wish to do a replacement?
Go to Tools/Options, and under Schedule Editor Options click Replacement Song Options. The first search mode that appears is for Replacement Song Search (F9). By default, it is set to “Use category of currently scheduled song or element.” But you have four other options to choose from. You can have it look at all categories with or without uncategorized, the category list from the clock element, or the one I’m suggesting, “Specific Category List (Below).”
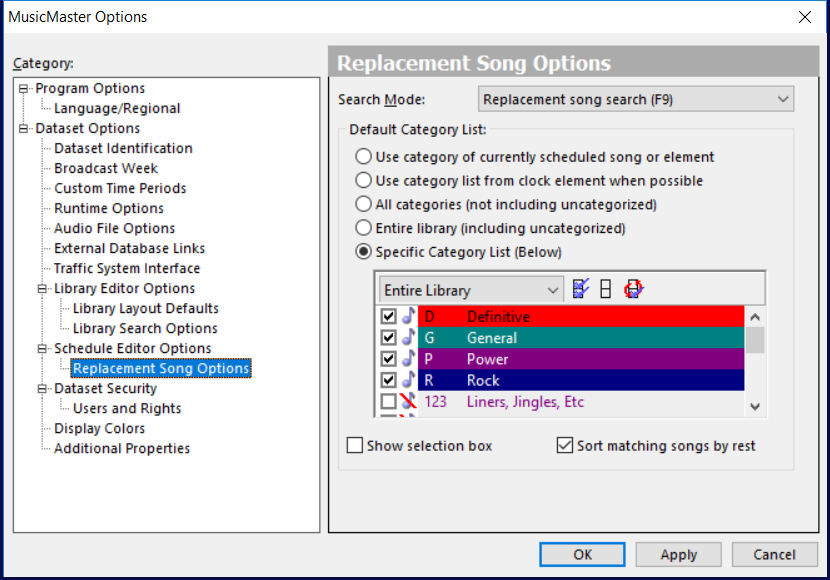
Select that option, then check the categories you want your double-click (or F9 or K) to load. Or you can check the box to “Show selection box” and MusicMaster will let you choose the categories each time you wish to replace an element. I’d advise to “sort matching songs by rest” so the most rested songs appear at the top of your replacement list.
There are lots of customization tools at the ready. Ask your MusicMaster Scheduling Consultant which ones will work best for you!
Customize the look of your clocks in Version 7 posted on December 3rd, 2018
By Marianne Burkett
As I’m digging deeper into Version 7, I’m seeing things I’ve always dreamed of as a programmer.
First go to Tools/Options/Display Colors and set up this feature that has been in the program for some time. You can select colors you’d like to see for various elements in the clocks. In the capture below, I made Stopsets Deep Red and Lognotes Pale Yellow.
When building clocks, I love our “Pie” view. If you color your categories with various colors, it makes it simple to distribute the categories evenly through the clock.
Check out the default view in Pies which we’ve always had.
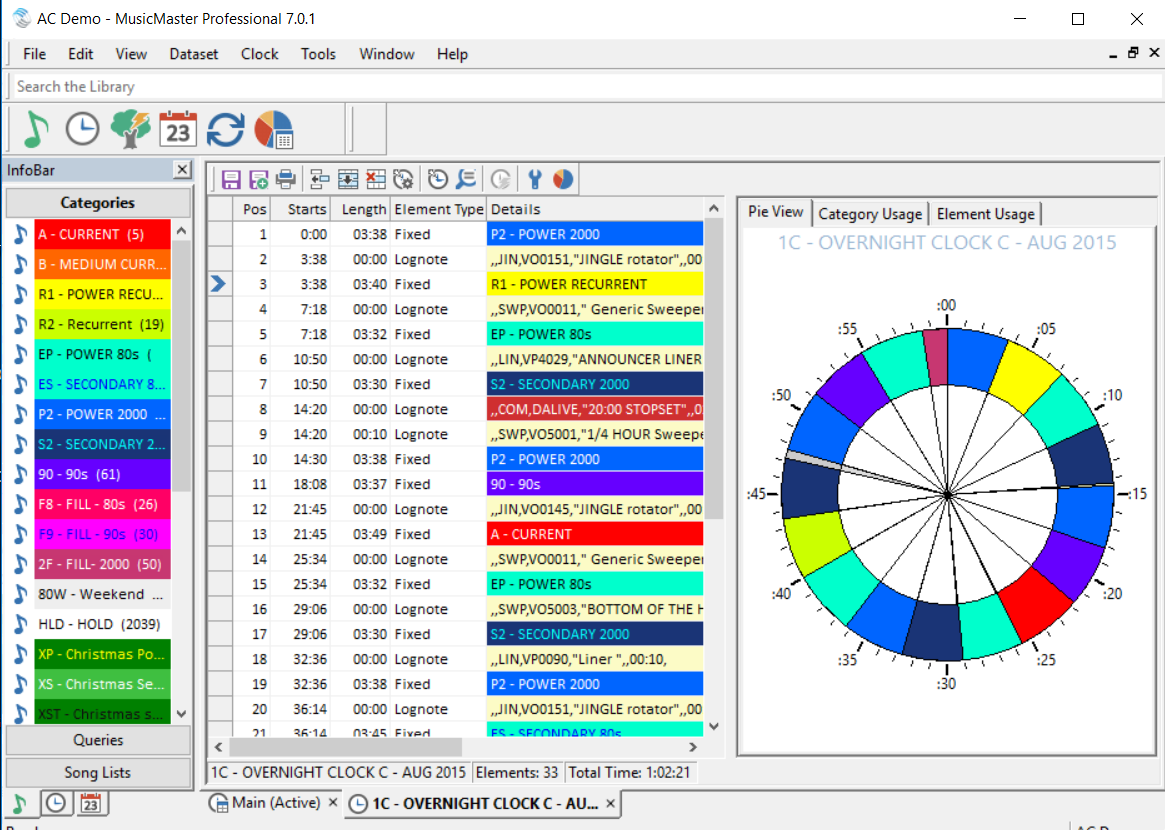
In Version 7, with a quick visit to Tools/Options/Additional Properties you can put the number “1” in “PieClockLabels” in the Clocks Section, and you get category code and element information in the pie view as well.
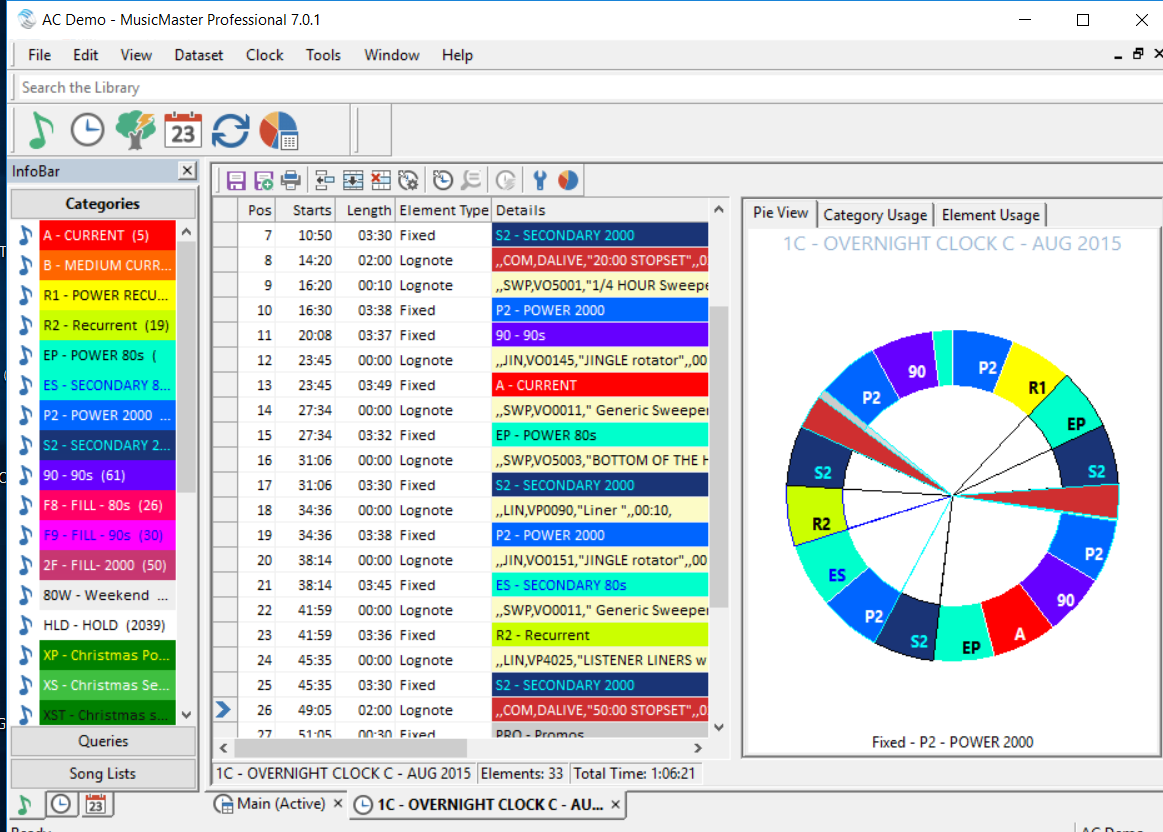
When you hover over anything in the pie you also get details about lognotes, music and non music descriptions below the pie. In the sample screen shot, my cursor was on a P2 Power 2000 category.
If you made a lot of clock changes and use the pie, this new feature can help in making sure they’re spaced out correctly.
If you’d like the video tour of new core features in Version 7, click the link below.
https://www.musicmaster.com/version7.php
Any questions, call your Music Scheduling Consultant!
Holiday music, turnover analysis, and autoburn posted on November 19th, 2018
By Brian Wheeler
If you’re like most programmers you’re getting ready to dust off the holiday music for another season. Some of you may be playing holiday music already!
There are lots of pitfalls that can occur when reintroducing holiday music to your programming. Do I have enough music? Are there elements in the clocks I no longer use? Do I need to put in new programs I didn’t run in past years?
With all the other things you’re trying to remember for the holiday season, you may forget to see how those holiday music categories are rotating. Holiday music can burn easily. You don’t want to add to the burn by having bad rotations. To make matters worse, many stations gradually ramp up their holiday music which CHANGES the rotations on these holiday categories with each increase of usage in their clocks. Are you checking those rotations to make sure you’re not stacking up? What can be done to compensate for a poorly rotating holiday category?
The turnover analysis screen can give you some great insight as to how these categories are plotting out as the holiday season advances. If you do run into a rotation that plots the same songs in the same hours or dayparts, like this:
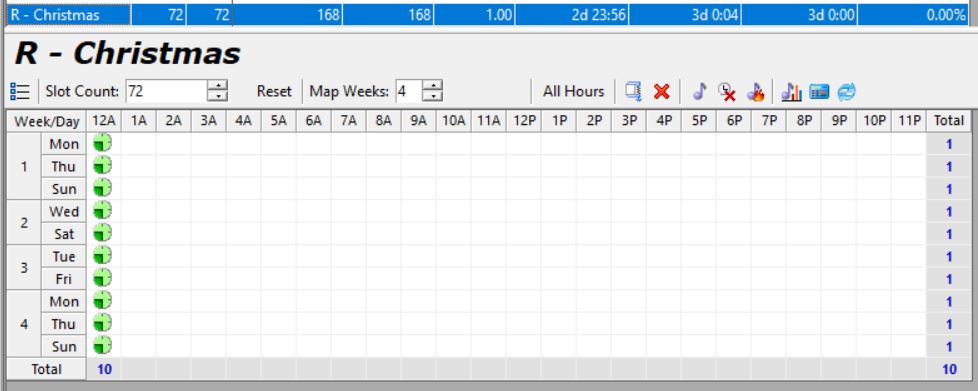
An “autoburn”, which can be described a simulated play, can be put into place to alter an otherwise redundant or “stacking rotation”. In this case, we ‘burned’ one song at midnight each overnight to force an otherwise mathematically redundant rotation into a more ‘stair-stepped’ rotation that moves your music through the dayparts over time.
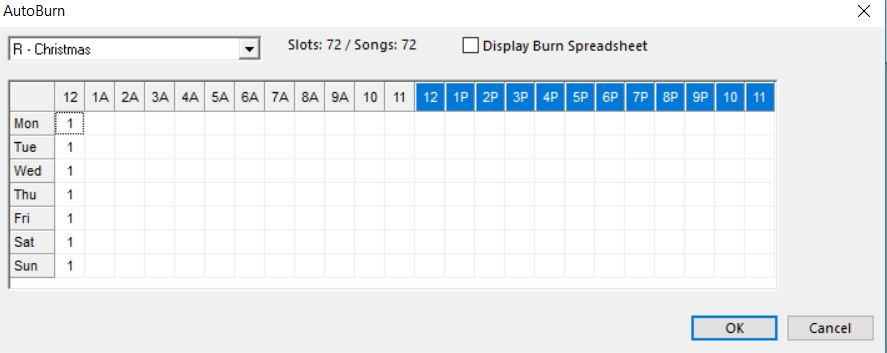
The result is better coverage from day to day and less chance of premature burn with your audience.

Autoburn can be the fix you need to get those holiday songs moving through the different hours and dayparts again when changing the clocks or changing the category size is not a possibility.
As always, if you have questions don’t hesitate to ask your Music Scheduling Consultant. Happy Holidays!
Creating Custom Fields in 7.0 posted on November 5th, 2018
By Dave Tyler
The Field really should get more respect. It’s the key to all the magic in MusicMaster. The fields you have in MusicMaster allow you to organize the data, filter it and later turn on the rules to make your station sound great. Often a user will want a specific field type but they have already used all of the fields of that particular type in their database already. Let’s say for instance you want a “Sound Code 2” field but you have already used all of the Attribute Multiple fields in your data. Since the dawn of MusicMaster you would need to send your database to me or one of our other Music Scheduling Consultants and we would go “Under the Hood”, add the field for you and then return your data to you. Although not a lengthy process, MusicMaster 7.0 will now allow you to perform that process to happen in mere seconds.
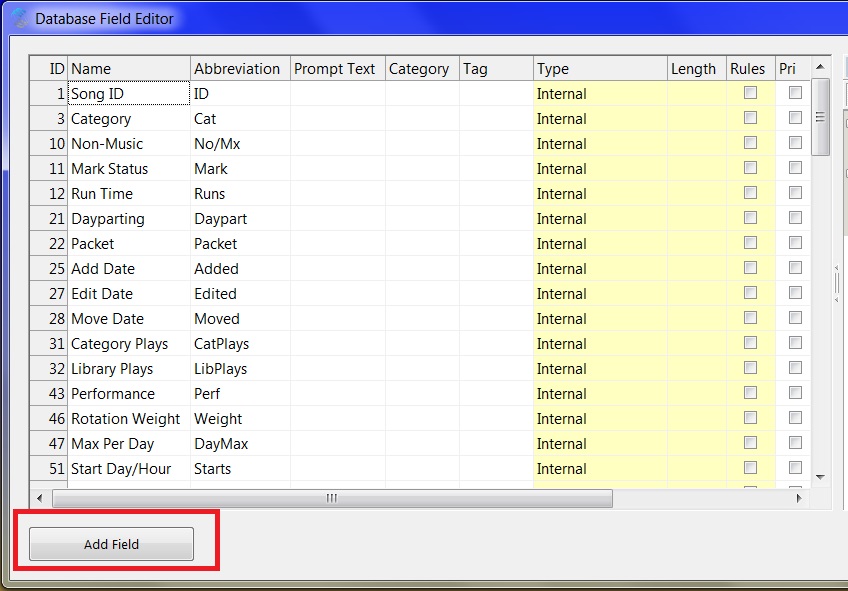
Let’s use my example from above and say you want a new “Sound Code 2” field. This field is usually an “Attribute Multiple” which means if you were a Country station and used codes in this field like P-Patriotic, T-Trucks & S-Sad then Lee Brice’s “I Drive Your Truck” could have all 3 codes on it P,T & S and if you wanted to keep “Sad” songs from playing back to back you could put a Segue Protection rule on it or if you wanted to play a group of “Truck” songs you could filter to achieve that too. So let’s make the field but get ready because this is going to be as fast as driving through a one traffic light town. Click Dataset/Library/Fields:
Now click the “Add Field” button:
And now select the type of field you want to use and name it. I chose “Sound Code 2” Attribute Multiple. You will also notice the “Abbreviation” box. I labeled this “SC 2”.
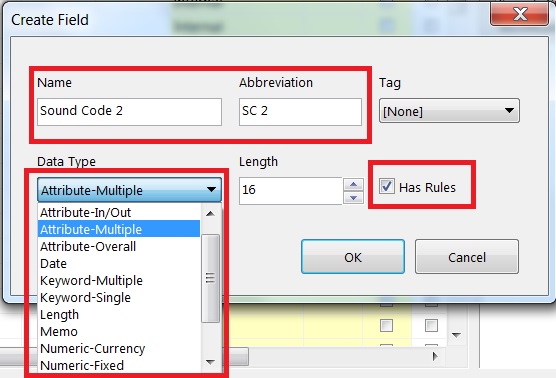
The abbreviation of SC 2 comes into play when I add this field to my layout. In my examples below you see that when I added the field I get the full name “Sound Code 2” but if I am having a screen real estate issue and want to shorten that field to keep my layout view all on one page without having to scroll, the field automatically becomes the abbreviated “SC 2”.

It is important to note that when you are creating a new field you need to know the “What” and “Why” of it. What are you trying to achieve with it and why are you using it? Do you just need a Text field or a Keyword field or one of the different Attribute field types?
One other important note: You need to be the only one in the data when you add the field. If not, you will receive a warning about this when you try to exit the Field screen.
Most of this can be found in the terrific “Help” section in MusicMaster but if you are not sure then double checking with your Music Scheduling Consultant is always a good idea.