
MusicMaster Blog
Scheduling from a Different Time Zone posté par Jesus Rodriguez le April 19th, 2021
Scheduling from A Different Time Zone
By Jesus Rodriguez
It appears that with COVID and the unfortunate downsizing in our industry, there are more music schedulers doing logs for stations outside of their location. Some are scheduling for stations located in a completely different time zone. While some are scheduling music remotely, accessing a local machine at the station, or sending backups to each other so that the local office can export the logs. Others are doing everything from their home computer or office location while exporting the log directly to the station across the country.
So, what is the big issue, you ask? Many are exporting the same log to multiple stations and need for the shows to air at the same local time. For example, if you were scheduling in Los Angeles for New York, then the LA midnight hour is heard at 3 am in New York.
You could focus on having one log and share it among your other stations without any concern that your “Tune in at midnight tonight” show promo will be accurate with no problem that the show will air at 3 am because of your time zone difference. You probably already realized it takes a load of work off your plate by reading the last sentence not to manage two different databases.
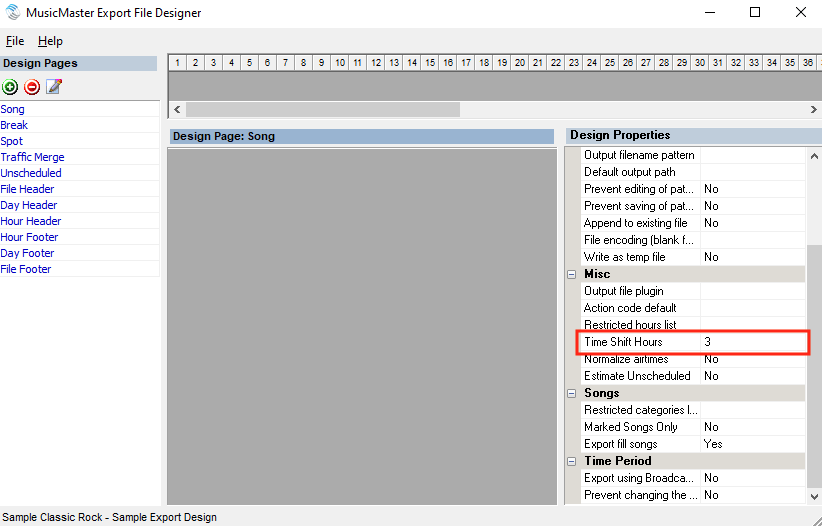
The export design can assist you with this hurdle by using Time Shift located in the MusicMaster Export Designer. You can find this in the Start menu under “MusicMaster”. Open this and pick your station. Next, go to File then Design Properties. In the Misc. section, find “Time Shift Hours”.
You can export your New York copy of the log with by putting a 3 in Time Shift, which will export everything three hours back. This feature will help have a mirrored programming for any time zone where you share your logs. If you were in New York sending it the other way to LA, you would add a minus sign -3 in your Time Shift.
“But what about my sweepers? They are different at both markets that will never work for us!” I hear you loud and clear with have to answer for that too called Virtual Breaks. This feature allows you to select the correct sweepers for the proper export. Here is a video tutorial on that topic. https://youtu.be/73_7_74aYvE
Combined, these options give you the control to schedule your logs so they’ll sound the way you need them no matter what the time zone.
If you have any questions, reach out to your Music Scheduling Consultant.
Song Rest: Rules or Goals? posté par Dave Tyler le April 5th, 2021
Song Rest: Rules or Goals?
By Dave Tyler
We are all aiming for good, even rotations. We want all songs in our categories to play. It feels good when you look at the History Graph and see those beautiful patterns filling the day.
The starting point for this is song rest. If a song was not required to rest it would always be available to schedule and this could lead to potential problems. We all have those wonderful medium-tempo, feel good songs that are easy to schedule. If the song happens to be a one-hit wonder then it is even easier to schedule because Artist Separation is never a problem either. Without song rest, you could have a one-hit wonder scheduling more than a core artist. On the other end of the scale, you have songs that are more difficult to schedule. This might be because they are a fast or slow tempo or have a lot of featured artists on them causing Artist Separation rules to constantly fail.
Song Rest can help with these concerns. MusicMaster offers several ways to manage rest. Minimum Rest allows you set a custom time for a category so songs that have been scheduled sit on the bench and allow the other songs in the category to play. I love using the word “Churn” to describe this process. As the category churns we get to hear the entire category.
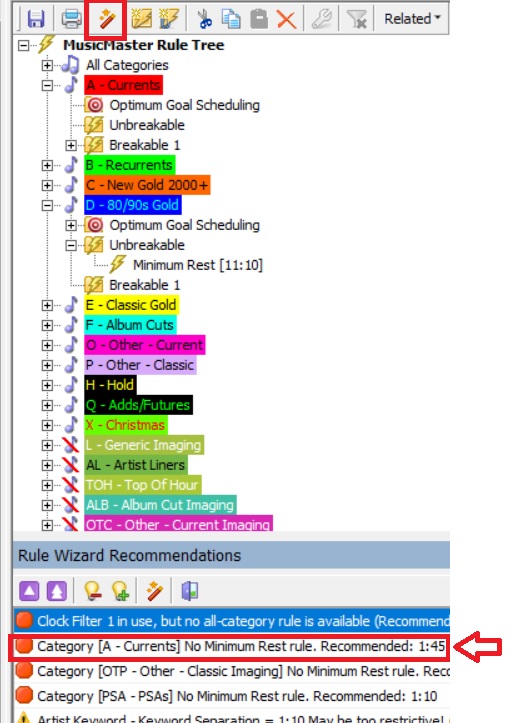
Setting a Minimum Rest rule requires some important math and is not something you just set off the top of your head. I don’t know about you but I know for sure math was not present on my list of why I want to be in radio! MusicMaster has several ways to find the right number. In your MusicMaster Rule Tree you can click on the magic wand icon and activate the Rule Wizard. This does all of the math you and I don’t want to do! It looks at how many songs are in the category and how many times you are calling for that category in clocks in your active grid and then offers a time that you can use. The brilliance is that the suggested Minimum Rest is only 60% of the slowest average turnover of the category. That means you can put this time in with the highest confidence it will not affect the rotation of a category. Keep in mind if you make changes to your clocks or the size of your categories, these settings need to reviewed and corrected.
Below is a picture showing the Rule Wizard and we can see the time it suggests for the A category. To use this suggestion, I can just double click on it and it will either be added to my Rule Tree or update the existing rule.
You could also click on the Turnover Analysis icon and you will see the suggested Minimum Rest number there as well. Please note in the pic below the suggested rest is different than the one in the wizard but off by a single minute. Both numbers are good. The algorithm used by the Wizard brings the number to the nearest “5” while Turnover Analysis goes to the specific number but again both numbers are spot on!

Using the Turnover Analysis number you would now go back to the Rule Tree and either add the rule from the “Song History Rule” under the available rule types or adjust the existing rule in the Rule Tree.
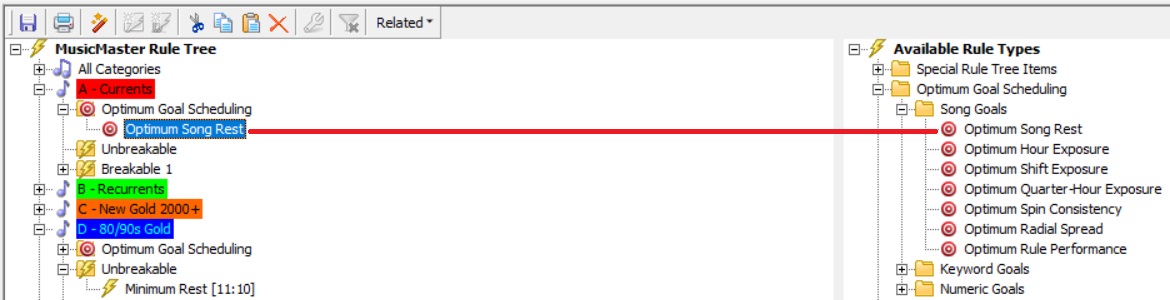
….but wait there’s more! MusicMaster also pioneered the cutting-edge tool of “Optimum Scheduling Goals”. Unlike a rule that can potentially leave an unscheduled song if no song can be found that passes, Optimum Scheduling Goals search the entire search depth and break any ties with the Optimum Scheduling Goals you’ve chosen. Even better, Optimum Scheduling Goals do all the math for you without reviewing it because it does this every time you schedule.
Here’s a simple overview of how Optimum Scheduling Goals work:
The search depth is reviewed and if there is only one song that meets all of the unbreakable and breakable rules, that song is scheduled. If there are multiple songs that meet this criteria or only songs that break breakable rules, the highest scoring songs are passed on to the Optimum Scheduling Goals to break the tie. A simple example is our Song Rest. What happens when there are multiple songs that all meet the Minimum Rest setting on the Category? Without the Optimum Scheduling Goals, the first song that passed the Minimum Rest rule would be scheduled. With the Optimum Scheduling Goals, it now looks to see if there might be an even better song it could schedule.
Now think about how this might work with the other rules you have in your Rule Tree.
If you have all of your rules for Artist Separation, Coding (tempo, etc.) and Hour Rotation AND you choose to use a Song Rest Optimum Scheduling Goal, MusicMaster make sure these rules are passed and should there be any tie, it will use the Song Rest Optimum Scheduling Goal to break the tie.
If you have all of the above rules as well as Minimum Rest and also included the Song Rest Optimum Scheduling Goal, this has the added benefit of making sure there is some “floor” to your Minimum Rest time and from there, the Optimum Scheduling Goal may come into play to give you even more.
Either way will handle Song Rest. The best one for you really comes down to your programming philosophy and how YOU want to manage or control rest with each category.
As always if you have any questions regarding rules or goals just call your Music Scheduling Consultant and let us help.
Library Maintenance Time Savers posté par Chris Malone le March 22nd, 2021
Library Maintenance Time Savers
By Chris Malone
There are many ways to save time and cut corners when working on your library, but here are my top three ways to short cut library maintenance projects when you right click on any field in your database.
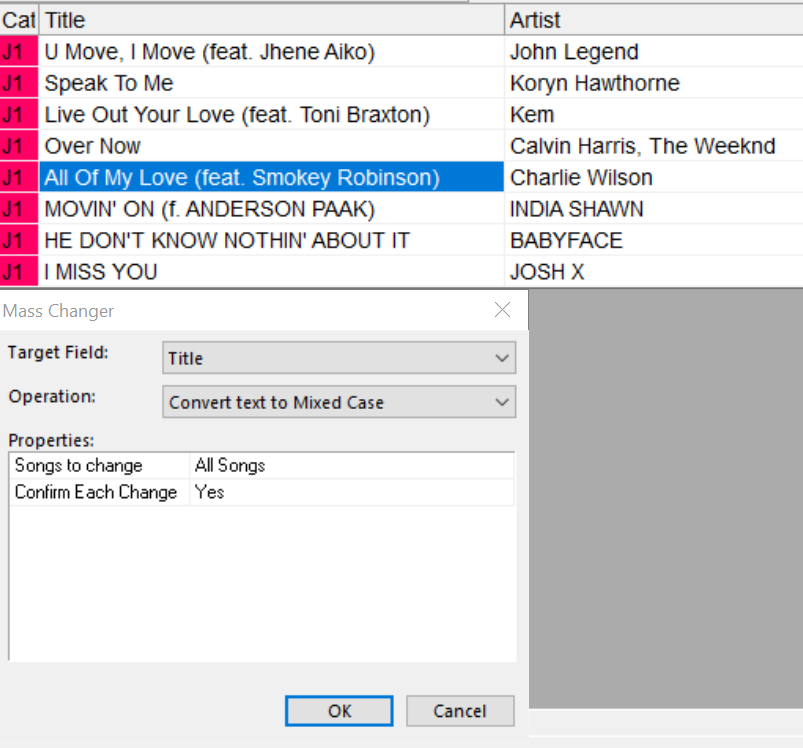
Mass Changer
This tool comes in handy for a variety of tasks such as: add/remove specific attributes or keywords, search and replace certain words or phrases or even assign sequential values to numerical fields. You can apply Mass Changer to other fields in your library maintenance (such as attribute and keyword fields).
I want to convert the Upper-Case titles to Mixed Case.
Warning: We recommend to ALWAYS take a backup before attempting to do any mass changer work in MusicMaster, these changes irreversible unless you have a current backup to restore.
Library Analysis
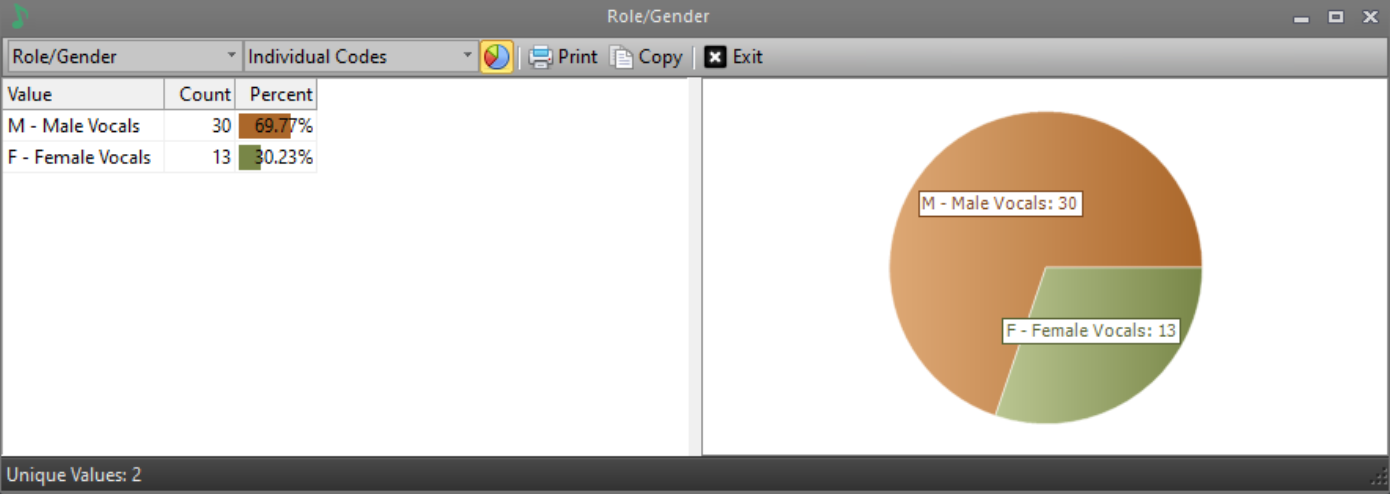
There is no need to pull out paper and pencil to figure out what’s going in a category or category group. You can run a Library Analysis to give you a view of what your inventory looks like with any given attribute or keyword. In this example, I opened our ‘Rotated Music’ category group and ran a library analysis on the Gender. This gives me a way to review my coding to better gauge if the station’s music selection is aligned with the overall strategy.
Find Matching Values
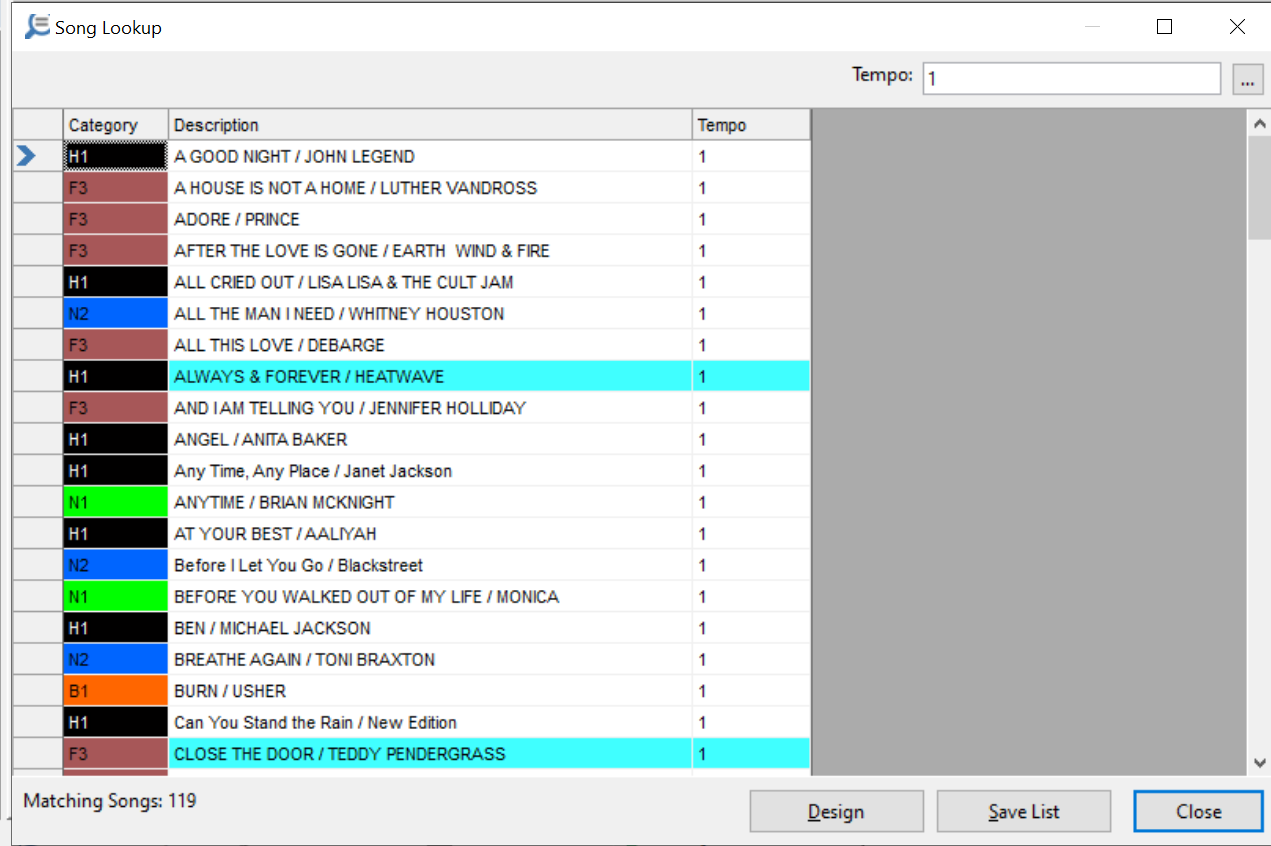
This tool allows you to find matching values across any given field in your library. In my example, I’m looking to add a ‘Slow Jams’ hour, so I conducted a Find Matching Values on the Tempo attribute field for the attribute code of 1 (which equals slow in this database). Now that I have the matching songs together, I can proceed to create a Save List that I can later use to build a Saved List clock with all ‘Slow Jams’.
You may already have a few ideas on how you can instantly get creative with our library maintenance tools to make life easier.
If you need any assistance, please don’t hesitate to reach out to your MusicMaster Music Scheduling Consultant.
Daylight Saving Time – Hope Springs Eternal posté par Brian Wheeler le March 8th, 2021
Daylight Saving Time – Hope Springs Eternal
By Brian Wheeler
I don’t know about you, but I’m about ready for Spring to arrive! It seems a lot of people have endured more than their fair share of Winter and it is time for things to thaw out a bit. With that change also comes a slight time shift for many of us. Here in the U.S. and Canada, we will ‘spring forward’ one hour on March 14, 2021. MusicMaster will skip an hour at 2 a.m. to account for this change.
There’s not much you’ll need to do for this. MusicMaster will take the settings from your computer operating system for how you’ll handle DST in your area, but you can check to see if your settings are correct in MusicMaster by going to Help, System information. That will bring up the following box: 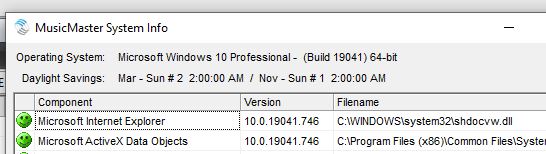
As you can see, it states that Daylight Saving will be recognized on the second Sunday in March at 2 a.m., and the fallback will occur the first Sunday in November, also at 2 a.m.
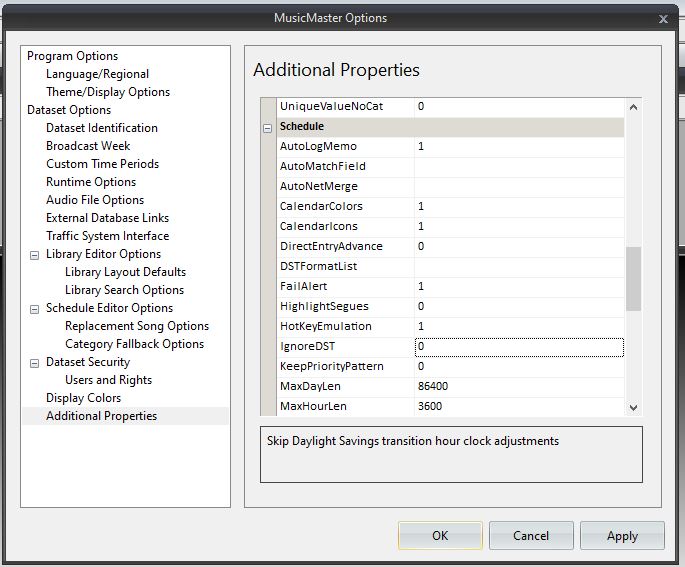
To confirm that your copy of MusicMaster is set up to recognize Daylight Saving Time, go to Tools, Options, Additional Options. A zero in the Ignore DST column will ensure that normal Daylight Saving adjustments will occur. If you do not wish for MusicMaster to adjust for DST, you would place a 1 in the column.
NOTE: If you are using MusicMaster CS, please go to Enterprise, Stations and pick your station. Then go to the Misc. section to find the Ignore DST setting.
There will be a slight impact on your rotations on the morning of March 14th because you are skipping an hour on the overnight. The good news is, the adjustment is happening in an hour on the overnight, and it’s a Sunday. Most programmers agree that listenership is a little different on the weekends, so by the time Monday rolls around your rotations will be back to normal and it should have little to no impact on your rotations for the week. To show you the difference, here is a normal five song, one song per hour current rotation:
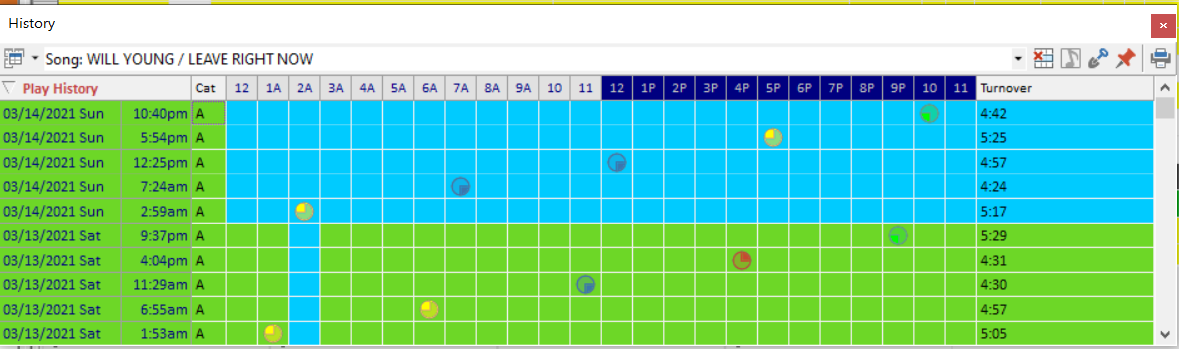
Ahh…a nice stairstep pattern. Now here’s the same song after DST adjustment:
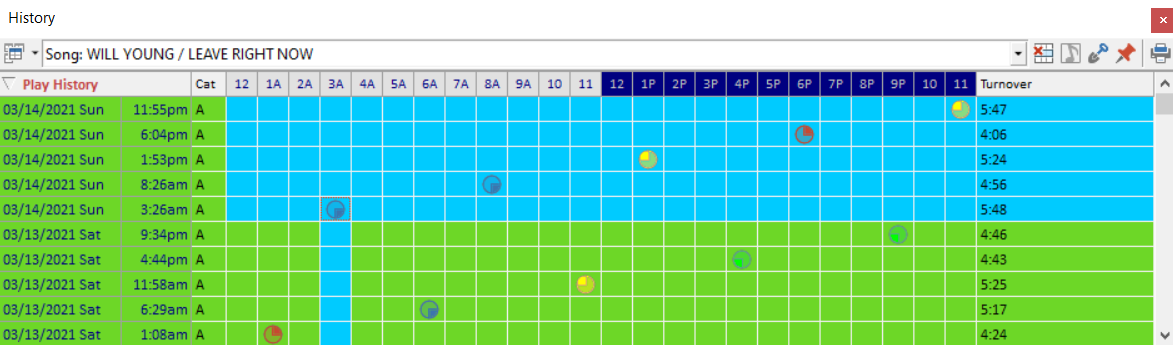
There is still a nice stair step pattern but if you look closely, the play On March 14 in the first capture is at 2am. In the capture above, you will see that it’s in the 3am hour. That gap is due to the extra hour being skipped. Again, after a day with these new rotations, the new pattern is fully established by Monday.
If you have any further questions regarding Daylight Saving adjustments, feel free to reach out to your MusicMaster Scheduling consultant and they can help get the spring back in your step.
And the winner is… posté par Brian Wheeler le February 22nd, 2021
And the winner of the MusicMaster User Tips Contest is…
by Brian Wheeler
Thank you to everyone who participated in our contest! We asked you, our faithful and ever-knowledgeable MusicMaster users to send us your Pro Tips for using MusicMaster. We received responses from all over the map. Our panel of judges have convened, and these are our three finalists:
Matt Pelishek, PD at 99.3 Life FM in Bakersfield says:
“My best tip that has saved me a ton of time is this – just call MusicMaster and let them figure it out, and then I take the credit at the station.”
That’s some pretty good advice, Matt! If you’re stuck and not quite sure how to do something, there’s no point in languishing any longer. Give MusicMaster a call and we can help!
Shawn Sullivan of Happy Trucker Productions sent along this gem:
“When I need to time out an hour, I set up a query to drop in at the end of my hour. I drag the query into the schedule editor, enter the time I am looking for, and MusicMaster gives me a list of songs with that exact runtime. Queries are a great way of getting what you’re looking for without a lot of hassle.”
Great suggestion, Shawn! That’s using your noggin for something more than a hat rack for that Happy Trucker Hat you’re sporting. By the way, how does a guy get one of those?
Our grand prize winner comes from The Great White North. Laurent Boulet from CJMF/FM93 in Quebec City, Quebec sent us these words of wisdom:
“My tip would only be 3 words
TAKE A BACKUP !
At the end (or beginning) of each day TAKE A BACKUP !
Before doing special operations like unscheduling TAKE A BACKUP !
Before changing clocks TAKE A BACKUP !
Before any kind of mass changes TAKE A BACKUP !
Just for the fun of it TAKE A BACKUP !
When there’s nothing good on TV TAKE A BACKUP !
When you have no idea what to eat for dinner ! TAKE A BACKUP !
They literally take 3 seconds and you have no idea the amount of time they will save you when you lose something or do something wrong, or are not especially concentrated like that particular Thursday PM just before Christmas.
So TAKE A BACKUP !”
Wiser words were never spoken, Laurent. We’ll be reaching out to Laurent to get him set up with a fabulous prize out of the prize closet. Thanks to everyone who participated!
Rule Tree Basics – The use of “Rule Groups” posté par Joseph Knapp le February 8th, 2021
Rule Tree Basics – The use of “Rule Groups”
By Joe Knapp
What is a Rule Group and why should you use it?
I refer to Rule Groups as boxes you can put some rules into.
Rule Groups give you the ability to use Dayparting or a Format Clock list to control when those rules apply, select which Categories will respect those rules and even let you apply a Filter to select which songs must test those rules.
You can put Rule Group “boxes” anywhere in your Rule Tree. They’re often used in the “All Categories” folder, but you can also use them in specific Category folders too.
Simply put, Rule Groups make it easier to organize and adjust rules.
When you open the Rule Tree, on top right-hand side is a Folder called: Special Rule Tree Items. Open the folder and you will see Rule Group inside. Grab the Rule Group with your mouse and drag that across to the “All Categories” folder, or to a specific Category folder on the left-hand side of the screen. Once you let go, the Rule Group Properties box will open automatically. Once you’ve added a Rule Group, you can right-click on it at any time to review or modify these Properties.
The six areas of the Rule Group you can adjust are highlighted below.
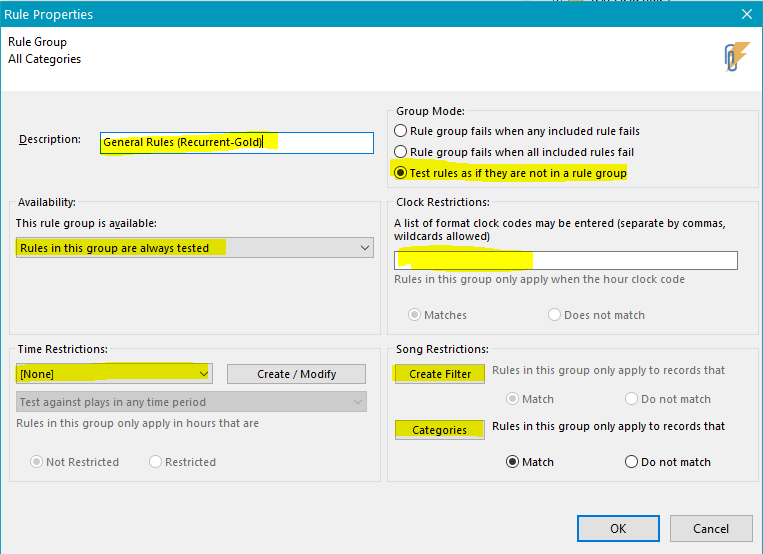
Let’s go over each of these and what it can do for you:
- Description: is just a name you give the Rule Group. Try to use a name that helps you remember the reason you want the rules included in this group, such as “Morning Drive Rules” or “Tempo Segue for Female Vocals.”
- Availability. This allows you to decide when the rules in this Rule Group are tested. Typically, programmers like to keep the rules engaged while using the auto scheduler and while editing. Some just want rules to apply only while auto-scheduling, others only while manually editing the logs. There is even a setting called “Rules in this group are never tested”. You can use this to “shut off” all the rules in this Rule Group without deleting them. This allows you to activate them again later.
- Time Restrictions. This allows you to “daypart” your rules. If you wanted a specialty show to sound a bit different than your normal programming, you can isolate different times of day and apply different rules to any location within the week. Remember that the Daypart codes you apply to Rule Groups may also be applied to songs. If you change a Daypart code, those changes will affect any song or Rule Group that uses that code. Consider naming any daypart for a Rule Group with something that makes it clear it’s used in the Rule Group, so you don’t accidentally change it and affect your rules.
What about the drop-down box in the Time Restrictions settings? That box says “Test against plays in any time period” by default. But what if you want to set up Hour Rotation rules that ignore weekday plays on weekends, and vice-versa? The option to “Ignore plays outside this time period” lets you do that. Put your weekend Hour Rotation rules in a Rule Group, daypart the Rule Group to only test on weekends, then set it to ignore plays outside the dayparted hours. MusicMaster will pretend the weekdays don’t even exist when testing these Hour Rotation rules on the weekend. You should also create a second Rule Group that is set up the same way but dayparted to only apply during the weekdays. The Hour Rotation rules you put in there will ignore plays that occurred on the weekend. There’s another option to “Ignore failures outside this time period.” Use this option when you want MusicMaster to see the plays outside the dayparted hours but ignore any failures against them. This is handy for special shows you might schedule on weekends where you only want MusicMaster to test the rules within the special show itself.
- Group Mode. Most people use “Test rules as if they are not in a rule group” because it allows them to see which individual rule failed in a Recap Report. “Rule Group fails when any included rule fails” causes the entire Rule Group to fail if any rule you’ve put in that group fails. MusicMaster doesn’t bother to test the rest of the rules in that group once it finds one rule that fails. When using this mode, you’ll see that the entire Rule Group failed in the Recap Report.
The most interesting option is “Rule Group fails when all included rules fail.” This one let’s you do some things that would be virtually impossible in any other system. For example, let’s say you don’t want two Slow Tempo songs that are both sung by Female vocalists to play back-to-back. It is alright, though, to play two Female vocalists back-to-back if one of them is not Slow. You’d put just two rules in the Rule Group to handle this special case. One would prevent two Slow songs from playing back-to-back and the other would prevent two Female songs from playing back-to-back. Both rules would have to fail before the Rule Group fails. If only one of them fails, the entire Rule Group passes.
- Clock Restrictions: You can use this if you’d rather just type in the Format Clock letter codes instead of using a Daypart code in the Time Restrictions section. For example, if you have a Sunday Morning Jazz show for four hours and you’re just using one or two clocks, typing in the Clock Codes separated by a comma would achieve the same exact thing as Dayparting the Rule Group. But, if you later move that show’s Clocks to different hours, the Rule Group will automatically follow that show to the new time period.
- Song Restrictions: This setting allows you to select a Filter and/or a list of Categories that would apply to this Rule Group. In my example screen shot, you’ll see the name of this Rule Group is Recurrent-Gold, so I’ve just selected those Categories and a fill category to adhere to the rules in this group. Note: If you have bypassed any Category using the All Category bypass option in the Rule Tree, that designation will supersede any settings here. In other words, if you bypass Category A, even if you include Category A on the category list here, it still will not be tested.
The Filter option is very powerful. It allows you to apply rules only to certain types of songs. For example, you might apply a special separation rule to songs with an Instrumental Sound Code if they also happen to be coded with a Jazz sound code.
How many Rule Groups can you have? As many as you like!
If you have any questions about Rule Groups, or would like to know more about the MusicMaster Rule Tree, contact your Music Scheduling Consultant, refer to the “Help” section of the software, or stop by our website and click on the “Learn” button.
MusicMaster Emergency Kit posté par Jesus Rodriguez le January 25th, 2021
Your Company Consolidated? Here is your MusicMaster Five-Step Emergency Kit
By Jesus Rodriguez
In the unfortunate world we live in today, many companies have to consolidate, furlough, let go, lay off, to stay profitable and avoid things like bankruptcies. Unfortunately, as we have experienced during the Covid-19 pandemic there has been a lot of lost revenue. Fewer places open for business meant they did not need to purchase commercials.
If you were one of the lucky individuals to not be affected by those changes, you may be thinking that those that think you got lucky have no idea of the amount of work you now have to do. You are more than likely now a team of one. Your Operations Manager is gone and you are overseen by another markets management. You lost your Music Director/APD. Maybe the Program Director got to stay but has been moved to a different location. Now here you are with a new promotion and your first time opening MusicMaster. Whether you are the PD that lost their team or the night jock that is now working days in the office to help program the station, I have compiled a list of some of our blogs and videos to help you get going right.
Here is your Five-Step MusicMaster Emergency Kit.
Your Music Director is gone and it is your first time picking a song that will go on the air. How do you add a song to the library?
Adding Songs, Imaging, or other items to the Library
https://www.youtube.com/watch?v=ockIX0Ue3U8&list=PLQClZKdxvI1ze6tU8BPwFbeorYCNAz-8y
You added your new music for the week to keep the station’s momentum going but you still need to create a log for tomorrow’s programming and your PD is also no longer available.
How to Use the Automatic Scheduler
https://www.youtube.com/watch?v=8P-Mp9ZIhOA&list=PLQClZKdxvI1ze6tU8BPwFbeorYCNAz-8y
Now you have your log, but you would like to massage the playlist to change some of the songs around.
Editing Logs
Swapping elements in the Log
https://www.youtube.com/watch?v=tTZQJCe322M&list=PLQClZKdxvI1ze6tU8BPwFbeorYCNAz-8y
Replacing Songs
You can also replace categories easily by pressing F9 or double-clicking on the item to get the replacement window. Once you select the item you wish, press [enter] to replace it in the position. If you do not see the song or category you want in the replacement window press the binocular icon to open the query. That will allow you to pick a different category.
You have completed your log and are now ready to export it to your automation for on-air!
Exporting logs to your automation system
https://www.youtube.com/watch?v=rXfahVJAv1s&list=PLQClZKdxvI1ze6tU8BPwFbeorYCNAz-8y
CALL MUSICMASTER!!!!!
You may not know this, but it is very likely that your subscription also includes 24/7 support for all users at your location. You are not alone. We have been there before too. Please call our direct support hotline at 262-825-4000. You’ll be put in contact with one of our support representatives so you can request a MusicMaster 101 session. These five steps are only scratching the surface of the power of MusicMaster. Let us help you become a MusicMaster Genius in a short time.
If you made it this far into this blog let me be one of the first to tell you congratulations on the new position. Remember you were selected by those above you for a reason and we are here to help you every step of the way beyond these five emergency steps.
What’s Your MusicMaster Tip? posté par Brian Wheeler le January 11th, 2021
What’s your MusicMaster tip?
By Brian Wheeler
For years, we at MusicMaster have provided you, our beloved MusicMaster users with tips and tricks, thoughts and concepts, schemes and strategies to get the most out of your MusicMaster experience.
Now it’s your turn. If you had one thought, one idea, one tip or trick that you could share with MusicMaster users around the world, what would it be? Here’s your chance to shine! We’re now taking your submissions contest@musicmaster.com
You have until February 11th to get your ideas submitted to us. We’ll then select the three best submissions (as selected by a panel of judges) and share them with our MusicMaster family around the globe. The top selection will also win a fabulous prize from my prize closet! Here’s just a sample of some of the available prizes (we’ll try to tailor a prize to your tastes):


Our grand prize winner will be announced on February 22nd, at which time we’ll also share the top three tips in our February article. Get those ideas submitted! We’re looking forward to seeing creative MusicMaster minds at work!
Legal note: by submitting a blog tip, you agree to let us use your name, call letters/company in our winner’s blog post. Please clearly notate in your submission if you wish to remain anonymous and we’ll be happy to honor that request. For transparency reasons, we request that those who wish to be eligible to win a prize allow us to share who you are.
Filter the Flow posté par Chris Malone le December 28th, 2020
Filter The Flow
By Chris Malone
At times, programmers will call MusicMaster Support and ask how to enforce a specific sound attribute at a specific position within the clock. For example, an Urban AC programmer may want to start the hour with a R&B sound attribute to establish a smooth R&B flow, right out of the gate. You can create a clock filter at any given position within your clock. Your filter ideas can go far deeper than sound code attributes. Commonly, you can create filters for energy, tempo, artist keywords and beyond.
In this example, we’re creating a clock filter on the 90’s position that follows our Legal ID to only include R&B songs within that category. First step, you want to double click on the 90’s fixed position on the clock and the Element Properties box appears. Click the Filters tab and begin defining the filter.
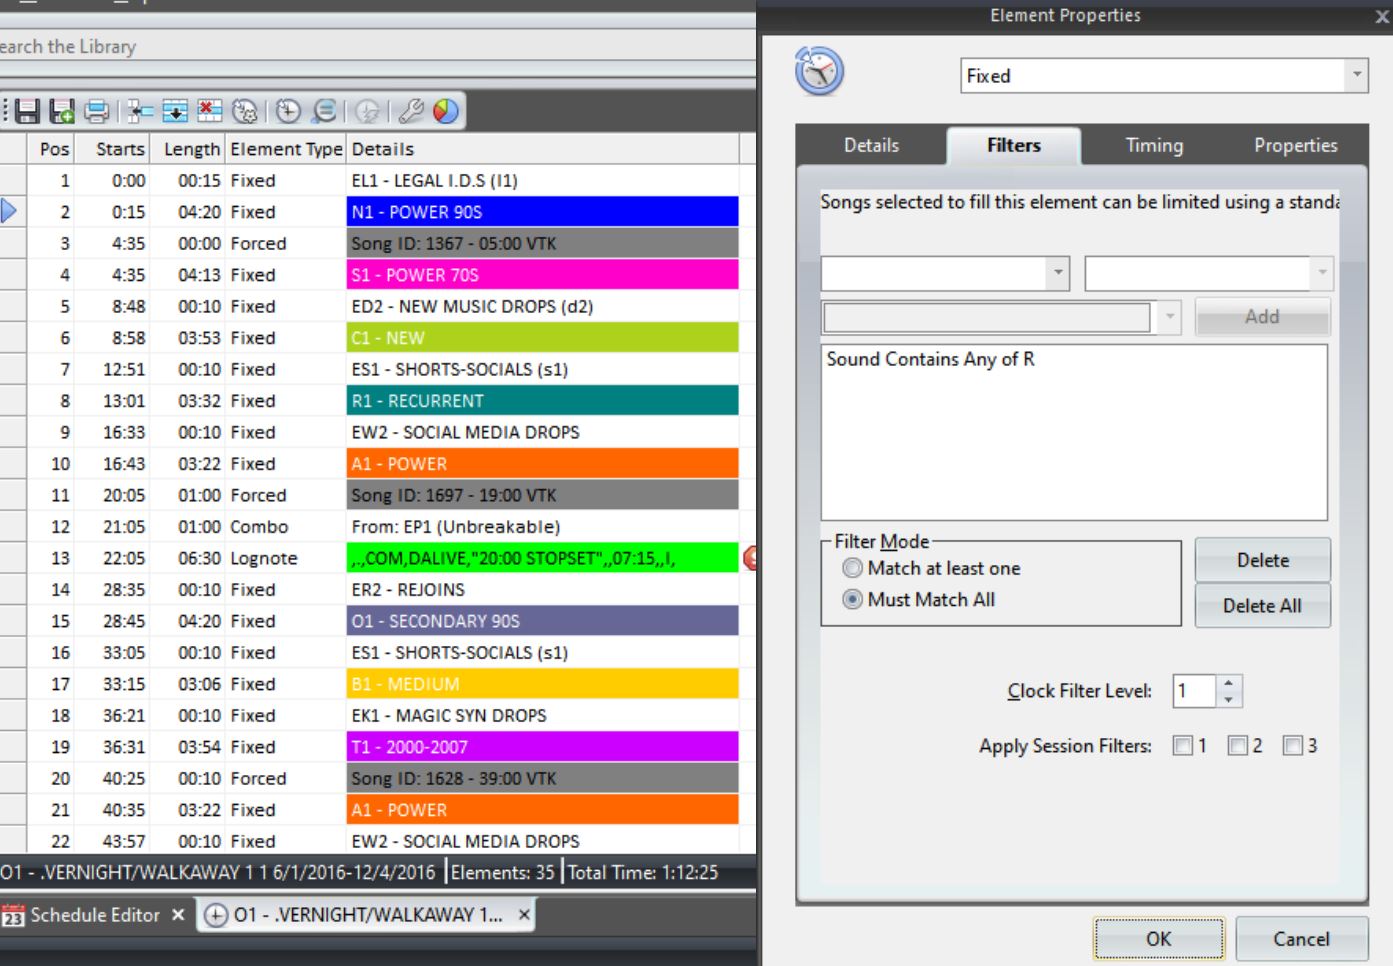
The setup translates as: only allow Sound that Contains Any Of – R, which is the sound attribute code for R&B in this database, to schedule in this position. Please pay close attention to the Clock Filter Level in your Element Properties because you’ll need to know that when you activate the Clock Filter in your Rule Tree. Once you’ve defined the filter you want, press OK.

The filter icon next to the 90’s position, indicates that the filter has been properly applied to the clock and to take it a step further, you can right click on the filter and Show Matching Songs to get an idea of which filtered songs qualify for this clock position.
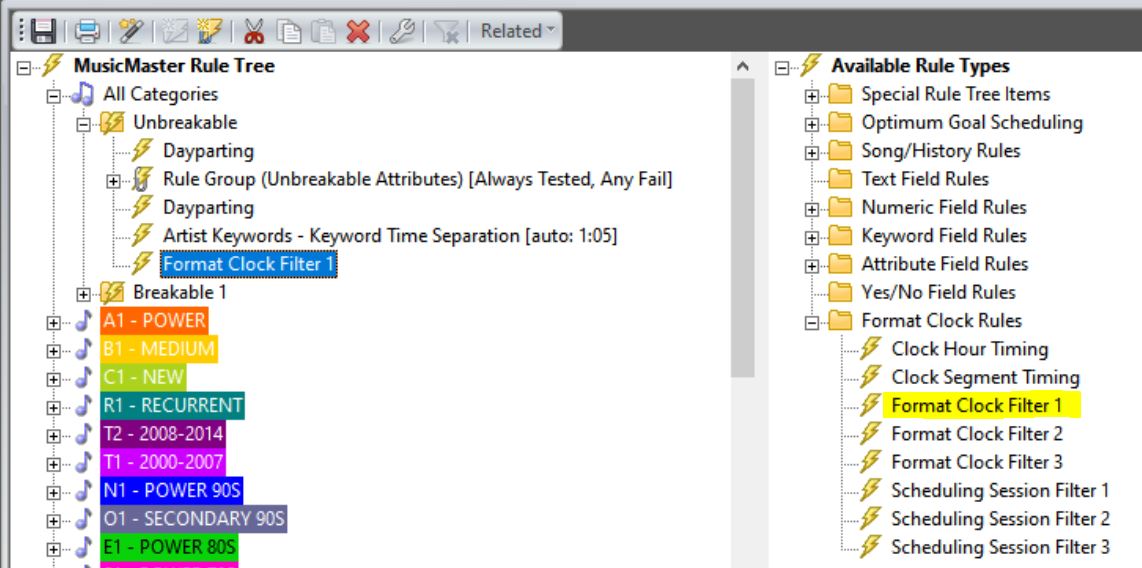
Next, you simply want to activate the proper Clock Filter rule in your Rule Tree. In your Element Properties setup, you recall we are using Clock Filter 1. In the Available Rule Types under Format Clock Rules, we need Format Clock Filter 1. That available rule needs to be active. I put it under All Categories so I can adjust any clock adding a Clock Filter 1 and have it be Unbreakable. You can put the rule in a specific category if you’d like. Once you’ve turned on the rule, save your rule tree and you’re done!
With three Format Clock Filter options available, you have flexibility to mix and match Unbreakable and Breakable rules along with setting up different filters on different positions. Maybe you’d like a certain sound code coming out of a stopset. Set up the filter and make the rule breakable.
If you want to learn about Clock Filters or explore other ways to use Clock Filters, please reach out to your Music Scheduling Consultant for more assistance.
Planning for the Holidays posté par Dave Tyler le December 14th, 2020
Planning For the Holidays
By Dave Tyler
We all love the holidays right? I know I do but we also know that if anything is going to go wrong it is going to happen on a Friday, when you are on vacation or over the holiday. So what can you do to minimize that?
When do you start playing Christmas tunes? Maybe you add some new clocks to your grid or perhaps you have a “Holiday” grid(s) that you use each year. No matter your format, it’s likely your regular playlist freezes around this time too. This gives you a unique opportunity to take the stress out of your scheduling.
Since you are doing your holiday music and your regular playlist is frozen, you can safely schedule out a week or more because you won’t be adding any new music or making changes. Think about it. If you’re using the Format Scheduler to activate those holiday grids, your regular grid will come back up all by itself. That means you might schedule the entire month of December and into January!
When you reach the point where you know nothing is going to change between when your holiday music starts and your playlist is frozen, get going. This accomplishes a few of things. It allows you to get the scheduling completed well ahead of time. It also gives you the opportunity to make just minor changes as each day comes along if needed. Finally, you won’t be in any big rush on that Friday before you take off to get tons of logs done.
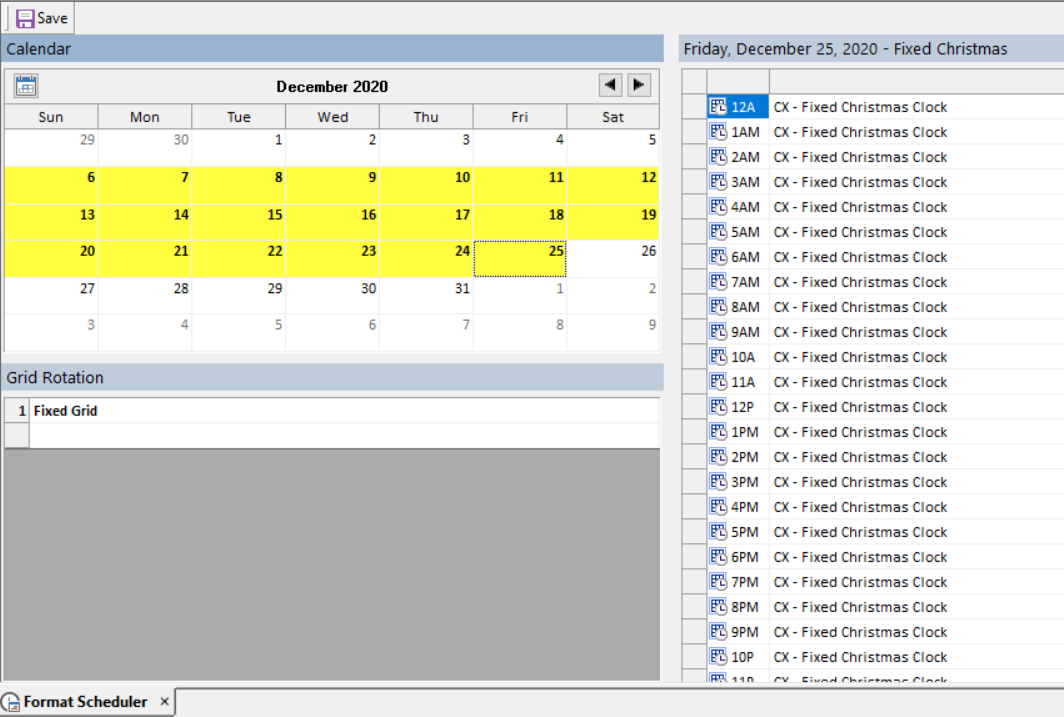
We do get calls every year where someone says they have Christmas music scheduled on December 26th and they don’t know why. It’s because they are manually activating grids and forgot to re-activate their regular grid. This is why we highly recommend the Format Scheduler. If you’ve never used the Format Scheduler before, this is the perfect time to give it a try. It’s just too easy to forget which grid you have active when you are manually changing it. By using the Format Scheduler, you pick the grid and date(s) where it applies. If you don’t change anything, your regular, active grid is used. You can even do this down to the clock level, which means if you decide to start playing holiday music at noon, you can change the individual clocks from noon to 11pm. You’ll assign the holiday grid to the entire day moving forward.
As you can see in this screen capture, the Fixed Christmas Clocks are scheduled across the day. I assigned the grid that contained this clock across multiple weeks. Any dates in yellow mean something different is going on. Any dates in white mean the regular grid is active. Dates in red (if you see them) mean the log has already been scheduled.
When you put this all together, with a couple of simple adjustments in MusicMaster, you can schedule your holiday music and get back to your regular programming automatically. When you factor in the ability to schedule ahead, it adds up to the MusicMaster way to take just a little bit of the stress out of the holidays. You’re welcome!
If you have any questions about implementing your holiday music, do not hesitate to reach out to your Music Scheduling Consultant.