
MusicMaster Blog
Utilizing MusicMaster to Schedule Traffic publicado em June 3rd, 2019
By the W.I.Z.A.R.D.
While MusicMaster is designed to schedule your music elements, it can be utilized to schedule simple traffic elements. Follow along as we go through the steps necessary to make that happen.
First create a category where you will enter these elements. While you could use LogNotes to accomplish this, we recommend a category and “song” card so that affidavits can be used. More on that in a bit, but first, let’s discuss the category setup. Under Library, Categories, create a new category:
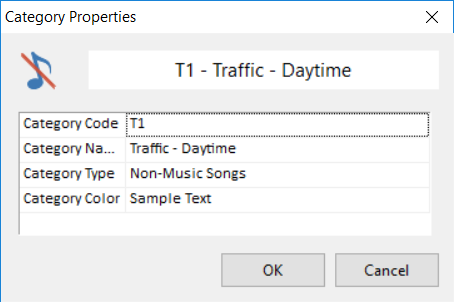
Notice we set the Category Type to Non-Music Songs. This is not only true since the category will contain your spots, but important so the elements do not interfere with any rules you have applied to your music categories. You’ll want to create as many of these categories as you need in order to schedule the spots.
Next, add “song” cards to these categories, one for each spot. If you are using a playout system, you will want to enter the traffic element and include the necessary file numbers. We would suggest you also include all the specific information that will identify the spot including the sponsor and title. You could use the “artist” field to contain the sponsor information if you’d like. You may need a field where you can indicate the monetary value of the spot. If you do not have a Numeric-Currency field in your data, you can add one under Library, Fields. There are built-in fields in MusicMaster for Start Date/Hour and End Date/Hour. These can be useful if the spot has a specific schedule that must be followed. There is also a Kill Plays field that could be used if a spot can only have a specific number of plays.
Our illustration shows the Sponsor in the Artist field, the Title of the spot, the runtime and value (Cost) of the spot each time it airs.

With the traffic spots added, you can now determine how those will be included in your clocks. You might consider simply calling for the category. This would be considered “run of schedule” in the traffic world. When the category is scheduled, one of the spots will be scheduled. You might consider having multiple categories for this to allow for certain spots to run at certain times of the day or you could daypart the spots to accomplish that.
In this sample clock, you can see that the Traffic – Daytime category has been added in two places, each listing the category more than once. This has the effect of scheduling multiple spots in the same break.
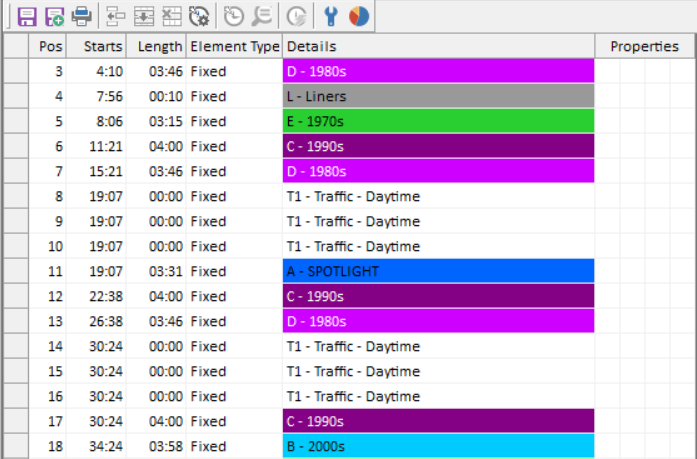
If you need a specific spot at a specific time, we would recommend you include a Forced Element your clock which allows you to pick a specific element at a specific location in the hour. For instance, if you have a sponsor for a feature, using a Forced element would ensure that happened. In our example, the local record store, Vinyl Memories, sponsors the top five countdown. You can see the Forced position calling for their specific spot during the countdown.
As you can see, some thought should be put into how you organize the traffic elements before you start to add the elements into the clock.
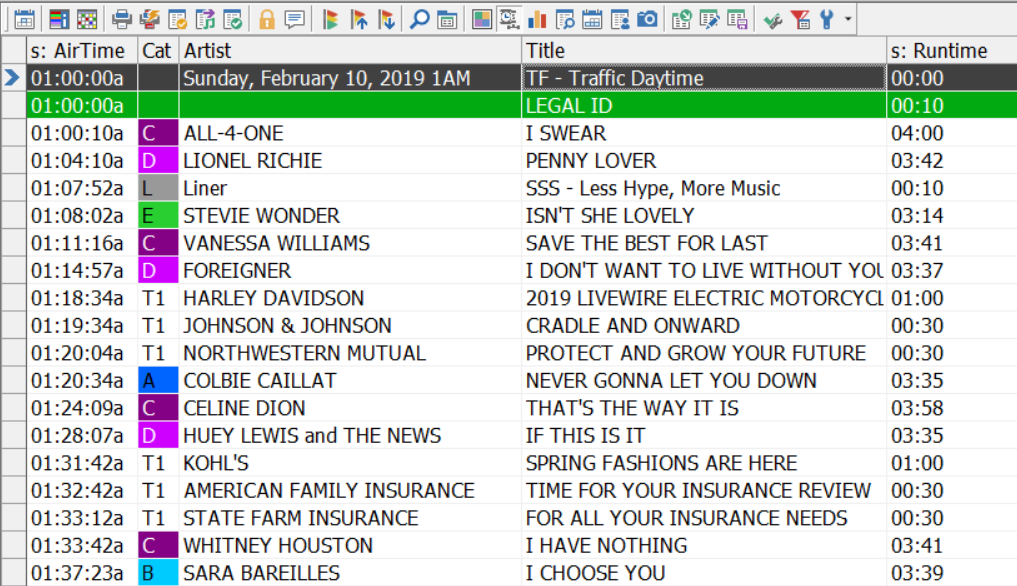
Once you have determined the best approach for your situation and have added the elements to the clocks, you’re basically done. It’s unlikely that you would need Rules on these categories, although you could choose to do so if necessary. When you schedule the log, you will now see these traffic elements much like you see the songs.
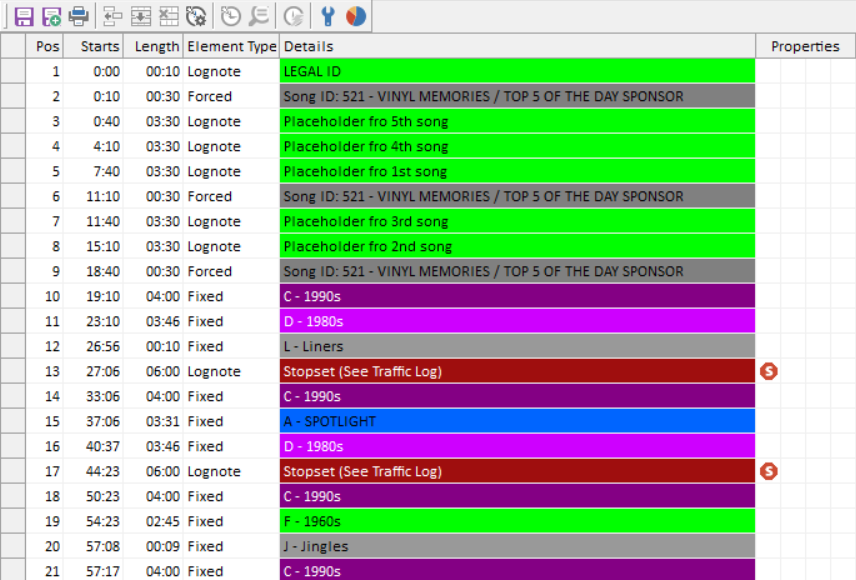
Here’s how the countdown hour appears:
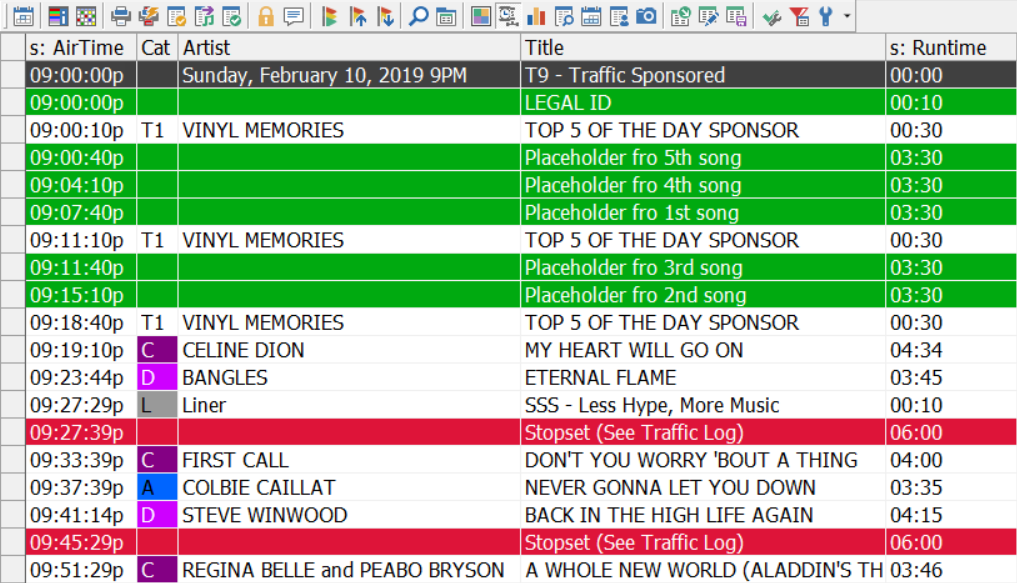
The placeholders can be filled in with the appropriate songs when the countdown is determined.
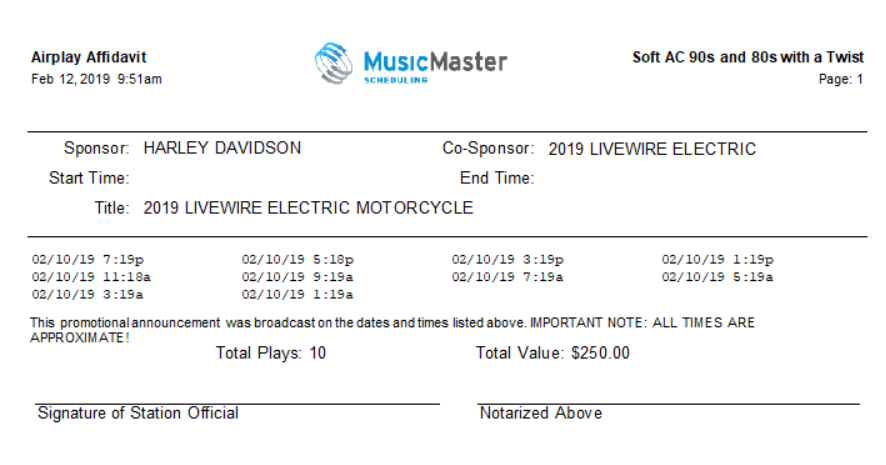
With a scheduled log, you can also run an affidavit by going to Analysis, Special Library Reports. The AirPlay Affidavit will allow you to specify which categories to include along with Report Options with appropriate fields. In our example, we selected the T1 category. Notice Sponsor=Artist and Value=Cost.

If you needed to do this for all of your spots at one time, you can do this by calling up those categories in the Library, then doing a right-click to select Print, All Songs from the context menu. The AirPlay Affidavit will then be pre-filtered for the categories you selected.
The resulting report will show you the date/time of each play for the spot that aired in the time frame. Since we included a monetary value in the cost field, the report also calculates the value of the spots aired.
With a little set-up you can easily manage simply traffic tasks with MusicMaster.
Should you have any questions, reach out to your Music Scheduling Consultant.
Taking “Theme” Programming To The Next Level publicado em May 20th, 2019
By Dave Tyler
MusicMaster has always been the leader in flexible ways to schedule the sound you want to hear on your radio station. For decades great programmers have put together themed weekends and shows with a few clicks using Special Sets and Saved Lists. We have all heard “The Sales Department makes money and the Programming Department spends it all”! Specialty programming, either during the week or on the weekends is a great way to offer your Sales Department a product they can make money on via sponsorships.
You can search our blogs and videos and find lots of articles and walkthroughs on Special Sets and Saved Lists but what I want to talk about today is a new feature in MusicMaster Pro version 7.0 called “Find Similar” that gives you another tool in your toolbox to locate songs and save them in lists to use for your specialty programming.
Let’s say for example I am programming a Light AC station and at 8am and 8pm each day I want a segment called “The 80’s Ladies at 8” that I can sell a sponsorship for. I can open my entire music library and find a single song that matches my criteria, for example, Tina Turner “What’s Love Got To Do With It”. At this point right click in the column of an attribute like Role or Era and select “Find Similar Attributes”.

This pulls up the “Similar Attributes” dialog box and we have some choices from the dropdown that determine how exact we want this list to match.

Depending on what level of “Exactness” you choose determines how many songs you get. If you are just looking for female singers with 80’s hits well you got ‘em! If you want more exactness it will also grab similar tempos etc. You can set the fields you want to see and search on by clicking the “Design” button and pulling up the “Edit Grid Layout” box which is similar to your “Show/Hide” box in the Editor.
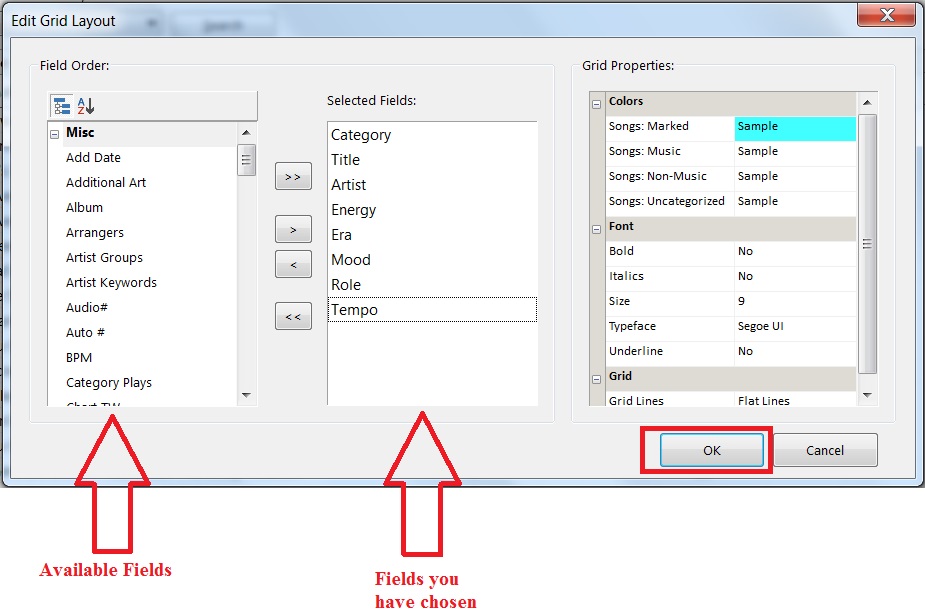
Once you have the fields you selected click ok. When you have the list you want simply click on the “Save List” button, name your list and click ok.

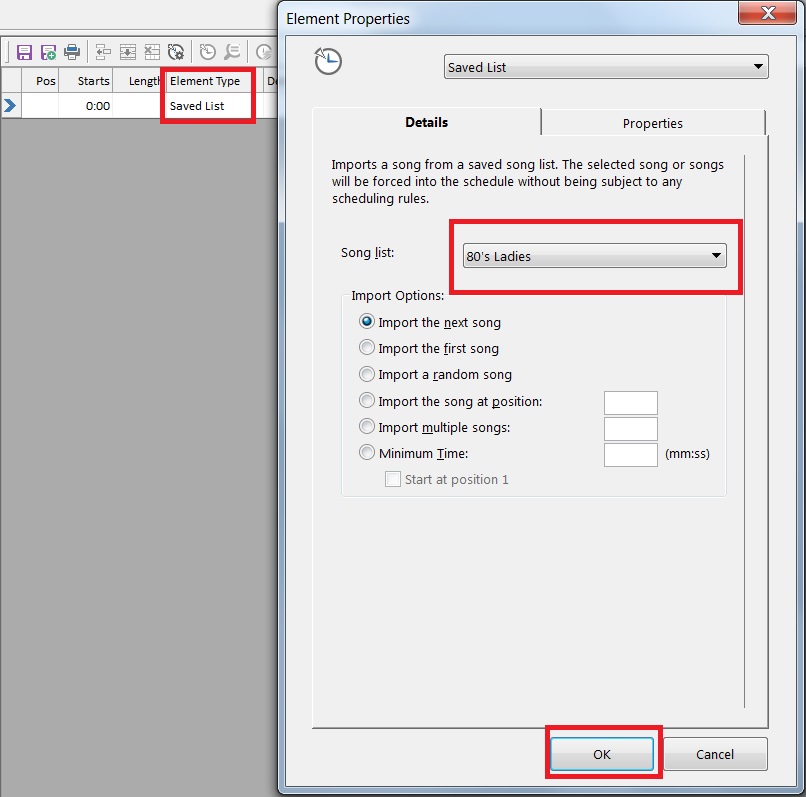
You now have a “80’s Ladies” saved list that you can program from by selecting the “Saved List” element type in your clock and then choosing your list from the dropdown.
This a great new feature in MusicMaster Pro 7.0. Stay tuned for more on this version and be sure to search our brand new, completely redone and awesome Help section in MusicMaster. It includes videos and more!
Packets: Three Different Ways to Manage Challenges Within Your Library publicado em May 6th, 2019
By Brian Wheeler
Once in a while, I’ll have a couple back-to-back phone calls from MusicMaster users that will give me an idea for blog content. This blog is a result of such a phenomenon.
The first call was from a programmer who played a good amount of gold that were regional hits and wanted to manage those tracks so they didn’t have quite the same impact as the regular gold in his categories. With a couple of tweaks we’d set up two kinds of packets for him.
The first kind of packets we set up were standard packets for his depth cuts from core regional artists. These were all ‘bubbling under’ tracks that were still pretty big regionally but didn’t do much nationally. He wanted them to continue to get exposure but at a reduced level from the rest of the category. We talked about how the size of the packets determined their exposure. A packet of 2 splits the exposure in half. A packet of 3 reduces exposure by 66%, etc. It’s that pesky math, always creeping into programming.
Here’s a sample of what his standard packets would look like:
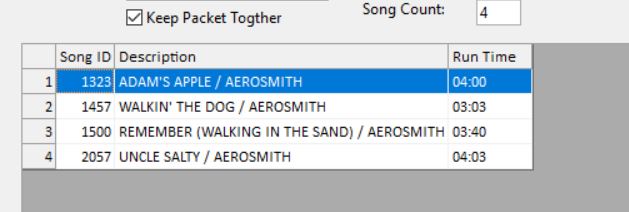
For the songs we were packeting, a standard packet was going to get the job done. These songs didn’t have much that was going to prevent them from scheduling as far as rules go. So when that packet came up in the schedule order, the song at the top of the packet was scheduled, then sent back to the bottom of the packet list and the next song in the packet would be considered the next time around. It was perfect.
But then he had some one-hit wonders that he also wanted to control with packets, and some of those songs regularly challenged his rules. He found that he was getting unscheduled positions when he’d encounter these packets and it was causing him to rethink the packet concept. I proposed the diggable packet, which allowed MusicMaster to dig through the packet to find a song that satisfied his rules. He loved that idea. His minimum rest rule would prevent these songs from playing too frequently, but if he ran into the rare one-hit wonder within that packet that violated the rule it wouldn’t prevent the scheduler from finding a song that DIDN’T violate. He was reducing his exposure to these songs and still able to focus on the other aspects of his programming rather than micromanage a handful of one-hit wonders that he rarely wanted to appear.

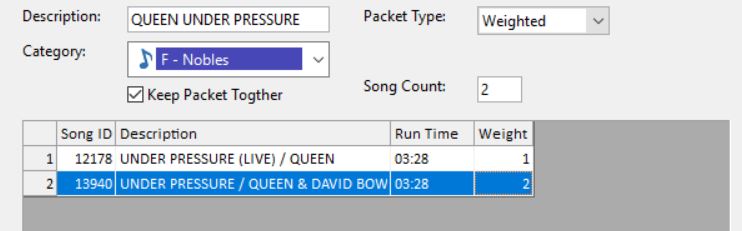
The next call I got was from a programmer who wanted to play live versions of a particular song, but in a reduced ratio to the regular recording of the song. She didn’t have many live versions that she wanted to play, but enough where she felt there needed to be an element of control. I proposed the weighted packet. She could place the live version in a packet with the regular version, then control the ratio to regular plays to live plays by placing a weight on the regular version. In some situations, she applied a ‘2’ to the regular version when the live version was a hit, but she still wanted the regular version to play twice for every single live version play. Then on a few others where the live version wasn’t a hit and she just wanted to add flavor, she applied a ‘3’ or a ‘4’ to the regular version. This meant the regular version would play that many times before the live version would come up for airplay.
Control achieved. She is still playing the live version, but at a reduced rate and very much within her comfort zone.
If you’ve not created a packet before or would like a refresher course, here’s a brief video demonstrating creation of packets.
If you have any questions, please reach out to your Music Scheduling Consultant for assistance.
Song Merge publicado em April 22nd, 2019
By Marianne Burkett
Today I’d like to dive into something new in Version 7, Song Merge. What exactly is it?
Let’s say you identify a few duplicate songs in your station. You can A: delete one of them; or, B: Merge the two or more duplicate songs into one; or, C: hoard all your duplicates!! We don’t recommend A because you’ll likely lose information, like play history. We recommend B using the new feature in Version 7, Song Merge. The benefit of this feature is that it looks in many places to consolidate information. That means you’ll have all your play history and trivia combined. Things like forced instances in a clock, listings in a song list and play/library counters are all updated. Song Merge combines all of that while deleting the duplicates. Nothing is lost and you’ll end up with one song card that combines all the important information you want.
The first thing you’ll do is select all the duplicate songs. Right click on the pointer column (blue arrow in the left column) and select the songs. Right-click to open the context menu and select “Merge” then pick Selected Songs. There are other options here and depending on how you made your list, you can pick the right one.
Here’s a capture of three different instances of Gerry Rafferty “Baker Street”. The first column shows the song as played in its original category followed by two other instances. Notice each instance has a different WO Number. One new instance is longer and the other is a radio edit. Okay, now decision time! I think I’ll start using the radio edit rather than the full six-minute version. How to do this? Click on the fields you’d like to retain. The boxes will turn blue. Be sure you scroll all the way down the list to see all the fields.
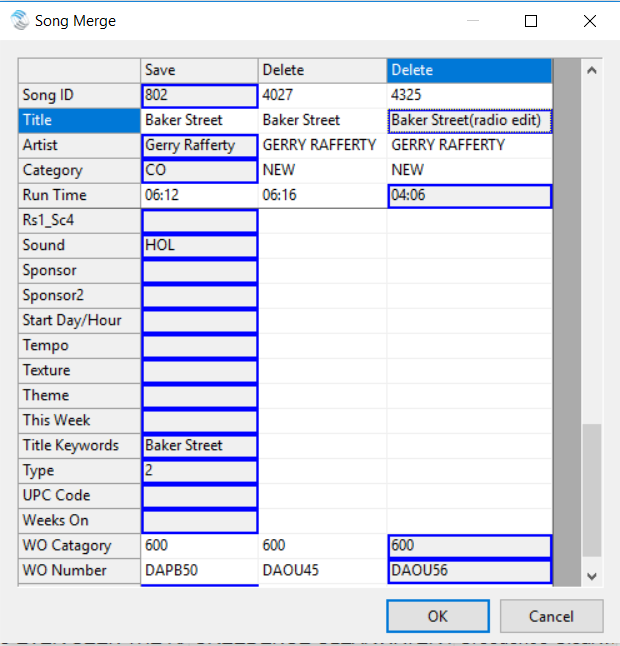
After I click OK I’m keeping/merging the song in the first column (note Save as the column header), adding any play history, trivia from the songs on the right (note Delete as the column header) and replacing the data I want to replace with the information in the blue boxes. I can click any cell to make it blue so its information is saved.
Click OK and you’ll get a verification pop up:

Once I’ve completed the operation, the duplicates disappear and only one “Baker Street”, the radio edit, will be in my library.
If you have a reason to keep your duplicates, be sure you have something in place to help you at least combine the histories, like putting a Title Keyword in place or a History Link.
As always, if you have any questions about any feature in MusicMaster, please contact your Music Scheduling Consultant.
Exporting Different Versions of the Same Log for Different Stations publicado em April 8th, 2019
By Jesus Rodriguez
Recently I had a client call me wanting to send the same log to multiple studios. The client did have one request that his station local imaging did not export along with it only the generic imaging. This meant we couldn’t allow his frequency or city imaging to be exported because this would be going to an HD and a stream channel on the company’s app. Additionally, the two studios use different automation systems!
Given all those considerations, my first instinct was to introduce him to Export to Affiliate/Import from Network. With this option, he’d create a second database, export the relevant categories to the affiliate station, schedule the imaging and then export to the second station. However, he said that sounds too complicated and more work than he wants to do. We discussed it some more and he got straight to the point that he just doesn’t want these specific categories exported where they are at the few times in the hour the songs can segue.
Now if you think that Export to Affiliate/Import from Network is more your thing, I invite you to look up those blogs and videos on that topic from our site.
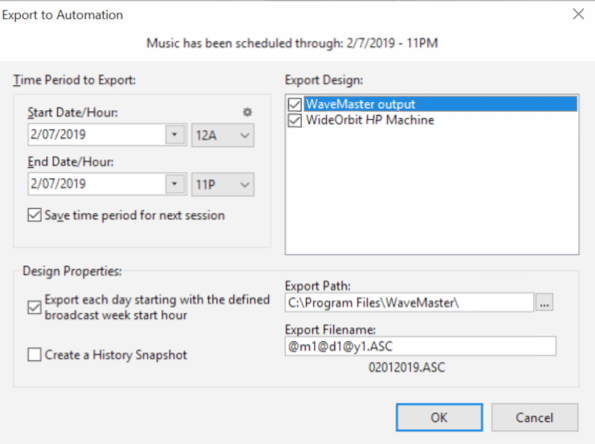
Fortunately, he had already prepared for this by loading the audio for all his items to both of his automation systems and had a designated field for each cart number. Each song and imager had a field for automation cart 1 and automation cart 2. I was able to create a second export design for him now that was designated to only export the information needed for the second automation, and in this case, the critical factor was to export with the correct cart number field. We were also able to exclude specific categories from participating in the second export design. In this case, we double-clicked on the song window to get another window where we selected only the categories that he needed to export which then gave us a random sequence of a song-to-song segues where we scheduled but did not export the local frequency imaging.

Presto! He got what he wanted and added no additional work to his daily task. We can now export two versions of his station, one localized, and another a bit more generic. He is using the same one log he does every day, sending it to two different studio locations with two different automation systems ultimately saving him money by being able to maximize his time because time is money. As an added bonus he’s not using an expensive automation system for this jukebox of a station.
I’ll be the first to admit the export design section can get a little tricky even for me but fear not for you are not alone! Contact your MusicMaster Scheduling Consultant for assistance.
Clocks: Quick Entry publicado em March 25th, 2019
By Paul Ziino
MusicMaster Version 7 offers a new way to edit clocks. Introducing Quick Entry!
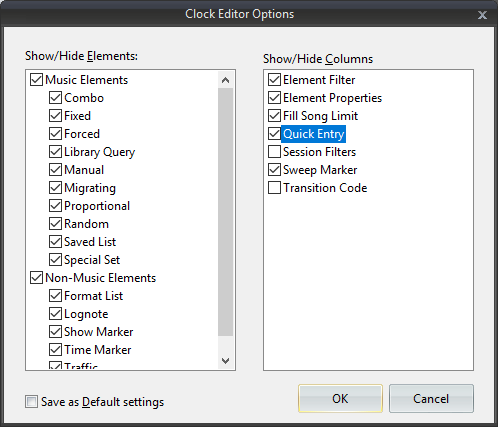
Open a clock or create a new one, then click the wrench icon. Here you have two columns of options: Show/Hide Elements and Show/Hide Columns. If you don’t want to view specific element types you can un-check them. For this exercise we’re going to add a check to Quick Entry under the Show/Hide Columns. If you want to keep these settings, check the box to Save as Default Settings.
Each element type has a keyboard shortcut associated with it now. You can enter that shortcut in the QuickEntry column of your clock editor.
MusicMaster 7.0.4 Now Available publicado em March 12th, 2019
The latest service release is now available for Version 7. Go to Help, Check for Update to get 7.0.4. This update corrects various problems, including issues with copy/paste operations in various areas and drag and drop. New options include the ability to set up more than one traffic definition file in your export design, the ability to use macro commands in the file path specification that work off the standard folders on the computer and the ability to limit definition files that are shown by adding an option that indicates the database name when building the definition file. Finally, MusicMaster is used around the world so we’ve added a Special History Report for our friends in Romania.
What is the Average Year for the Music You are Playing? publicado em March 11th, 2019
By Jerry Butler
Does your active library skew older or newer? What is your target year? I occasionally get calls from programmers wanting to find out the average year for the music in their library. Here is a quick way for you to analyze the yearly breakdown of your library.
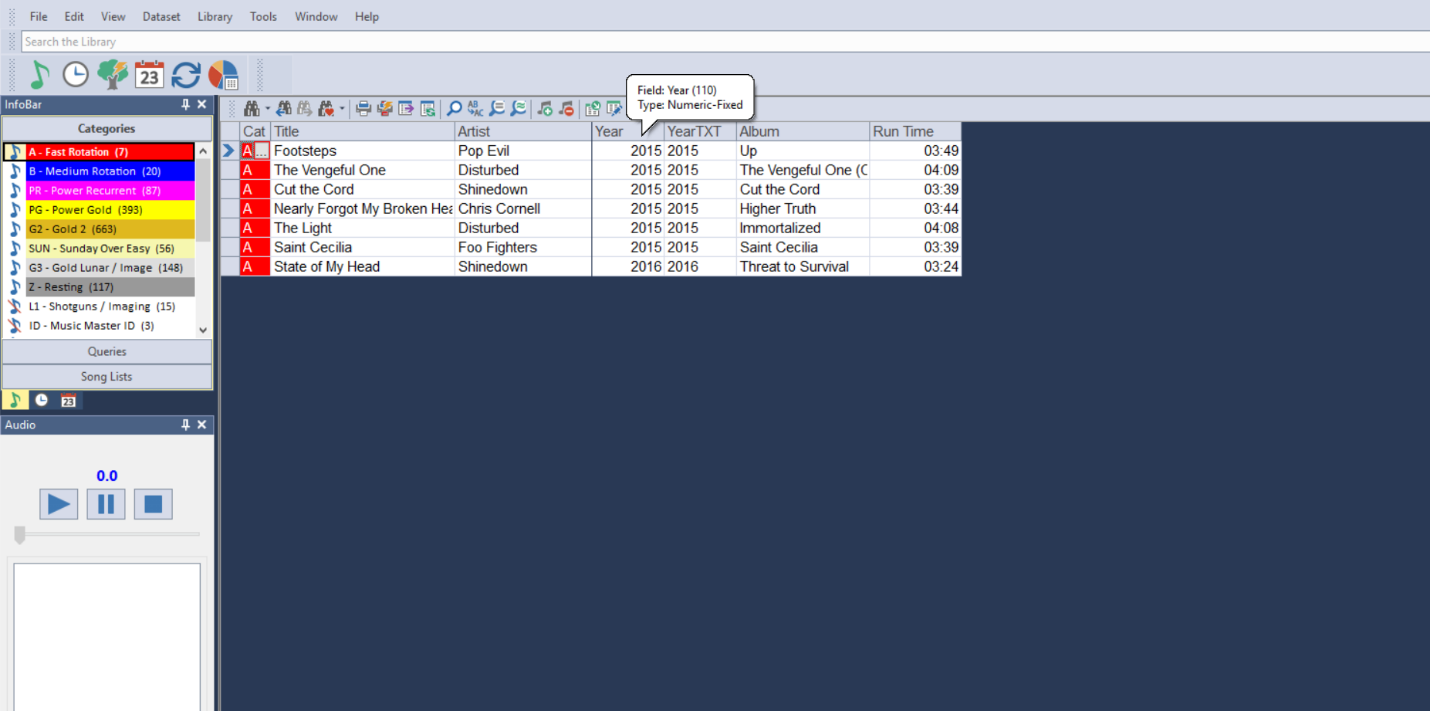
First thing you will want to do is confirm the field you are using for your year data is a numeric-fixed field. Many stations use a text field for this, but there is an advantage of using the numeric-fix field. To check what your field is, you can hover your mouse over the header for the field in your library maintenance window. You’ll notice I have both a year (numeric-fixed) field as well as a text field side-by-side for this demonstration.
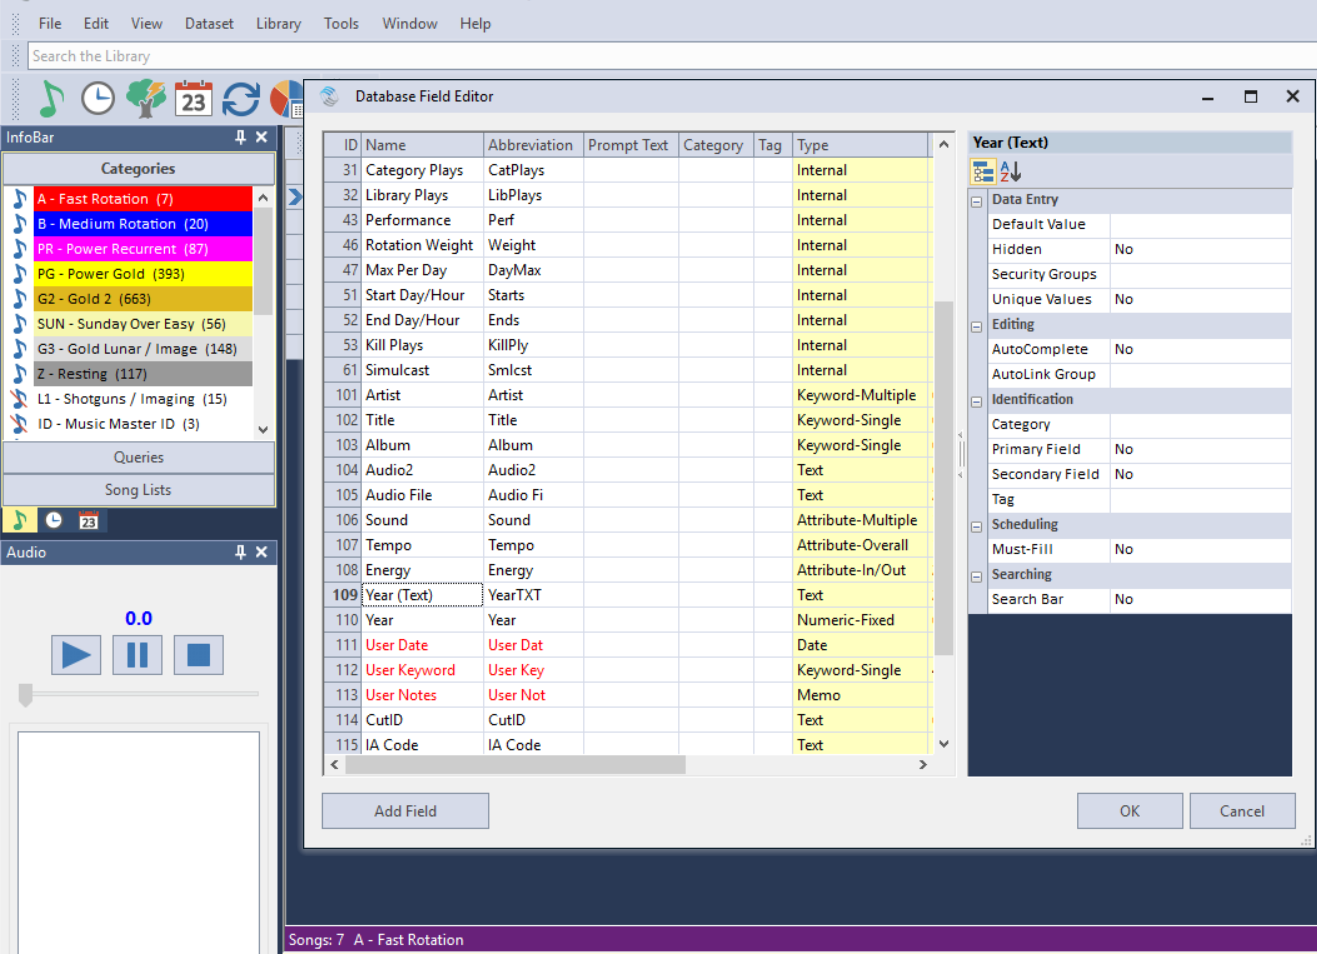
You can also click dataset, library and fields and locate your “Year” field. The description will be on the right telling you if it is a text or numeric-fixed field. If it is a text, you may consider copying your year data over to a numeric-fixed field.
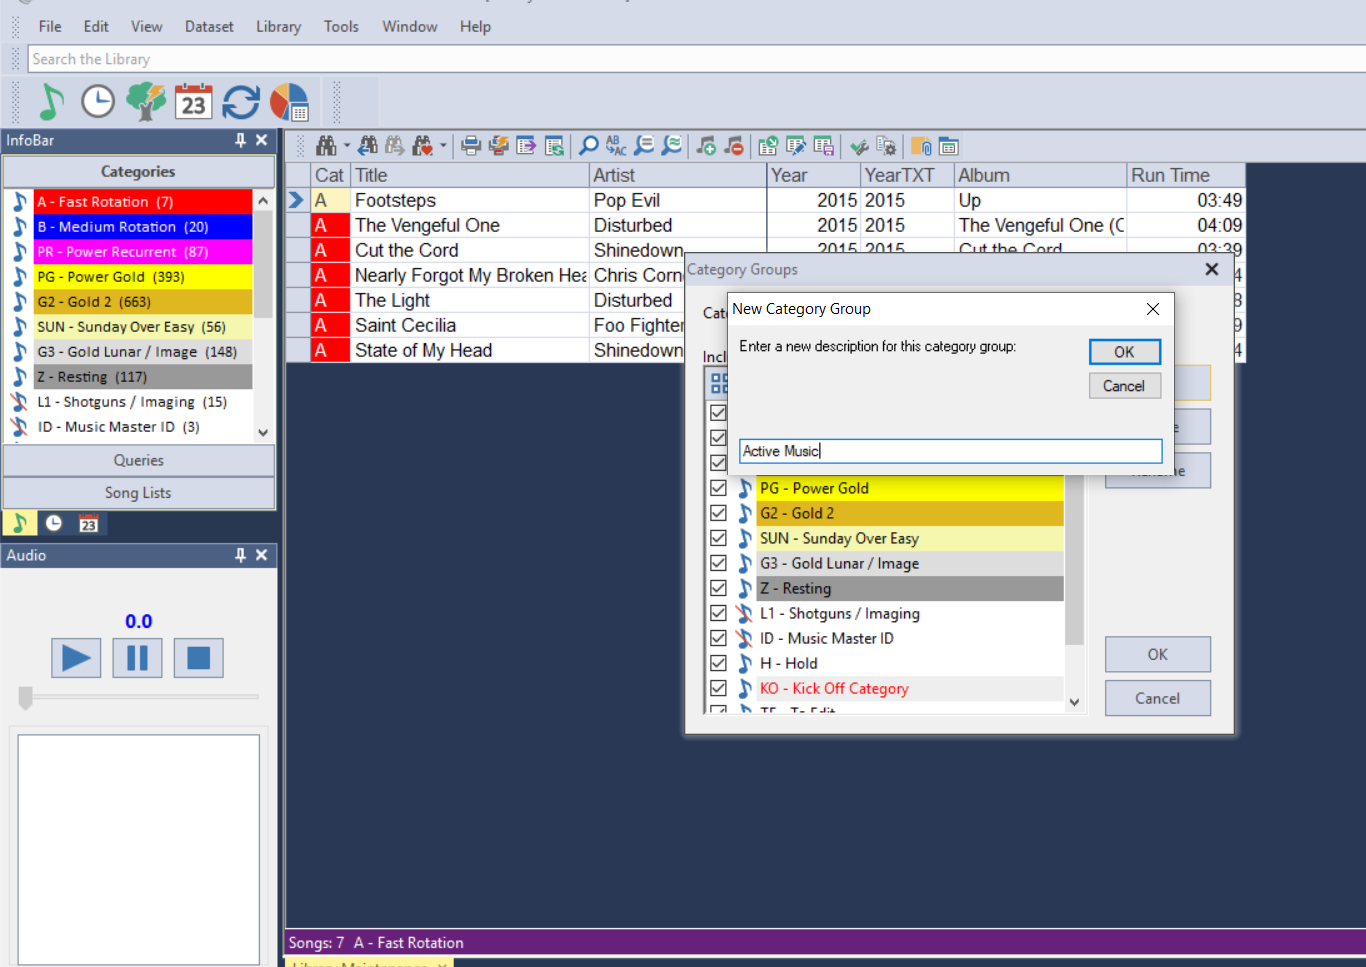
If you have a numeric-fixed field already, I recommend creating a category group for your active categories. This give you a more accurate view of what is airing on your station. You can do that by right clicking in your info bar (list of categories) and selecting category groups. You may also go to Dataset, Library and Categories and click Groups on the popup. Click new, type in the name Active Music and click “OK”. Select categories that are scheduling to be included in the group and click OK.
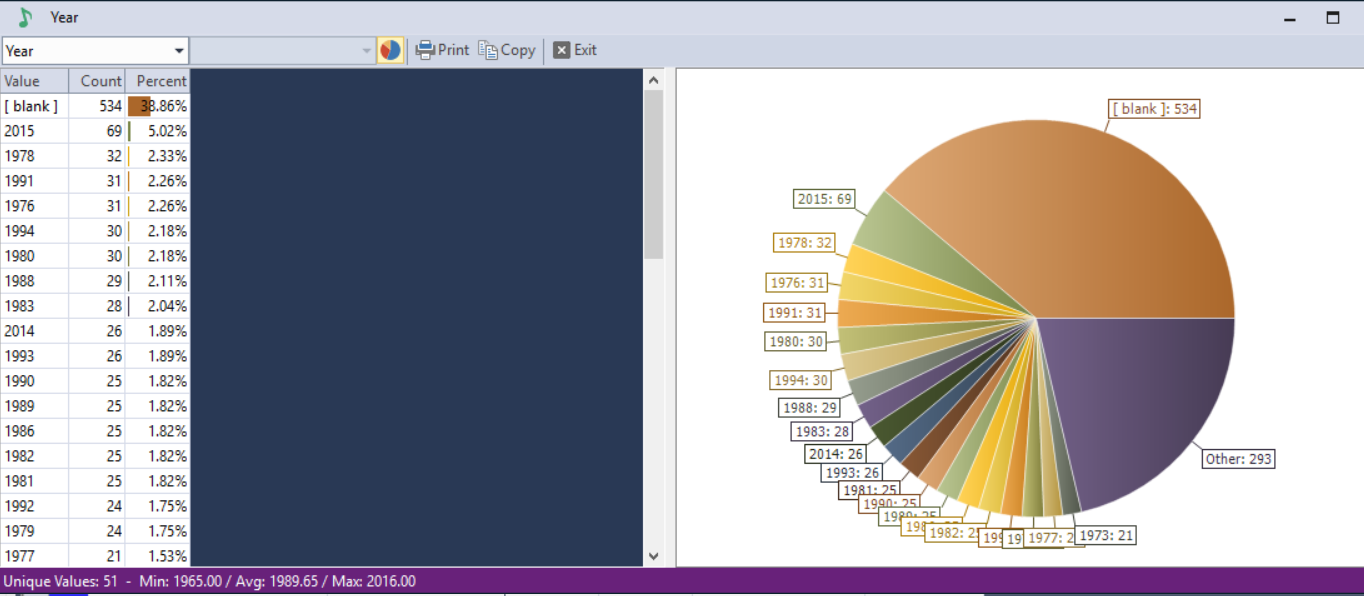
You can now pull up all active music by clicking on your new category group Active Music. Once the group is showing in the library maintenance window, you can right click on the “year” header and select library analysis.
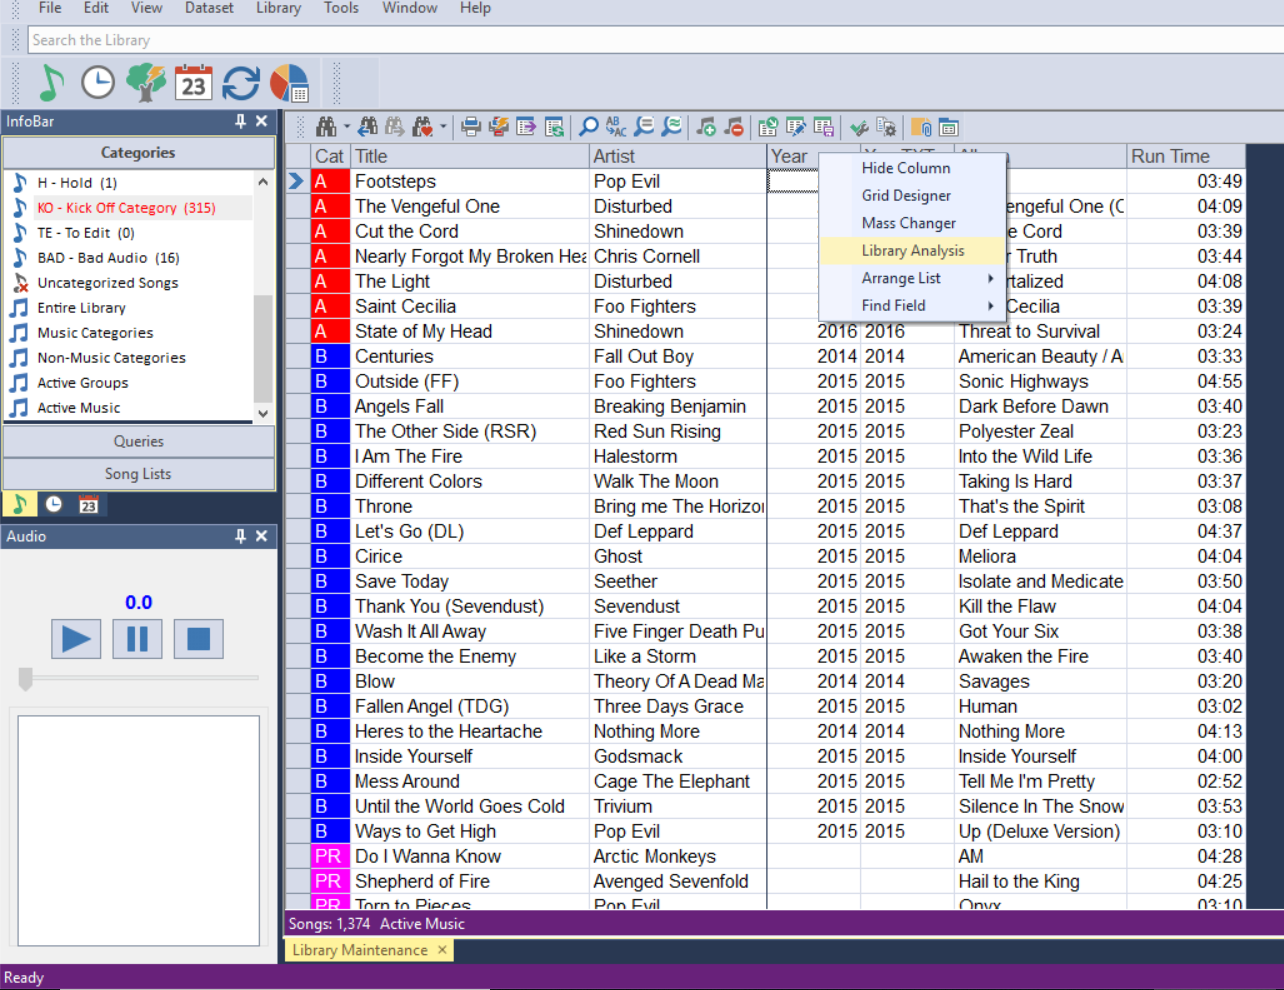
You will get a year breakdown in both the text and numeric-fixed fields as well as unique values. However, if you are using numeric-fixed, you will also be able to see Min (earliest year), Average year and Max (latest year) at the bottom of the display. This will give you a better idea of the music that makes up your active library and how many songs still need coding.
If you have any questions, reach out to your Music Scheduling Consultant.
Drag Text from MusicMaster to a Text Application publicado em February 25th, 2019
By Brian Wheeler
Your consultant or regional PD calls and says “I want to take a look at your gold category. Can you send me a list?” Oh, man…how do I print that out again? I think I can do a quick print somewhere…I wish I could just drag this category to Excel and be done with it.”
Now you can.
Stop Listeners from Hearing Your Station! publicado em February 11th, 2019
By Jesus Rodriguez
Have I confused you with the title of this blog? You are probably thinking why anyone would ever want to stop their listeners from hearing their stations. I tell this a lot to my clients “You need to prevent your listeners from hearing your station to keep your flow going. The second a listener hears something you may have taken them out of their subconscious that could have them change the channel.”
For me to explain myself let’s review the definition of hearing.
Definition of hearing. 1a: the process, function, or power of perceiving sound specifically: the special sense by which noises and tones are received as stimuli.
If you want to increase your TSL, you have to think beyond your song’s tempos and moods. We also have to consider the same for the items in between the records. We need to code tempo and mood for jingles, sweepers, and any other form of imaging. The majority of our radio listeners will listen to your station’s music in the background whether at work or on the road. If you schedule both your music and non-music items in MusicMaster, you have the ability to control the entire experience. Your audience might stop listening when something grabs their attention like a loud sweeper. Also, an imaging piece that has too many explosions, production effects and segues into a slow intro or ballad, or jingles that are just harmonically out of tune with the song that comes after it, can cause the person to wake up from a listening state of mind. It is important to devote as much time to your non-music items as it is to your music.
If you are not currently scheduling your imaging within MusicMaster, I would like for you to reconsider and I promise that you will notice a significant difference. This adjustment is so much better than having a random cart playing in front of each song. If you are scheduling your imaging within MusicMaster, I would like you to consider some of the following blogs to help you have a much better flow in between the songs than rotating an imaging category. If you need any assistance with any of the following suggestions, please contact your MusicMaster support representative.
https://www.musicmaster.com/?p=4905