
MusicMaster Blog
Cloning Your Data publicado em March 23rd, 2020
Cloning Your Data
by Paul Ziino
Things are slow at the start of the new year. Now might be a good time to do some database maintenance and retooling. I’ve had a number of stations call me asking about making a copy of their data so they can do work without it taking effect on the air until they’re ready to roll with it. Here are a few easy steps to do this.
One. Close your database. You can’t make a copy of it when it’s open.
Two. Go to File/Open Dataset
Three. Click or highlight the dataset you wish to copy and click the Clone button.
Four. Give it a new name. Then click OK.
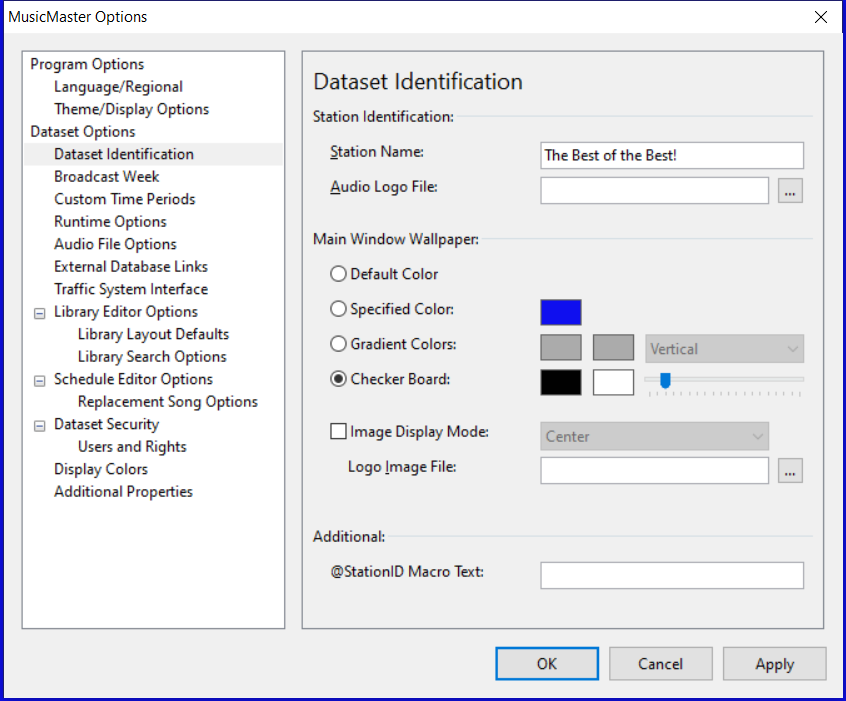
Five. The first thing I suggest you do in your clone is change the background color so that you have an obvious visual clue that this is not your regular database. To do this go to Tools/Options/Dataset Identification. In the center under Main Window Wallpaper change it up. Switch the color to something extreme or opposite of the usual. I like to set up Checker Board. I don’t use it on any other data, so if I open MusicMaster and see a checkerboard I know I’m not in my usual data!
Six. Get to work! Make all those changes. Create new categories. Delete your rules. Rebuild all your clocks. Recode your library. Delete the history. Run test schedules. Do it all! When you have the clone ready to roll…
Seven. Make it active! Reconcile the missing play history into your new database—assuming you even care about the missing play history. Then start scheduling your new logs going forward. Stop using the original data and go forth and conquer the new year!
If you need a hand with this or anything else, just give your Music Scheduling Consultant a call!
Working Remotely with MusicMaster publicado em March 16th, 2020
To our valued MusicMaster clients:
During this COVID-19 pandemic, broadcasters around the world are fulfilling the important role of providing news and companionship to worried communities. Radio is a 24/7/365 operation and we are right there with you. During this crisis, we remain committed to helping you meet any challenge, any time.
We are all facing a situation with unprecedented challenges. It has always been our mission to be more than just a software provider, but to be your partner. Today, more than ever, we encourage you to lean on us for that support.
As more companies are moving to remote operations, we’d like to remind you of some resources you can use to access MusicMaster from home.
CLICK HERE FOR INFORMATION ON USING MUSICMASTER FROM HOME
As always, if you need any assistance, please Contact Support. Contact Support
Create a Safe List the Quick Way publicado em March 9th, 2020
Create A Safe List The Quick Way
By: Chris Malone
Certain formats such as Urban, Urban AC, CHR and Rhythmic CHR are known to do mix-shows. As many programmers know, it’s not a wise idea to turn your station over to a mix DJ for 30 minutes or an hour and let them execute free form without some sort of guidance.
Here’s a way to get your mixers a safe list using a Quick Print of songs that you approve based on several different criteria.
Here’s how:
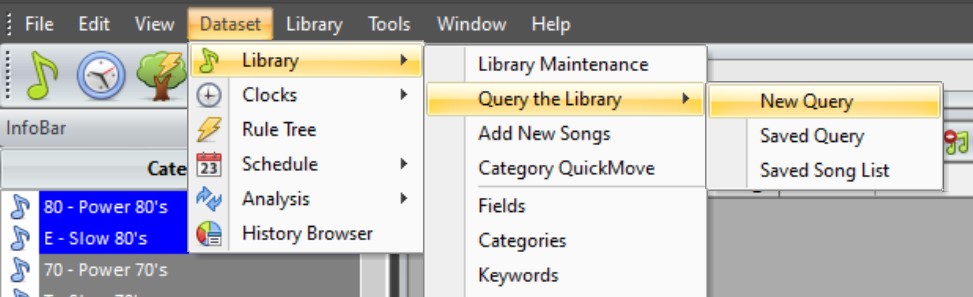
Click Library from the drop-down menu, then Query the Library and select New Query.
You’ll then get a Library Query window and here you can set up your criteria.

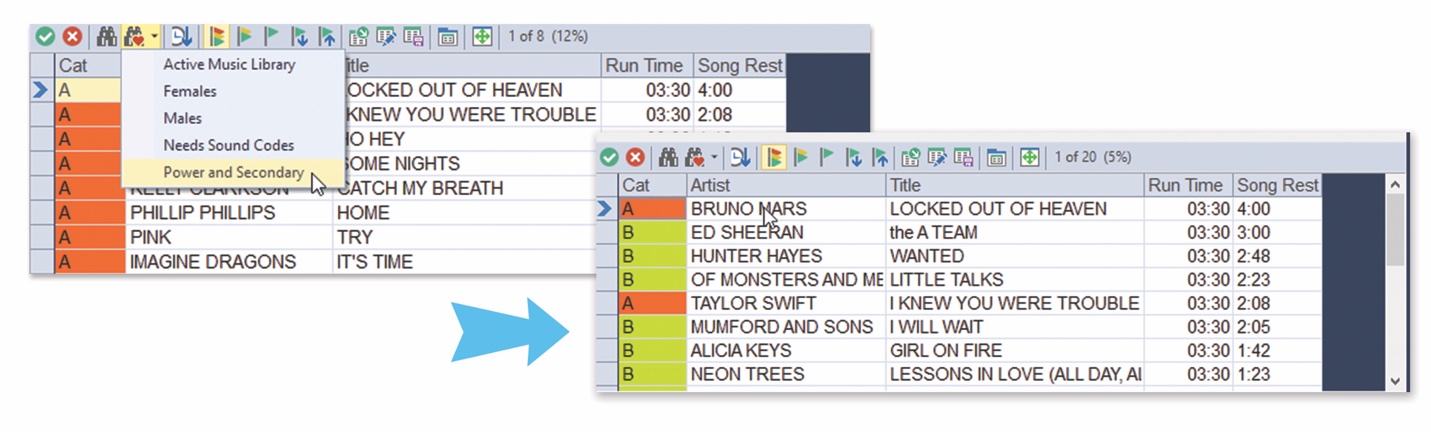
Perhaps you use research scores in your database and only want scores at a certain percentage or higher to be in mix shows. You’d create a search filter to generate those specific songs. In the above example, we’re doing a Michael Jackson mix show. I only want my mixers to play songs from our library and certain power categories. I’ve created a search filter for Artist Keywords contains Michael Jackson. You can use any combination of criteria your database allows.
When you click OK, MusicMaster will open up the library of all of the songs that match your search using only the categories you want. You can sort this list any way you want by pressing the column title (this example is sorted by Category)
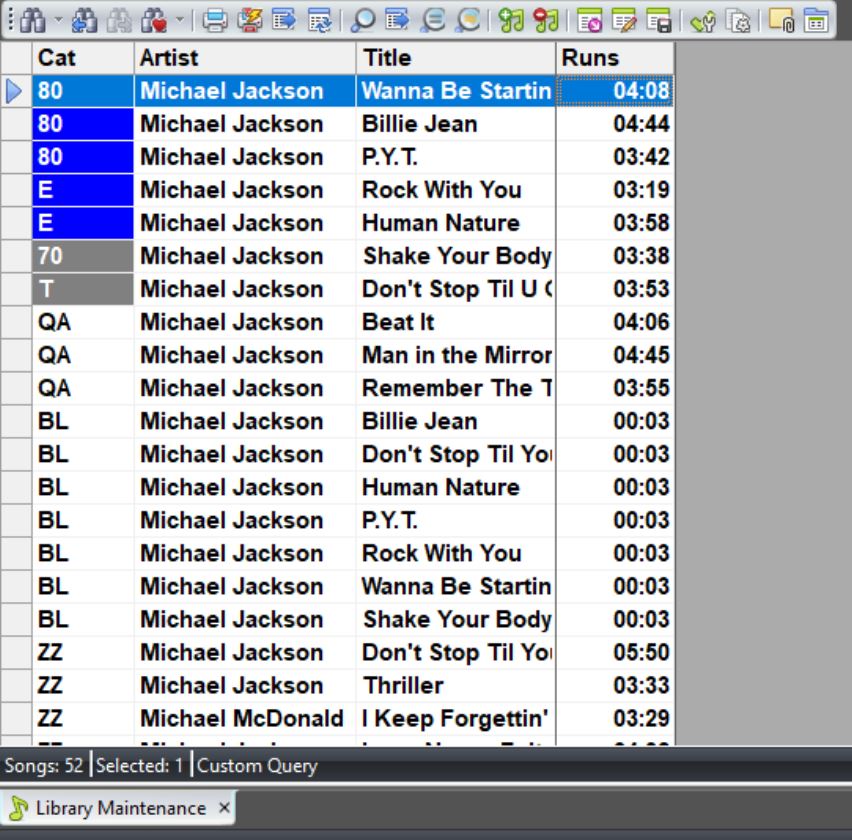
You will likely also need to hide columns in this view as well (for example – Cart Number, Sound Codes, Gender, Test Scores are not as important to your mixers). Right click on each unwanted field and hide column on each of those you want to remove from the report. The report above includes Category, Artist, Title, and Runtime. If this is a layout you can use for other purposes, click the Save Library Layout icon on the toolbar giving the layout an appropriate name.
Lastly, press the Quick Print icon (the printer with a lightning bolt) – it will create a PDF that you can save and distribute to your team.

Good luck with your safe list! If you have any questions, please contact your Music Scheduling Consultant.
Painless Format Flip publicado em February 24th, 2020
By Marianne Burkett
Are you either switching formats completely, doing a major overhaul, perhaps starting up a new HD or streaming format? This task is overwhelming to many, plus it’s got to be done and within a week! Stop freaking out and start this simple step-by-step process.
Clone your current database in MusicMaster
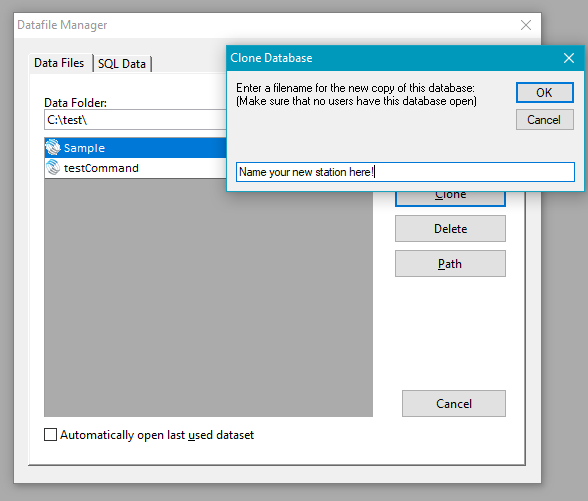
Depending on which version of MusicMaster Pro you are running, the steps can be a little different to Clone. Here’s a way that will work no matter what version you use. With the program open, go to File/Close and then File/Open. This will bring to the Datafile Manager (where you can see any databases located in the database folder either on your local drive or on the network). Look to the right and you will see a “Clone” button. Put your cursor on the database you’d like to Clone and Click Clone!

When you do this, another window pops up where you can name your new database whatever you’d like:
Once the new database is created it will show up in the list along with your other databases. You can now open your new database and start the reworking process. We recommend going to Tools/Options/ Dataset Identification. Change the color so it’s really obvious you’re in the new clone.
Demolition of any database is pretty simple in MusicMaster. What do you need to do?
Delete all songs
Click on Group “Entire Library”. Make sure you’re in spreadsheet view and you REALLY want to discard everything. Some things like a voice track category or stopset category may help you complete your format flip quicker. If there is something you’d like to keep, do a custom search for songs from any category you’d like to delete. You can also just delete the category itself, IF you’re not going to use any existing clocks with categories of the same name. When you delete a “category” the songs all dump into the built-in category “Uncategorized Songs”. A deleted category also shows up in the clocks as “Invalid Category”, which cannot be mass changed in the clocks, so keep that in mind.
Once you are satisfied with the list of songs displayed, click the upper left-hand corner of the list to highlights all the cells.
You’ll see all the songs turn dark blue which means everything is “selected”.
From there, right click on the pointer column (where the blue arrow is) and Delete/Selected Songs.
You are done clearing the library.
Clear the History
While there may be no songs left, you may want to “clear all” histories from the database if you’re completely starting from scratch. Go to Dataset/Schedule/Purge History and “Clear All”. When you’re done you should see no Active or Archived History. When it’s done, just close that.
Clear the Rules
A new format and new categories mean you will need completely different rules. Enter the rule tree and put your cursor on the word “MusicMaster Rule Tree”. You’ll then see a BIG red X on the toolbar. Click on that and delete all the rules.
You can now begin to make any changes here.
Clear Clocks and Assignment Grids
Review the existing clocks by going to the clock icon on the main toolbar. You can select any clocks you’d like to delete or select all of them if you want to start from scratch. I like to keep a clock or two for syncs or stopsets. At least you’ll have somewhere to begin without starting at ground zero.
Next, select Assignment Grids. You can put check marks next to any assignment grid and then use the delete key.
New Coding Attributes
This step can be done now or perhaps it’s not needed, but something to think about. What Sound Codes will you be using? If you’re taking a Country database and turning it into a Rock database, you’ll likely need some different codes. Go to Dataset/Library/Attributes and delete unwanted codes and create some new codes.
Final Step is Tools/Purge. You’ve discarded songs, categories, clocks and rules so you want to flush any remnants away.
Once the new titles are in MusicMaster, here’s a list of things to do in order of importance:
- Create Categories
- Populate Categories
- Code Songs in Active Categories
- Create Clocks and Assignment Grids
- Build Rules
- Schedule Music and Launch your new format!
The beauty of creating a new database from a clone is that you retain your Export Design and Paper Log Design, all your custom searches and editor views and if you choose to retain your clocks and category codes/names, it makes that aspect a lot easier
Of course, if you need assistance with any of this, please contact your Music Scheduling Consultant!
Featured Artist publicado em February 10th, 2020
Featured Artist Keywords…A New Twist
By Dave Tyler
Recently I was fortunate enough to be able to travel up and down the Eastern Seaboard for two weeks visiting with great programmers and schedulers using MusicMaster. We met with more than 125 MusicMaster stations! It was an amazing trip. One of the things I walked away with was how creative and bright these guys and gals are. Not a single person uses MusicMaster in the same way, but all displayed their artistry with the program. On this trip I learned how one programmer handles a very current problem.
That issue, especially with the CHR, Urban, Hot AC and Country formats, is “Featured Artists”. Time and time again the question came up “How do I treat these featured artists as far as separation goes?”. I will give you my philosophy and then I will give you a new and creative option I learned on the trip.
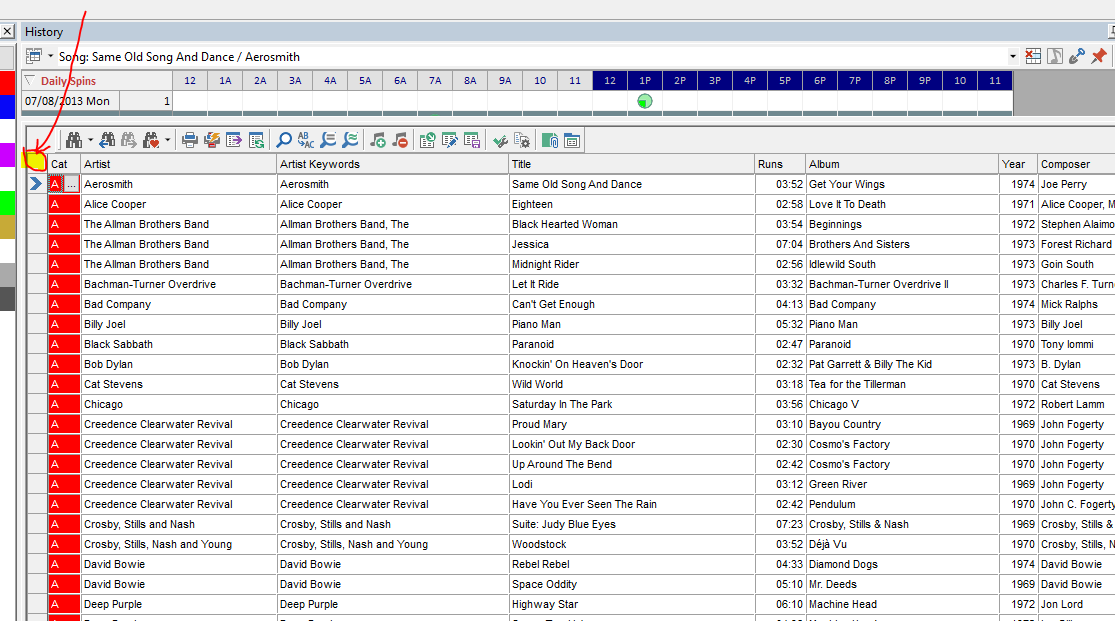
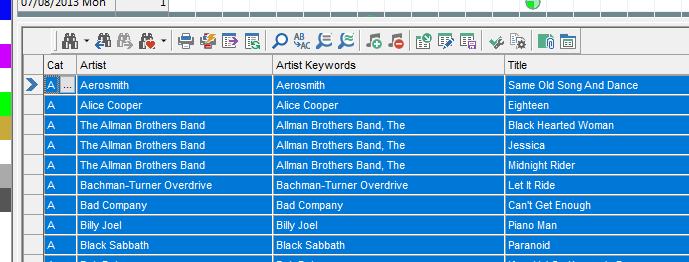
Let’s say Taylor Swift has a song that features Ed Sheeran. My Artist Separation rule is set to 1:10 (1 hour and 10 minutes). This song is essentially a duet because both artists have full roles in it. In this case I would have both Taylor Swift AND Ed Sheeran in the Artist Keywords because I do not want this song playing near either another Taylor or Ed song. Now in a different example we have a Taylor Swift that features Ed Sheeran. Ed just does some minor background vocals and the song in no way comes across that Ed is on it but it is good information for your jock to bring up on the air. This would be where I run it through the separation filter in my head. Do I mind this song playing near an Ed Sheeran tune? If I do, then I will list him on the Artist Keyword. If I do not mind this song plays near an Ed song because his role is negligible, then I will leave him off the keyword. This is just how I do it.
There is however a bit of a gray area here. What if Ed has a noticeable role in the song but it would not be considered a “Duet”? What if it would not be considered an “Ed” song but gosh he is playing guitar in it in that style that is “Ed”? What if he is adding vocals that are definitely him? In this case you might want to keep this song from playing near another Ed song but you do not want Ed Sheeran to have to wait the full 1:10 before another of his songs can schedule. We often will set up a “Secondary Artist Keyword” field to accommodate that. This can get a bit tricky sometimes. So, here’s the great suggestion I heard from a programmer named John Fowlkes with Curtis Media.
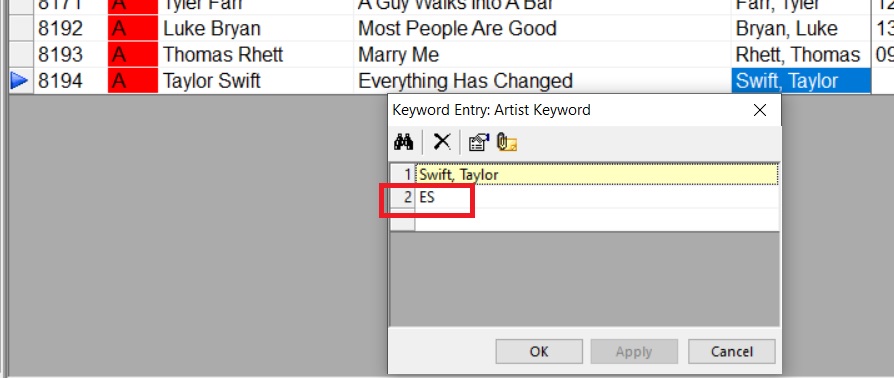
He said when he has a featured artist in this situation he gives that artist two keywords. He has an Ed Sheeran keyword AND an ES keyword. If he has a full or Duet role on a song then he puts the Ed Sheeran keyword on it. However if his role is noticeable but he would be okay with another Ed Sheeran song playing in say 14 minutes then he puts “ES” in the keyword field.
This “ES” keyword is for Ed Sheeran but allows him to put a custom time on it. He does this by going to Dataset/Library/Keywords and choosing Artist Keywords and unchecking the “Auto box and entering his custom time of 14 minutes in there.
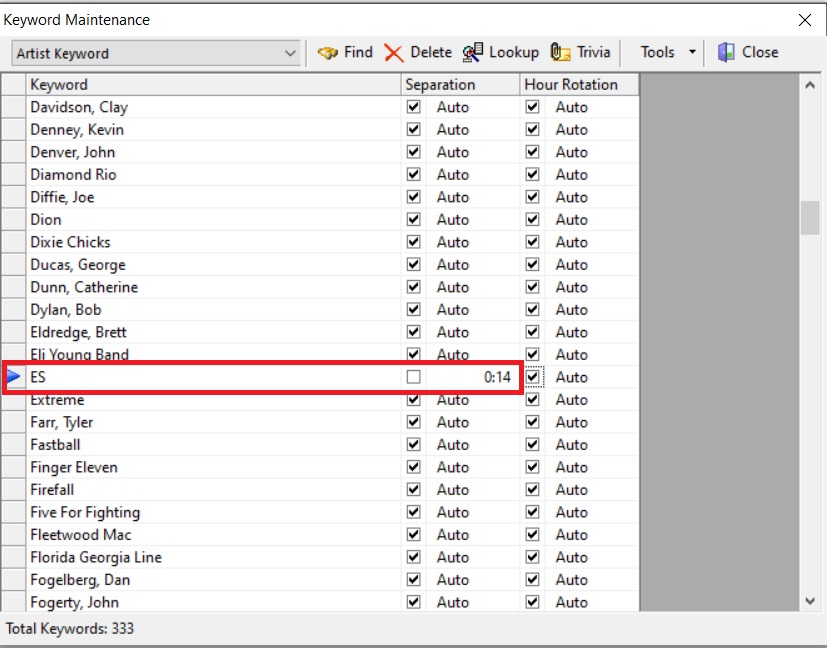
Remember, adding the “ES” keyword to songs where Ed Sheeran is a minor contributor only separates those songs from each other. It will not separate the “ES” songs form the “Sheeran, Ed” songs. To do that, you would also have to add the “ES” keyword to all of the songs with the “Sheeran, Ed” keyword. This ensures you separate separate the main performances from the ones where he is a contributor.
This is a very creative way of handling featured artists without having to create and manage a secondary keyword field. It’s a perfect example of the super bright MusicMaster users around the world not only using the software but pushing the limits and thinking way outside of the box! I will share more great ideas gleaned from my trip in future blogs.
If you have any questions, please contact your MusicMaster Scheduling Consultant.
Time Saving Tips – Part 2 publicado em January 30th, 2020
![]()
“Takin’ Care of Business” – Part 2
Time-Saving Tips When You Don’t Have Enough Time
This is a guest article written by MusicMaster ProTeam consultant Kristopher Jones, Owner of M3 Merge Music Media. In this article, he shares Part 2 of his favorite time-saving tips in MusicMaster. You can find Part 1 here.
When you think about it, the quality of your music programming is perhaps the single most important aspect of your radio station. Then why is it that the music rarely gets the time and attention it deserves?
“If you don’t have time to do it right, when will you have time to do it over?” – John Wooden
When you’re running a busy radio operation time is the most valuable resource you have. Some say that you can’t make more time. I beg to differ.
In Part 1 of “Takin’ Care of Business” I shared my philosophy on ROTI (Return On Time Investment). By investing time up front you can make your weekly or daily routines more efficient, ultimately saving you more time than you initially spent. It’s an investment that pays off every time you open MusicMaster.
In Part 1 I shared several time-saving tips and tricks to setting up MusicMaster, from saved queries and views to setting up favorites. Many of the routine things that you do in MusicMaster can be done in the future with just a click.
But time savings is not the only goal. The goals are high quality music programming AND more time to put out all those other fires around the radio station.
Checking the quality of your scheduling is another worthy investment and we can save time there too.
History often reveals some surprising things about your radio station and the health of your MusicMaster database. In Part 1 I talked about having a variety of favorites saved in the History Browser. It’s an excellent data analysis tool. And even though I spend a big chunk of my days looking at playlists on spreadsheets, I’m a very visual guy. When I want to see what’s really happening I pop open the History Graph.
Bring up a category in Library Maintenance, then from the menu at the top select View > History Graph. Then you can arrow down through your category and see the days and hours each song played on a grid. If you have your category rotations and hour rotations set up well your music probably looks pretty good in Song View.
Now, on the History Graph hit the dropdown, change the view to Keyword and click the red thumbtack icon to pin it. Now what do you see when you scroll through your library?
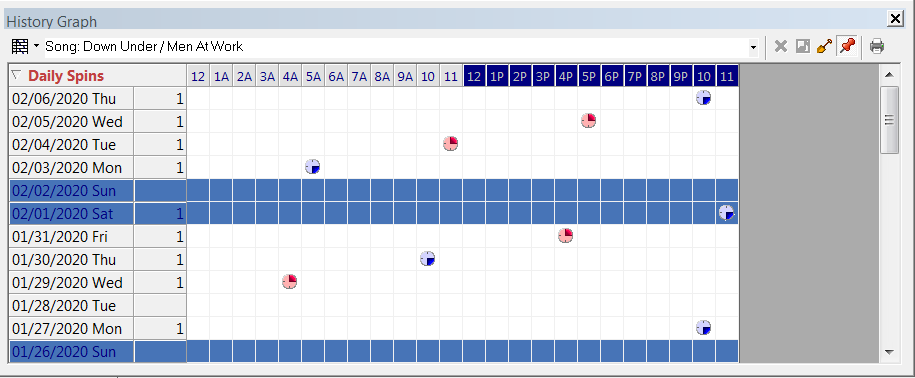
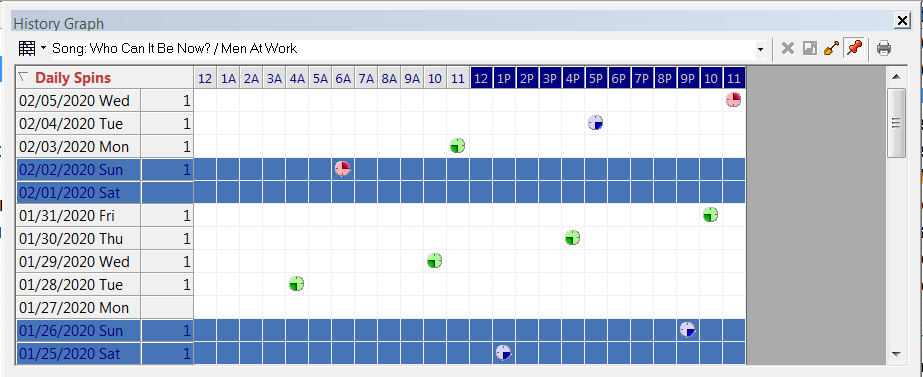
Here’s a simple example: two Men At Work songs in the Power category of a Classic Hits format. Individually, “Down Under” and “Who Can It Be Now?” look pretty good.
But look them together on the Artist Keyword view.
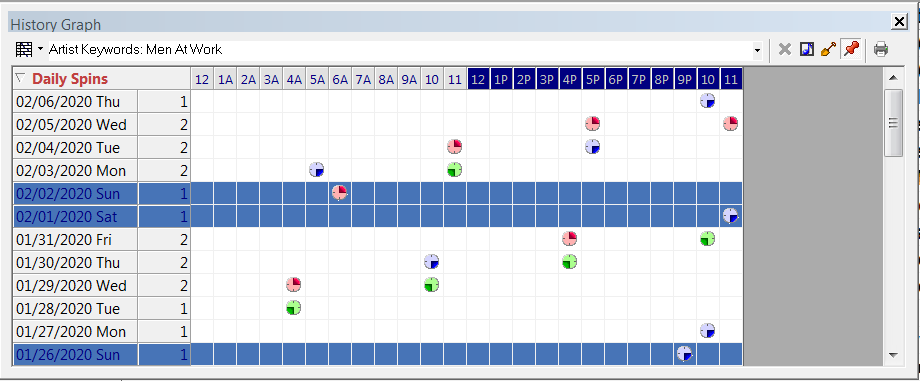
Yikes! Not so pretty. Artist Hour Rotation would fix that.
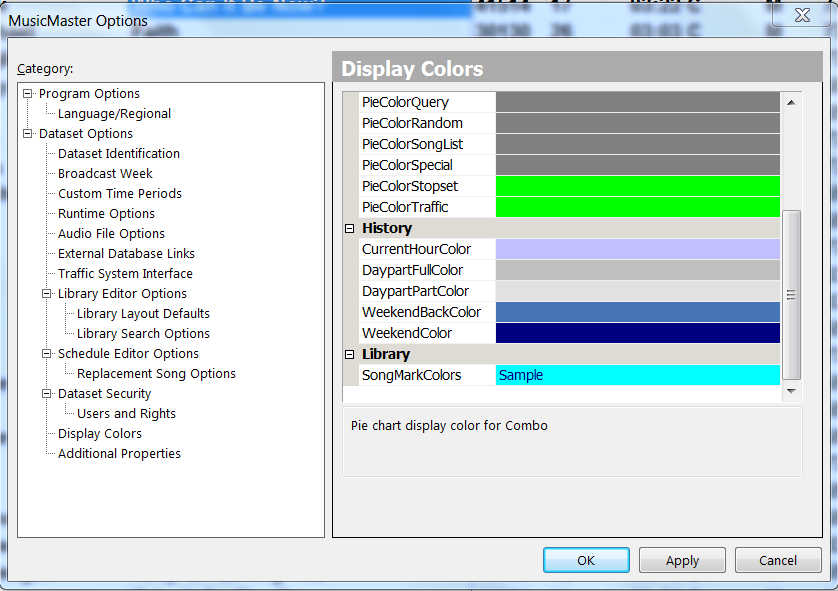
You might also notice that I have weekends highlighted. That helps me visually isolate weekday vs. weekend plays. You can set up that highlight in Tools > Options > Display Colors, scroll down to History and choose your highlight color for WeekendBackColor.
Highlights
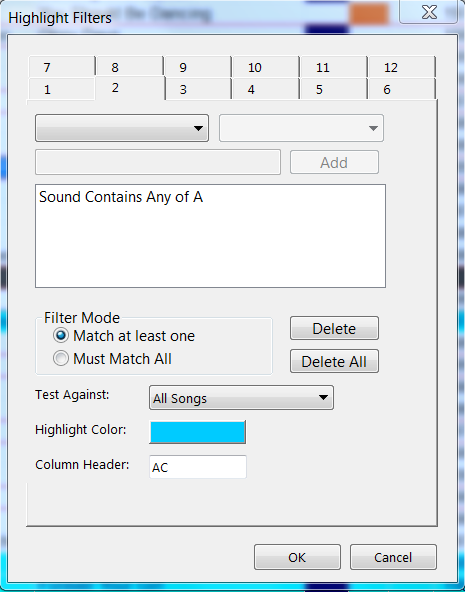
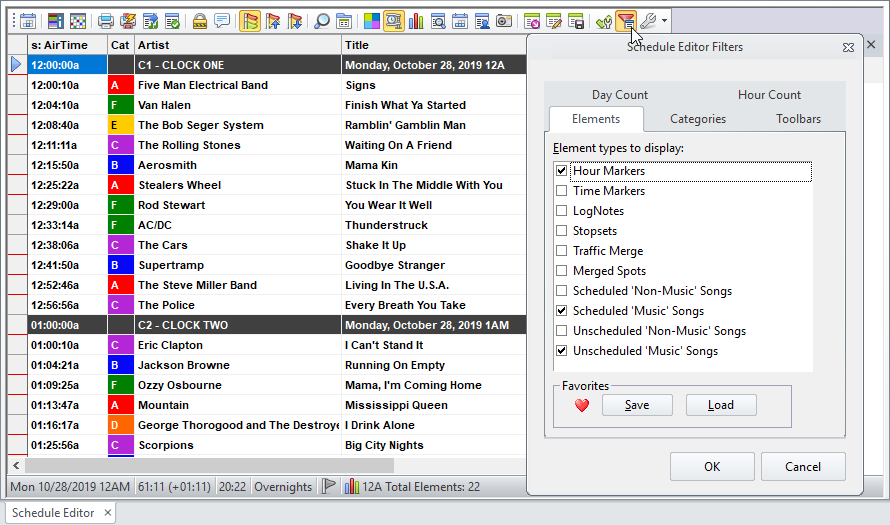
I also use highlights in the Schedule Editor for critical editing information. Depending on what’s important I’ll use highlights for Decade or Era, Sound Codes or Tempo. It is a quick and easy visual way to check your work and balance the hour.
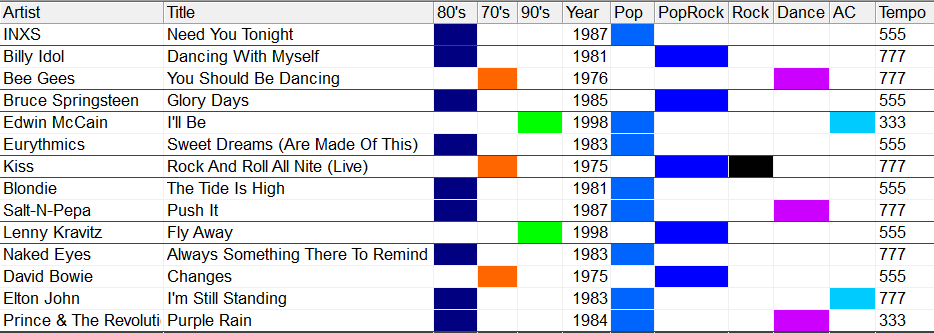
To set up highlights in the Schedule Editor, select the Song Highlight Filters icon at the top. Be sure to label them in the Column Header field, then add them to your saved Schedule Editor View.
Schedule Analysis
The Schedule Analysis icon at the top can also give you a quick look at how balanced your radio station is based on any code you choose. This quick count provides really good feedback on how consistent your radio station sounds throughout the day.
For me, maps and grids and color highlights help me see how my stations sound and help me process information faster. Because it’s all about two things… saving time and making your radio station sound great!
Remember: ROTI!
If you have any questions, please email me at the address below. I’d love to hear from you!
Time Saving Tips – Part 1 publicado em January 29th, 2020
Takin’ Care of Business – Part 1
Time-Saving Tips When You Don’t Have Enough Time
This is a guest article written by MusicMaster ProTeam consultant Kristopher Jones, Owner of M3 Merge Music Media. In this article, he shares some of his favorite time-saving tips in MusicMaster.
Time. We never seem to have enough of it. With all of the responsibilities of running a radio station (or several), the immediate demand of what’s urgent moves like a tsunami through the day, leaving a trail of debris and destruction in its wake.
Okay, maybe it’s not quite that bad, but it can be hard to find the time to sit down and focus on your music scheduling. “I just don’t have enough time” is something I hear from clients all the time.
I schedule music for a lot of radio stations, so knowing how to set up MusicMaster is critical for me to produce outstanding weekly music logs with confidence and efficiency. I’m a big believer in investing dedicated time up front knowing that the payoff will save me time every single week going forward. Think of it as ROTI – return on time investment.
Here’s part one of some of my favorite time-saving tips and tricks in MusicMaster.
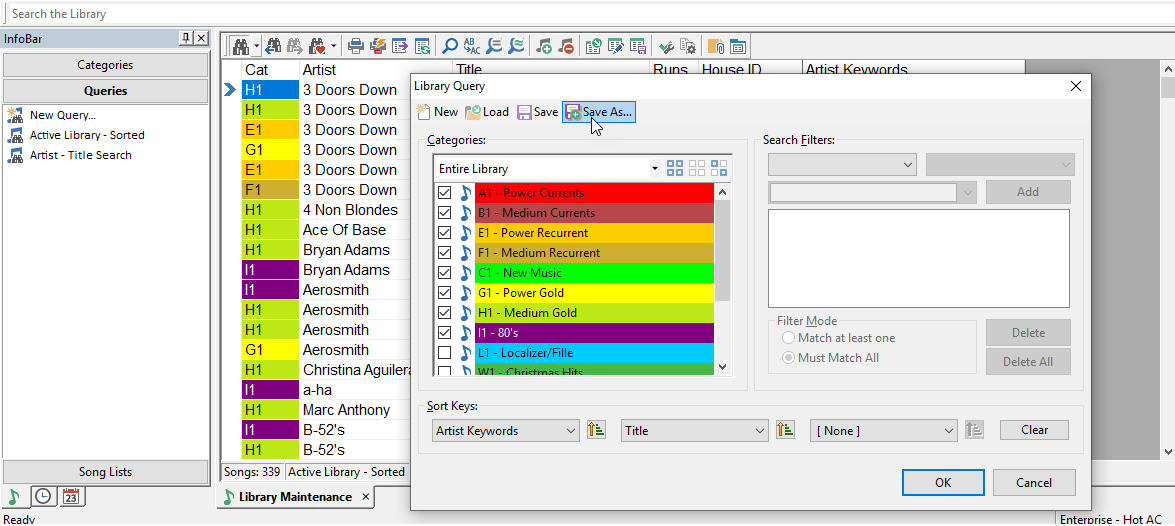
Library – Saved Queries
If your MusicMaster routine includes selecting and sorting categories, the next time you do that, save it! Just click on the binocular icon, “Save As” and give it a name.
I have saved queries for my currents and recurrents, sorted by category, artist keyword and title for doing my weekly music adds and changes. I also have saved queries for my active library, sorted the same way, and another sorted just by artist keyword and title. Now, under the queries tab of the Info Bar on the left, all those saved queries are just double-click and go!
I have a variety of library grid layouts that I use for different tasks. This helps me eliminate the visual clutter and focus on what’s important. By clicking on the show/hide fields icon, you can select and arrange things how you want them and save that layout so you can quickly load it next time.
For example, when I’m doing my weekly music adds and changes, I double click the saved query I mentioned above and load my saved grid for that task, which shows important details like add date, move date, category spins and library spins.
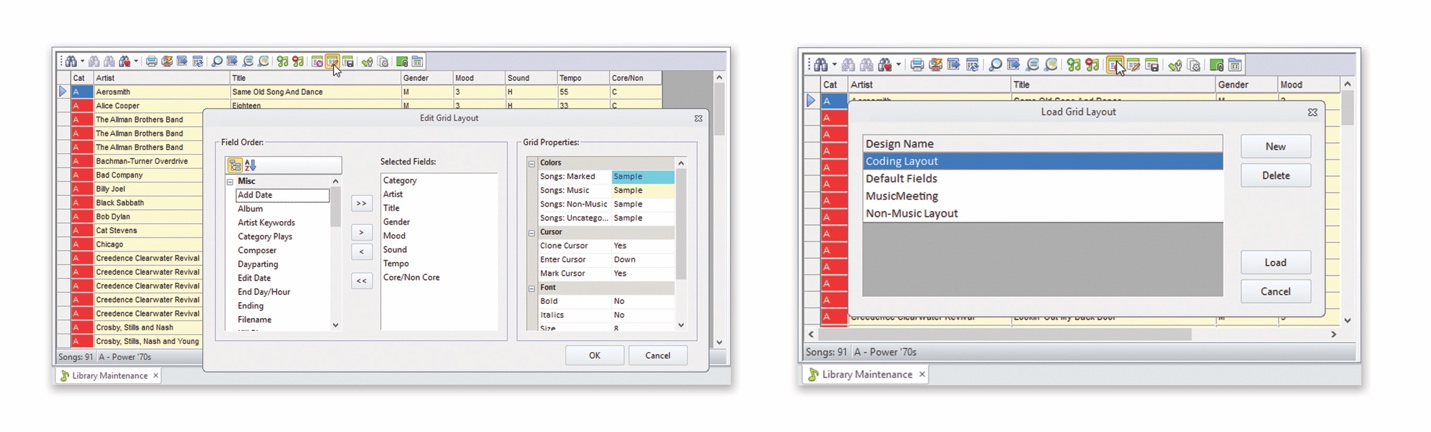
I have another one just for coding (role, tempo, energy, sound, mood, era, etc.). I also have a saved grid layout that matches the “add new songs” layout in every database. That allows me to quickly copy and paste crossover songs from one format to another.
Schedule Editor – Favorite Query
I run my power recurrents and power gold categories pretty tight. I want those songs to get maximum exposure and always have great rotations. When a position goes unscheduled, it’s typically because hour rotation rules are protecting those rotations. Instead of compromising my rotations, I’ll fall back to my secondary category to fill the position. If you have your category rotations and hour rotation rules set correctly, you shouldn’t have too many of these to fill.
By double clicking the unscheduled position, then clicking on the binocular icon, you can check additional categories to test in the position. It works exactly the same as a saved query, “save as” and give it a name. Then, click the down arrow next to the binocular icon with the red heart and make your new saved query a “favorite.”
Next time you have to fill a power gold position with a secondary gold, just click the binocular heart icon all those additional songs will be immediately tested for that position. Find the best song for that position and go!
Schedule Editor – Saved Views
Just like with saved library grid views, you can save and load different layouts in the Schedule Editor as well. My goal is always to eliminate visual clutter so I can quickly see what I need to see to make decisions efficiently. Strip out anything that doesn’t serve that purpose.
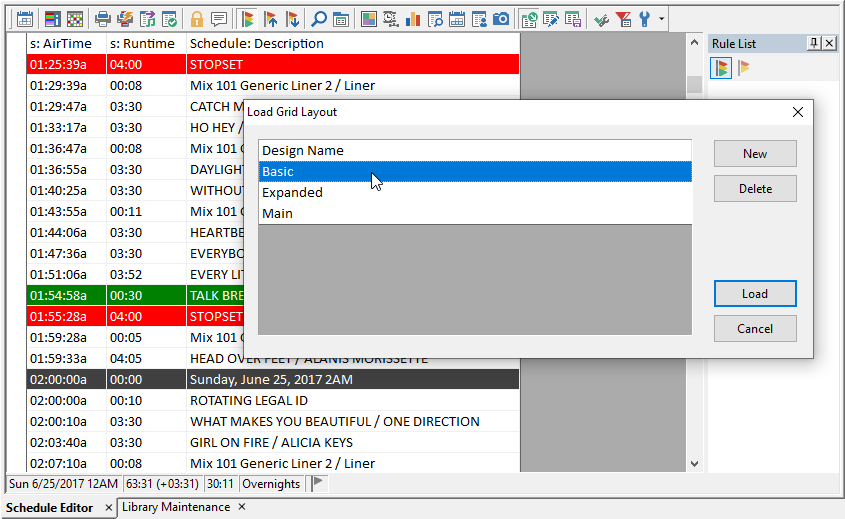
This is another way to reduce visual clutter when you’re editing your logs. Here you can remove various non-music elements from the view so you can focus on the flow of the music. You can also isolate certain categories.
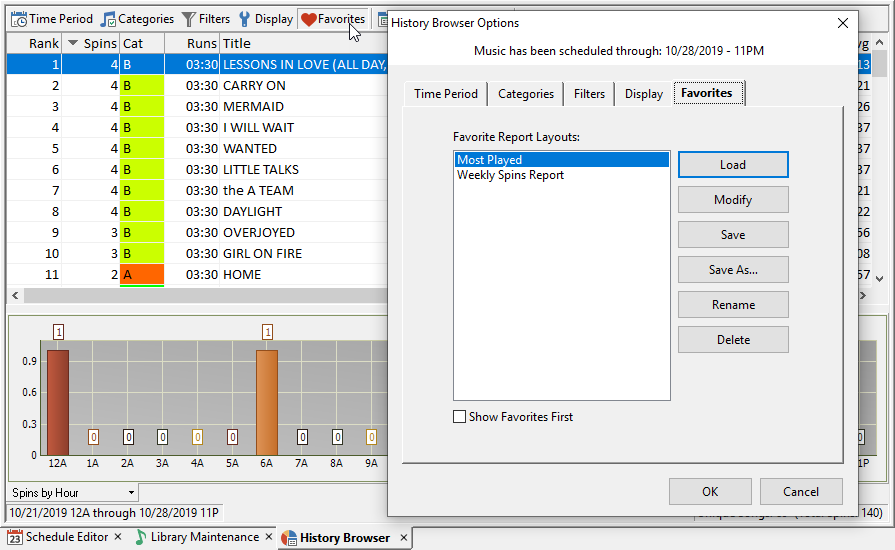
A common use of the History Browser is “Most Played” reports. Similarly to everything else, once you have made your Time Period, Categories and Display selections, save it as a “favorite” so it’s just a one click process every week.
I use the History Browser extensively as an analysis tool to check on the health of rotations, artist separations, coding and more. All are saved as favorites so I can quickly get a read on what’s happening in my databases and make adjustments if necessary.
There’s never enough time. Finding ways to shave the time it takes to do routine weekly tasks, or even more complicated analysis, buys you more time to focus on the quality of your work. If you take advantage of the tools available to you in MusicMaster, a little time investment up front will save you hours over the course of the year.
There are more time-saving tips and tricks in the schedule editor… I’ll save those for next time. If you have any questions, please feel free to reach out to me at the email address below. I’d love to hear from you!
“It’s the little details that are vital. Little things make big things happen.” – John Wooden
Max Fails and Max Skips publicado em January 27th, 2020
When you go to Schedule Properties you will see a column for Max Fails and one for Max Skips. Ever wonder how these are used?
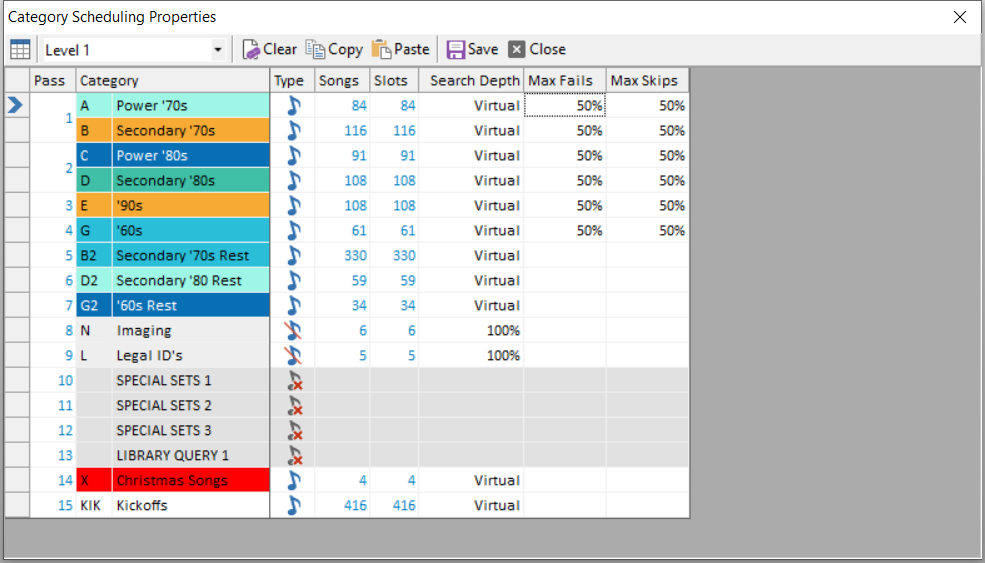
Let’s start with what Max Fails and Max Skips are. These settings only apply when using Dynamic Rest Compensation as the Category Order Management (set under Schedule Order).
Max Fails is the maximum number of times a song in the search depth can be passed because it fails one or more rules. Once it gets to the setting, the song is put back in its rightful place in the Schedule Order. This is considered to be a Skip.
Max Skips is the number of times you’ll allow that song to be skipped before you force it to sit at the top of the scheduling stack until it does finally plot. When a song is skipped the number of times you’ve set, it will remain in the search depth until it eventually schedules, however long that takes.
What does that mean? When your Max Fails is set to 10 and Max Skips is set to 3, if a song fails to be scheduled 10 times unsuccessfully it will be skipped. After that song is skipped three times it will sit at the top of the stack indefinitely until it can be plotted automatically. You can also set set a value that is a percentage of the number of songs in the category, which allows the values to change dynamically as the size of the category changes.
Why use this? When an element is being scheduled, the search depth allows multiple songs to be considered and the best available one is scheduled. If a song is having a hard time scheduling it will just sit at the top of the stack indefinitely. This is where using Max Fails allows MusicMaster to keep track of the number of times the song was bypassed while scheduling. You’re using use Max Skips to tell MusicMaster it’s okay to let the song fail out and be skipped, but after so many times we just want it to schedule and to keep trying it until it does.
Keep in mind the search depth is being prepared for each element you schedule. The songs are adjusted so the one with the most fails is considered first. The purpose of that is to give the songs that are most difficult to schedule more opportunities to schedule.
Sometimes you have songs that fail due to their coding or other rules you have set up. These songs become difficult to schedule and the search depth can become clogged with these songs. Using Max Fails and Max Skips gives you a way to remove these songs from the search depth after it reaches your settings.
Should you have dayparted songs, those get special treatment. Since they cannot play due to their dayparting, the songs do not get fails. If there is a Max Skips setting and it has not yet been reached, the dayparted song is skipped immediately. If there is no Max Skips setting or it has already been reached, the song is “bypassed”, which means it will remain in the search depth but not counted against it. That allows the search depth to dig one more song to find something to play. You can probably imagine a situation where your search depth could be completely filled with songs that failed dayparting if MusicMaster did not do this.
Of course, if you are using search depths of 100% every song would be up for consideration every time the category is called for. Then Max Fails would still put the song back into its rightful place in the category, but you’d potentially be considering that song anyway if nothing earlier in the depth meets the unbreakable rules.
Now that you know what these values do, you’re probably wondering what happens with different combinations of these settings.
When there is no Max Fails setting, a song simply remains in the search depth until it schedules.
If you have a value for Max Fails but not Max Skips, the song will just keep failing and will be skipped for as long as it takes to be scheduled.
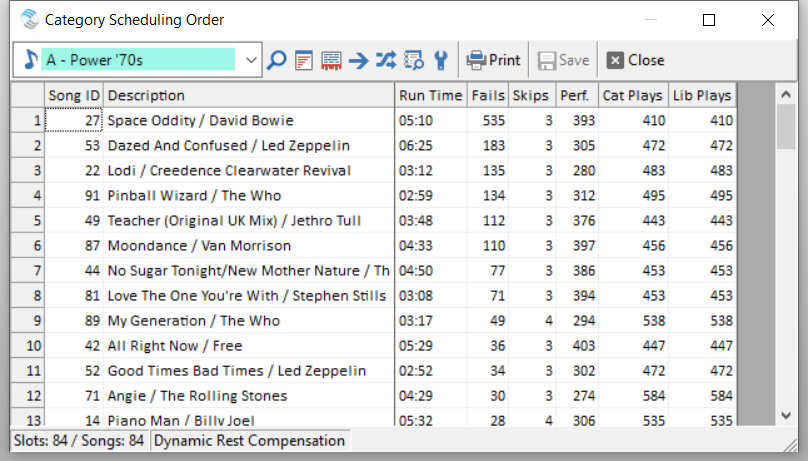
You can see the songs that currently have Fails and Skips in the Schedule Order editor.
For more tips and tricks, check out our other blog articles or call your friendly MusicMaster Scheduling Consultant.
Mix Show DJ’s Spins Count Too! publicado em January 13th, 2020
By: Jesus Rodriguez
Recently the topic about mix show spins came up a lot with my clients. I’m referring to stations that air syndicated, or local DJ mix shows either prerecorded or live. I am shocked to see that many of my clients have a blank hour for these programs in the log or are not reconciling what aired by the jocks. I understand that part of it may be the limitations of the software your DJs use to mix the tracks. Maybe they can’t export a playlist for reconciliation like your automation integration, but at the very least, I would assume that you are getting some playlist for every show submitted.
I’m writing this article, not only because I am still to this day a club DJ that got his first break on the radio as a kid via a mix show, but more importantly because of the number of spins and credit you are missing out on in the spins reports you submit to any agency. Let’s do some basic math: let’s say that you have a lunch mix, a traffic mix, and a night mix on your station daily, but you don’t account for those spins. With only one power position song you are missing up to three spins per day. Let’s not get started on the four to seven per hour or more for night weekend mix shows or the nonstop holiday weekend mixes of spins not accounted for in your reports. I can’t even count that high; it’s so many!
Here is your solution, and it is called History Linking!
Step One: Mixshow Library Song Carts
If you are doing prerecorded mixes that schedule in MusicMaster, you are halfway there, but if you are not doing a prerecorded mix show, you can still use this method by creating a mix show category to keep track of what aired. In this case, I would create a dummy category and dummy song carts not in rotation for the mix shows. That way I can follow these steps as a placeholder for my history linking items to be able to account for the spin count of all the songs I have in rotation that are linked to an aired live mix show
Step Two: Sharing History
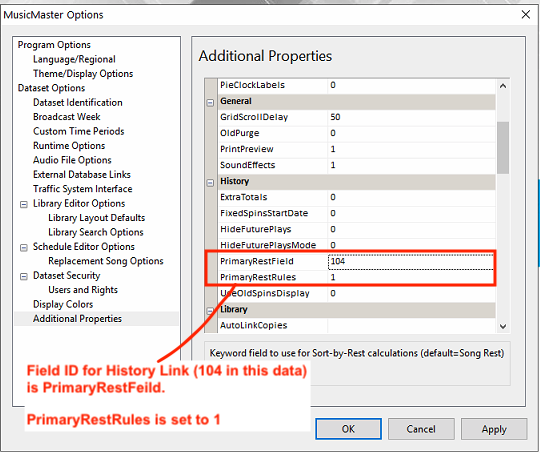
You’ll need a Keyword Multiple field in which to place a unique identifier for the song. If your data is lacking an unused Keyword Multiple Field you can create one in version 7.0. If you are on an older version, check you Field list to see if you have unused field you could use. If you don’t have any available fields, contact your MusicMaster Scheduling Consultant and ask them to add one for you. You can label this field as “History Link.” Make sure to note the field ID assigned to the History Link field in Dataset/Library/Fields.

Now go to Tools/Options/Additional Properties. Under the History Header, indicate the History Link field ID in the Primary Rest Field, and set Primary Rest Rules to 1. This tells MusicMaster to use the History Link field when determining song rest. Then click Apply and OK.
Step Three: Mixshow Song History
Now that we have a History Link Keyword Field we can use it like we do other keywords to help keep songs from scheduling around our prerecorded mixes so that we don’t go from regular programming to the same song back-to-back. You accomplish this by using a unique identifier in the history link field in both our current songs in the library as well as the mix show cart. Typically, I would recommend an automation number.

Now that both your songs in the library and prerecorded mix have the cart number in the history link field, we can put a rule to separate those unique items from each other by using the History Linked Keyword Separation Rule in the rule tree for your music and mix show category if it’s a prerecorded mix. This is the same way we would keep songs by the same artist from playing to close to each other.
I would suggest if you are using prerecorded mixes, it would be best to place that category at the top of your scheduling properties pass order so that it schedules first then all of your song categories can schedule around it to prevent the same songs from playing too close to each other when you launch the mix. To adjust the order, go to Dataset/Schedule/Schedule Properties and drag the category to the top of the list using the blue pointer arrow.
History linking has an additional benefit which takes us to the next step.
Step Four: Viewing Combined Histories
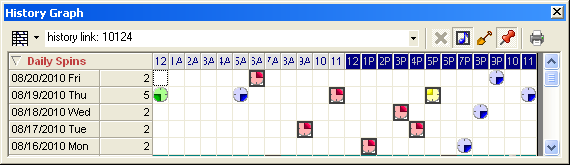
After you have scheduled music, open the F6 history graph for one of your linked songs. By default, MusicMaster displays all scheduled spins of that song within the active history. You can use the dropdown at the right of the song line to switch from the Song view to any keyword history, packet history, and even move history. Since the History Link is a keyword field, you can see a combined history of all songs sharing that History Link! Furthermore, you can click the icon to “Highlight plays by the active song card you are on” to add boxes to the display for spins of this copy as opposed to other copies of the song. You can see that in the next capture.
As you manage your station, we would not recommend you not delete the elements. You could move them to a dead category or use the Song Merge feature. If you’d like to take a deeper dive into History Linking, you can watch our Master Class video on History Linking.
You are now all set. Your music library will now include the History Linked spins for your mix shows when you run your reports, glance at your history graph, and have more control over song separation.
Should you have any questions, do not hesitate to contact your Music Scheduling Consultant.
Get The Power Of A Wizard On Your Side publicado em December 30th, 2019
By Dave Tyler
Every professional no matter their trade requires tools to get the job done. If you have ever bought a cheap screw driver you have quickly learned that a quality tool will get the job done better and last longer. MusicMaster is a tool. Actually it is more than that. It is a toolbox and even more than that it is one of those big red rolling toolboxes filled with other great tools. Today I want to tell you about just one of them that may be overlooked but is packed with powerful qualities to make your job easier and your station sound better!
If you have not already met, let me introduce you to the “Rule Wizard” and explain why it is so darn good. We all want our station to sound its best: to get the best rotations, avoid tempo train wrecks and artist conflicts etc. The Rule Wizard can cut to the chase for you. It is easy to access this power. Simply go to the Rule Tree and click on the Rule Wizard icon and it will start working its magic. After analyzing your data and looking at things like how many songs are in your categories and how many times those categories are being called for in your active grid voila, RESULTS!
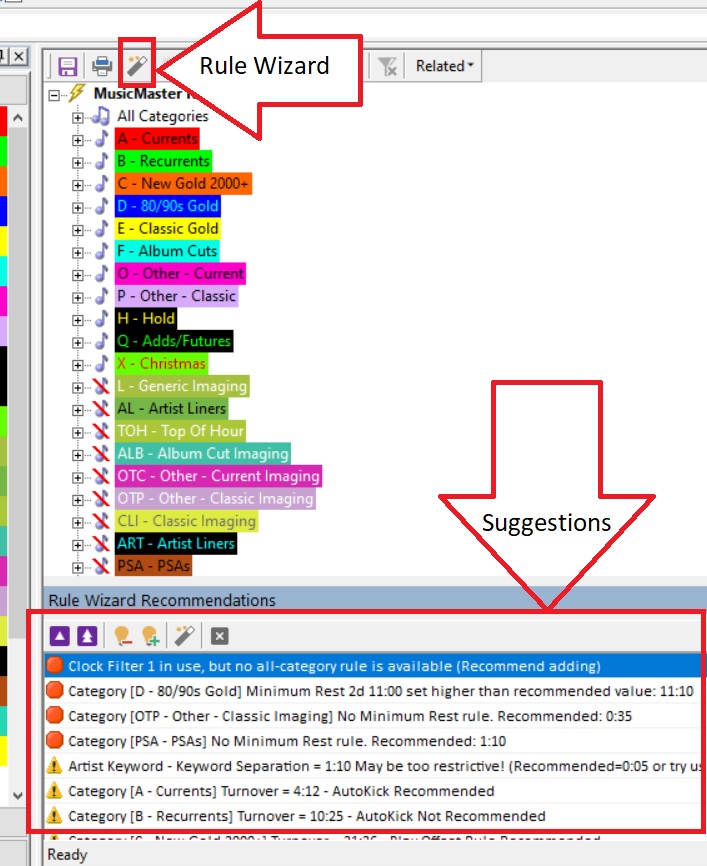
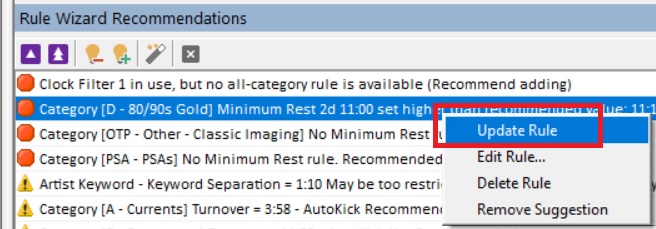
Keep in mind MusicMaster and the Rule Wizard and simply crunching numbers and doing calculations. I know I didn’t get into radio because I loved math. If you did more power to you but I got into radio so girls would think I was cool (still working on that, just don’t tell my wife!) So these “Suggestions” that pop up are just that. In my example above you can see my Category D (80s/90s) has a minimum rest rule set much higher than the suggestion. I bet this database is getting a lOT of unscheduled positions for that category because of that rule. If I want to correct this all I have to do right click on the recommendation and choose “Update Rule”. Then save the rule tree and I am done.
Keep in mind that the Rule Wizard does not have a “Programming Philosophy” like you do which is why these are “Recommendations”. In the end you decide if that suggestion makes sense. My above setting is so out whack that ignoring would likely mean more unnecessary work being done by me each day while massaging my logs.
Here are a couple more important things to remember when using the Wizard. The Wizard makes its calculations based on the last scheduling session. If you just scheduled your weekend then ran the Wizard that may not be the a clear view of what your database needs. I always recommend scheduling a full week, 7 days so that the Wizard has a comprehensive view of the big picture. You can always unschedule the music when done. The other item to be aware of is that the Wizard knows you likely have other rules and settings that will affect your songs getting scheduled and it takes this into consideration when making its recommendations. If you put your Minimum Rest rule at 100% of what is possible and there were no other rules in your database then that might be okay, but you do have other rules like Artist Separation, Tempo rules, Dayparting, Era etc. If you set it at 100% because it is not the ONLY rule you have you would get unscheduleds and probably a bunch. The Wizard understands this and so once the numbers are crunched and it comes up with the 100% it backs it down by about 30% to give room for other rules to come into play. The recommendations given by the Wizard are conservative and generally a safe bet to go with.
MusicMaster has other ways to determine things like Minimum Rest. You can go into Turnover Analysis and see results in there and jot them then go make the changes but why when the Rule Wizard can save you that time so you can get back to trying make girls think you’re cool?!
If you have any questions, please call your Music Scheduling Consultant.