MusicMaster Blog
MusicMaster Sports posted on August 14th, 2023
By Jesus Rodriguez
Did you know that MusicMaster isn’t only for scheduling music? While you may already be aware that MusicMaster can be used for scheduling talk shows, like morning drive or even a full talk radio station, the topic has come up frequently concerning sports. There are now more clients that are partnering with their local sport franchises of every level from youth sports to professional for game broadcast. The question coming up a lot lately is, “How do I create a clock for a sports broadcast?” In this blog, I hope to show you a very basic sports clock using the log notes element and some additional categories as a suggestion for sweepers or bumper music.
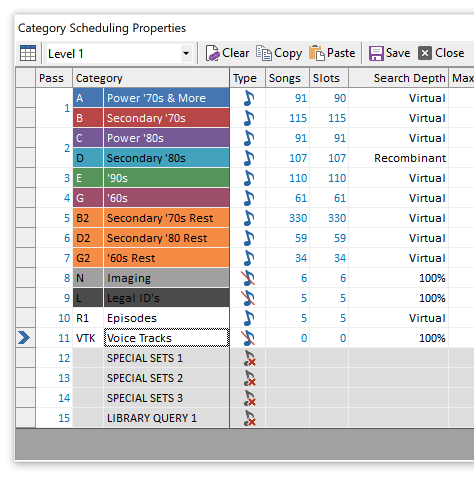
Sample MusicMaster Sports Clock:
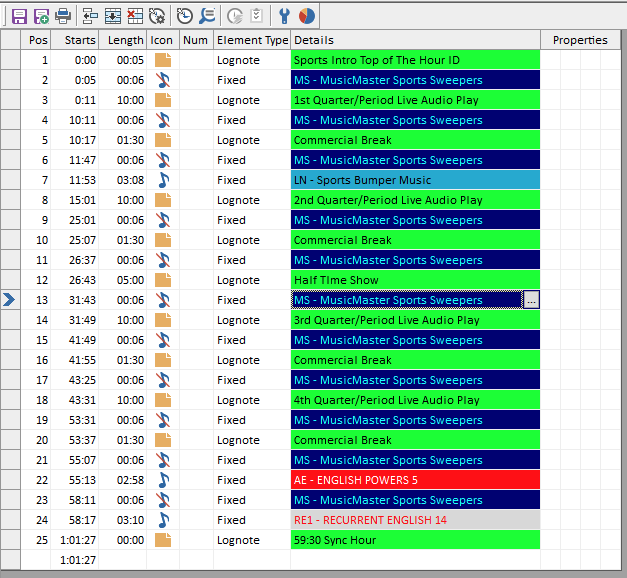
Quick disclaimer, most sports will be longer in length than one hour and may require multiple clocks. The sample above is a basic sports clock with shorter play periods/quarters for basic math and understanding.
The two main clock elements (although you are welcome to use others) are lognotes and fixed positions. You will replace the lognote shown above with your own description if you wish and most importantly, with your automations commands for things like turning off the live feed channel, going back to the live feed pod, commands for your commercial breaks (which will be identical to what you are already using now in your music clocks with the minor time modification if required), and sync commands.
The lognotes represent the portions of the live show, while the fixed items are your show’s sweepers and bumper music, which is optional. There you can also include song categories if you plan to incorporate them into your show to still have a feeling of your music station being represented during a sports broadcast.
If you have any questions or need assistance, please contact your MusicMaster support representative.
Let’s Get Spicy! Proportional Elements posted on July 30th, 2023
By Chris Hulsether
You want to get a little spicy with your playlist, but need to control that spice so everything balances well. Just like balancing the flavors of a great street taco: not too spicy, but enough spice to know it’s there. On one hand, you can use the Random element, but it is random and will schedule any of your selected categories, with no rhyme or reason to what categories get scheduled. Or you can use Format List elements, but unless you do a lot of different patterns the same pattern can get predictable.
How about Proportional elements? This can give you a little spice and a way to control it!
I would recommend this for gold formats or gold categories, if you have a few different ones to choose from.
Today’s country stations and even some CHR’s are starting to spike in more and more “Old” Gold into the playlist, and I am all about it! You get that occasional Garth Brooks “Friends in Low Places” that pops up out of nowhere. Or a classic Britney Spears song for that CHR.
This is the way you can use the Proportional element. In my example, I set it so that 80% of the time, you get a familiar song from Power Gold. But 20% of the time, you can have it go to a “Throwback” Category where you will have an older Garth, George Strait or Alan Jackson song pop up. If you add this once or twice in your clocks all day, you will sometimes get that random throwback in your day that gives that “Oh Wow I haven’t heard that one in forever” feel to your station. It also won’t be predictable when it schedules, and you control what that proportion is so it’s not too much or too little.
So how is it done?
Take a clock and change an Element position and make it Proportional.

You set the percentages in the Element Properties. I have a 4 to 1 ratio meaning 80% of the time it will be Power Gold (PG), 20% Uber Gold (UBG). You can use whatever ratio you like and use as many categories as possible that you want in one element.

Now, this doesn’t mean that you’ll always hear four PGs in this position and then a UBG. Rather, over the course of time, you’ll have a 4:1 ratio of PG:UBG in that position. You could get five or more PGs before a UBG comes into that clock position. But, over time, that requested ratio would be realized.
Over time, this will schedule that random throwback song in different places and different times based on your clock setup, and the rules for that random category will still apply, just like any other element.
You can use the History Browser and see how many “Throwback” songs scheduled and see the different hours they are popping up, so you can tell if it’s too spicy or if it needs a little more.
Everyday I’m Shufflin’ posted on July 24th, 2023
by Dave Tyler
I get a call about once per week where a programmer is asking if it is possible to “Shuffle” the schedule order of a category. The answer is a big YES. To keep it simple before taking a deeper dive, to do a basic “Full Shuffle” go to Dataset/Schedule/Schedule Order and click on the “Arrange Songs In This Category” icon. You can also right click anywhere in the Info Bar and choose Schedule Order as well.
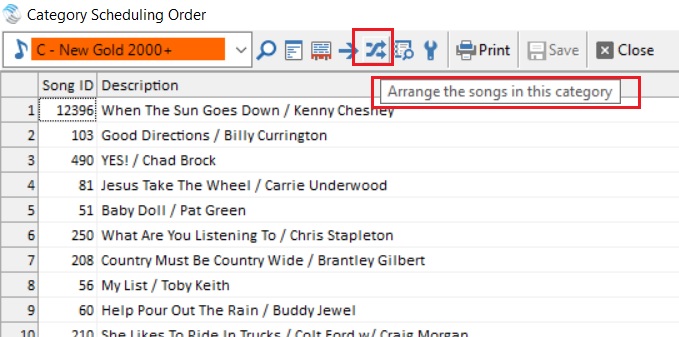
The next box that pops up defaults to the “Full Shuffle”. The Full Shuffle is simply a random shuffle of the category. Sometimes folks will choose this when they begin to sense a predictable pattern of a category and just want to freshen up the order. You can choose a single category or multiple categories.
It is important to note that if you are a song history buff and love looking at your rotations and histories and seeing that nice wave of a song moving through hours and quarter hours, that a shuffle will disrupt that pattern briefly upon the next scheduling session because the order has changed and therefore the pattern has changed. It will plane out again as you continue to schedule.
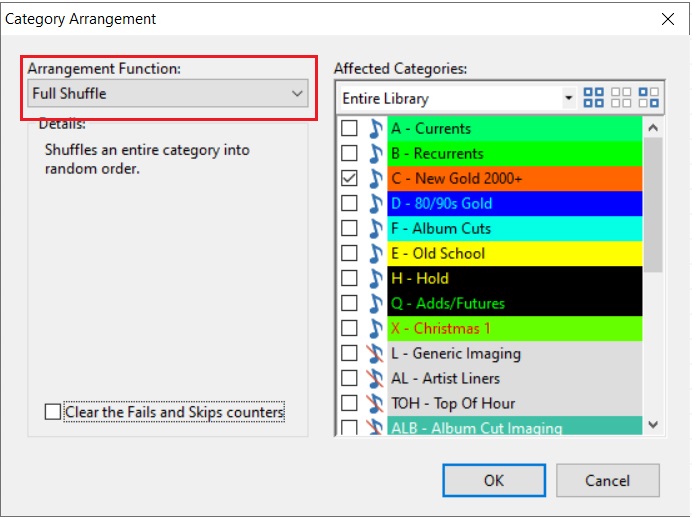
A full shuffle is kind of a generic shuffle just to mix things up, but MusicMaster offers many more options when it comes to how or what you shuffle. Clicking on the dropdown menu, you get these incredible options.

A quick look in the robust MusicMaster “Help Section” defines what each of these does.

For more information on how to use our great Help section check out this blog post: https://musicmaster.com/?p=8397
One of my favorite shuffle options is the “Optimize By Field”. If you have a new library and are adding a bunch of songs by a single artist, or perhaps your format has a huge amount of “Featured” artists on songs and it is a challenge to schedule because of this, then this is a pretty amazing feature. Using the example above, if I “Optimize by Field” and choose “Artist Keywords” it will separate all the songs by each artist as far apart from each other in the schedule order as mathematically possible. So, if you’re a Classic Rock station and just added 50 Rolling Stones songs to a category, then this will separate them from each other to make scheduling easier. My other example was featured artists on songs. Just about every format from Latin to R&B, Country to CHR is inundated with featured artists. When Optimizing by Artist Keyword, MusicMaster tries to optimize all of the artists on the song. Just plain cool! Now of course if you add 50 Rolling Stones songs, they are not going to schedule back to back even if they are in that order in the Schedule Order because of Artists Separation rules and others. But by shuffling this way, it makes the process easier from the start because the order is more natural and comfortable. Speaking of the difficulties of featured artists, here is a link to a blog with some cool ideas and solutions to deal with this: https://musicmaster.com/?p=7733
Another question I get a lot is “How often should I shuffle?”. There is not really a black and white answer to this. You don’t need to shuffle ever, but you may want to shuffle for a variety of reasons, many of which we discussed above. If you add a bunch of new music or feel like you are hearing the same songs scheduled near each in a similar order, then you may choose to shuffle. It really comes down to your philosophy and there is no wrong answer. The only thing to keep in mind is the shuffle does change the schedule order, which is what you want, but you can expect it to affect your history pattern initially. So if you see the hiccup in the pattern, it is nothing to be alarmed by.
Shuffling is just one more way MusicMaster helps you control and tailor the sound of your radio station.
Clicking (the “Right” Way) posted on June 28th, 2023
By Dave Tyler
MusicMaster is a powerful and robust software, we all know that! But did you know there are many different ways of using it? I am always looking for ways to accomplish something in fewer clicks. Before you call me lazy, let me redirect by saying I am an efficiency junkie. I have been involved in the martial arts for 40 years and efficiency is paramount in successful technique. To bring this back around to music, Elvis really was a Black Belt and studied with an incredible American Kenpo master named Ed Parker who frequently used the term “Economy of Motion” to describe the process of optimal form to gain speed and power. This Economy of Motion is built into MusicMaster too!
I have said many times there are many ways to just about everything in MusicMaster, and for me at least, the “Right Click” is my secret weapon to quickly getting where I want to be in the software. Let’s take a look at what I mean.
The Info Bar
This is the place where all of our categories live and are arranged. Did you know you can right click here to pull up a variety of destinations?
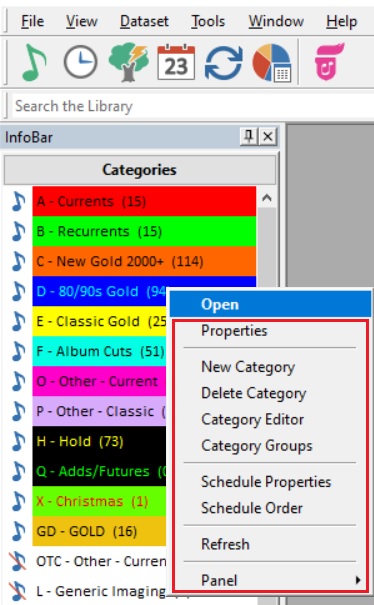
This box allows you to do multiple things like see the properties of the category you clicked on or create a new category, delete a category, open the Category Editor, and edit or create Category Groups. You can also get to these locations by going to Dataset/Library/Categories. There are also options to check out Schedule Properties and the Schedule Order. The right click in my opinion is the fastest way to do this, but you can also still go to Dataset/Schedule and then choose Schedule Properties or Order too. Cool huh?
Library Maintenance Grid
Let’s open a category(s) in Library Maintenance. Right click on the header of any field and look at the array of options you have!
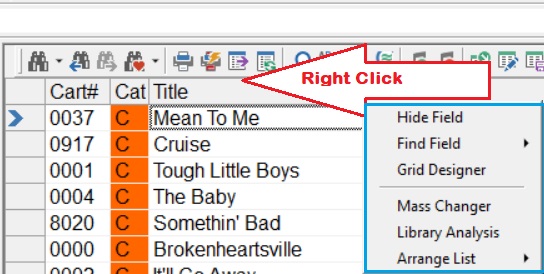
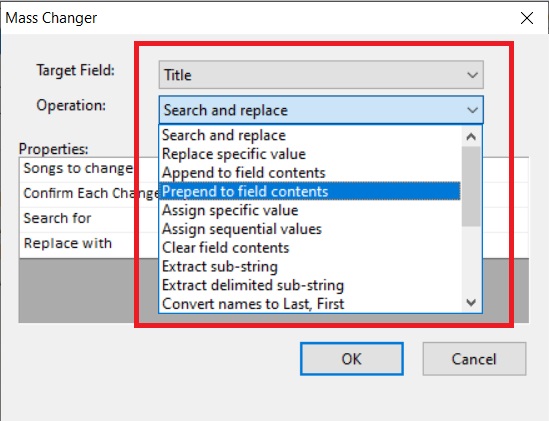
You have the powerful Mass Changer at your fingertips which allows you to mass change all sorts of things from adding/deleting/changing values to converting text to mixed case, etc. It is recommended that any time you choose to use the Mass Changer you make a backup of your database first in case you do not get the desired result. There is more info on the Mass changer in this blog article: https://musicmaster.com/?p=95
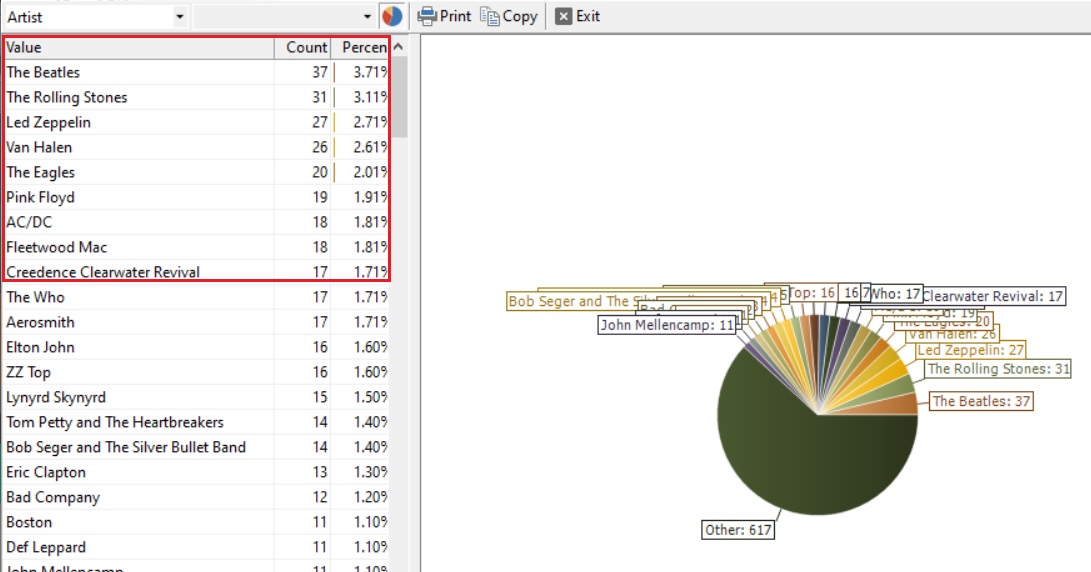
You can also choose the incredible Library Analysis feature here. Depending on what field you right clicked on, you will see an analysis of that field. In my example below I am looking at the Artist field and it is easy to see which artists have the most songs in the library.
Again depending on which field header you are right clicking on, you will get different information. If you clicked on your Role/Gender field you would see the percentage of Male and Female artists (as long as that field is populated) or perhaps right clicking on your Sound Code, you could see the percentage of Rock, Urban or Acoustic songs you have or any other custom codes. My colleague Brian Wheeler wrote a great blog on this topic and you can find it here: https://musicmaster.com/?p=7268.
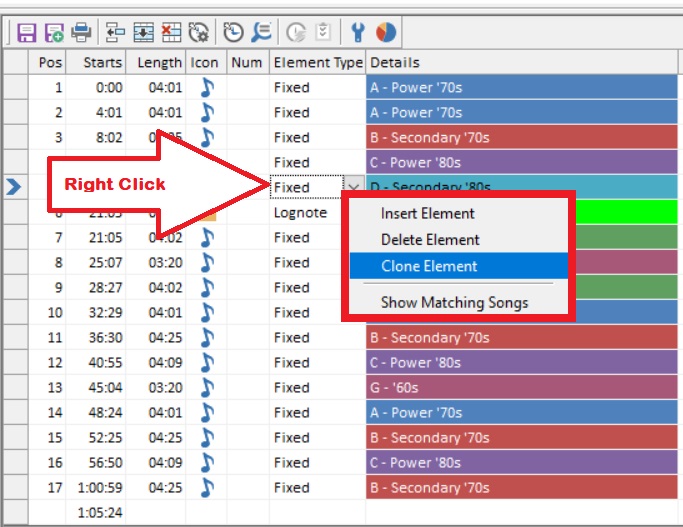
Clock Editor
If you are building or editing a clock, a right click gives you the same options as some of the buttons above do by allowing you to Insert, Clone or Delete an element.
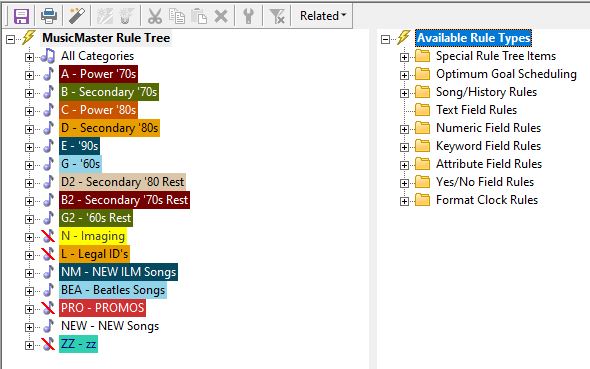
Rule Tree
This right click mania doesn’t stop there. Open your Rule Tree and you will find one of the most important right clicks in the program: Rule Tree Properties!
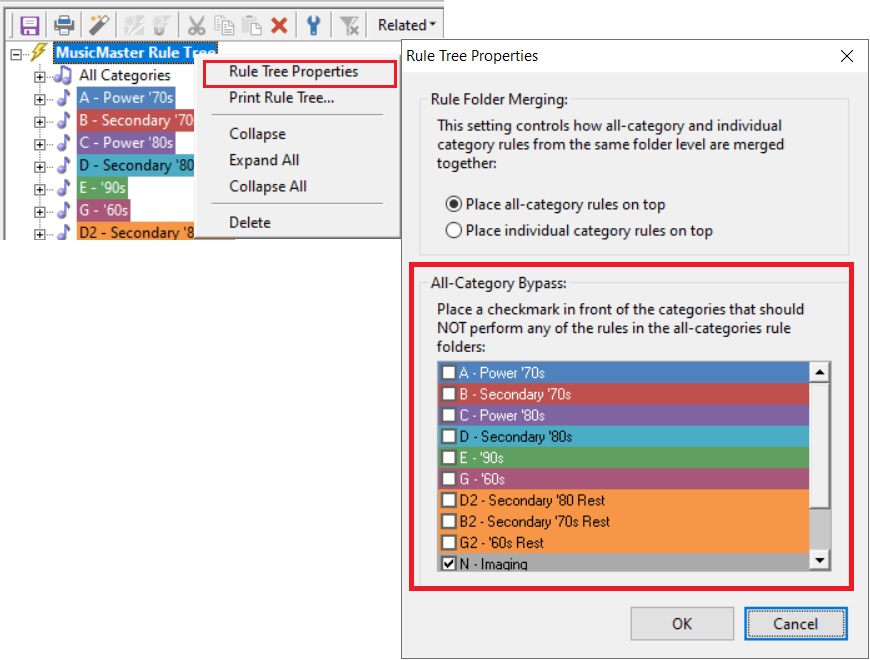
This special box allows you to bypass the rules in your All-Category folders so they won’t apply to certain categories. Why would you do this? Well you probably don’t want or need Artist Separation and Sound Code rules etc. to be performed on your non-music categories (Jingles, Imaging etc.) and if you schedule Christmas music during the season, you may want to bypass your Christmas categories because the regular rules might be too difficult to satisfy. You can then add just the rules you need in those specific category folders. Good stuff!!
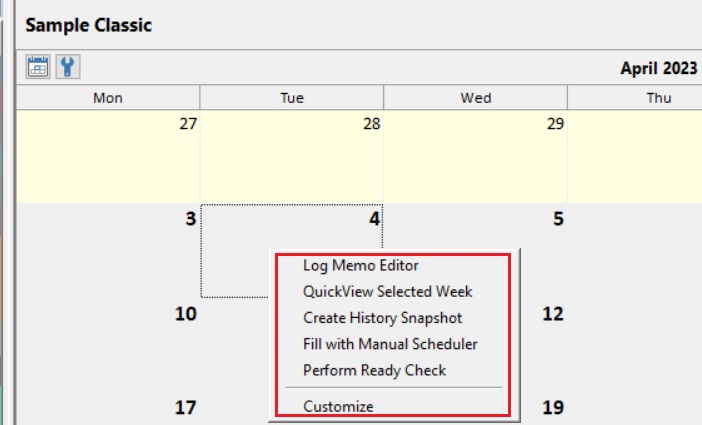
Schedule Calendar
If you open your scheduling calendar and right click, you get some quick options that you may find useful.
Schedule Editor
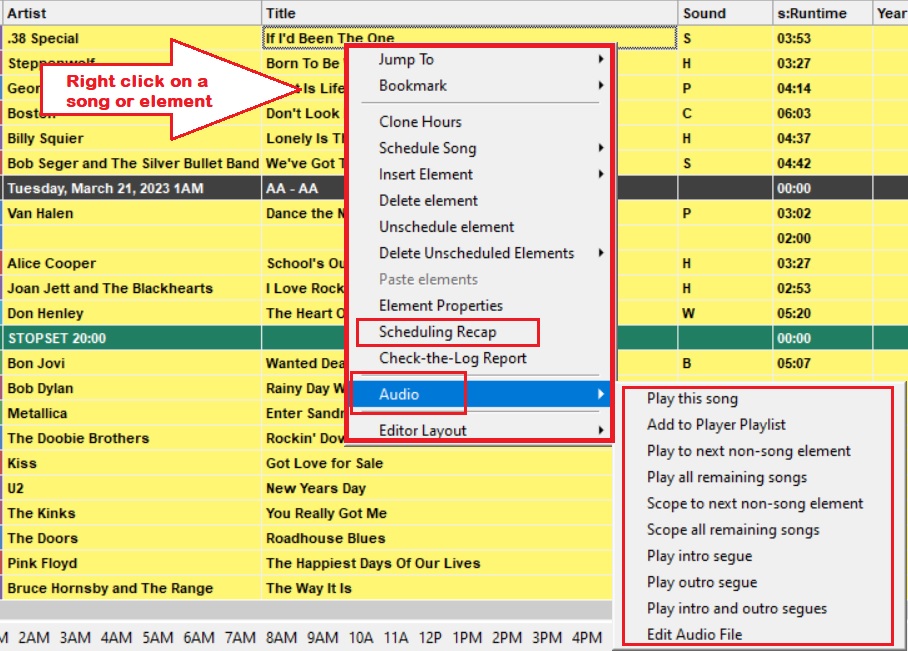
Jump into the Schedule Editor, and if you right click on the Hour Header, you get several options including the ability to insert, delete and unschedule an element. There are also two unique options including the ability to lock the hour to prevent any further editing of that hour, or you can pick to view the format clock for that hour (You can also do this by double clicking on the hour header as well).
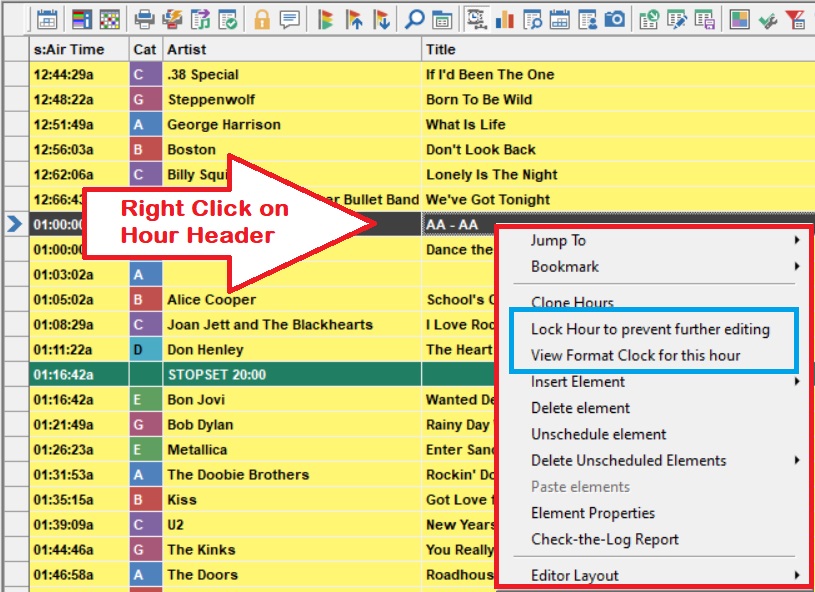
If you right click on an element (song, imaging, etc.) within the hour, you will see the same Insert, Delete and Unschedule options from the clock box, but here again are a couple options unique to this right click.
The first is the Scheduling Recap, which shows you the process MusicMaster went through based on your Rules, Optimum Goals, etc. to schedule each position in your log. The second is the “Audio” option which is awesome! Did you know you can listen to songs in the Schedule Editor or even Scope hours (listening to intros and segues)? This is a great way to listen to your log and see if it sounds as great as you think it does. In order for this to work you do need to set up and link your song cards to your audio, but don’t fret, here is a link to the step-by-step process to do just that: https://musicmaster.com/?p=3486.
Turnover Analysi
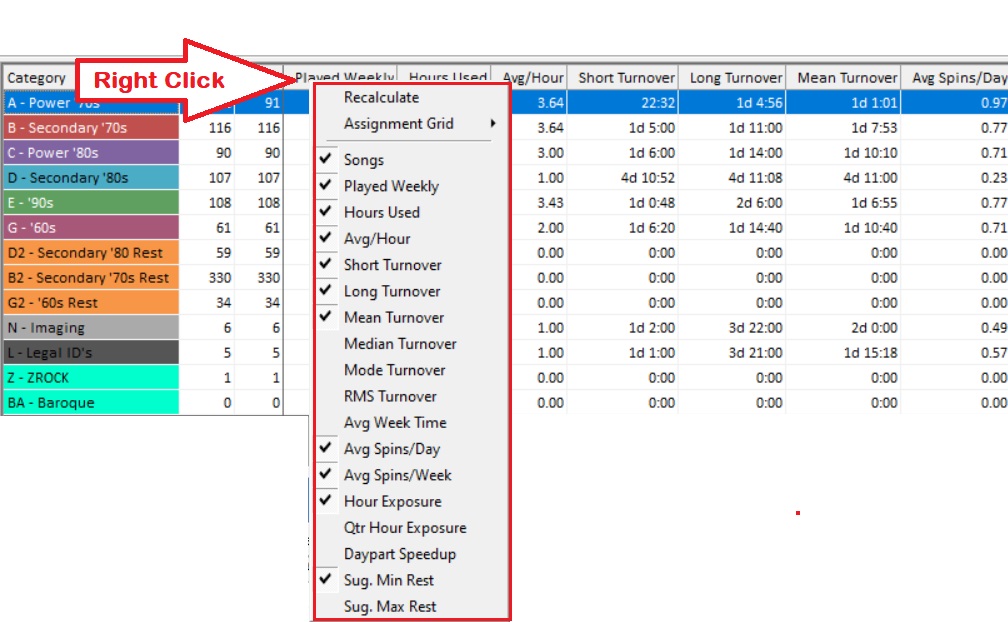
Let’s move to Turnover Analysis. This ridiculously powerful area of MusicMaster is chock full of great information on how your categories work, but there is more to it than just what you see. Right click anywhere in the grid and you will see all of the fields available to put in your view. Checkmark a field and it is added.
Want more information on the power of understanding Turnover Analysis? Check out this in-depth blog: https://musicmaster.com/?p=7832
These are some of the cool “Right Clicks” in MusicMaster that can help you manage your database, and control and create great Radio and TV. Just when you thought you knew it all, right?
Live…But on the Ropes posted on June 13th, 2023
by Brian Wheeler
I’ve had the pleasure of attending hundreds of shows in the last 35 years and with few exceptions, a live performance is my happy place. I love the energy of a crowd that is enjoying the moments created by a great live band. But live music performances are at a crossroads. Many factors are converging and something has to give.
Artists are facing greater challenges than ever before. The opportunity to make a living creating music is becoming difficult at best. Music buying is down, venues are taking bigger cuts in an effort to stay afloat, and higher costs associated with touring are driving artists off the road. COVID certainly had an impact on touring in recent years, and don’t get me started on Ticketmaster.
Some artists are certainly coming up with creative ways of combating this issue. David Lowery, front man of the bands Camper Van Beethoven and Cracker, has taken to a more practical approach to sales, marketing, and touring. Long a vocal opponent of entities such as Napster, Pandora, and Spotify, David has returned to his DIY roots, cutting out the middleman and selling his merch and music on his own. In a Facebook post in 2022, David cited a lack of ‘soft ticket’ events (corporate sponsored events), a 15 to 20 percent reduction in ticket sales, and a 40% increase in expenses when touring as the main issues faced by many bands when attempting to coordinate a tour. These days when David hits the road solo or with his band, Cracker, he’ll concentrate on high-yield/low overhead tour destinations in an attempt to break even or perhaps make a small profit on the tour. Merch sales often make the difference as to whether many artists lose money, break even, or make a profit.
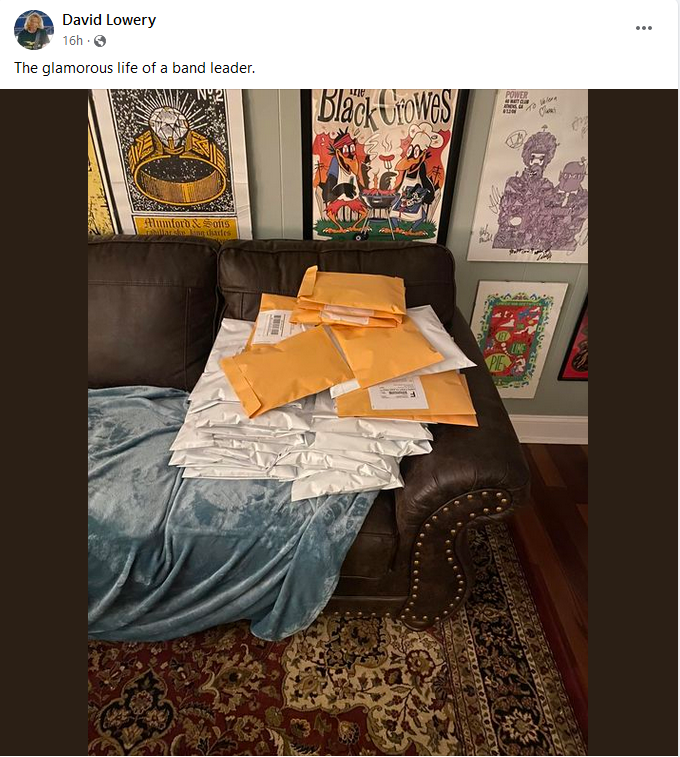
David Lowery hand-packs another load of merchandise for shipping.
Tommy Stinson, formerly of The Replacements and Guns ‘n Roses, takes a similar approach. When Tommy hits the road he’ll book clubs across the United States, then coordinate intimate performances at listening rooms, garages, even fans’ living rooms in between those dates. This method minimizes travel time and costs between dates and maximizes earning potential all while generating buzz and goodwill with his modest fanbase. Before his untimely passing in 2017, Pat DiNizio of The Smithereens also toured with living room performances peppered between club dates.
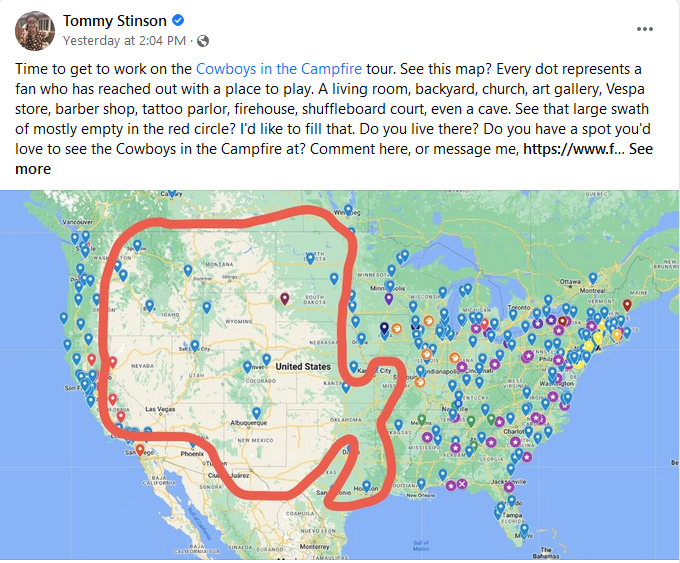
Stinson plots his route
Obviously not everyone can tour living rooms and sling limited-release CDs from their homes and hope to make a living. I think it’s important to ask what CAN be done to keep the music industry viable, however. Without a vibrant music scene, the product that music-based radio stations provide suffers more and more. If an artist can’t make a living making music, they’re going to stop making music.
So what can be done? Jamie Lee Curtis recently opined that she’d like to see matinee performances, as she didn’t want to be up as late as some performances are normally scheduled. There may be a kernel of truth to this at the club level and in fact is sometimes practiced, but it also presents its own set of problems. You’ll need the venue staff there longer, which increases costs and presents scheduling issues. You’ll have to clear out the early crowd before bringing in the late crowd. Large productions will require cleanup between shows. Can you imagine having to clean up the confetti and whatever else ended up on the floor between arena shows to reset for a later performance?
The onus does not fall on the shoulders of radio entirely, but the strong connection between the music industry and the radio industry cannot be ignored. I don’t know what the solution is, but I think radio can play a role in sustaining the live music scene and music in general. It’s important that we do what we can to keep the lifeblood of so many of our stations healthy and vibrant. It’s important not only for our industry, but for our general well-being. I can’t imagine living in a world without music, and I don’t want to.
2 Tips 2 Spring Cleaning Your Database posted on May 26th, 2023
by Vicky James
It’s that time of year where we swap all of our winter fleece ‘n furs for our bright colorful florals! I typically will do a purge of things that I haven’t worn for years, pieces that are dated or things that I should’ve gotten rid of five years ago! Well ironically, this blog isn’t about old clothes, but it is about the stuff that’s sitting in your database that you’ve overlooked monthly, if not daily!
Here’s your guide to Spring Cleaning your database:
Tip 1: Cleaning Clocks
There is a way to clean up your clocks without “guessing” which clocks aren’t being used and to avoid accidentally deleting something needed!
Here’s how:
1. Click on the Clock Icon in the toolbar to open the Format Clock Maintenance
2. Click “Select” on the right
3. Select “Assigned Clocks”, then select “Assigned to Any Clock Grid”. This checks only the clocks that are being used in any assignment grid.
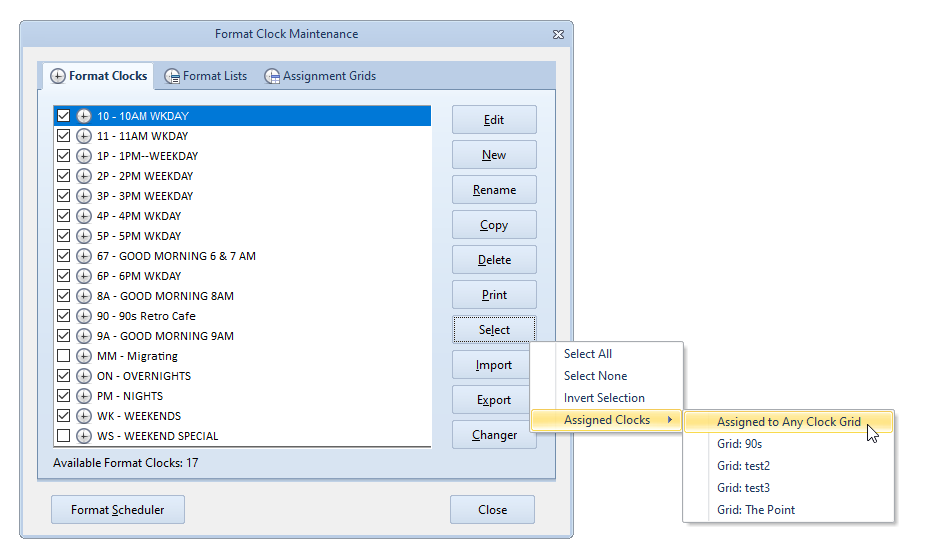
4. Then go back to “Select” again and click “Invert Selection”. Now only unused clocks will remain checked.
5. I suggest reviewing the checked clocks to be sure that you want to delete them.
5. After you’ve reviewed the clocks, Click delete and the unused clocks are all gone!
Rule of thumb… Anytime that you are making a mass change such as deleting clocks ALWAYS make a backup first so you can revert if needed.
And that’s how you would clean up your clocks!
Tip 2: Cleaning Keywords
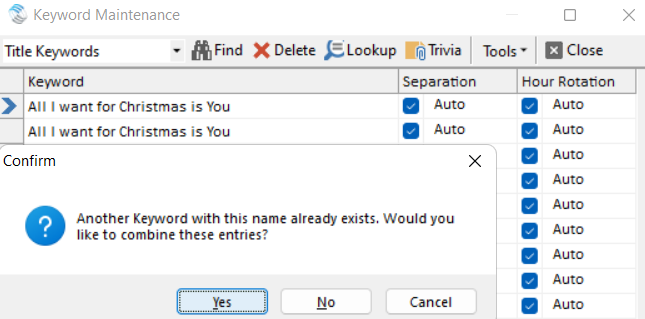
It’s not uncommon for title keywords to accidentally get entered with an error or duplicate titles with different spellings. This is often found with Christmas titles, as you see pictured below.

In this example, we’re looking at the Title Keyword for “All I Want For Christmas”. Here, I’d like to have the Mariah Carey title match the other entries. Going to the Keyword Maintenance will allow us to quickly make the update.
Now, let’s navigate to finding your keywords. Click on Dataset, Library and Keywords. Use the dropdown menu to select the keywords that you would like to check, be it your Artist Keywords, Title Keywords, Album Keywords, or any other field that utilizes a keyword. As I mentioned, in this case we will update the Title Keywords. Use Find to start typing “All I want for Christmas” and it should find both versions of the keywords shown above: “All I want for Christmas” and “All I want for Christmas is You”
Now, you can edit the keyword you want to change to match the other one. In this case, I’ve added “is You” to the end of “All I want for Christmas”. You’ll be prompted with a message that indicates there are now two identical keywords, asking “Would you like to combine these entries?” Select Yes and it will combine the two Title Keywords and update any songs that had the keyword that was changed.
Also in Keyword Maintenance, you can also use the Tools drop down menu to select “Remove Unused Keywords”. This would delete any incorrect or leftover keywords that aren’t currently assigned to any songs.
For more on Keyword Maintenance, check out this blog: https://musicmaster.com/index.php?p=7817
As a Bonus Spring Cleaning Tip… You can use Purge to declutter your databases of old deleted items that were removed from your database, like library, clocks, keywords, etc. Think of it like emptying the Recycle Bin. Purging is found under the Tools menu and if you look closely in the left corner as the resulting process completes, you’ll see how much of your database was cleaned up.
Should you have any questions please reach out to your MusicMaster Scheduling Consultant.
MusicMaster Pro 8.0.10 posted on May 25th, 2023
MusicMaster Pro 8.0.10 is now available to you under Help, Check for Update. Changes are as follows:
You can now configure a new prompt message to remind you to make a backup when closing a station. This setting is available in the Backup/Restore utility under the new Options button in the lower left corner. This message can appear every time, or only when the last backup reaches a specified number of days old.
The AutoKick rule now tests in both directions by default, but contains a property to make it look
backward only like other history rules.
Adjusted the Unique Value search dialog so it better handles the case where you manually edit the current value before clicking OK.
The unique values search function was adjusted to better handle the case where you were entering plain numeric values into a text field without any padding to make the entries equal length.
Corrected an error that would sometimes appear when deleting a packet.
You can find the full list of changes under Help, Release notes. Contact your MusicMaster Scheduling Consultant with any questions.
Maximize Your Voice Tracking Library with Special Sets posted on May 18th, 2023
By Jesus Rodriguez
Never let voice track recordings go to waste again! Why have your on-air personality record one short segment once and then delete it? Why not use the voice track again? Did enough people hear the voice track that was only seconds long? Why not maximize it and use it again?
There are so many more questions I can ask but you get the point. In this blog, I hope to open your mind to that idea. This was originally targeted to smaller stations where there may only be a few on air personalities or none, like some streamers or HD channels. However, this concept can be useful for any station at any level for several reasons. What if your jock loses their voice or is ill and can’t come in to work? The remote jock that voice tracks lost power or internet and can’t do the tracks? Maybe give the jock a break and truly let them enjoy their vacation not having to voice track the days they are out. I mean, does it really count as a vacation when you still must do the work from your vacation time?
The goal is to save all your voice tracks in a category or multiple categories if you prefer so that you can repurpose them the same way you do your new music or your gold records. We will create a new multiple keyword field so you can give your voice tracks and songs any number of descriptions that will allow the proper voice track to play in front of the correct songs. This will allow you to create a massive library of voice tracks overtime and the more you have, the better it will sound because your listeners will not catch on.
For the first step, let’s create the multiple keyword field. You can do this yourself if you are using MusicMaster Version 7 or greater. On the menu bar go to Dataset, Library, Fields, then at the bottom left corner, click on Add Field. Create the settings as shown in the image below.
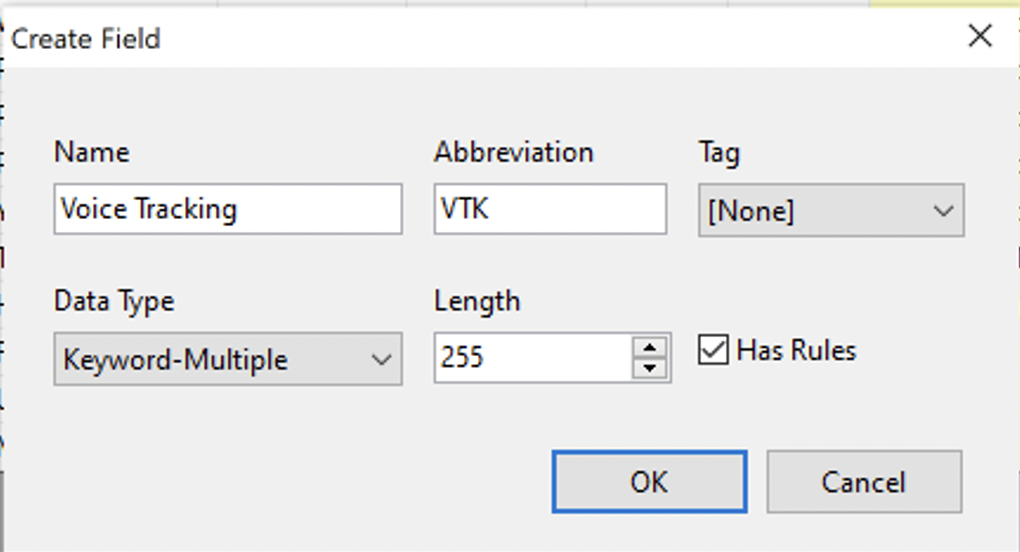
Press OK to create the new field and OK again on the Field list window to return to the database.
If you did not do so already you can create your Voice Tracking category and add your Voice Tracks information the same way you do with songs. In case you need a reminder of those steps, I included them in the links below with short 1 minute video clips.
How to Create a New Category Video:
How to Add Music/Voice Tracks to Your Library Video:
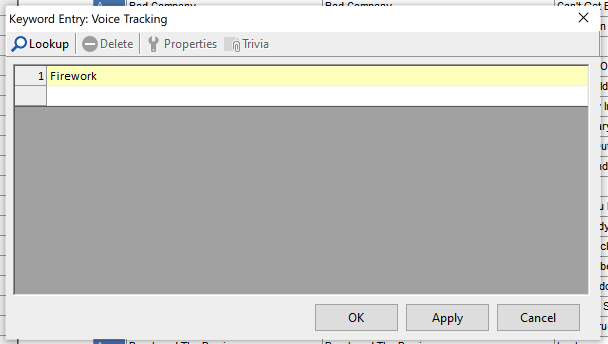
Next, you will want to add your new field to your library layout so you can begin to label each of your voice tracks accordingly. This tells MusicMaster what they are, so that in the next step, I can show you how they will match up to the perfect song each time. Double click on that new field in your library layout to open up the Keyword entry.
Below are examples of a few of my voice tracks. Each voice track will have a description designating what songs they will be allowed to play in front of.
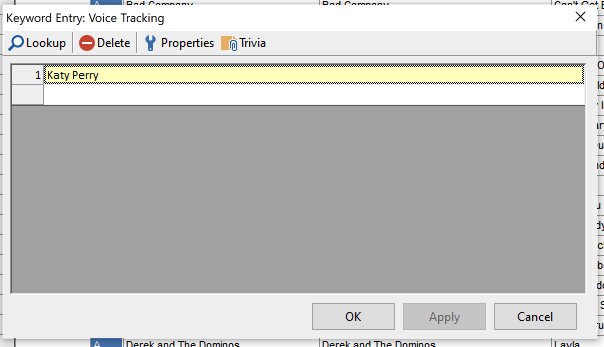
Voice Track 1: Only be allowed to play in front of Katy Perry’s “Firework”
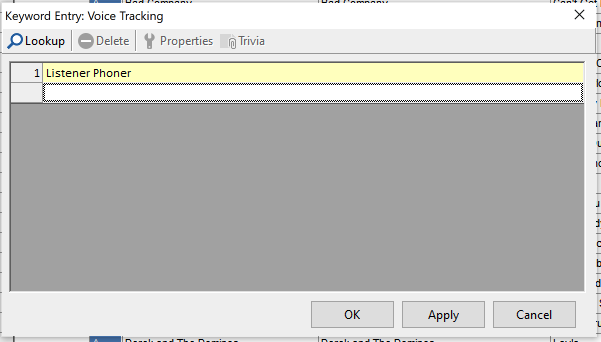
Voice Track 2: Can play in front of any song where I also gave that song the keyword description of Listener Phoner. This is great for songs with long intros.
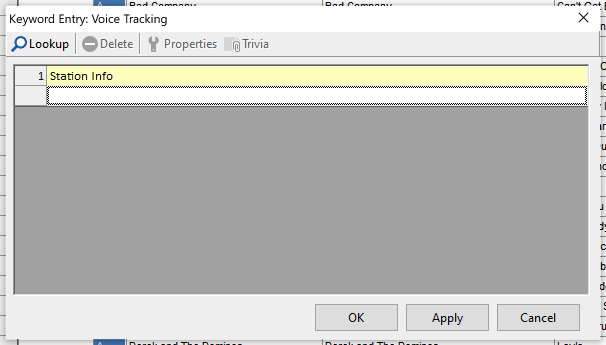
Voice Track 3: This Voice Track may be good in front of any song if all the songs have the keyword of Station Info in this same field.
Voice Track 4: This recording may only play in front of any Katy Perry song because it possibly is a generic topic about the artist that works any time of the year like “Did you know Katy is a huge fan of… Here she is on XYZ-FM!”
You will repeat this process with all your voice tracks and my personal recommendation is to only give your voice tracks one description. Another recommendation is to use voice tracks that are not seasonal or contain current events like “this week this next artist got a divorce” or “this artist will perform on the Channel 8 Christmas Special”
So how do we match the voice tracks to the songs you ask? It is a similar process to what we did with the voice tracks in the previous step. I suggest taking note of the descriptions you created for the voice tracks so you can use those same keywords in the same field we created, but for the songs themselves. It is important that the keywords be written the same so they find their match later in the process.
You will want to go through every song and add all the keywords for voicetracks that will sound great in front of the song. In this case the more the better, because more options you have, the less likely to sound repetitive with your voice tracks.
For Katy Perry “Firework”, I included the following voice track keywords we created that are all allowed to play in front of this song.

How do we do the actual matching of the correct voice track to the correct song? This is where we use Special Sets in the clock positions where your talk breaks will occur. In your clock add a Special Set element position as shown below.
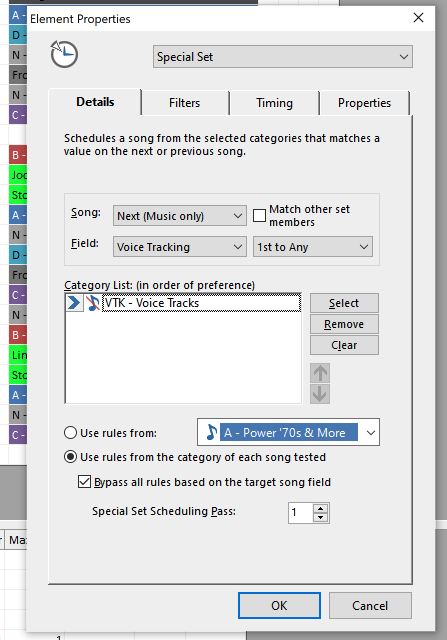
You will want to make sure that your Voice Track category is bypassed from the all-category section of the rule tree by right clicking on the bold MusicMaster Rule Tree and going to Rule Tree Properties as shown below to place a check mark on that category. This will prevent any other rules in the all-category section from affecting this category, and we can place any rule we need directly in the category, which I will explain later in this blog.

Also, go to the menu Dataset, Schedule, Schedule Properties to adjust the scheduling pass order. You will want your special set to schedule last, so move it to the bottom of the list so that your music schedules first followed by the voice tracking category special set to match. This is important because without the song in the log first, the voice track category will not have anything to reference to make the proper decision of which voice track to place in front of it. I also suggest you set the depth for the voice track category to 100% so it can dig in deep enough to locate the best option, should you decide to use additional rules.
We can take this a step further in the Rule Tree for the Voice Track category and add rules for the Voice Tracking field we created for things like Keyword Separation, so we don’t get the same tracks too close to each other or sounding repetitive. We can also add more rules, such as dayparting, so the right jock voice plays during the right shift. Minimum rest, Day or Play Offset, and other rules can help with the rotations, so the tracks don’t play as frequently or in the same positions, allowing you to maximize the voice tracks for weeks, months, even years.
Now for the fun part! Call all your friends and family members that owe you favors and have them record a lot of exciting voice tracks for your station. I also hear AI voices are sounding very realistic these days at reading back scripts, so maybe it’s time to hit the record button.
Rule Tree Filters posted on April 26th, 2023
What Rules are we using and where are they?
by Chris Hulsether
What if I told you, you could save time and find out what rules you are using and where they are in your Rule Tree?
Maybe you just took over a database and you have no idea what the person who had it before you were doing. You see all these available rules and you’re wondering “What are we doing?” and “Where are the rules set up in my Rule Tree?” Maybe you see a rule that you want to use, but you are not sure if has already been set up. Maybe you have a lot of categories and you don’t want to go through each category one by one to see what rules they have. Or maybe you could be getting unscheduled events in your log because of a rule you didn’t know you had, and you want to find where it’s being used so you can adjust it or get rid of it.
To help see these things easier, you can Filter your Rule Tree to identify everywhere a specific rule is being used. It’s a quick and easy way to see what rules you are using and which ones you are not.
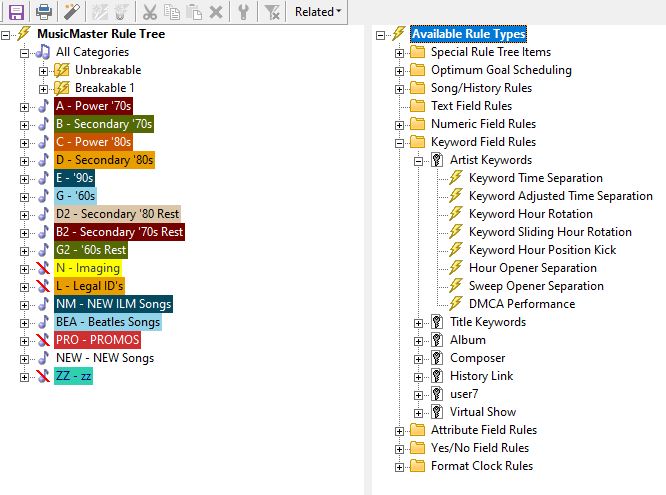
First, go to your Rule Tree using the Dataset/Rule Tree or clicking the toolbar icon.
On the left is your Rule Tree with all the rules you are using. On the right is the list of all the available rules you can use.
To expand your rule tree folders or the available rule folders, click on the little square box with the plus sign in it.
You can also right click on the Category and select Expand or Collapse to open or close it. If you right click on the words in bold MusicMaster Rule Tree you can Expand or Collapse all the categories at once. The same can be done on Available Rule Types.
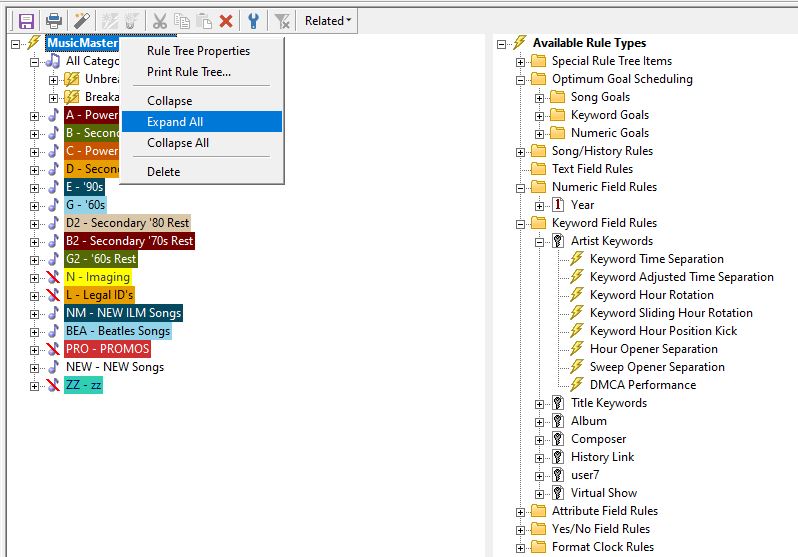
In your Rule Tree you will see the Breakable and Unbreakable folders. Unbreakable means MusicMaster will not violate the rules in that folder when you auto schedule or when the replacement window is choosing the “perfect” songs to choose from. Breakable means the rules inside the folder will attempt to be followed, but if the software cannot find another song to schedule that passes those rules, it will break the rule as a last resort.
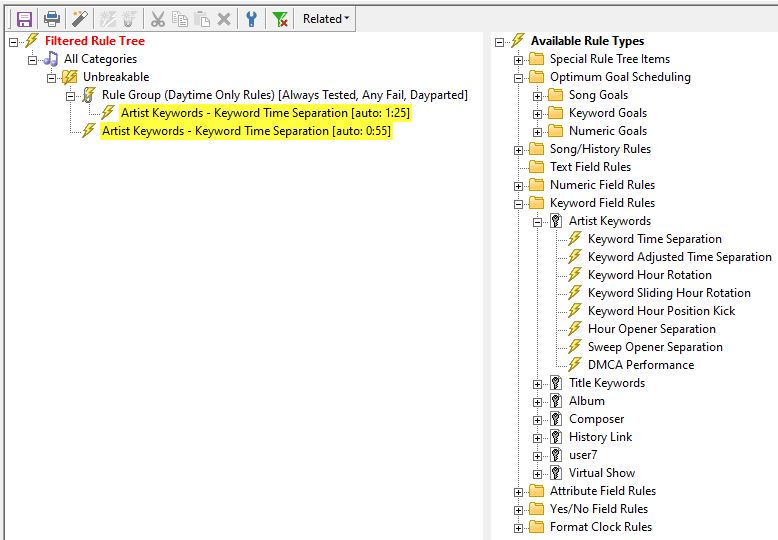
To Filter the Rule Tree
Right click on any available rule on the right.

Once selected, the left column will show you everywhere the rule is being used. If it’s not being used, the left side will be blank.
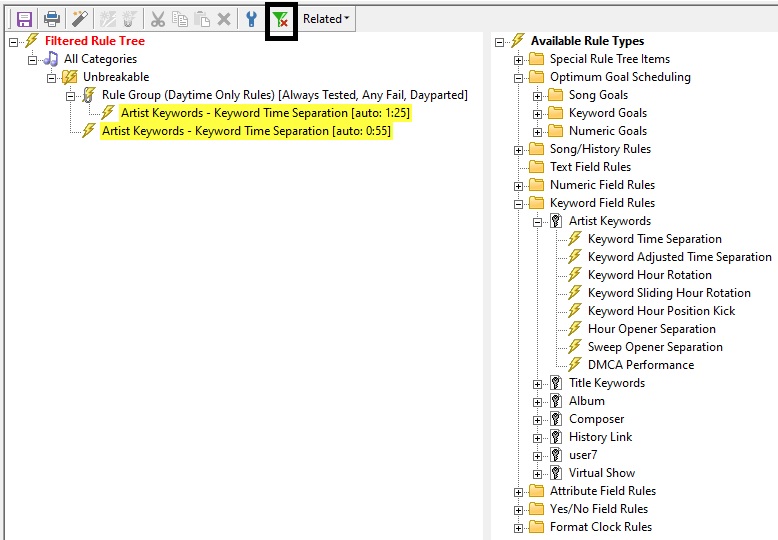
To clear the Filter, look for the icon of the filter with an x on it.
MusicMaster is all about saving time and working as quickly as possible. Ask your Music Scheduling Consultant for assistance if needed.
Is the Key to Change… a Key Change? posted on April 11th, 2023
By Brian Wheeler
I saw a fascinating factoid recently and I had to share this, as the vast majority of MusicMaster clients program music. I want to preface this blog with my pledge to you that I’m going to do my best to not sound like the ‘old man shaking fist at cloud’ while presenting this information to you. I do hope that the information reaches the music industry and a bit of a renaissance takes place because I feel like there’s been some stagnation in popular music today, and this graph appears to support that theory.
A handy and effective tool in a musician’s arsenal is modulation and key change. Modulations and key changes can help the artist convey emotion and feeling. There are countless examples of key changes that brighten (or darken) a soundscape or change a mood in general. A well-placed key change can have a very powerful effect that captivates or moves the audience.
But is this tool disappearing from the collective toolbox? This is the astonishing graph that compelled me to ponder that question.
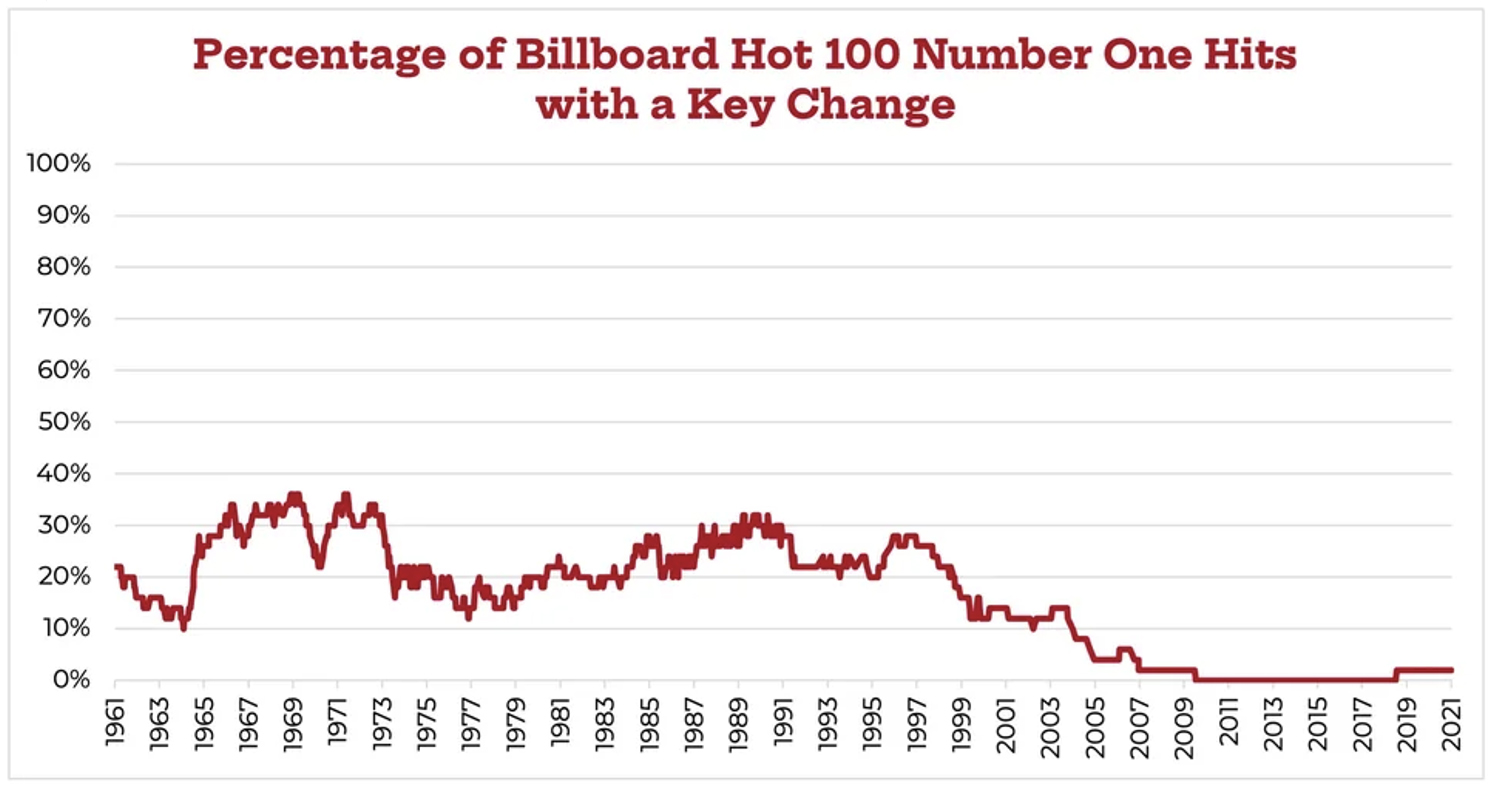
There are many factors in play here, but the flatline can’t be ignored. Popular music structure has been undergoing changes for the best part of the last two decades. Instrumentation and general structure have seen a shift, and tools like Autotune and sampling have seen wider use. Even the length of a good number of popular hits has shifted to the 2-to-3 minute range we saw decades ago. Simple can be good, but are the days of complex compositions behind us?
As I went down the proverbial rabbit hole of key changes and their role in popular music over the last 60 years, I stumbled upon an astonishing nugget. There was a song I remember hearing on the radio when I was younger that boldly went into some impressive key gymnastics, although I didn’t realize it at the time. The song is “Never Gonna Let You Go” by Sergio Mendes, a song written by the popular writing team of Cynthia Weil and Barry Mann. The single hit number 4 on the Billboard Hot 100 back in ’83 (Number 1 on the US AC chart), and it boasts a whopping 22 key changes! There’s an entertaining YouTube video from Rick Beato that discusses his attempt to decipher the song. I encourage you to check it out.
Obviously that’s an extreme example of key and modulation usage, but the question remains: are we seeing the demise of the unforgettable melody? What is the anatomy of a timeless hit? What is the essence of a well-crafted song? Is it the creation of thoughtful couplets? Perhaps the key change/resolution? And who will be the next great innovators? That may be an entirely different discussion. Back to the question I asked earlier: Will we see a musical renaissance? I believe we will, despite the assertion that it’s all been done. New ears will demand it.
For another Rick Beato video on this topic, check out “The Disappearance of Key Changes in Modern Music”